1,背景
最近项目集成客服系统涉及到推送消息, app 进行整体消息改版,所有我把项目中的推送相关的代码和逻辑整合了一下,总结了一下 iOS7 - iOS10 系统的推送注册和点击通知进入 app 时走的代理方法。由于在程序被kill时收到推送时不能链接 Xcode 进行代码的断点调试,所以我使用 http-server ,在涉及到推送代理的每一个代理方法中,利用 http-server 获得 app 点击通知进入 app 时,走的每一个方法名。
2,HTTP-SERVER安装和使用
npm install http-server -g
使用 npm 安装 http-server(确保是全局安装),直接在终端执行命令 http-server ,如下图,找到与自己电脑的ip一致的地址,直接请求那个地址(GET),就可以在终端中看见你发来的请求了,当然参数也一起发过来了。我就是用这种方法,来定位程序点击推送时,走的是哪个代理方法。(先确认你的工程支持http请求,需要暂时关闭ATS)
例如我在代理中使用这个方法来发送请求,把方法名作为参数传到终端,请求URL后拼接时间是防止有缓存。
- (void)uploadMethodName:(NSString *)methodName
{

    NSString *path = [NSString stringWithFormat:@"http://10.2.0.243:8080/?methodName=%@&%lf", methodName, [[NSDate date] timeIntervalSince1970]];
    [[XHCNetWorking sharedClient] requestWithPath:path params:nil httpMethod:XHCRequestGet callback:^(BOOL rs, NSObject *obj) {
        DLog(@"%@", obj);
    }];
}
3,注册推送
#define IOS_GREATER_THAN_OR_EQUAL_TO(v) ([[[UIDevice currentDevice] systemVersion] compare:v options:NSNumericSearch] != NSOrderedAscending)

/** 注册用户通知 */
- (void)registerUserNotification
{
    /*
     注册通知(推送)
     申请App需要接受来自服务商提供推送消息
     */

    // 在iOS10开始,苹果将通知统一到了UserNotifications这个类中,首先导入这个类
    // #import
    // iOS10的注册方法
    if (IOS_GREATER_THAN_OR_EQUAL_TO(@"10")) {
        UNUserNotificationCenter *notificationCenter = [UNUserNotificationCenter currentNotificationCenter];
        notificationCenter.delegate = XHCAPPDELEGATE;
        [notificationCenter requestAuthorizationWithOptions:UNAuthorizationOptionBadge | UNAuthorizationOptionSound |UNAuthorizationOptionAlert completionHandler:^(BOOL granted, NSError * _Nullable error) {

            if (granted) {
                DLog(@"request authorization succeeded!");
            }
            else {
                DLog(@"request authorization fail!");
                if (error) {
                    DLog(@"authorization error = %@", error.localizedDescription);
                }
            }
        }];
        [[UIApplication sharedApplication] registerForRemoteNotifications];
    }

    // iOS8以上系统的注册方法
    else if (IOS_GREATER_THAN_OR_EQUAL_TO(@"8") ||
        [UIApplication instancesRespondToSelector:@selector(registerUserNotificationSettings:)]) {

        // 定义用户通知类型(Remote.远程 - Badge.标记 Alert.提示 Sound.声音)
        UIUserNotificationType types = UIUserNotificationTypeAlert | UIUserNotificationTypeBadge | UIUserNotificationTypeSound;

        // 定义用户通知设置
        UIUserNotificationSettings *settings = [UIUserNotificationSettings settingsForTypes:types categories:nil];

        // 注册用户通知 - 根据用户通知设置
        [[UIApplication sharedApplication] registerForRemoteNotifications];
        [[UIApplication sharedApplication] registerUserNotificationSettings:settings];
    }

    else { // iOS8.0 以前远程推送设置方式
        // 定义远程通知类型(Remote.远程 - Badge.标记 Alert.提示 Sound.声音)
        UIRemoteNotificationType myTypes = UIRemoteNotificationTypeBadge | UIRemoteNotificationTypeAlert | UIRemoteNotificationTypeSound;

        // 注册远程通知 -根据远程通知类型
        [[UIApplication sharedApplication] registerForRemoteNotificationTypes:myTypes];
    }
}
4,推送的代理方法
4.1,iOS 7 - iOS 9系统:
// iOS7-iOS9点击消息进入app,走此方法
- (void)application:(UIApplication *)application didReceiveRemoteNotification:(NSDictionary *)userInfo fetchCompletionHandler:(void (^)(UIBackgroundFetchResult result))completionHandler
{
    // 监听走的是什么方法
    [self uploadMethodName:@"application_didReceiveRemoteNotification_fetchCompletionHandler"];
    // 当app被压入后台存活时,收到通知就回相应这个方法,需要进行一下判断此时是什么状态。(iOS7-10,收到消息都会默认走一遍这个方法)
    if (userInfo && application.applicationState == UIApplicationStateActive) {
    //这是程序运行的时候,收到通知[这时推送直接调此方法]
    DLog(@"在前台");
    }
    else if (userInfo && application.applicationState==UIApplicationStateInactive) {
    DLog(@"点击通知进入app,在此处处理跳转逻辑");
    [[AppNotificationManager sharedInstance] handleReceiveRemoteNotification:userInfo];
    }
    else if (userInfo&&application.applicationState==UIApplicationStateBackground) {
    DLog(@"在后台");
    }
    // 这个block必须实现
    completionHandler(UIBackgroundFetchResultNewData);
}
4.2,iOS 10 系统:
// iOS10点击通知进入app时,调用的方法,iOS10在此处处理跳转逻辑
- (void)userNotificationCenter:(UNUserNotificationCenter *)center didReceiveNotificationResponse:(UNNotificationResponse *)response withCompletionHandler:(void (^)())completionHandler {

    [self uploadMethodName:@"userNotificationCenter_didReceiveNotificationResponse_withCompletionHandler"];

    UNNotification *notification = response.notification;

    UNNotificationRequest *request = notification.request;  // 收到推送的请求

    UNNotificationContent *content = request.content;   // 收到推送的消息内容

    NSDictionary *userInfo = content.userInfo;
    NSNumber *badge = content.badge;    // 推送消息的角标
    NSString *body = content.body;  // 推送消息体
    UNNotificationSound *sound = content.sound;  // 推送消息的声音
    NSString *subtitle = content.subtitle;  // 推送消息的副标题
    NSString *title = content.title;  // 推送消息的标题

    if ([request.trigger isKindOfClass:[UNPushNotificationTrigger class]]) {// 收到的是远程推送
        // 处理推送跳转
        [[AppNotificationManager sharedInstance] handleReceiveRemoteNotification:userInfo];
    }
    else {// 收到本地推送

    }
    completionHandler();  // 系统要求执行这个方法
    // 在点击事件中,如果我们不写completionHandler()这个方法,可能会报一下的错误,希望大家注意下~
    //Warning: UNUserNotificationCenter delegate received call to -userNotificationCenter:didReceiveNotificationResponse:withCompletionHandler: but the completion handler was never called.
}
4.3,App点击通知冷启动
就是指当app被kill掉时,通过点击通知启动app时,在application_didFinishLaunchingWithOptions方法中,推送信息会包含在options属性中。
- (BOOL)application:(UIApplication *)application didFinishLaunchingWithOptions:(NSDictionary *)options
{
    // options 中包含推送的信息
}
4.4,Tips:
走完这个函数之后,系统还是会走1,2中aps的代理方法,要避免对通知逻辑进行重复处理,我觉得在启动函数中,不应处理逻辑跳转,统一在推送代理中进行统一处理。
运行实践结果:
kill:
ios7.1:
        application_didReceiveRemoteNotification_fetchCompletionHandler
        application_didFinishLaunchingWithOptions
        application_didRegisterForRemoteNotificationsWithDeviceToken

ios8.4:
        application_didReceiveRemoteNotification_fetchCompletionHandler
        application_didRegisterForRemoteNotificationsWithDeviceToken
        application_didFinishLaunchingWithOptions

ios9.3.5:
        application_didReceiveRemoteNotification_fetchCompletionHandler
        application_didFinishLaunchingWithOptions
        application_didRegisterForRemoteNotificationsWithDeviceToken

ios10:
        application_didFinishLaunchingWithOptions
        application_didRegisterForRemoteNotificationsWithDeviceToken
        userNotificationCenter_didReceiveNotificationResponse_withCompletionHandler

压入后台
ios7.1.2:
        application_didReceiveRemoteNotification_fetchCompletionHandler
ios8.4.1
        application_didReceiveRemoteNotification_fetchCompletionHandler
ios9.3.5
        application_didReceiveRemoteNotification_fetchCompletionHandler
ios10.0.1
        userNotificationCenter_didReceiveNotificationResponse_withCompletionHandler
5,本地推送以及自定义推送声音
不管是远程退送还是本地推送,都需要先注册推送。(查看第3步)
// 初始化本地通知
UILocalNotification *noti = [[UILocalNotification alloc] init];
// 推送的声音
noti.soundName = @"iosPush.caf";
// 推送执行的时间
noti.fireDate = [NSDate dateWithTimeInterval:5 sinceDate:[NSDate date]];
// app上显示的角标
noti.applicationIconBadgeNumber = 12;
// 推送的内容,必填项,不然会推送失败。
noti.alertBody = @"aaaa";
// 推送的标题
noti.alertTitle = @"vvvv";
// 注册推送到系统
[[UIApplication sharedApplication] scheduleLocalNotification:noti];
[[UIApplication sharedApplication] presentLocalNotificationNow:noti];
5.1,自定义声音
由于自定义的声音由系统去播放,所以对其格式还是有要求限制的,可以是以下四种:
1)Linear PCM
2)MA4 (IMA/ADPCM)
3)µLaw
4)aLaw
对应音频文件格式是 aiff,wav,caf 文件,文件也必须放到 app 的 mainBundle 目录中。自定义通知声音的播放时间必须在 30s 内,如果超过这个限制,则将用系统默认通知声音替代。
可以使用 afconvert 工具来处理音频文件格式,在终端中敲入如下命令就可以将一个 mp3 文件转换成 caf 文件:
afconvert iosPush.mp3 iosPush.caf -d ima4 -f caff -v
发送推送通知时,只需配置 sound 字段即可,就是 iosPush.caf 。远程推送的时候只需让后台将sound配置成相应的名字即可。
5.2,sound决定推送声音和震动的有无
APNs 通知通过sound字段来控制声音,默认为default,即系统的默认声音,如果设置为空值,则为静音。如果设为特殊的名称,需要在app的bundle文件中添加相应的声音文件。
5.3,总结
1) 声音键开启时:
想要既有声音和震动,sound需要设为非空值。
想要自定义声音,sound需要设为工程中某个文件的名字(带后缀)。
想要既没声音也没震动,sound=nil;
想要有震动没声音,sound需要设为工程中某个没有声音的音频文件。
2)声音键关闭时:
想要震动,_notification.soundName需要设为非空值。
想无震动,_notification.soundName=nil;
6,iOS 10推送总结(图片,声音)
Apple 在 iOS 10 中新增了 Notification Service Extension 机制,可在消息送达时进行业务处理,所以我们可以通过这个自定义通知的样式。
6.1,在项目中添加 Notification Service Extension
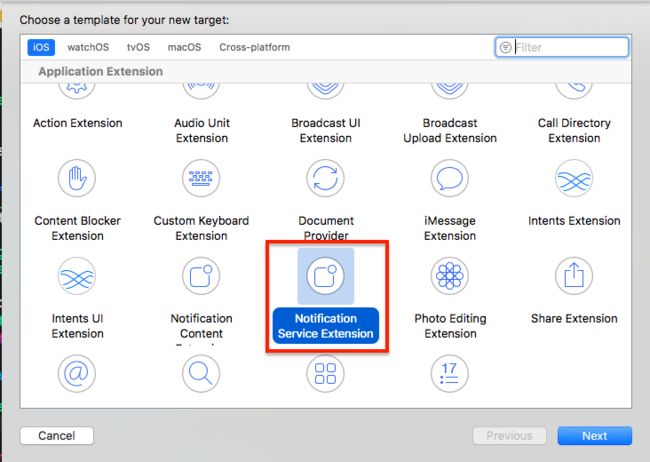
打开 Xcode 8,菜单选择 File -> New -> Target -> Notification Service Extension :
填写 Target 的时候需要注意以下两点:
- Extension 的 Bundle Identifier 不能和 Main Target(也就是你自己的 App Target)的 Bundle Identifier 相同,否则会报 BundeID 重复的错误。
- Extension 的 Bundle Identifier 需要在 Main Target 的命名空间下,比如说 Main Target 的 BundleID 为 com.xiaohongchun.xxx,那么Extension的BundleID应该类似与com.xiaohongchun.xxx.yyy这样的格式。如果不这么做,会引起命名错误。(建议使用
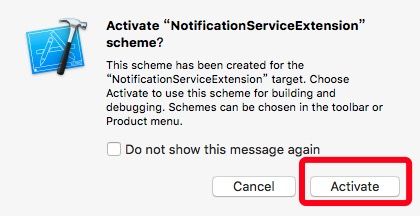
.NotificationService) - 添加 Notification Service Extension 后会生成相应的 Target。点 Finish 按钮后会弹出是否激活该 Target 对应的 scheme 的选项框,选择 Activate。如下图:
Notification Service Extension 添加成功后会在项目中自动生成 NotificationService.h 和 NotificationService.m 两个类,包含以下两个方法:
didReceiveNotificationRequest:(UNNotificationRequest *)request withContentHandler:(void (^)(UNNotificationContent *contentToDeliver))contentHandler
我们可以在这个方法中处理我们的 APNs 通知,并个性化展示给用户。APNs 推送的消息送达时会调用这个方法,此时你可以对推送的内容进行处理,然后使用contentHandler方法结束这次处理。但是如果处理时间过长,将会进入serviceExtensionTimeWillExpire方法进行最后的紧急处理。
- (void)serviceExtensionTimeWillExpire {
    // Called just before the extension will be terminated by the system.
    // Use this as an opportunity to deliver your "best attempt" at modified content, otherwise the original push payload will be used.
    self.contentHandler(self.bestAttemptContent);
}
如果didReceiveNotificationRequest方法在限定时间内没有调用 contentHandler方法结束处理,则会在过期之前进行回调本方法。此时你可以对你的 APNs 消息进行紧急处理后展示,如果没有处理,则显示原始 APNs 推送。
6.2,配置个性化通知
- (void)didReceiveNotificationRequest:(UNNotificationRequest *)request withContentHandler:(void (^)(UNNotificationContent * _Nonnull))contentHandler {

    self.contentHandler = contentHandler;
    // 1,把推送内容转为可变类型
    self.bestAttemptContent = [request.content mutableCopy];

    // 2,获取自定义字段, msgimg是与后台定义好的图片链接
    NSString *urlString = [request.content.userInfo valueForKey:@"msgimg"];

    // 3,根据 url 创建 attachment
    // 3.1 下载图片
    NSData *imageData = [NSData dataWithContentsOfURL:[NSURL URLWithString:urlString]];
    // 3.2 将图片保存到沙盒
    NSString *documentPath = NSSearchPathForDirectoriesInDomains(NSDocumentDirectory, NSUserDomainMask, YES).firstObject;
    NSString *localPath = [documentPath stringByAppendingPathComponent:@"localNotificationImage.jpg"];
    [imageData writeToFile:localPath atomically:YES];
    //3.3设置通知的attachment
    if (localPath && ![localPath isEqualToString:@""]) {
        UNNotificationAttachment * attachment = [UNNotificationAttachment attachmentWithIdentifier:@"pushImage" URL:[NSURL URLWithString:[@"file://" stringByAppendingString:localPath]] options:nil error:nil];
        if (attachment) {
            self.bestAttemptContent.attachments = @[attachment];
        }
    }

    self.contentHandler(self.bestAttemptContent);
}
6.2.1,小提示
// Creates an attachment for the data at URL with an optional options dictionary. URL must be a file URL. Returns nil if the data at URL is not supported.
+ (nullable instancetype)attachmentWithIdentifier:(NSString *)identifier URL:(NSURL *)URL options:(nullable NSDictionary *)options error:(NSError *__nullable *__nullable)error;
1)设置通知的attachment时,其中url必须是文件路径, 所以需要拼接file:// ;
2)存在沙盒的推送图片,会在推送完成后自动删除;
3)发送 payload 需依照下述格式:
{
   aps : {
       alert : {...},
       mutable-content : 1 //必须
   }
   your-attachment : aPicture.png //必须
}
-
mutable-content : 1说明该推送在接收后可被修改,这个字段决定了系统是否会调用 Notification Service 中的方法。 -
your-attachment:是自定义的字段,key 可以自定义(你自己要记住),value 需要是一个完整的文件名(或 url),即你想要展示的文件。
6.3,测试推送效果
先运行你的项目 target 使之在手机上安装,再运行 Notification Service 的 target,并选择在你的项目上运行该 Extension。此时可进行 Notification Service 代码的调试,即在 NotificationService.m 中打断点可以调试,但是在你的项目中的断点无法调试。
6.4,带 Notification Service Extension 项目上传 AppStore 须知
使用了 Notification Service Extension 的项目在制作待上传至 AppStore 的 IPA 包时,编译设备需要选择 Generic iOS Device,然后再进行 Product -> Archive 操作。只有选择 Generic iOS Device 才能打包编译出带有 Notification Service Extension 且适配全机型设备的 IPA 包。如下图所示:
以上就是近期做推送时的总结啦,关于自定义3D touch功能还没有进行研究,后续学习之后再补全。
写些文章,全当是记个笔记,希望能帮助到其他人,至少证明自己曾经做过开发,今后看到自己的文章,就能想到当时的自己在做些什么,回忆起来也是一段美好的时光吧。


