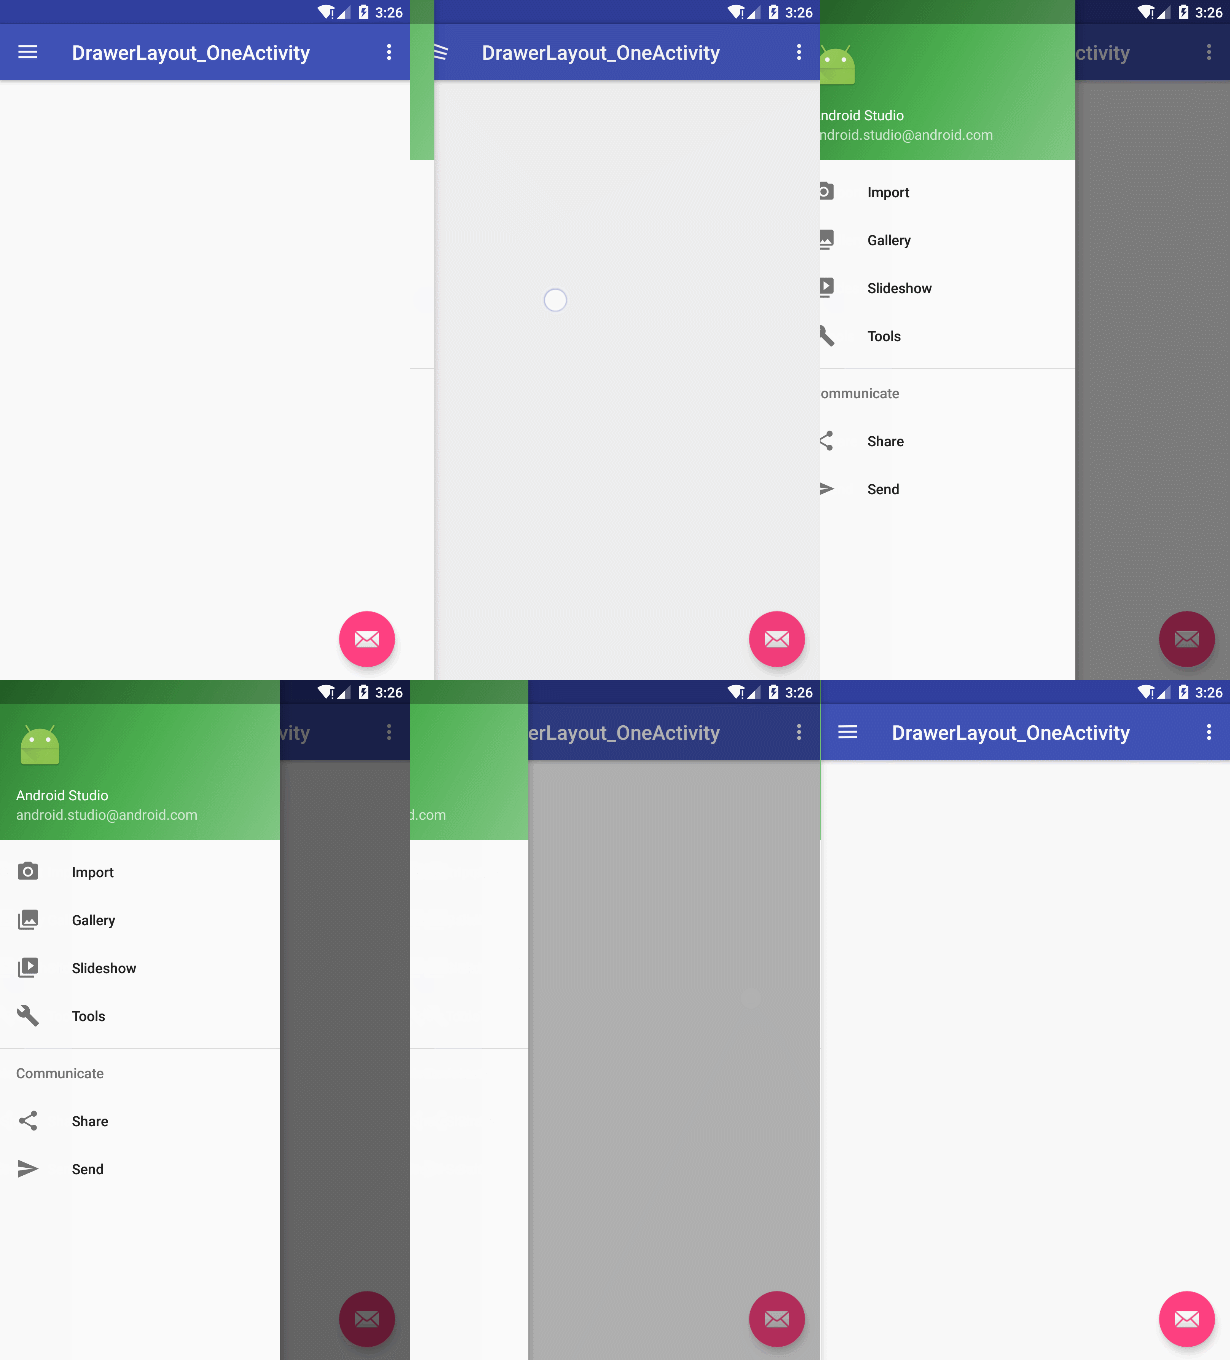
先看效果:
导航抽屉:
- 导航抽屉一般显示在屏幕最左侧,默认情况下是隐藏的,当用户手纸从边缘向另一个滑动的时候,会出现一个隐藏的面板,当点击面板外部或者原先方向滑动的时候,抽屉就消失。
- 很多 app 都有类似的需求,最经典的是 qq个人信息栏的滑动,后来 github 上开源出了民间的控件 SlideMenu。后来被Google 收录进 support-v4包里面,命名为 DrawerLayout。
- NavigationView:是谷歌在侧滑的 MaterialDesign 的一种规范,所以提出了一个新的控件,用来规范侧滑的基本样式。
- 使用 Eclipse 的同学在使用 NavigationView 的时候记得同时引用 RecyclerView 哦,不然会报错,NavigationView的内部使用了 RecyclerView。
用法:
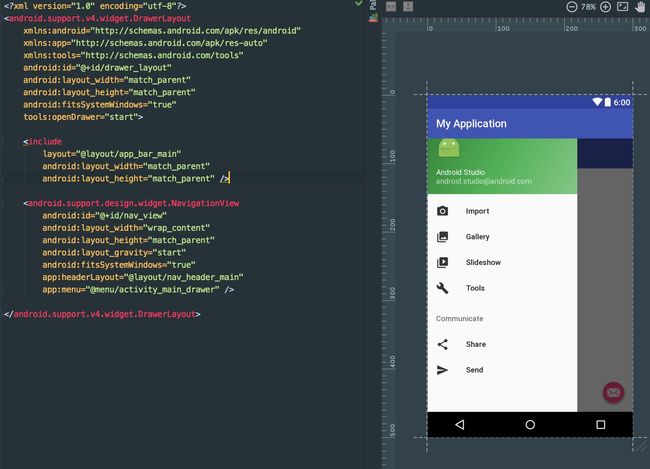
在创建项目的时候直接选择 Navigation Drawer Activity 即可,之后我们便可以看到如下布局文件(直接手写以下文件也行)
效果如下:
最外层是一个 DrawerLayout,包含了两个子 View。第一个 include 引用的 layout 为主页内容区域。第二个NavigationView 为侧滑区域View。
layout_gravity可以设置为 start 或者 end,分别对应的是从左边滑出和从右边滑出。
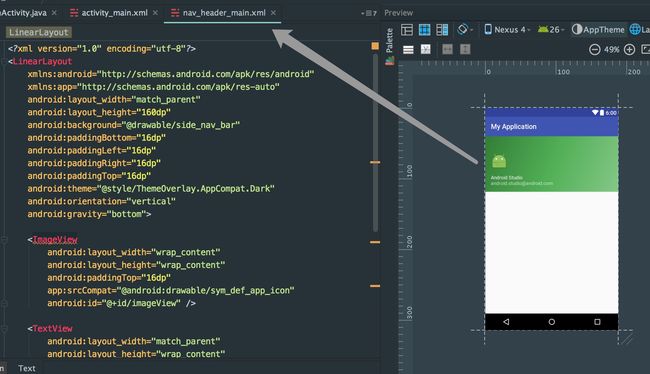
NavigationView 有两个 app 属性,分别是 app:headerLayout和 app:menu。前者是用于控制头布局,查看资源文件 nav-header-main 可以看到:
查看 menu文件 activity-main-drawer我们可以看到如下代码
对应了侧滑栏目的菜单。
Activity 里面的代码
Toolbar toolbar = (Toolbar) findViewById(R.id.toolbar);
//使用 toolbar 替换 actionbar,不然 onCreateOptionsMenu无法生效到 toolbar 上
setSupportActionBar(toolbar);

  //给 toolbar 设置导航剪头,并绑定 DrawLayout,在滑动的时候执行动画
DrawerLayout drawer = (DrawerLayout) findViewById(R.id.drawer_layout);
ActionBarDrawerToggle toggle = new ActionBarDrawerToggle(
        this, drawer, toolbar, R.string.navigation_drawer_open, R.string.navigation_drawer_close);
drawer.setDrawerListener(toggle);
toggle.syncState();

//给NavigationView的菜单设置点击事件,
//点击事件处理之后调用drawer.closeDrawer(GravityCompat.START)关闭菜单
//onBackPressed()方法里面可以判断 drawer.isDrawerOpen()来判断执行动作
NavigationView navigationView = (NavigationView) findViewById(R.id.nav_view);
navigationView.setNavigationItemSelectedListener(this);
Tips:
- 如果在 xml 里面写了toolbar,又在 activity 里面setSupportActionBar(toolbar);要记得给主题设置 android:theme="@style/AppTheme.NoActionBar"
- 如果想要 NavigationView 在 Toolbar 下方,可以在 DrawerLayout外层再包裹一个 LinearLayout,并且添加 Toolabr 节点即可
- Toolbar上不显示Home旋转开关按钮,上文有注释,删除ActionBarDrawerToggle相关代码即可。
- 不使用NavigationView,使用DrawerLayout+其他布局。很简单,把上文中布局文件里面的 DrawerLayout 节点里面的 NavigationView替换成任意 View 或者 ViewGroup。
- fitsSystemWindows:控制控件是否填充状态栏的位置,false 为不填充。
源码分析
----NavigationView----
这是从 design 包的 Value 文件里面拷贝出来的自定义属性,属性命名很规范,我就不一个一个解释了。
NavigationView 继承自 FrameLayout,然后透过配置headerLayout和menu来为其设置头布局和菜单列表,接下来,我们就来看看源码实现。
首先看构造方法
 public NavigationView(Context context, AttributeSet attrs, int defStyleAttr) {

 // Custom attributes
    TintTypedArray a = TintTypedArray.obtainStyledAttributes(context, attrs,
            R.styleable.NavigationView, defStyleAttr,
            R.style.Widget_Design_NavigationView);

    ...//省略部分代码

    if (a.hasValue(R.styleable.NavigationView_menu)) {
        inflateMenu(a.getResourceId(R.styleable.NavigationView_menu, 0));
    }

    if (a.hasValue(R.styleable.NavigationView_headerLayout)) {
        inflateHeaderView(a.getResourceId(R.styleable.NavigationView_headerLayout, 0));
    }

    a.recycle();
}
我们可以看到,如果attrs属性包含 headerLayout 属性和 menu 属性,则会去加载。
inflateMenu(int resId)
 public void inflateMenu(int resId) {
    mPresenter.setUpdateSuspended(true);
    getMenuInflater().inflate(resId, mMenu);
    mPresenter.setUpdateSuspended(false);
    mPresenter.updateMenuView(false);
}
这个方法很简单,mPresenter.setUpdateSuspended()为防错处理,暂时不用太纠结;
然后就是getMenuInflater().inflate(resId, mMenu)去解析menu 的 xml 属性;
mPresenter.updateMenuView(false);这句话调用了更新 MenuView,追进去看代码
 @Override
public void updateMenuView(boolean cleared) {
    if (mAdapter != null) {
        mAdapter.update();
    }
}
如果mAdapter不为 null,那么就更新mAdapter;根据代码经验,这个mAdapter一般是给 ListView 或者 RecyclerView 用的,查看了一下mAdapter这个类,果然继承自 RecyclerView.Adapter.
然后我们再看mAdapter 的update()方法
 public void update() {
    prepareMenuItems();
    notifyDataSetChanged();
 }
这里调用了两个方法,第二个方法我就不说了,看不懂的出门左拐。继续追prepareMenuItems()
 /**
 * Flattens the visible menu items of {@link #mMenu} into {@link #mItems},
 * while inserting separators between items when necessary.
 */
private void prepareMenuItems() {}
这个方法是 mAdapter 里面的一个私有方法,看方法说明,我们就能知道这个方法就是将mMenu里面的数据转换成 mAdapter 需要的 NavigationMenuItem 数据,然后再走 Update 方法里面的notifyDataSetChanged()方法将数据刷新到界面上。
inflateHeaderView(@LayoutRes int res)
 public View inflateHeaderView(@LayoutRes int res) {
    return mPresenter.inflateHeaderView(res);
}
不多说了,直接追mPresenter.inflateHeaderView(res);
 public View inflateHeaderView(@LayoutRes int res) {
    View view = mLayoutInflater.inflate(res, mHeaderLayout, false);
    addHeaderView(view);
    return view;
}

public void addHeaderView(@NonNull View view) {
    mHeaderLayout.addView(view);
    // The padding on top should be cleared.
    mMenuView.setPadding(0, 0, 0, mMenuView.getPaddingBottom());
}
直接调用LayoutInflater去inflate一个 LayoutRes 文件得到一个 view,然后添加进 mHeaderLayout里面,源码里面方法注释都懒得写,我也不过多赘述了。
好,NavigationView 核心代码分析完毕。
----DrawerLayout----
看 activity_main.xml的布局文件我们可以知道,DrawerLayout是 ContentView 和 NavigationView 的父节点,然后根据命名,我们可以大胆的猜测,DrawerLayout就是处理侧滑效果的。汗。。。。。。其实就是一个处理侧滑的 view
先看类注释说明吧,看不懂直接看后面的翻译~~
 /**
  * DrawerLayout acts as a top-level container for window content that allows for
  * interactive "drawer" views to be pulled out from one or both vertical edges of the window.
  *
  * Drawer positioning and layout is controlled using the android:layout_gravity
  * attribute on child views corresponding to which side of the view you want the drawer
  * to emerge from: left or right (or start/end on platform versions that support layout direction.)
  * Note that you can only have one drawer view for each vertical edge of the window. If your
  * layout configures more than one drawer view per vertical edge of the window, an exception will
  * be thrown at runtime.
  *
  *
  * To use a DrawerLayout, position your primary content view as the first child with
  * width and height of match_parent and no layout_gravity>.
  * Add drawers as child views after the main content view and set the layout_gravity
  * appropriately. Drawers commonly use match_parent for height with a fixed width.
  *
  * {@link DrawerListener} can be used to monitor the state and motion of drawer views.
  * Avoid performing expensive operations such as layout during animation as it can cause
  * stuttering; try to perform expensive operations during the {@link #STATE_IDLE} state.
  * {@link SimpleDrawerListener} offers default/no-op implementations of each callback method.
  *
  * As per the Android Design
  * guide, any drawers positioned to the left/start should
  * always contain content for navigating around the application, whereas any drawers
  * positioned to the right/end should always contain actions to take on the current content.
  * This preserves the same navigation left, actions right structure present in the Action Bar
  * and elsewhere.
  *
  * For more information about how to use DrawerLayout, read Creating a Navigation
  * Drawer.
  */
类注释说明很长,我用我三级的蹩脚英语结合翻译工具给大家简单翻译一下
- 可以作为一个从左右两边拉出抽屉效果的顶层容器
- 抽屉的位置取决于 layout_gravity属性。注意:每个垂直边最多只能有一个抽屉,否则会在运行的时候抛出异常
- 使用 DrawerLayout 的时候,主要的内容 view 必须放在第一个位置,宽和高为 match_parent 并且不能有 layout_gravity 属性;抽屉 view 设置在主内容 view 之后并且必须设置 layout_gravity,抽屉 view 的高度为 match_parent,宽度设为固定值。
- DrawerListener可以用来监听抽屉的状态和滑动,避免在滑动过程中执行高消耗的行为,STATE_IDLE状态下可以进行性能消耗比较大的动作。
接下来,我们来看 DrawerLayout 是怎么来控制抽屉滑动的。
在 DrawerLayout 的构造方法里面,我找到了一个熟悉的类--ViewDragHelper,熟悉 ViewDragHelper 这个类的童鞋看到这里可以不用往下看了,对,没错,DrawerLayout 的内部实现就是基于 ViewDragHelper。
mLeftCallback = new ViewDragCallback(Gravity.LEFT);
mLeftDragger = ViewDragHelper.create(this, TOUCH_SLOP_SENSITIVITY, mLeftCallback);
mLeftDragger.setEdgeTrackingEnabled(ViewDragHelper.EDGE_LEFT);
mLeftDragger.setMinVelocity(minVel);
mLeftCallback.setDragger(mLeftDragger);
这里是控制左边抽屉拖动的关键代码,与之相同的还有右边抽屉的处理。
这里就是用了 ViewDragHelper 这个类来处理 contentView 的触摸滑动来拖动抽屉。
这里,我就简单讲一下ViewDragHelper这个类吧
 /**
  * ViewDragHelper is a utility class for writing custom ViewGroups. It offers a number
  * of useful operations and state tracking for allowing a user to drag and reposition
  * views within their parent ViewGroup.
  */
ViewDragHelper是一个编写自定义 ViewGroup 的实用类,它提供一个用于追踪view拖动事件的参数。
翻译得有点拗口,简单点就是在 ViewGroup 里面监听一个 View 的拖动。
ViewGroup 的使用很简单,就三步
1.调用静态方法create(ViewGroup forParent, float sensitivity, Callback cb)创建实力,第一个参数传 ViewGroup 本身,第二个参数是拖动的敏感度,一般用1F 即可,第三个参数后文单独说。
2.在 onTouch 和 onInterceptTouchEvent 方法里面做如下处理
@Override
public boolean onInterceptTouchEvent(MotionEvent event)
{
    return mDragger.shouldInterceptTouchEvent(event);
}

@Override
public boolean onTouchEvent(MotionEvent event)
{
    mDragger.processTouchEvent(event);
    return true;
}
3.实现 ViewDragHelper.Callback类,
 /**
 * Called when the drag state changes. See the STATE_* constants
 * for more information.
 * 当ViewDragHelper状态发生变化时回调(IDLE,DRAGGING,SETTING[自动滚动时])
 * @param state The new drag state
 *
 * @see #STATE_IDLE
 * @see #STATE_DRAGGING
 * @see #STATE_SETTLING
 */
public void onViewDragStateChanged(int state) {}

/**
 * Called when the captured view's position changes as the result of a drag or settle.
 * 当captureview的位置发生改变时回调
 * @param changedView View whose position changed
 * @param left New X coordinate of the left edge of the view
 * @param top New Y coordinate of the top edge of the view
 * @param dx Change in X position from the last call
 * @param dy Change in Y position from the last call
 */
public void onViewPositionChanged(View changedView, int left, int top, int dx, int dy) {}

/**
 * Called when a child view is captured for dragging or settling. The ID of the pointer
 * currently dragging the captured view is supplied. If activePointerId is
 * identified as {@link #INVALID_POINTER} the capture is programmatic instead of
 * pointer-initiated.
 * 当captureview被捕获时回调
 * @param capturedChild Child view that was captured
 * @param activePointerId Pointer id tracking the child capture
 */
public void onViewCaptured(View capturedChild, int activePointerId) {}

/**
 * Called when the child view is no longer being actively dragged.
 * The fling velocity is also supplied, if relevant. The velocity values may
 * be clamped to system minimums or maximums.
 *
 * Calling code may decide to fling or otherwise release the view to let it
 * settle into place. It should do so using {@link #settleCapturedViewAt(int, int)}
 * or {@link #flingCapturedView(int, int, int, int)}. If the Callback invokes
 * one of these methods, the ViewDragHelper will enter {@link #STATE_SETTLING}
 * and the view capture will not fully end until it comes to a complete stop.
 * If neither of these methods is invoked before onViewReleased returns,
 * the view will stop in place and the ViewDragHelper will return to
 * {@link #STATE_IDLE}.
 * 手指释放的时候回调
 * @param releasedChild The captured child view now being released
 * @param xvel X velocity of the pointer as it left the screen in pixels per second.
 * @param yvel Y velocity of the pointer as it left the screen in pixels per second.
 */
public void onViewReleased(View releasedChild, float xvel, float yvel) {}

/**
 * Called when one of the subscribed edges in the parent view has been touched
 * by the user while no child view is currently captured.
 * 当触摸到边界时回调。
 * @param edgeFlags A combination of edge flags describing the edge(s) currently touched
 * @param pointerId ID of the pointer touching the described edge(s)
 * @see #EDGE_LEFT
 * @see #EDGE_TOP
 * @see #EDGE_RIGHT
 * @see #EDGE_BOTTOM
 */
public void onEdgeTouched(int edgeFlags, int pointerId) {}

/**
 * Called when the given edge may become locked. This can happen if an edge drag
 * was preliminarily rejected before beginning, but after {@link #onEdgeTouched(int, int)}
 * was called. This method should return true to lock this edge or false to leave it
 * unlocked. The default behavior is to leave edges unlocked.
 * true的时候会锁住当前的边界,false则unLock。
 * @param edgeFlags A combination of edge flags describing the edge(s) locked
 * @return true to lock the edge, false to leave it unlocked
 */
public boolean onEdgeLock(int edgeFlags) {
    return false;
}

/**
 * Called when the user has started a deliberate drag away from one
 * of the subscribed edges in the parent view while no child view is currently captured.
 * 在边界拖动时回调
 * @param edgeFlags A combination of edge flags describing the edge(s) dragged
 * @param pointerId ID of the pointer touching the described edge(s)
 * @see #EDGE_LEFT
 * @see #EDGE_TOP
 * @see #EDGE_RIGHT
 * @see #EDGE_BOTTOM
 */
public void onEdgeDragStarted(int edgeFlags, int pointerId) {}

/**
 * Called to determine the Z-order of child views.
 * 这个没看懂,没用过
 * @param index the ordered position to query for
 * @return index of the view that should be ordered at position index
 */
public int getOrderedChildIndex(int index) {
    return index;
}

/**
 * Return the magnitude of a draggable child view's horizontal range of motion in pixels.
 * This method should return 0 for views that cannot move horizontally.
 * 获取目标 view 水平方向拖动的距离
 * @param child Child view to check
 * @return range of horizontal motion in pixels
 */
public int getViewHorizontalDragRange(View child) {
    return 0;
}

/**
 * Return the magnitude of a draggable child view's vertical range of motion in pixels.
 * This method should return 0 for views that cannot move vertically.
 * 获取目标 view 垂直方向拖动的距离
 * @param child Child view to check
 * @return range of vertical motion in pixels
 */
public int getViewVerticalDragRange(View child) {
    return 0;
}

/**
 * Called when the user's input indicates that they want to capture the given child view
 * with the pointer indicated by pointerId. The callback should return true if the user
 * is permitted to drag the given view with the indicated pointer.
 *
 * ViewDragHelper may call this method multiple times for the same view even if
 * the view is already captured; this indicates that a new pointer is trying to take
 * control of the view.
 *
 * If this method returns true, a call to {@link #onViewCaptured(android.view.View, int)}
 * will follow if the capture is successful.
 * 如果返回 true,则捕获该 view 的拖动事件。通常写法 return child == targeView;
 * @param child Child the user is attempting to capture
 * @param pointerId ID of the pointer attempting the capture
 * @return true if capture should be allowed, false otherwise
 */
public abstract boolean tryCaptureView(View child, int pointerId);

/**
 * Restrict the motion of the dragged child view along the horizontal axis.
 * The default implementation does not allow horizontal motion; the extending
 * class must override this method and provide the desired clamping.
 * 控制 child移动的水平边界
 * @param child Child view being dragged
 * @param left Attempted motion along the X axis
 * @param dx Proposed change in position for left
 * @return The new clamped position for left
 */
public int clampViewPositionHorizontal(View child, int left, int dx) {
    return 0;
}

/**
 * Restrict the motion of the dragged child view along the vertical axis.
 * The default implementation does not allow vertical motion; the extending
 * class must override this method and provide the desired clamping.
 * 控制 child 移动的垂直边界
 * @param child Child view being dragged
 * @param top Attempted motion along the Y axis
 * @param dy Proposed change in position for top
 * @return The new clamped position for top
 */
public int clampViewPositionVertical(View child, int top, int dy) {
    return 0;
}
就到这里吧,ViewDragHelper 的用法其实很简单,DrawerLayout 里面也是这三个步骤,追过加了一些逻辑处理而已,详细用法可以参看鸿洋大神的 blog 《Android ViewDragHelper完全解析 自定义ViewGroup神器》,看完之后再回过头来自己去捋一捋 DrawerLayout 里面的逻辑


