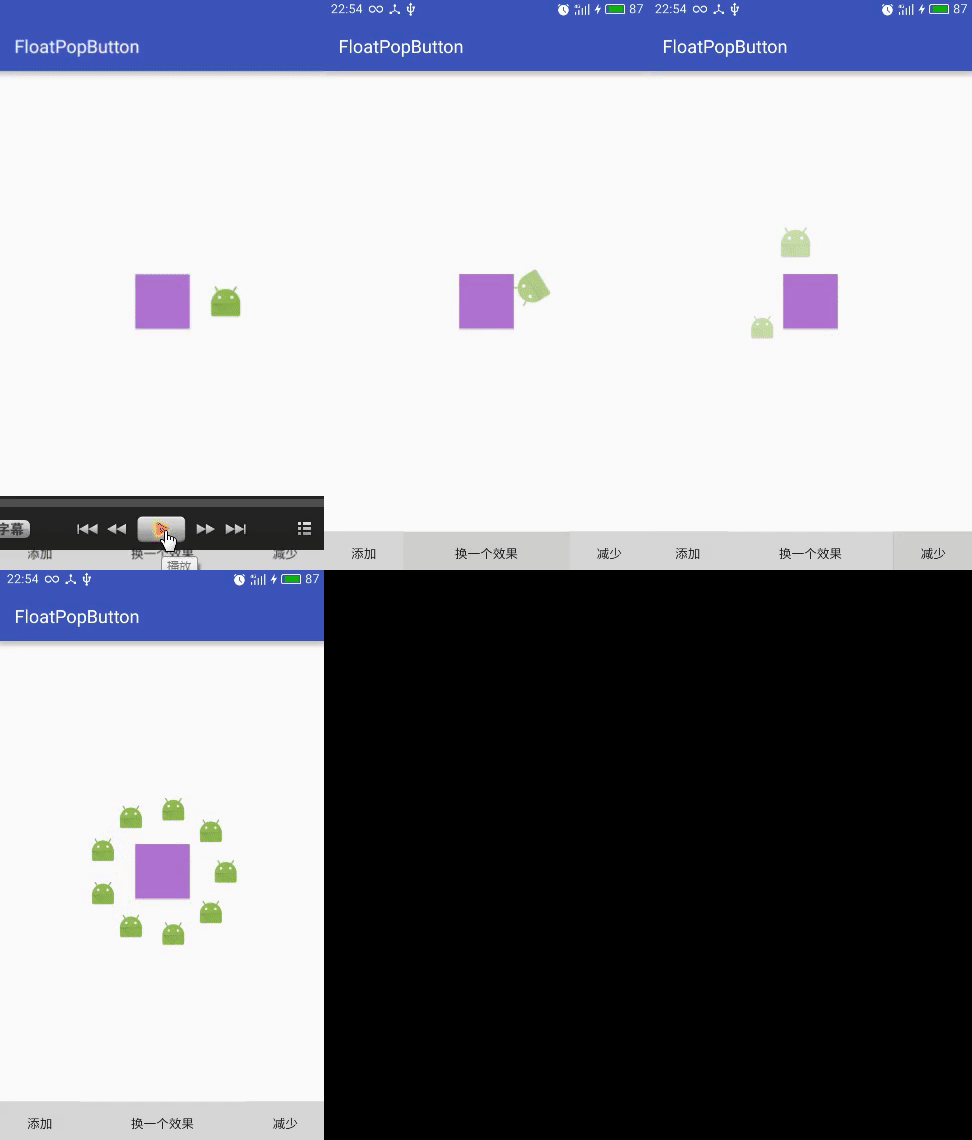
懒惰是人之本性,而我,过年后已经变成了一条废鱼,所以决定要写点什么东西,那么写什么呢?突然想起之前有个弹出菜单的效果挺好的,所以我就写了这么一个控件!来看下效果呗
- 动画效果包括四个方向垂直弹出和斜边弹出,周围弹出
- 支持动态更改数量和自定义动画效果
好吧,下面我们直接进入进入撸代码的环节!
- 继承一个ViewGroup,获取到子View和显示隐藏的按钮
- 计算子View的宽高并初始化位置
- 声明启动点击动画效果,并支持动画的扩展
我们新建一个类继承自FrameLayout,由于FrameLayout的特点是后来的在上面,所以我们的MenuView就是FrameLayout里面的最后一个子View。
public class PopMenu extends FrameLayout {
private ArrayListviews = new ArrayList<>();
private View menuView;//显示隐藏按钮
private int measureHeight;//menuView的宽高public PopMenu(Context context, AttributeSet attrs) { super(context, attrs); }}
那么我们要测量子View的宽高和放置位置
@Override
protected void onMeasure(int widthMeasureSpec, int heightMeasureSpec) {
super.onMeasure(widthMeasureSpec, heightMeasureSpec);
for (int i = 0; i < getChildCount(); i++) {
measureChild(getChildAt(i), widthMeasureSpec, heightMeasureSpec);
}
if (menuView != null) {
measureHeight = menuView.getMeasuredHeight();
}
}@Override
protected void onLayout(boolean changed, int left, int top, int right, int bottom) {
super.onLayout(changed, left, top, right, bottom);
initView();
for (int i = 0; i < views.size(); i++) {
View itemView = views.get(i);
itemView.layout(
menuView.getLeft() + (menuView.getMeasuredWidth() - itemView.getMeasuredWidth()) / 2,
menuView.getTop() + (menuView.getMeasuredHeight() - itemView.getMeasuredHeight()) / 2,
menuView.getLeft() + (menuView.getMeasuredWidth() + itemView.getMeasuredWidth()) / 2,
menuView.getTop() + (menuView.getMeasuredHeight() + itemView.getMeasuredHeight()) / 2
);/** * 在这里添加View动画配置 */ } }//初始化参数变量
public void initView() {
if (getChildCount() < 1) return;
views.clear();for (int i = 0; i < getChildCount() - 1; i++) { views.add(getChildAt(i)); getChildAt(i).setAlpha(0); } menuView = getChildAt(getChildCount() - 1); menuView.setOnClickListener(new OnClickListener() { @Override public void onClick(View v) { startAnim(); } }); }
由于我们点击到MenuView后,菜单对象会播放动画,我们需要给MenuView添加点击效果监听
 menuView.setOnClickListener(new OnClickListener() {
 @Override
 public void onClick(View v) {
 startAnim();
 }
 });
 /**
 * 开始动画
 */
 public void startAnim() {
 if (popAnimator.isShow) {
 popAnimator.doAnimIn();
 showShade();
 popAnimator.isShow = false;
 } else {
 popAnimator.doAnimOut();
 showShade();
 popAnimator.isShow = true;
 }
 }
我们获取到子View对象后,就可以对他们进行动画的处理了,那么播放动画需要什么参数呢?我们声明一个Config类来保存动画的相关参数,另外声明一个父类保存动画,之后如果有新的动画效果,可以直接继承父类,再注入。
我们写父类的时候,需要对里面的数据进行初始化和配置更新处理,另外需要给外部提供动画的显示和隐藏效果!
public class PopAnimator {
public int measureHeight = 0;//菜单按钮高度
public ArrayListviews = new ArrayList<>();//弹出按钮列表
public boolean isShow = false;//当前显示状态
public long duration = 400;
public int alpha = 1;
public int radius = 20;public void loadConfig(AnimatorConfigBuild config) { measureHeight = config.getMeasureHeight(); views = config.getViews(); isShow = config.isShow(); duration = config.getDuration(); alpha = config.getAlpha(); radius = config.getRadius(); } public AnimatorConfigBuild saveConfig() { return new AnimatorConfigBuild().setAlpha(alpha) .setDuration(duration) .setMeasureHeight(measureHeight) .setRadius(radius) .setShow(isShow) .setViews(views); } /** * 重写动画效果 */ public void doAnimOut() { if (views.isEmpty()) return; int start = 0; int degree = 360 / views.size(); for (int i = 0; i < views.size(); i++) { View view = views.get(i); view.animate() .setDuration(duration) .translationY((float) ((radius + measureHeight) * Math.sin(Math.toRadians(start + degree * i)))) .translationX((float) ((radius + measureHeight) * Math.cos(Math.toRadians(start + degree * i)))) .rotation(360) .alphaBy(0) .alpha(alpha); } } public void doAnimIn() { for (int i = 0; i < views.size(); i++) { View view = views.get(i); view.animate() .setDuration(duration) .translationY(0) .translationX(0) .rotation(0) .alpha(0); } }}
//通过链式声明的方式来写动画配置类
public class AnimatorConfigBuild {
public int measureHeight = 0;//菜单按钮高度
public ArrayListviews = new ArrayList<>();//弹出按钮列表
public boolean isShow = false;//当前显示状态
public long duration = 400;
public int alpha = 1;
public int radius = 20;/**
- 配置动画效果
*/
public AnimatorConfigBuild build(PopAnimator animator) {
if (animator == null) {
animator = new PopAnimator();
}
animator.loadConfig(this);
return this;
}
}
我们把配置类写好之后,回到PopMenu类,在onlayout里面把动画对象实例化并赋予内容参数
 /**
 * 初始化内容参数
 */
 new AnimatorConfigBuild()
 .setMeasureHeight(measureHeight)
 .setViews(views).build(popAnimator);
那么我们的简单的自定义弹出菜单就完成了!有很多地方都还需要改进
下面我们就实现扩展的动画类,由于动画隐藏的效果都是回到最初的位置,所以我们主要还是实现View弹出效果,就可以了
public class PopUpAnim extends PopAnimator {
private int padding = 8;
private int type;//左上右下
int distance;public void doAnimOut() { if (views.isEmpty()) return; for (int i = 0; i < views.size(); i++) { View view = views.get(i); if (i == 0) { distance = measureHeight / 2 - view.getMeasuredHeight() / 2; } distance = distance + view.getMeasuredHeight() + padding; view.animate() .setDuration(duration) .translationY(getDirection() ? 0 : getDistance()) .translationX(getDirection() ? getDistance() : 0) .rotation(360) .alphaBy(0) .alpha(alpha); } } /** * 计算距离 * * @return */ public int getDistance() { return type > 1 ? distance : -distance; } /** * 获取方向 * * @return */ public boolean getDirection() { //返回横向为true return type % 2 == 0; } public PopUpAnim setType(int type) { type %= 4; this.type = type; return this; } public void setPadding(int padding) { this.padding = padding; }}
接下来,我们把它放到Activity里面就可以看到效果了,xml布局里面添加几个按钮和PopMenu控件
  android:layout_width="match_parent"
 android:layout_height="match_parent">
然后在Activity添加逻辑代码
public class MainActivity extends AppCompatActivity {PopMenu menu; ArrayListanimators = new ArrayList<>(); @Override protected void onCreate(Bundle savedInstanceState) { super.onCreate(savedInstanceState); setContentView(R.layout.activity_main); menu = (PopMenu) findViewById(R.id.menu); animators.add(new PopUpAnim().setType(0)); animators.add(new PopCircleAnim()); animators.add(new PopUpAnim().setType(1)); animators.add(new PopLeftTopAnim()); animators.add(new PopUpAnim().setType(2)); animators.add(new PopCircleAnim()); animators.add(new PopUpAnim().setType(3)); animators.add(new PopLeftTopAnim()); } /** * 切换效果 * * @param view */ int index = 0; public void onBtnChange(View view) { index = (++index) % animators.size(); menu.setPopAnimator(animators.get(index)); } Handler handler = new Handler(); public void onBtnAdd(View view) { Button button = new Button(this); button.setLayoutParams(new FrameLayout.LayoutParams(60, 60)); button.setBackgroundResource(R.mipmap.ic_launcher); menu.addView(button, 0); handler.postDelayed(new Runnable() { @Override public void run() { menu.startAnim(); } }, 100); } public void onBtnMul(View view) { if (menu.getChildCount() > 1) { menu.removeViewAt(0); handler.postDelayed(new Runnable() { @Override public void run() { menu.startAnim(); } }, 100); } } }
代码地址:https://github.com/Mark911105/PopAnimButton,欢迎大家Fork and Star !
