介绍
ButterKnife是为Android View而设的绑定注解,把我们从findViewById()和setOnclicktListener()中全面解放。
但是使用ButterKnife的有一些东西需要注意:
- 属性布局不能用
private或static修饰,否则会报错 - 不能通过注解实现
setContentView() - 调用
ButterKnife.bind(this)之前必须先调用setContentView(R.layout.id) - 父类已经调用
ButterKnife.bind(this),则子类无需再次调用。
ButterKnife Github: https://github.com/JakeWharton/butterknife
ButterKnife 博客: http://jakewharton.github.io/butterknife/
一、导入
在作者的Github中可以获得最新的源码和版本号。下面是Android Studio Gradle使用ButterKnife,演示的版本是8.4.0。如果想知道更多使用的方法,在作者的博客中有详细的介绍。
1.1 build.gradle(Module)
apply plugin: 'com.android.application'
apply plugin: 'com.jakewharton.butterknife'

....
....

dependencies {
    compile fileTree(dir: 'libs', include: ['*.jar'])
    androidTestCompile('com.android.support.test.espresso:espresso-core:2.2.2', {
        exclude group: 'com.android.support', module: 'support-annotations'
    })
    compile 'com.android.support:appcompat-v7:23.4.0'
    testCompile 'junit:junit:4.12'

    compile 'com.jakewharton:butterknife:8.4.0'
    annotationProcessor 'com.jakewharton:butterknife-compiler:8.4.0'
}
设置完成后同步一下。
1.2 build.gradle(Project)
在build.gradle(Project)中插入如下代码
dependencies {
    classpath 'com.jakewharton:butterknife-gradle-plugin:8.4.0'
}
设置完成后同步一下就完成了。
2.使用
因为每次都要在Activity中的onCreate通过setContentView绑定Activity,所以写一个BaseActivity来完成绑定,子类继承并实现抽象方法。
public abstract class BaseActivity extends Activity {

    @Override
    protected void onCreate(Bundle savedInstanceState) {
        super.onCreate(savedInstanceState);
        setContentView(getContentViewId());
        ButterKnife.bind(this);
        afterCreate(savedInstanceState);
    }

    protected abstract int getContentViewId();
    protected abstract void afterCreate(Bundle bundle);
}
MainActivity继承BaseActivity,实现两个抽象方法。
public class MainActivity extends BaseActivity {

    @BindView(R.id.button_click) Button button_click;

    @Override
    public int getContentViewId() {
        return R.layout.activity_main;
    }

    /*
     * 以前初始化的工作在onCreate()中完成,现在放在afterCreate().
     */
    @Override
    protected void afterCreate(Bundle bundle) {}

}
在对应的xml布局中加入一个按钮,按钮资源名为R.id.button_click,运行然后点击按钮就可以看见按钮字的变化。
三、更多用法
对资源进行绑定
@BindString(R.string.title) String title;
@BindDrawable(R.drawable.graphic) Drawable graphic;
@BindColor(R.color.red) int red;
@BindDimen(R.dimen.spacer) Float spacer;
控件的点击事件绑定。
@OnClick(R.id.button_click)
public void setTextView(Button button){
    button.setText("Button Clicked");
}
如果控件的行为不会被改变,就不需要传控件的引用
@OnClick(R.id.button_click)
public void setTextView(){
    Toast.makeText(this, "Button Clicked", LENGTH_SHORT).show();
}
多个控件绑定到同一个方法,注意多了一个花括号
@OnClick({R.id.button_click, R.id.text_1})
public void setTextView(){
    Toast.makeText(this, "Clicked", LENGTH_SHORT).show();
}
相当于给EditText加addTextChangedListener,实现了文本改变监听器。
@OnTextChanged(value = R.id.editText,callback = OnTextChanged.Callback.BEFORE_TEXT_CHANGED)
void beforeTextChanged(CharSequence s, int start, int count, int after) {}

@OnTextChanged(value = R.id.editText, callback = OnTextChanged.Callback.TEXT_CHANGED)
void onTextChanged(CharSequence s, int start, int before, int count) {}

@OnTextChanged(value = R.id.editText, callback = OnTextChanged.Callback.AFTER_TEXT_CHANGED)
void afterTextChanged(Editable s) {}
四、技巧
4.1 免混淆
在proguard配置文件中加入以下规则
-keep class butterknife.** { *; }
-dontwarn butterknife.internal.**
-keep class **$$ViewBinder { *; }

-keepclasseswithmembernames class * {
    @butterknife.* ;
}

-keepclasseswithmembernames class * {
    @butterknife.* ;
}
4.2 代码生成插件
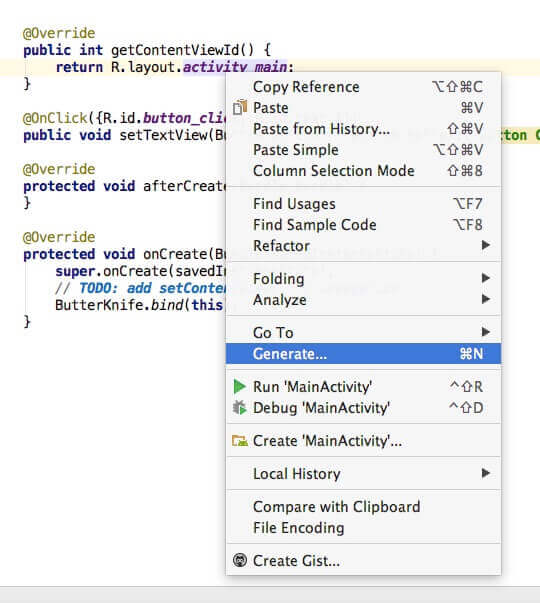
使用Zelezny能自动生成ButterKnife Injections。
AndroidStudio->File->Settings->Plugins->搜索Zelezny下载添加
鼠标先要选中布局文件,如图中选中R.layout.activity_main,然后点击右键,选中Generate
点击Generate Butterknife Injections
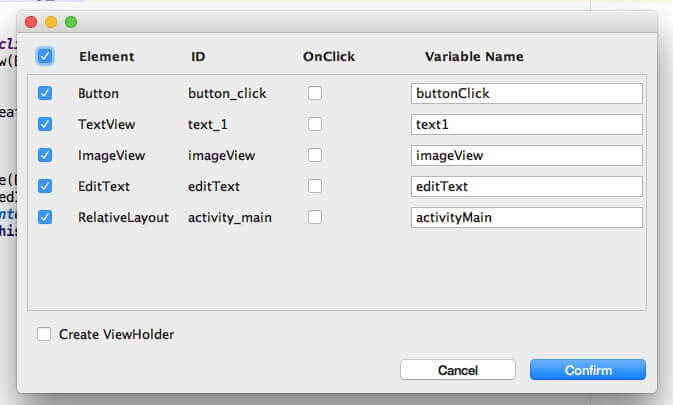
默认选中所有课识别的空间,如果需要OnClick就手动勾选。如果控件已经被绑定,该选项会变为灰色
代码自动生成后


