前言
公司新项目是使用springboot作为后端的微服务,前端就让我自己捣鼓用现在比较火的vue来做的分离前端,边学边做折腾了一个月,项目也差不多了完成了一个功能,准备发布下测试环境了,但是问题来了.服务器上的后端服务是接入了cas中央认证服务的单点登录的(cas接单页应用真的很费劲啊,有时间就写下来).所以是基于https的,所以和同事商量,那就使用nginx大法搭建一个全站https吧
vue2项目中的配置
- 在webpack配置里主要还是
config/index.js的assetsPublicPath的设置
  //config/index.js
  module.exports = {
  build: {
    testEnv: require('./test.env'),
    prodEnv: require('./prod.env'),
    index: path.resolve(__dirname, '../dist/index.html'),
    assetsRoot: path.resolve(__dirname, '../dist'),
    assetsSubDirectory: 'static',
    assetsPublicPath: '/leo-face/',    //配置的是nginx下根目录新建的一个leo-face文件夹
    productionSourceMap: true,
    // Gzip off by default as many popular static hosts such as
    // Surge or Netlify already gzip all static assets for you.
    // Before setting to `true`, make sure to:
    // npm install --save-dev compression-webpack-plugin
    productionGzip: false,
    productionGzipExtensions: ['js', 'css'],
    // Run the build command with an extra argument to
    // View the bundle analyzer report after build finishes:
    // `npm run build --report`
    // Set to `true` or `false` to always turn it on or off
    bundleAnalyzerReport: process.env.npm_config_report
  },
  dev: {
    env: require('./dev.env'),
    port: 8089,
    autoOpenBrowser: true,
    assetsSubDirectory: 'static',
    assetsPublicPath: '/',
    proxyTable: {},
    // CSS Sourcemaps off by default because relative paths are "buggy"
    // with this option, according to the CSS-Loader README
    // (https://github.com/webpack/css-loader#sourcemaps)
    // In our experience, they generally work as expected,
    // just be aware of this issue when enabling this option.
    cssSourceMap: false
  }
}
注意: 项目是用vue-cli脚手架搭建的,就有这个
config目录
- 构建的配置路径弄好了.就要执行相应的命令了
npm run build:test
- 附上
packagejson中script的命令
"build:test": "cross-env NODE_ENV=testing npm_config_preview=true npm_config_report=true node build/build.js",
- vue-cli生成的模板是没有这个命令的,这是我自己自定义的命令.首先会找到
build/build.js读取相应配置,读取的还是webpack.prod.conf.js这个配置,但是我在这个webpack profile中做了一些修改
 // 调用方法,判断引入的后端接口地址
//这样一来,引入的就上面build.js对象中的testEnv的配置了
 var env = process.env.NODE_ENV === 'testing'
  ? config.build.testEnv
  : config.build.prodEnv

//plugins的HtmlWebpackPlugin修改
 new HtmlWebpackPlugin({
      filename: process.env.NODE_ENV === 'testing'
        ? 'index.html'
        : config.build.index,
      template: 'index.html',
      favicon: resolveApp('leo-face.ico'),
      inject: true,
      minify: {
        removeComments: true,
        collapseWhitespace: true,
        removeRedundantAttributes: true,
        useShortDoctype: true,
        removeEmptyAttributes: true,
        removeStyleLinkTypeAttributes: true,
        keepClosingSlash: true,
        minifyJS: true,
        minifyCSS: true,
        minifyURLs: true
      },
      path: config.build.assetsPublicPath + config.build.assetsSubDirectory,
      // necessary to consistently work with multiple chunks via CommonsChunkPlugin
      chunksSortMode: 'dependency'
    }),

//下面是test.env.js的配置
var merge = require('webpack-merge')
var devEnv = require('./dev.env')

module.exports = merge(devEnv, {
  NODE_ENV: '"testing"',
  BASE_API: '"https://testx.xxx.net/leo"',   //整个应用后端请求的地址
})
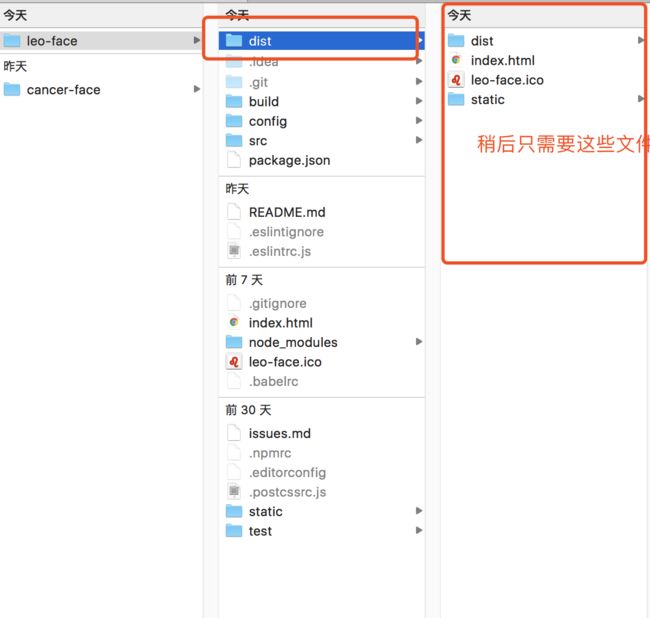
- 打包环境配置好了,包也打好了生成的目录就是这样的,下图
- 现在还不能直接去折腾nginx,因为还有个重要的设置没有更改,如果你的项目中使用的vue-router,想部署上服务器有优雅的路径,那么现在就需要设置你的router对象属性了
//创建路由
export default new Router({
  mode:'history',
  base: '/leo-face/',
  routes: constantRouterMap
});
参数我就不说明了,百度,官方一堆介绍
- 好了下面可以去折腾一下nginx了,由于我在本地已经搭建过nginx,也没有问题,所以就直接上服务器折腾.
Nginx 相关配置
- 服务器是linux的,和mac的差别不大.但是因为我是用homebrew装的nginx,只是目录有点不一样而已,附上自己三脚猫的画图功夫的流程图.
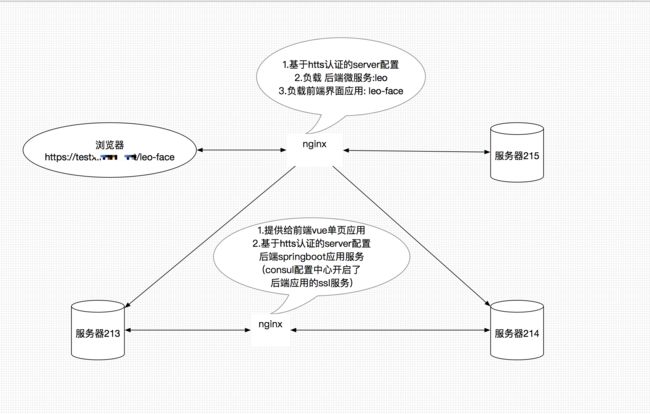
image.png
https域名入口服务器的nginx.conf配置,这台服务器是215
- linux上的
nginx/config目录nginx.conf配置
    //后端服务负载策略
    upstream leo {
        server   xxx.xxx.xxx.213:8424 weight=1;
        server   xxx.xxx.xxx.214:8424 weight=1;
    }
  //前端负载策略
    upstream leo-face {
        server   xxx.xxx.xxx.213:443 weight=1;
        server   xxx.xxx.xxx.214:443 weight=1;
    }

 //server配置
  server {
        listen       443;
        server_name  testx.xxx.net;

        ssl on;

        ssl_certificate      "name.pem"
        ssl_certificate_key  "name.key";

        ssl_session_cache    shared:SSL:10m;
        ssl_session_timeout  10m;
        ssl_protocols  TLSv1 TLSv1.1 TLSv1.2;

        ssl_ciphers  HIGH:!RC4:!MD5:!aNULL:!eNULL:!NULL:!DH:!EDH:!EXP:+MEDIUM;
        ssl_prefer_server_ciphers  on;

        location ~ /leo-face {
            access_log logs/leo-faceacc.log main;
            error_log logs/leo-face.log warn;
            proxy_pass https://leo-face;
            proxy_redirect          off;
            proxy_set_header        Host            $host:443;
            proxy_set_header        X-Real-IP       $remote_addr;
            proxy_set_header        X-Forwarded-For $proxy_add_x_forwarded_for;
            proxy_connect_timeout   180;
            proxy_send_timeout      180;
            proxy_read_timeout      180;
            proxy_buffer_size       128k;
            proxy_buffers           4 128k;
            proxy_busy_buffers_size 128k;
            proxy_temp_file_write_size 128k;
            add_header  Nginx-Cache "$upstream_cache_status";
        }

        location ~ /leo {
            access_log logs/leoacc.log main;
            error_log logs/leo.log warn;
            proxy_pass https://leo;
            proxy_redirect          off;
            proxy_set_header        Host            $host:443;
            proxy_set_header        X-Real-IP       $remote_addr;
            proxy_set_header        X-Forwarded-For $proxy_add_x_forwarded_for;
            proxy_connect_timeout   180;
            proxy_send_timeout      180;
            proxy_read_timeout      180;
            proxy_buffer_size       128k;
            proxy_buffers           4 128k;
            proxy_busy_buffers_size 128k;
            proxy_temp_file_write_size 128k;
            add_header  Nginx-Cache "$upstream_cache_status";
        }
    }
重启nginx服务器访问测试nginx的https是否开启
转发服务器nginx.conf的配置
server {
    listen       443;
    server_name  xxx.xxx.xxx.213;

    location /leo-face {
        try_files $uri $uri/ /leo-face/index.html;
        root   /opt/nginx/html;
        index  index.html index.htm;
    }

    ssl on;

    ssl_certificate      "name.pem"
    ssl_certificate_key  "name.key";

    ssl_session_cache    shared:SSL:10m;
    ssl_session_timeout  10m;
    ssl_protocols  TLSv1 TLSv1.1 TLSv1.2;

    ssl_ciphers  HIGH:!RC4:!MD5:!aNULL:!eNULL:!NULL:!DH:!EDH:!EXP:+MEDIUM;
    ssl_prefer_server_ciphers  on;

    error_page   500 502 503 504  /50x.html;
    location = /50x.html {
        root   html;
    }
}
相关说明:
- 213 服务器的证书可以从入口服务器215上面拷贝一份过来,保持一致,ssl配置也可以拷贝
try_files $uri $uri/ /leo-face/index.html;由于页面是由js内部进行加载的,匹配当前url的所有地址,没有页面重定向到index.html. 官方说明- 有人觉得我后台服务为什么没有配置ssl? 上图已经声明了,后端springboot微服务使用的是consul这个分布式服务发现和共享配置的解决方案,在应用启动时读取了consul配置中心开启的springboot应用内置tomcat容器的ssl配置..并且证书放在应用包中.
发布
- 配置全部都完成了,接下来就是关键的点了.发布你的前端应用,记得前面打包好的文件了吧.
- 在nginx负载转发出去的应用服务器上(文章中是213,214俩台服务器)的
nginx/html目录下新建一个leo-face目录.把文件拷贝进去. - 现在你的访问目录就应该像这样
https://test.xxx.net/leo-face - 启动nginx或者重启nginx,
nginx -s reload
- 在nginx负载转发出去的应用服务器上(文章中是213,214俩台服务器)的
- 新建文件夹的名称是因为之前打包时webpack中配置了
assetsPublicPath的路径就是这个名字,所以在index.html引入的js,css地址前缀也会带这个名称
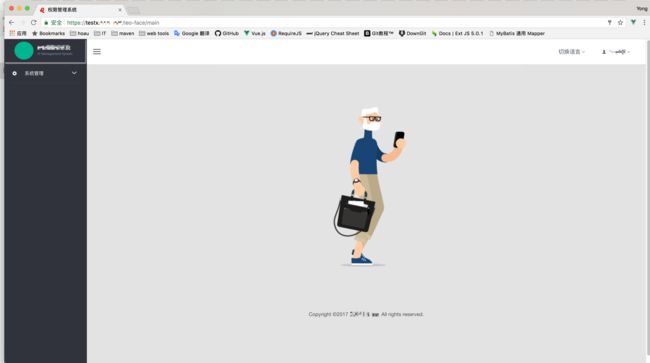
- 好了,现在访问一下看看,OK~ 完美...
https main.png
会遇到的问题
- nginx入口服务器 配置相同域名多个访问路径时.是有匹配规则的,比如我把leo-face放在leo下就不能访问到/leo-face这个地址了
- 如按照文章中的顺序无法接入成功,则 先可以配置基于http单点应用服务器的nginx是否可以正常访问前端应用.后面再将https入口服务接入负载转发到应用服务器上