上一周学了下mongoose,虽然学了点皮毛,但还是想写写总结总结,这也是我的第一篇技术博客。还是蛮开心的,happy~~来,切入正题!项目源码我会放在github上。 github 地址
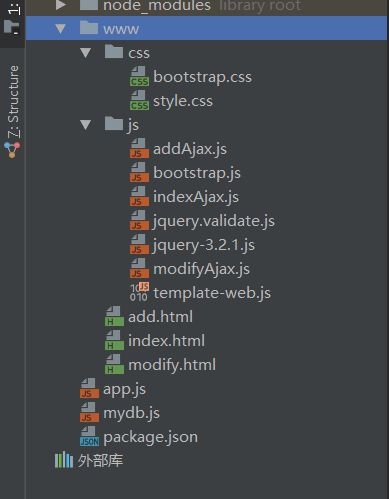
代码目录
有些东西可根据自己喜好设置,并非必须。
创建并初始化目录
$ mkdir student_manage
$ cd student_manage
$ npm init
第三方模块安装
1. Express
1.1 Express 基于 Node.js 平台,快速、开放、极简的 web 开发框架。
Express 4.x API 中文手册 安装如下:
$ npm install express --save
1.2 body-parser用于解析客户端请求的body中的内容,内部使用JSON编码处理,url编码处理以及对于文件的上传处理。安装如下:
$ npm install body-parser --save
2. mongoose
2.1 mongoose是在node.js异步环境下对mongodb进行便捷操作的对象模型工具。
mongoose文档 安装如下:
$ npm install mongoose --save
开始写代码咯~~
当然在项目开始前要确定电脑是否安装mongoDB
mongoDB下载地址
mongoDB图形化界面robomongo
下载好具体怎么配置还请问度娘或Google吧,本文不做介绍了哈。注意:安装完mongoDB的时候进行项目时要把lib目录下的mongod服务器打开哈~~
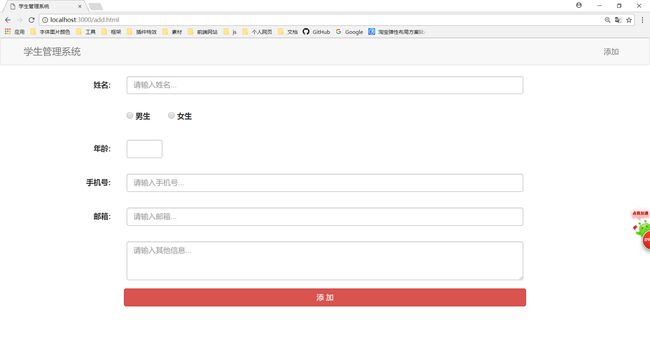
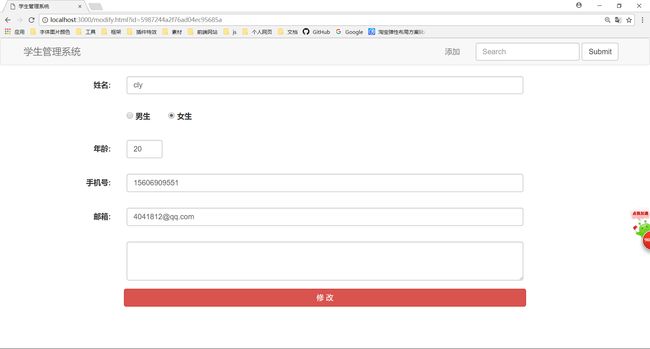
先展示下最终实现的项目效果,以防大家心里有数。
首页
添加页
修改页
前台具体代码就不列出来,比较简单,为了节约时间,就使用bootstrap进行快速生成,当然大家可以进行美化。
核心代码(敲黑板~~~)
- mydb.js 对数据库进行连接
    //引入mongoose模块
var mongoose=require('mongoose')

//数据库连接地址  链接到myStudent数据库
var DB_URL='mongodb://localhost:27017/myStudent'
//数据库连接
mongoose.connect(DB_URL)

//连接成功终端显示消息
mongoose.connection.on('connected',function () {
    console.log('mongoose connection open to '+DB_URL)
})
//连接失败终端显示消息
mongoose.connection.on('error',function () {
    console.log('mongoose error ')
})
//连接断开终端显示消息
mongoose.connection.on('disconnected',function () {
    console.log('mongoose disconnected')
})

//创建一个Schema  每一个schema会一一对应mongo中的collection
var schema=mongoose.Schema

//实例化一个Schema
var studentSchema=new schema(
    {
        //设置studentSchema信息的数据格式
        name:{type:String},
        sex:{type:String},
        age:{type:Number},
        phone:{type:String},
        email:{type:String},
        other:{type:String},
    },
    //{versionKey: false}是干嘛用?如果不加这个设置,我们通过mongoose第一次创建某个集合时,
    // 它会给这个集合设定一个versionKey属性值,我们不需要,所以不让它显示
    {
        versionKey:false
    }
)

//生成一个具体student的model并导出
//第一个参数是集合名,在数据库中会自动加s
//把Model名字字母全部变小写和在后面加复数s
var student=mongoose.model('student',studentSchema)
//将Student的model导出
module.exports=student
里面的代码我已逐条进行注释。有几个要说明的地方:1.可能大家看到Schema的时候有一点懵,不过他理解起来挺简单的就像关系型数据库里面的表。定义可以这么讲:schema是mongoose里会用到的一种数据模式,可以理解为表结构的定义;每个schema会映射到mongodb中的一个collection,它不具备操作数据库的能力。2.生成一个student的model的时候,如果myStudent数据库里面没有student(第一个参数的值)集合的话,系统会自动创建一个students的collection,注意在student后面加了s。
- app.js
//导入express模块
var expres=require('express')
var bodyParser=require('body-parser')
//导入之前写的mydb.js
var student=require('./mydb')

//调用函数, express实例化
var app=expres()

app.use(bodyParser.urlencoded({extended:false}))
app.use(bodyParser.json())

//处理静态目录
app.use(expres.static('www'))

// 允许跨域访问///
app.all('/api/*', function (req, res, next) {
    res.header('Access-Control-Allow-Origin', '*')
    res.header('Access-Control-Allow-Headers', 'x-Request-with')
    res.header('Access-Control-Allow-Methods', 'PUT,POST,GET,DELETE,OPTIONS')
    res.header('X-Powered-By', '4.15.2')
    res.header('Content-Type', 'application/json;charset=utf-8')
    next()   //执行下一个中间件。
})

//首页展示获取数据
app.post('/index',function (req,res) {
    //mongoose 数据查找
    student.find({}).exec(function (error,data) {
        if (error){
            console.log('数据获取失败'+error)
        }
        else{
            res.json({
                status:'y',
                message:'查询成功',
                //传递返回的数据
                data:data
            })
        }
    })
})

//修改页面 获取数据
app.post('/modify',function (req,res) {
    //mongoose根据条件进行查找
    student.find({_id: req.body.id}).exec(function (error,data) {
        console.log('2')
        if (error){
            console.log('数据获取失败'+error)
        }
        else{
            console.log(data)
            res.json({
                status:'y',
                message:'查询成功',
                data:data
            })
            console.log(4)
        }
    })
})

//修改提交修改数据库
app.post('/modifyStu',function (req,res) {
    console.log('1')
    console.log(req.body)
    //查询的条件
    var whereStr={_id:req.body.id}
    //更新的内容
    var updateStr={
        $set:{
            name:req.body.name,
            sex:req.body.sex,
            age: req.body.age,
            phone:req.body.phone,
            email:req.body.email,
            other:req.body.other,

        }
    }
    //对数据库进行更新
    student.update(whereStr,updateStr,function (error) {
        if (error){
            console.log('数据修改失败:'+error)
            res.json({
                status:'y',
                message:'修改失败',
                data:req.body
            })
        }
        else{
            console.log('数据修改成功')
            res.json({
                status:'y',
                message:'修改成功',
                data:req.body
            })
        }
    })
})

//删除数据库其中的项
app.post('/del',function (req,res) {
    //mongoose根据指定条件进行删除
    student.remove({_id: req.body.id},function(error){
        if (error){
            console.log('数据获取失败'+error)
            res.json({
                status:'y',
                message:'删除不成功',
            })
        }
        else{
            res.json({
                status:'y',
                message:'删除成功',
            })
        }
    })
})

//导航栏search操作
app.post('/findName',function (req,res) {
    console.log(req.body.searchName)
    student.find({name: req.body.searchName}).exec(function (error,data) {
        if (error){
            console.log('查询失败'+error)
            res.json({
                status:'y',
                message:'查询失败',
            })
        }
        else{
            res.json({
                status:'y',
                message:'查询成功',
                data:data
            })
        }
    })
})

//添加数据库操作
app.post('/addStu',function (req,res) {
    console.log(req.body)
    //实例化一个student
    var newStu=new student({
        name:req.body.name,
        sex:req.body.sex,
        age:req.body.age,
        phone:req.body.phone,
        email:req.body.email,
        other:req.body.other,

    })
    //对实例化的内容进行保存
    newStu.save(function (error) {
        if (error){
            console.log('数据添加失败:'+error)
            res.json({
                status:'y',
                message:'添加失败',
                data:req.body
            })
        }
        else {
            console.log('数据添加成功')
            res.json({
                status:'y',
                message:'添加成功',
                data:req.body
            })
        }
    })
})

//服务器监听端口
app.listen(3000,()=>{
    console.log('node is ok')
})
到处服务器搭建完成,接下来就是对各个js代码进行操作,ajax获取表单数据请求服务器,ajax获取地址栏请求服务器等等。然后ajax在接收到服务器返回的数据,对此进行渲染到前台页面,此项目我用的是 artTemplate 进行模板渲染。
就举一个栗子吧~~
- 添加页的 addAjax.js
$(function () {

    //添加表单验证方法   手机号的验证
    $.validator.addMethod('isPhone',function (value,ele) {
        var length=value.length
        var reg=/^1[34578]\d{9}$/
        if (length >= 11 && reg.test(value)){
            return true
        }
        else {
            return false
        }
    })

    //对表单进行验证
    $('#addForm').validate({
        debug:true,
        //验证的规则
        rules:{
            name:{
                required:true,
                minlength:3
            },
            age:{
                required:true
            },
            phone:{
                required:true,
                isPhone:true
            },
            email:{
                required:true,
                email:true
            }
        },
        //错误的提示信息
        messages:{
            name:{
                required:'姓名不能为空',
                minlength:'姓名不能少于3位'
            },
            age:{
                required:'年龄不能为空'
            },
            phone:{
                required:'手机号不能为空',
                isPhone:'手机号格式错误'
            },
            email:{
                required:'邮箱不能为空',
                email:'邮箱格式错误'
            }
        },
        //正确时执行的函数
        submitHandler:function (form) {
            //ajax请求
            $.ajax({
                type:'post',
                url:'/addStu',
                dataType:'json',
                //表单数据序列化
                data:$(form).serialize(),
                //ajax请求成功操作
                success:function (res) {
                    $('.modal-body').text(res.message)
                    //显示出模态框
                    $('.modal').modal('show').on('hidden.bs.modal',function () {
                        if (res.message == '添加成功'){
                            location.href='index.html'
                        }
                    })
                },
                //ajax请求失败操作
                error:function (jqXHR) {
                    console.log(jqXHR.status)
                }
            })
        },

    })
})
表单验证我用了 jquery.validate.js
- 添加完毕,首页进行渲染 index.html(部分)
{{each}}

        {{$value.name}}
        {{$value.sex}}
        {{$value.age}}
        {{$value.phone}}
        {{$value.email}}

            修改
            删除


    {{/each}}
- 首页的 indexAjax.js(部分)
$(function () {
    $.ajax({
        type:'post',
        url:'/index',
        success:function (res) {
            //进行模板渲染
            var strHtml=template('showStu',res.data)
            $('#tb').html(strHtml)

            ......代码有点长就不放了哈~~........
结尾
夜已深。不知不觉写这个文章也花了挺长时间的,哈哈哈,不过自己开心就行~~ 自己在做这个项目的时候,以为会很快搞完,但是还是遇到了问题,哎,纠结了好久,现在也没得出个答案,后来用了另一种的解决方法,感觉有点像投机取巧,但好像也不能怎么说,哈哈...个人技术水平真的很渣,写文章一方面是分享,一方面是再次重温自己的思路。请勿喷哈~~自己的第一篇技术博客,写的有点匆忙,不过还是希望可以给大家带来帮助。
于 厦门高崎新村 自己的小屋
本文首发于个人博客 >> 黄明照--一个在路上慢慢行走的前端人


