初涉angular之自定义指令
1.自定义指令
import {Directive, ElementRef, HostListener} from "@angular/core";

@Directive({
 selector: '[nu-input]'
})
export class InputTrimDirective {
 constructor(public elementRef: ElementRef) {
 }
 @HostListener('keyup', ['$event.target'])
 keyupFun(evt) {
   if (evt.value) {
     this.elementRef.nativeElement.value = evt.value.trim();
   }
 }
}
在app.module声明指令,在app.module的declarations中声明才能生效
import {BrowserModule} from '@angular/platform-browser';
import {NgModule} from '@angular/core';
import {FormsModule} from '@angular/forms';
import {AppComponent} from './app.component';
import {InputTrimDirective} from "./direcitve/input-trim.directive";

@NgModule({
 declarations: [
   AppComponent,
   InputTrimDirective
 ],
 imports: [
   BrowserModule,
   FormsModule,
 ],
 bootstrap: [AppComponent]
})
export class AppModule {
}
通过inport从core库中导入Directive,HostListener,ElementRef,Input .....的引入。
Directive
用于@Directive装饰器功能,用于定义这个class是一个指令,通过@Directive修饰这样就拥有了指令的功能,我们在元组中声明selector属性值为[input-trim],方括号的写法表示是一个属性指令 还有以下几种写法:
element-name: 使用元素名称选择
.class: 使用类名选择
[attribute]: 使用属性选择
[attribute=value]:使用属性和值选择
:not(sub_selector):只有当元素与sub_selector不匹配时才选择
selector1,selector2:选择择selector1或selector2 这里我们采用属性的方式指定选择器。
这里采用的是属性的方式指定选择器,
@Directive({
selector: '[nu-input]'
})
模板中使用,直接写 nu-input
HostListener
HostListener 是属性装饰器,用来为宿主元素添加事件监,类似于我们原生JavaScript的addEventListener。 这里我们监听了keyup事件(还可以定义原生JavaScript中的其他事件),当表单中有输入的时候我们就会调用方法,传递了一个$event对象进去,后面紧跟我们触法keyup事件的方法体
ElementRef(注意:需要在构造函数中注入进去)
用于获取获取DOM节点相关的属性
这里我们当我们在页面表单输入的时候,会调用keyupFun方法,首先判断是否有值输入,有的情况下,我们通过传递进来的evt获取表单的value值,在调用trim()方法去除空格,赋值给elementRef.nativeElement.value渲染到页面
import { Input, ElementRef, OnInit, Directive } from '@angular/core';
@Directive({
  selector: '[nu-input]',
  exportAs: 'nuInput',
  host: {
    '[class.nu-input]': 'true'
  }
})
export class NuInput implements OnInit {
  /**
   * 通过size设置input大小,默认为small, 支持big
   */
  @Input() size: String = 'small';
  constructor(private _elementRef: ElementRef) {
  }
  ngOnInit() {
    (this._elementRef.nativeElement as HTMLElement).classList.add('nu-input-' + this.size);
  }
}
扩展Host
这里如果我们不采用HostListener属性装饰器来监听事件,我们可以在指令的 metadata 信息中,设定宿主元素的事件监听信息,
// 自定义class类名
 host: {
    '[class.nu-input]': 'true'
  }
// 自定义'role-data'属性
 host: {
    'role-data': 'hello world'
 }
// 监听事件
 host: {
    '(keyup)': 'keyupFun($event.target)'
 }
exportAs
官方解释是说,exportAs: string:定义一个名字,用于在模板中把该指令赋值给一个变量。给的例子如下
@Directive({
     selector:  'child-dir',
     exportAs:  'child'
})
 class  ChildDir  { }
@Component({
selector: 'main',
template: `
// 这是NuToolTipDirective元件中的部分内容
@Directive({
    selector: '[nu-tooltip]',
    exportAs: 'nuTooltip',
    host: {
        '[class.nu-tooltip-open]': 'isOpen'
    }
})
export class NuToolTipDirective implements AfterViewInit, OnChanges, OnInit, OnDestroy {
     * @ignore 是否显示tooltip
     */
    isOpen = false;
......
// 在模板中使用
// #tooltip1="nuTooltip"中,nuTooltip就是NuToolTipDirective的exportAs所定义的name,
// 代表了NuToolTip这个指令本身,button中定义#tooltip1指代nuTooltip
// isOpen是元件指令中定义的Boolen值,在模板中tooltip1.isOpen调用
{{tooltip1.isOpen}}
//未指代,不能获取isOpen
{{tooltip2.isOpen}}
初涉angular之组件通讯
1.子component调用父component的方法或属性值
@Input
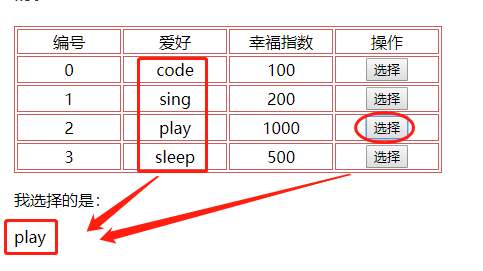
通过按钮获得hobby name,显示在list下方。
1.home.component.html
编号
爱好
幸福指数
操作
{{i}}
{{item.name}}
{{item.fzs}}
我选择的是:
2.home.component.ts
import { Component, OnInit } from '@angular/core';

@Component({
  selector: 'app-home',
  templateUrl: './home.component.html',
  styleUrls: ['./home.component.css']
})
export class HomeComponent implements OnInit {
  public hobbyName: string; //传给子组件的值
  public hobby = [
    {name: 'code', fzs: '100'},
    {name: 'sing', fzs: '200'},
    {name: 'play', fzs: '1000'},
    {name: 'sleep', fzs: '500'}
    ];
  constructor() { }

  ngOnInit() {
  }
  getDate(name) {
    console.log(name);
    //将获取的值给hobbyName 赋值
    this.hobbyName = name;
  }
}
3.子组件
import {Component, Input, OnInit} from '@angular/core';

@Component({
  selector: 'app-hobby',
  templateUrl: './hobby.component.html',
  styleUrls: ['./hobby.component.css']
})
export class HobbyComponent implements OnInit {
//@Input接受父组件传过来的[值]
  @Input() hobbyGetName: string;
  constructor() { }

  ngOnInit() {
  }

}
4.显示在view中
{{hobbyGetName}}
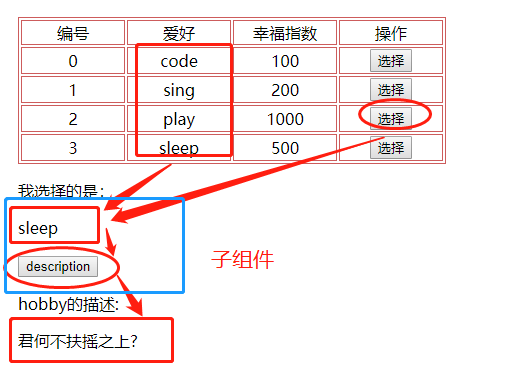
2.父component调用子component的方法或属性值
@Output 父组件接收子组件的数据时,子组件暴露一个EventEmitter属性,当事件发生时,子组件利用该属性emits(向上弹射)事件。父组件绑定到这个事件属性,并在事件发生时作出回应。
hobby.component.html
{{hobbyGetName}}
hobby.component.ts
import {Component, EventEmitter, Input, OnInit, Output} from '@angular/core';

@Component({
  selector: 'app-hobby',
  templateUrl: './hobby.component.html',
  styleUrls: ['./hobby.component.css']
})
export class HobbyComponent implements OnInit {
  @Input() hobbyGetName: string;
  @Output() Detail: EventEmitter = new EventEmitter();
  public hobbyDetail = [
    {name: 'code', description: '小辫子飞起!'},
    {name: 'sing', description: '听歌要命!'},
    {name: 'play', description: '莫不是怕上天?'},
    {name: 'sleep', description: '君何不扶摇之上?'}
  ];
  constructor() { }

  ngOnInit() {
  }
  Descrip() {
    console.log(this.hobbyGetName);
    this.hobbyDetail.forEach((i) => {
      if (this.hobbyGetName === i.name) {
        this.Detail.emit(i.description);
      }
    });
  }
}
home.component.html
  我选择的是:

  hobby的描述:
  {{hobbyDescription}}

