0x00 前情提要
自从前两篇文章里对Vol的内存取证功能有一定使用经验之后,打心底里对Vol编写者的技术水平有了崇拜之情。想想当年写Linux内核分析的作业以及工程实践linux下rootkit分析实现时被linux内核源码整的死去活来,一座金山银山摆在眼前却不知道怎么去挖。
现在看到了vol把linux内核、windows内核以及mac内核玩的这么6,真是超级膜拜。当下在傍晚跑步刷圈的时候决定把这个项目抓来分析解剖,一来看看怎么去用python实现一个框架式的牛逼工具(本来想肢解sqlmap的,奈何web经验不足),二来对各种内核的实现机理、数据结构这些杂七杂八不知从何学起的知识点有个导向性的学习规划。如此美好的契机,早已让我摩拳擦掌,把持不住,连就快要提交的论文初稿都放下了。
再次感谢vol的作者iMHLv2以及背后的基金会吧。
废话不说,本文主要的就是对我这两天学习vol的总结,挑简单的来,主要是关于三点:
- vol主线程运行机理
- vol插件的类派生
- vol插件运行机理
- Linux_arp插件运行机理
0x01 Vol主线程运行机理
首先我们去从vol的vol.py开始审视其源码。
def main():

    # 打印版本信息
    sys.stderr.write("Volatility Foundation Volatility Framework {0}\n".format(constants.VERSION))
    sys.stderr.flush()

    # 初始化debug模块
    debug.setup()
    # Load up modules in case they set config options
    registry.PluginImporter()

    ## Register all register_options for the various classes
    registry.register_global_options(config, addrspace.BaseAddressSpace)
    registry.register_global_options(config, commands.Command)

    if config.INFO:
        print_info()
        sys.exit(0)

    ## Parse all the options now
    config.parse_options(False)
    # Reset the logging level now we know whether debug is set or not
    debug.setup(config.DEBUG)

    module = None
    # 获取插件的字典 插件名:插件体
    cmds = registry.get_plugin_classes(commands.Command, lower = True)
    for m in config.args:
        # 找到参数里的第一个插件名
        if m in cmds.keys():
            # module即为插件名 比如Linux_arp
            module = m
            break

    if not module: # 插件不存在
        config.parse_options()
        debug.error("You must specify something to do (try -h)")

    if module in cmds.keys():
        # 插件存在,则获取插件对象,并将config赋值module这个插件的_config变量
        command = cmds[module](config)

        # hook 上help函数
        config.set_help_hook(obj.Curry(command_help, command))
        config.parse_options()

        if not config.LOCATION:
            debug.error("Please specify a location (-l) or filename (-f)")

        # 开始执行插件
        command.execute()
源码洋洋洒洒一大篇,看起来还是很吃力的。流程图如下:
上图是主线程的启动流程。
- vol从自身配置中获取插件字典,该字典的格式是[插件名:插件体]
- 主线程从命令行参数里获取第一个长得像是插件名的参数,就像我们输入的linux_arp一样的参数
- 参数:
- 不存在像是插件名的字符串则报错并退出
- 存在则以插件名、配置啦初始化插件。
- 在插件上hook help函数
- 开始执行插件
get_plugin_classes函数用于获取一切以commands.Command为父类的派生类字典。
0x02 Vol插件的类派生
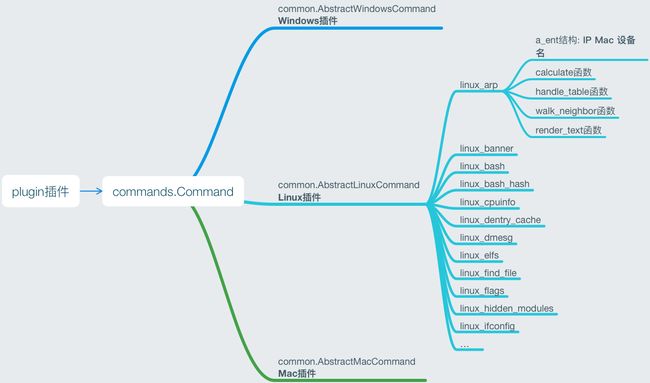
如上图可见,vol中的插件以commands的Command类为父类,分别派生出AbstractWindowsCommand类、AbstractMacCommand类以及AbstractLinuxCommand类,这分别代表三个平台插件的基类,这三类为不同平台的插件定义了一些共同的函数,以供具体的插件继承调用,当然也方便了我们自定义插件时复用这些函数。
0x03 Vol插件运行机理
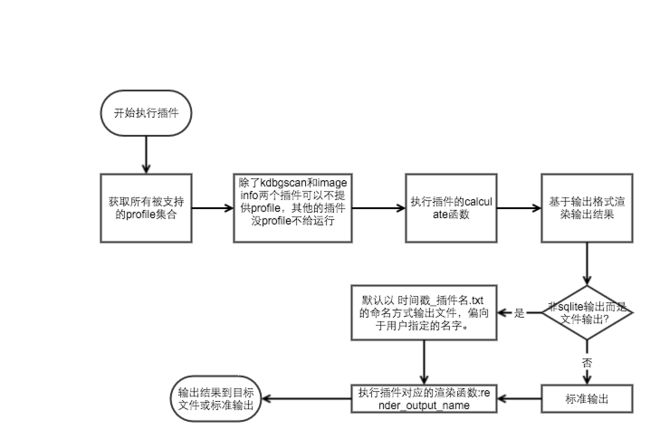
上图则是插件的运行机理。
首先获取所有已注册的Profile的派生类集合。
def execute(self):
    # 获取Profile类的子类
    profs = registry.get_plugin_classes(obj.Profile)
接着除了kdbgscan和imageinfo两个插件可以不提供profile而使用默认的profile--WinXPSP2x86以外,其他插件没有提供profile参数就不给运行的机会。
    if plugin_name != "mac_get_profile":
        if self._config.PROFILE == None:
            if plugin_name in ["kdbgscan", "imageinfo"]:
                self._config.update("PROFILE", "WinXPSP2x86")
            else:
                debug.error("You must set a profile!")

            if self._config.PROFILE not in profs:
                debug.error("Invalid profile " + self._config.PROFILE + " selected")
            if not self.is_valid_profile(profs[self._config.PROFILE]()):
                debug.error("This command does not support the profile " + self._config.PROFILE)
接着执行插件的calculate函数,这个函数我们在自定义插件的时候一般会实现,作为vol和我们的自定义插件之间的调用接口,即插件的执行。
    # # 首先执行calculate
    data = self.calculate()
随后基于输出格式确定渲染函数。
function_name = "render_{0}".format(self._config.OUTPUT)
若非sqlite输出且存在输出的目标文件,则进行写文件。否则将结果输出至标准输出。
    if not self._config.OUTPUT == "sqlite" and self._config.OUTPUT_FILE:
        ...
    else:
        outfd = sys.stdout
其中默认以时间戳_插件名的命名方式来创建输出文件,若指定了输出文件,则使用用户自定义的。
        out_file = '{0}_{1}.txt'.format(time.strftime('%Y%m%d%H%M%S'), plugin_name) if      self._config.OUTPUT_FILE == '.' else self._config.OUTPUT_FILE
        if os.path.exists(out_file):
            debug.error("File " + out_file + " already exists.  Cowardly refusing to overwrite it...")
        print 'Outputting to: {0}'.format(out_file)
        outfd = open(out_file, 'wb')
接着执行插件对应的渲染函数render_output
func = getattr(self, function_name)
最后将结果输出到输出对象里。
func(outfd, data)
0x03 Vol-Linux_arp插件运行机理
本节对Linux_arp插件的运行机理进行分析。
从vol的类派生图中可知,linux_arp这个插件顺着Command-AbstractLinuxCommand一路派生,终于成为一个
有一个以IP Mac DevName为内容的结构体和若干函数的类。
a_ent结构体
该结构体的格式如下:
class a_ent(object):
    def __init__(self, ip, mac, devname):
        self.ip = ip
        self.mac = mac
        self.devname = devname
calculate函数
既然每个插件的入口是calculate函数,那么我们则从该函数入手。
这里我先声明我的测试环境为
OS:                 Ubuntu Server
Version:            14.04
Kernel Version:     3.19.0-25
代码及注释如下:
def calculate(self):
    linux_common.set_plugin_members(self)

    # 获取邻接表偏移地址
    neigh_tables_addr = self.addr_space.profile.get_symbol("neigh_tables")

    # 邻接表是链表么?
    # 此处的neigh_table是内核头文件里 include/net/neighbour.h里的结构
    # linux 3.19.0-25中neigh_table非链表
    if hasattr("neigh_table", "next"):
        # 是,获取内存映射文件的邻接表起始地址,随后遍历链表,生成表的list
        ntables_ptr = obj.Object("Pointer", offset = neigh_tables_addr, vm = self.addr_space)
        tables = linux_common.walk_internal_list("neigh_table", "next", ntables_ptr)
    else:
        # 否,创建一个Pointer的数组
        # 内存映射的分布
        # vm            ===>    +---------------+
        #                       |               |
        #                       |               |
        # ntables_addr  ===>    |---------------|  <=== Array.origin_offset
        # Array.current --->    |////pointer////|  <----+
        #                       |---------------|       |
        #                       |////pointer////|       |
        #                       |---------------|       +-- Array.count = 4
        #                       |////pointer////|       |
        #                       |---------------|       |
        #                       |////pointer////|  <----+
        #                       |---------------|
        #                       |               |
        #                       +---------------+
        # 然后以neigh_table来解析创建table数组,因为我们可能有多张网卡,所以会有多个arp表

        tables_arr = obj.Object(theType="Array", targetType="Pointer", offset = neigh_tables_addr, vm = self.addr_space, count = 4)
        tables = [t.dereference_as("neigh_table") for t in tables_arr]

    for ntable in tables:
        # 对每个邻接表进行相应的处理
        for aent in self.handle_table(ntable):
            yield aent
贴出3.19内核头文件里的neigh_table结构:
struct neigh_table {
    int         family;
    int         entry_size;
    int         key_len;
    __u32           (*hash)(const void *pkey,
                    const struct net_device *dev,
                    __u32 *hash_rnd);
    int         (*constructor)(struct neighbour *);
    int         (*pconstructor)(struct pneigh_entry *);
    void            (*pdestructor)(struct pneigh_entry *);
    void            (*proxy_redo)(struct sk_buff *skb);
    char            *id;
    struct neigh_parms  parms;
    struct list_head    parms_list;
    int         gc_interval;
    int         gc_thresh1;
    int         gc_thresh2;
    int         gc_thresh3;
    unsigned long       last_flush;
    struct delayed_work gc_work;
    struct timer_list   proxy_timer;
    struct sk_buff_head proxy_queue;
    atomic_t        entries;
    rwlock_t        lock;
    unsigned long       last_rand;
    struct neigh_statistics __percpu *stats;
    struct neigh_hash_table __rcu *nht;
    struct pneigh_entry **phash_buckets;
};
如代码所示,该结构体不含名为next的变量,则calculate函数中第一个分支进入‘否’分支,获得邻接表的起始地址。由于我们的主机可能有多块网卡,故可能有多个邻接表。
随后将内存映像里neigh_table_addr指向的内存区域转变为Pointer的数组,数组长为4.接着对该数组中的元素,即Pointer对象,进行解引用,即获取其指向的内存区域,并组织成neigh_table对象,最后将这些表放入一个列表之中。
接着对列表中的每个邻接表进行处理,返回邻接表上邻居的集合。
handle_table函数
代码及注释如下。
def handle_table(self, ntable):

    ret = []

    # FIXME: Consider using kernel version metadata rather than checking hasattr
    if hasattr(ntable, 'hash_mask'):
        # 3.19没有该结构体
        hash_size = ntable.hash_mask
        hash_table = ntable.hash_buckets
    elif hasattr(ntable.nht, 'hash_mask'):
        # nht == neighbour hash table
        # 3.19也没有这个结构体
        hash_size = ntable.nht.hash_mask
        hash_table = ntable.nht.hash_buckets
    else:
        # 3.19有这个结构体
        hash_size = (1 << ntable.nht.hash_shift)
        hash_table = ntable.nht.hash_buckets

    # param:
    # hash_table 为 hash桶头指针数组的起始地址,即 neighbour **p
    # addr_space 视为 内存镜像,即一整片内存
    # hash_size 为 hash桶的个数
    # 本步骤则是将内存映象里的头指针数组转换为python里Pointer的列表
    buckets = obj.Object(theType = 'Array', offset = hash_table, vm = self.addr_space, targetType = 'Pointer', count = hash_size)

    for i in range(hash_size):
        if buckets[i]:
            # 取出其中的一个头指针,找出内存映像中偏移位置的内容,形成一个neighbour对象
            neighbor = obj.Object("neighbour", offset = buckets[i], vm = self.addr_space)

            # 以neighbor为起点遍历桶,并加入ret中
            ret.append(self.walk_neighbor(neighbor))

    # 整合桶集合成为一体
    return sum(ret, [])
首先是ntable是一个neigh_table的结构体。在linux内核中该结构体在上文中列过,并不存在hash_mask变量,且观察neigh_hash_table结构体中也不存在hash_mask变量,故handle_table函数的第一个分支进入子分支三,hash桶的大小为2的hash_shift次方,而hash桶的头指针数组起始地址为hash_table。其中hash_buckets即hash桶头指针数组的首地址,格式为neighbour **p。结构体neigh_hash_table的结构如下:
struct neigh_hash_table {
    struct neighbour __rcu  **hash_buckets;
    unsigned int        hash_shift;
    __u32           hash_rnd[NEIGH_NUM_HASH_RND];
    struct rcu_head     rcu;
};
随后以hash桶头指针数组的起始地址为出发点,找寻hash_size个指针,并构建为长度为hash_size的Pointer数组。
接着对数组中的元素,即hash桶头指针,取出并找出内存映象中头指针位置上的内容,构造成一个neighbour对象。
再以该对象为起点遍历整个桶,将便利结果放入ret中。最后将结果集合为一个集合返回。
walk_neighbor函数
代码及注释如下。
def walk_neighbor(self, neighbor):
    ret = []

    # 迭代器遍历以neighbor结构为头部的链表
    for n in linux_common.walk_internal_list("neighbour", "next", neighbor):

        # 解析
        family = n.tbl.family

        if family == socket.AF_INET:
            ip = obj.Object("IpAddress", offset = n.primary_key.obj_offset, vm = self.addr_space).v()
        elif family == socket.AF_INET6:
            ip = obj.Object("Ipv6Address", offset = n.primary_key.obj_offset, vm = self.addr_space).v()
        else:
            ip = '?'

        mac = ":".join(["{0:02x}".format(x) for x in n.ha][:n.dev.addr_len])
        devname = n.dev.name

        ret.append(a_ent(ip, mac, devname))

    return ret
首先遍历以neighbor结构为头部的链表。walk_internal_list("neighbour", "next", neighbor)返回一个迭代器,第一次迭代时会返回neighbor自身,即头节点。其代码如下:
# list_start = neighbor
# struct_name = neighbour
# list_member = next
def walk_internal_list(struct_name, list_member, list_start, addr_space = None):
    if not addr_space:
        addr_space = list_start.obj_vm

    while list_start:
        list_struct = obj.Object(struct_name, vm = addr_space, offset = list_start.v())
        yield list_struct
        list_start = getattr(list_struct, list_member)
如代码所示,会先取出start对应的内容先生成一个neighbour对象。
结合以上三个函数,最后就可以输出数据,即a_ent的集合。
接着以输出方式制定的渲染器渲染即可得到我们需要的输出文件了。
0x04 总结
由于这只是对代码进行分析的第一步,选择的代码相对来说比较简单,但是这里面也涉及到了不少知识点。
- linux内核结构:邻接表
- hash桶
- yield标识符
- vol的内部结构
要对整个内存进行分析,需要的linux内核知识远不止这些,希望自己能够有朝一日读完整个vol。


