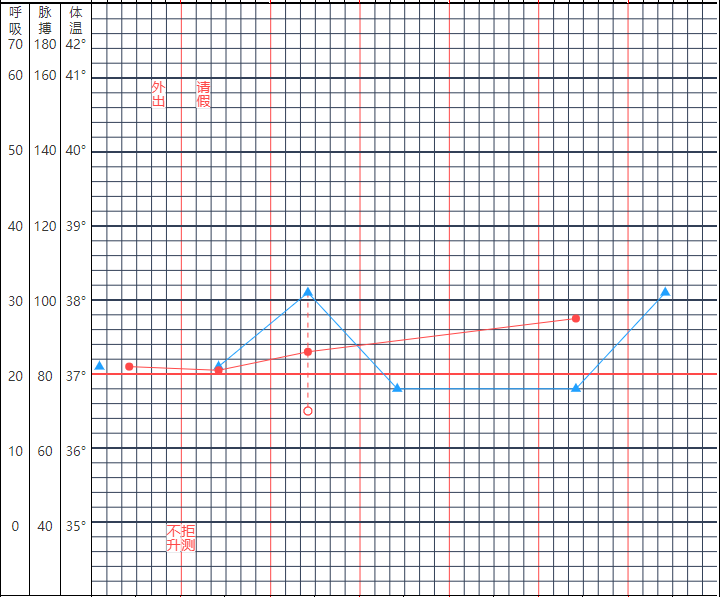
公司医院项目,需要定制化显示病人的体温、脉搏、呼吸。由于界面是定义好的,无法使用开源项目来改,干脆自己画一个了。
为什么是ZRender
ZRender 是百度前端团队用于绘制 EChar t的开源库,里面封装了各种对 Canvas 的使用。而且 ZRender 的文档是全中文的,对开发者也非常友好
需求
相对于其他知识点,绘图没什么特别要讲的。无非是不停的画而已。步骤复杂但是实现起来没有什么技术难点。所以直接写下需求,然后贴上代码供大家参考啦~
- 绘制表格 —— 计算好格子的宽、高、数量,
for循环绘制多条横线、竖线即可实现。 - 根据体温、脉搏等数据标注相应位置的点,点有各种形状。 —— 形状ZRender 已经提供,直接调用配置即可。
- 实心圆
- 空心圆
- 实心三角形
- 虚线
- 特殊符号 —— 其实都不难,慢慢画都能画出来。
- 纵向绘制文本 —— 没有发现纵向绘制的方式,于是将文本拆分一个一个字画上去。
- 鼠标
hover在各个点上需要有文本框显示具体内容。 —— 绘制一个文本,隐藏起来。当触发hover事件的时候显示文本,并将文本移动到相应位置。 - 线段连接 —— 计算一下两个点的x,y连接即可。虚线只需要配置
style: { lineDash: [ 5, 5 ] }即可实现虚线效果。 - 将 ZRender 绘制的表格打印出来 —— 转为图片打印,最后会讲。
贴个效果图:
实现
由于是公司项目,不发布源码啦~以下是demo代码。
table.html
Table
![]()
DrawUtil.js
// hover 框文本样式
var Text

var DrawUtil = {
    // 初始化悬浮文本
    initHoverText(zr){
        Text = new zrender.Text({
            style: {
                fontSize: 14,
                textBackgroundColor: '#FFF',
                textBorderColor: '#000',
                textBorderWidth: 1,
                textBorderRadius: 2,
                textPadding: 5,
            },
            zlevel: 100
        })
        zr.add(Text)
        Text.hide()
    },
    // 绘制纵向文本
    drawText (str, dx, dy) {
        let group = new zrender.Group()

        for (var i = 0; i < str.length; i++) {
            var text = new zrender.Text({
                style: {
                    text: str.charAt(i),
                    fontSize: 14,
                    textFill: '#FF4949',
                    textBackgroundColor: '#FFF',
                }
            })
            let y = 14 * i
            text.attr('position', [0, y])
            group.add(text)
        }

        group.attr('position', [dx, dy])
        return group
    },
    // 绘制实心圆
    drawCircle (Obj, Color) {
        return new zrender.Circle({
            shape: {
                cx: Obj.x,
                cy: Obj.y,
                r: 4
            },
            style: {
                fill: Color
            }
        }).on('mouseover', function () {
            Text.show()

            Text.attr('position', [Obj.x, Obj.y])
            Text.attr({
                style: {
                    text: Obj.txt
                }
            })
        }).on('mouseout', function () {
            Text.hide()
        })
    },
    // 绘制三角形
    drawIsogon (Obj, Color) {
        return new zrender.Isogon({
            shape: {
                x: Obj.x,
                y: Obj.y,
                r: 6,
                n: 3
            },
            style: {
                fill: Color
            }
        }).on('mouseover', function () {
            Text.show()

            Text.attr('position', [Obj.x, Obj.y])
            Text.attr({
                style: {
                    text: Obj.txt
                }
            })
        }).on('mouseout', function () {
            Text.hide()
        })
    },
    // 绘制空心圆
    drawHollowCircle (Obj, Color) {
        return new zrender.Circle({
            shape: {
                cx: Obj.x,
                cy: Obj.y,
                r: 4
            },
            style: {
                fill: '#FFFFFF',
                stroke: Color
            }
        }).on('mouseover', function () {
            Text.show()

            Text.attr('position', [Obj.x, Obj.y])
            Text.attr({
                style: {
                    text: Obj.txt
                }
            })
        }).on('mouseout', function () {
            Text.hide()
        })
    },
    // 绘制×
    drawX (Obj, Color) {
        return new zrender.Text({
            style: {
                text: '×',
                fontSize: 20,
                textFill: Color,
            },
            position: [Obj.x - 7, Obj.y - 11]
        }).on('mouseover', function () {
            Text.show()

            Text.attr('position', [Obj.x, Obj.y])
            Text.attr({
                style: {
                    text: Obj.txt
                }
            })
        }).on('mouseout', function () {
            Text.hide()
        })
    },
    // 绘制圆圈中有点的圆
    drawPointCircle (Obj, Color) {
        var group = new zrender.Group()
        var Point = new zrender.Circle({
            shape: {
                cx: 4,
                cy: 4,
                r: 1
            },
            style: {
                fill: Color
            }
        })
        var OutCircle = new zrender.Circle({
            shape: {
                cx: 4,
                cy: 4,
                r: 4
            },
            style: {
                fill: '#FFFFFF',
                stroke: Color
            }
        })
        group.on('mouseover', function () {
            Text.show()

            Text.attr('position', [Obj.x, Obj.y])
            Text.attr({
                style: {
                    text: Obj.txt
                }
            })
        }).on('mouseout', function () {
            Text.hide()
        })

        group.add(OutCircle)
        group.add(Point)
        group.attr('position', [Obj.x - 3, Obj.y - 3])

        return group
    },
    // 绘制圆圈中有H的圆
    drawHCircle (Obj, Color) {
        var group = new zrender.Group()
        var h = new zrender.Text({
            style: {
                text: 'H',
                fontSize: 8,
                textFill: Color
            },
            position: [2, -1]
        })
        var OutCircle = new zrender.Circle({
            shape: {
                cx: 5,
                cy: 5,
                r: 5
            },
            style: {
                fill: '#FFFFFF',
                stroke: Color
            }
        })
        group.on('mouseover', function () {
            Text.show()
            Text.attr('position', [Obj.x, Obj.y])
            Text.attr({
                style: {
                    text: Obj.txt
                }
            })
        }).on('mouseout', function () {
            Text.hide()
        })

        group.add(OutCircle)
        group.add(h)
        group.attr('position', [Obj.x - 4, Obj.y - 4])

        return group
    },
    // 绘制圆圈中有加号的圆
    drawAddCircle (Obj, Color) {
        var group = new zrender.Group()
        var h = new zrender.Text({
            style: {
                text: '+',
                fontSize: 8,
                textFill: Color
            },
            position: [2, -1]
        })
        var OutCircle = new zrender.Circle({
            shape: {
                cx: 5,
                cy: 5,
                r: 5
            },
            style: {
                fill: '#FFFFFF',
                stroke: Color
            }
        })
        group.on('mouseover', function () {
            Text.show()
            Text.attr('position', [Obj.x, Obj.y])
            Text.attr({
                style: {
                    text: Obj.txt
                }
            })
        }).on('mouseout', function () {
            Text.hide()
        })

        group.add(OutCircle)
        group.add(h)
        group.attr('position', [Obj.x - 4, Obj.y - 4])

        return group
    },
}
最后,需要将Canvas打印出来。我的解决方案是将Canvas转为图片。之后将图片放到你想放的地方即可。
    setTimeout(toImg, 1000)

    function toImg() {
        var canvas = document.querySelector('#main canvas')
        if (canvas) {
            var img = canvas.toDataURL("image/png")
            document.querySelector('#main_img').src = img
        }
    }
