目录
1、苹果推送介绍
2、mobpush介绍:MobPush文档链接
3、极光推送介绍:极光推送文档链接
4、个推介绍:个推文档介绍
5、三个SDK的总结
一 了解苹果推送
苹果推送分为本地推送、在线推送、离线推送三种模式, 本地推送是使用一套本地推送的机制和网络服务器无关,可用于闹钟之类的需求,在线推送是应用处于前台模式,使用APP自己的长链接推送 ,和APP设置通知的开关没有关系 ,离线推送就是APNs推送了,app服务器发送推送请求到APNs服务器,APNs服务器发送推送到指定的设备,离线推送就和APP设置的通知开关有关系了。以微信为例,当微信处于前台时是进入微信自己的长链接推送通道,和手机APP设置推送是否开启无关, 处于后台模式、锁屏或者kill了则使用APNs通道,通知关闭则收不到推送了
1 远程推送
远程推送又可以可以分为静默推送和正常推送
正常推送用户会收到推送内容、声音,应用处于后台或者kill点击推送内容进入APP后才会会进入
-(void)application:(UIApplication *)application didReceiveRemoteNotification:(NSDictionary *)userInfo fetchCompletionHandler:(void (^)(UIBackgroundFetchResult))completionHandler
静默推送是一种特殊的远程推送,没有推送内容声音,不用点击推送内容也不用进入APP就会执行,用户毫无感觉
-(void)application:(UIApplication *)application didReceiveRemoteNotification:(NSDictionary *)userInfo fetchCompletionHandler:(void (^)(UIBackgroundFetchResult))completionHandler
静默推送是iOS7.0之后推出的,又被称为:Background Remote Notification(后台远程推送)可以不用打开APP就可以运行代码,(大多是用户毫无察觉的处理 服务器传到APP的数据,更新APP内容)
2本地推送
本地推送和远程推送一样都是通知APP做事情,远程推送是需要联网的,只有联网才能和苹果服务器APNs建立长链接、接受APNs的消息,本地推送是不需要联网的,APP内部实现推送功能,本地推送的目标是安装了APP的设备,受APP在该设备的通知是否开启影响。最常用的就是闹钟APP
注意:iOS8 - iOS10的本地推送:当应用处于前台是不会有横幅或者弹框,用户无感知,可以在didReceiveLocalNotification 回调中处理弹框使用户感知,让应用处于后台才会有横幅和弹框铃声等,
推送的注册和回调,64条是苹果官方设置的上限。
-(void)registerAPNs:(UIApplication *)application
{
//    iOS8~iOS10 与 iOS10之后的系统本地推送是不同的
    if (@available(iOS 10.0, *)) {
        UNUserNotificationCenter *unCenter = [UNUserNotificationCenter currentNotificationCenter];
        unCenter.delegate = self;
        [unCenter requestAuthorizationWithOptions:(UNAuthorizationOptionAlert | UNAuthorizationOptionBadge | UNAuthorizationOptionSound) completionHandler:^(BOOL granted, NSError * _Nullable error) {
            if (!error) {
                NSLog(@"注册成功");

                dispatch_async(dispatch_get_main_queue(), ^{
                    [[UIApplication sharedApplication] registerForRemoteNotifications];
                });
            }
        }];
        [unCenter getNotificationSettingsWithCompletionHandler:^(UNNotificationSettings * _Nonnull settings) {
            NSLog(@"regist success settting is  =====+%@",settings);
        }];
    } else {
        if ([application respondsToSelector:@selector(registerUserNotificationSettings:)]) {
            UIUserNotificationSettings *setttings = [UIUserNotificationSettings settingsForTypes:(UIUserNotificationTypeSound | UIUserNotificationTypeAlert | UIUserNotificationTypeBadge) categories:nil];
            [application registerUserNotificationSettings:setttings];
            [application registerForRemoteNotifications];
        }
    }

}

#pragma mark -- ios10 推送代理
//不实现通知不会有提示
- (void)userNotificationCenter:(UNUserNotificationCenter *)center willPresentNotification:(UNNotification *)notification withCompletionHandler:(void (^)(UNNotificationPresentationOptions))completionHandler
API_AVAILABLE(ios(10.0)) API_AVAILABLE(ios(10.0)) API_AVAILABLE(ios(10.0)){

    completionHandler(UNNotificationPresentationOptionBadge | UNNotificationPresentationOptionSound | UNNotificationPresentationOptionAlert);
}

//对通知响应
-(void)userNotificationCenter:(UNUserNotificationCenter *)center didReceiveNotificationResponse:(UNNotificationResponse *)response withCompletionHandler:(void (^)(void))completionHandler
API_AVAILABLE(ios(10.0)) API_AVAILABLE(ios(10.0)){
    if ([response.notification.request.content.categoryIdentifier isEqualToString:@"request1"]) {
        [self handleResponse:response];
    }
    completionHandler();
}
//点击通知 进入APP的回调对通知响应
-(void)userNotificationCenter:(UNUserNotificationCenter *)center didReceiveNotificationResponse:(UNNotificationResponse *)response withCompletionHandler:(void (^)(void))completionHandler
API_AVAILABLE(ios(10.0)) API_AVAILABLE(ios(10.0)){
    NSString *categoryIdentifier = response.notification.request.content.categoryIdentifier;
    if ([categoryIdentifier isEqualToString:@"categoryIdentifier"]) {
        [self handleResponse:response];


    }
    completionHandler();
}

#pragma mark ---------------处理点击通知进入APP后的事件
-(void)handleResponse:(UNNotificationResponse *)response
API_AVAILABLE(ios(10.0)){
    [UIApplication sharedApplication].applicationIconBadgeNumber = 0;
    if ([response.actionIdentifier isEqualToString:@"commitActionTitle"])
    {
        NSLog(@"commit Action =====");
    }else if ([response.actionIdentifier isEqualToString:@"textAction1"]){
        UNTextInputNotificationResponse *textResponse = (UNTextInputNotificationResponse *)response;
        NSString *userText = textResponse.userText;
        NSLog(@"input text is ======%@",userText);
    }else if ([response.actionIdentifier isEqualToString:@"cancelActionTitle"]){
        NSLog(@"cancel Action -------");
    }

    NSLog(@"%@",@"处理通知");
}
设置推送内容
fireDate、timeZone、repeatInterval和repeatCalendar的含义
1 fireDate是UILocalNotification的激发的确切时间。
2 timeZone是UILocalNotification激发时间所根据的时区,如果设置为nil的话,那么UILocalNotification将在一段时候后被激发,而不是某一个确切时间被激发。
3 repeatInterval是UILocalNotification被重复激发之间的时间差,不过时间差是完全根据日历单位(NSCalendarUnit)的,例如每周激发的单位,NSWeekCalendarUnit,如果不设置的话,将不会重复激发。
4 repeatCalendar是UILocalNotification重复激发所使用的日历单位需要参考的日历,如果不设置的话,系统默认的日历将被作为参考日历。
5添加category按钮,和用户点击推送内容进行交互
UNTextInputNotificationAction:用户输入text,可以在didReceiveNotificationResponse回调中获取text内容
UNNotificationAction:根据需求自定义推送点击按钮
-(void)setLocalNotification
{
//   只创建一个通知,重复一次创建一次太恐怖了
    NSArray *notificatinArr = [[UIApplication sharedApplication] scheduledLocalNotifications];
    if (notificatinArr.count) {
        return;
    }
    NSString *title = @"通知-title";
    NSString *subTitle = @"通知-subTitle";
    NSString *body = @"通知-body";
    NSInteger badge = 1;
    NSInteger timeIntevel = 60;
    NSDictionary *userInfo = @{@"id":@"LOCAL_NOTIFY_SCHEDULE_ID"};
    if (@available(iOS 10.0, *)) {
        UNUserNotificationCenter *NotifCenter = [UNUserNotificationCenter currentNotificationCenter];
        UNMutableNotificationContent *notificationContent = [[UNMutableNotificationContent alloc] init];
        notificationContent.sound = [UNNotificationSound defaultSound];
        notificationContent.title = title;
        notificationContent.subtitle = subTitle;
        notificationContent.body = body;
        notificationContent.badge = @(badge);
        notificationContent.userInfo = userInfo;

        NSError *error = nil;
        NSString *path = [[NSBundle mainBundle] pathForResource:@"jjy2" ofType:@"jpg"];

//        设置通知附件内容
        UNNotificationAttachment *att = [UNNotificationAttachment attachmentWithIdentifier:@"att1" URL:[NSURL fileURLWithPath:path] options:nil error:&error];
        notificationContent.attachments = @[att];
        notificationContent.launchImageName = @"jjy2.png";
//        设置声音
        UNNotificationSound *sound = [UNNotificationSound soundNamed:@"sound02.wav"]; //要有后缀
        notificationContent.sound = sound;

//        标识符   推送用户的交互 左拉,点击管理按钮 会出现category 按钮
        notificationContent.categoryIdentifier = @"categoryIdentifier";

        UNTextInputNotificationAction *textAction = [UNTextInputNotificationAction actionWithIdentifier:@"textAction1" title:@"textActionTitle1" options:UNNotificationActionOptionForeground textInputButtonTitle:@"textInpuButtonTitle1" textInputPlaceholder:@"textInputPlaceholder1"];
        UNNotificationAction *commitAction = [UNNotificationAction actionWithIdentifier:@"commitAction" title:@"commitActionTitle" options:UNNotificationActionOptionForeground];
        UNNotificationAction *cancelAction = [UNNotificationAction actionWithIdentifier:@"cancelAction" title:@"cancelActionTitle" options:UNNotificationActionOptionForeground];
        UNNotificationCategory *notifCategory = [UNNotificationCategory categoryWithIdentifier:@"categoryIdentifier" actions:@[textAction,commitAction,cancelAction] intentIdentifiers:@[] options:UNNotificationCategoryOptionNone];
        NSSet *categorySet = [[NSSet alloc] initWithObjects:notifCategory, nil];
        [NotifCenter setNotificationCategories:categorySet];


//        设置触发模式
        UNTimeIntervalNotificationTrigger *timeIntervalTrigger = [UNTimeIntervalNotificationTrigger triggerWithTimeInterval:timeIntevel repeats:YES];
//        设置UNNotificationRequest
        UNNotificationRequest *request = [UNNotificationRequest requestWithIdentifier:@"request1" content:notificationContent trigger:timeIntervalTrigger];
//        把通知加到UNUserNotificationCenter 到指定触发点会被触发
        [NotifCenter addNotificationRequest:request withCompletionHandler:^(NSError * _Nullable error) {
            if (!error) {
                NSLog(@"addNotificationRequest success :error is  %@",error);
            }
            else{
                NSLog(@"addNotificationRequest failed");
            }
        }];
        if (error) {
            NSLog(@"attachment error %@",error);
        }
    } else {
//        iOS10之前的系统 APP处于后台才会有提示,但是会收到推送
        UILocalNotification *localNotification = [[UILocalNotification alloc] init];
        localNotification.alertTitle = [self setLowVersionLocalNotification:title];
        localNotification.alertBody = [self setLowVersionLocalNotification:body];
        localNotification.alertLaunchImage = [[NSBundle mainBundle] pathForResource:@"jjy2" ofType:@"jpg"];
//        锁屏状态下显示的文字
         localNotification.alertAction = @"锁屏状态下";
        localNotification.timeZone = [NSTimeZone defaultTimeZone];
        localNotification.fireDate = [NSDate dateWithTimeIntervalSinceNow:1];
        localNotification.repeatInterval = NSCalendarUnitMinute;

        localNotification.soundName = @"sound01.wav";//UILocalNotificationDefaultSoundName;
        localNotification.userInfo = @{@"keyInfo":@"valueInfo",
                                       @"id"     :@"LOCAL_NOTIFY_SCHEDULE_ID"};
        localNotification.applicationIconBadgeNumber = 1;

        [[UIApplication sharedApplication] scheduleLocalNotification:localNotification];
    }
}
取消推送
//不重复推送:推送一次后就会自动取消推送,重复推送的话需要手动取消,不然即使卸载应用也会残留,下次重装也会继续推送
-(void)cancelLocalNotifications
{

    NSArray *notificationArr = [[UIApplication sharedApplication] scheduledLocalNotifications];
    if (!notificationArr || notificationArr.count <= 0) {
        return;
    }
    for (UILocalNotification *localNotify in notificationArr) {
        if ([[localNotify.userInfo valueForKey:@"id"] isEqualToString:@"LOCAL_NOTIFY_SCHEDULE_ID"]) {
            if (@available(iOS 10.0, *)) {
                [[UNUserNotificationCenter currentNotificationCenter] removePendingNotificationRequestsWithIdentifiers:@[@"request1"]];
            } else {
                [[UIApplication sharedApplication] cancelLocalNotification:localNotify];
            }
        }
    }
}
3远程推送
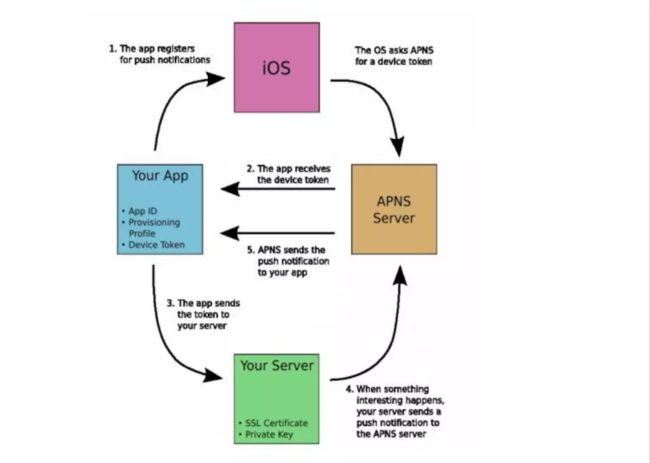
1 远程推送原理:
客户端注册远程推送发送Token key ,APNs服务器根据Token key 下发给客户端deviceToken; 客户端把DeviceToken发送给自己的服务器,自己的服务器发送推送消息给APNs服务器,APNs服务器将消息发给DeviceToken对应设备上的客户端,如下图所示
2 deviceToken介绍
deviceToken其实就是根据注册远程通知的时候向APNs服务器发送的token key(Token key 包括设备的UDID和APP的bundle id),APNs服务器 根据token key 生产一个deviceToken,deviceToken包含了用户的设备信息和App信息,根据deviceToken可以找到对应设备的对应App,从而把消息推送给该应用
deviceToken唯一性:同一个设备和bundle id ,deviceToken是一样的,deviceToken 对应为一个设备的应用,但是当用户升级系统是,deviceToken 会有变化
3 指定用户推送
根据userToken 可以推送指定的用户,同一个APP的同一个推送,有些用户可以收到有些用户不能收到,userToken一般都是根据自己公司自定义的规则去生成的,例如:用户的APP账号和密码,结合上面的deviceToken,deviceToken找到对用设备的对应APP,userToken找到APP的对应用户。上传deviceToken要上传userToken给APNs服务器
4 客户端和服务器的交互
每一条通知的消息都会组成一个json字典对象,其格式如下,示例中的key是官方的key,自定义的key 不要与之重复
{
     "aps" : {
        "alert"              :              {   // string or dictionary
          "title"          :   "string"
            "body"           :   "string",
            "title-loc-key"  :   "string or null"
            "title-loc-args" :   "array of strings or null"
            "action-loc-key" :   "string or null"
            "loc-key"        :   "string"
            "loc-args"       :   "array of strings"
            "launch-image"   :   "string"
        },
        "badge"             :    number,
        "sound"             :    "string"
        "content-available" :    number;
        "category"          :    "string"
     },
}
aps:推送消息必须有的key
alert:推送消息包含此key值,系统根据设备显示弹框
badge:在APP图标右上角显示的消息数目,缺少此key,消息数目不会改变,消除标记时把此key对应的value设置为0
sound:设置推送声音的key值,value 为default时会用系统默认的提示音
content-available:此key设置为1时,在收到消息之前会进入extent server 的回调方法,修改显示的值
category:UNNotificationCategory的identifier, 用户可操作的类型的key值
title:推送消息的标题:iOS8.2之后
body:推送内容
title-loc-key:功能类似title,附加功能是国际化,iOS8.2之后
title-loc-args:配合title-loc-key字段使用,iOS8.2之后
action-loc-key:可操作通知类型的key
loc-key:参考title-loc-key
loc-args:参考title-loc-args
launch-image:点击推送消息或者移动时间滑块时显示的图片,如果缺少此key值,会加载App默认的启动图片
自定义ke值
{
    "aps" : {
        "alert" : "Provider push messag.",
        "badge" : 9,
        "sound" : "toAlice.aiff"
    },
    "Id"   : 1314,               //  自定义key值
    "type" : "customType"        //  自定义key值
}
1模拟器不能接受推送,没有deviceToken,必须真机
二、mobpush推送介绍(划重点:不限次数,全部免费)
1、pods导入
pod 'mob_pushsdk'
2、 配置AppKey和AppSecret
在项目的Info.plist中添加2个字段:MOBAppKey和MOBAppSecret,对应的值是在mob.com官方申请的应用的AppKey和AppSecret。申请appkey流程

3、xcode开启推送服务

4、代码调用
在- (BOOL)application:(UIApplication *)application didFinishLaunchingWithOptions:(NSDictionary *)launchOptions中进行推送配置即可。
#import
// 设置推送环境
#ifdef DEBUG
    [MobPush setAPNsForProduction:NO];
#else
    [MobPush setAPNsForProduction:YES];
#endif

//MobPush推送设置(获得角标、声音、弹框提醒权限)
MPushNotificationConfiguration *configuration = [[MPushNotificationConfiguration alloc] init];
configuration.types = MPushAuthorizationOptionsBadge | MPushAuthorizationOptionsSound | MPushAuthorizationOptionsAlert;
[MobPush setupNotification:configuration];

// 回调监听
[[NSNotificationCenter defaultCenter] addObserver:self selector:@selector(didReceiveMessage:) name:MobPushDidReceiveMessageNotification object:nil];
// 收到通知回调
- (void)didReceiveMessage:(NSNotification *)notification
{
    MPushMessage *message = notification.object;

    switch (message.messageType)
    {
        case MPushMessageTypeCustom:
        {// 自定义消息

       }
            break;
        case MPushMessageTypeAPNs:
        {// APNs 回调

            if ([UIApplication sharedApplication].applicationState == UIApplicationStateActive)
            { // 前台

           }
            else
            { // 后台

           }
        }
            break;
        case MPushMessageTypeLocal:
        { // 本地通知回调
            NSString *body = message.notification.body;
            NSString *title = message.notification.title;
            NSString *subtitle = message.notification.subTitle;
            NSInteger badge = message.notification.badge;
            NSString *sound = message.notification.sound;

            NSLog(@"收到本地通知:{\nbody:%@,\ntitle:%@,\nsubtitle:%@,\nbadge:%ld,\nsound:%@,\n}",body, title, subtitle, badge, sound);
        }
            break;
        case MPushMessageTypeClicked:
        {
            NSLog(@"click the message!!!!!!!!!!!!");
        }
            break;
        default:
            break;
    }
}
集成以上接口就可以完成 基本mobpush推送,
其他功能接口如下,文档见:mobpushAPI文档
mobpushDemo见:点我得demo
三、极光 推送介绍
1Cocoapods 导入
 pod 'JCore' // 可选项,也可由pod 'JPush'自动获取
 pod 'JPush' // 必选项
注意事项
App在提交苹果审核时,对“此App是否使用广告标识符(IDFA)?”,需要选择“是”,并且需要根据App使用广告情况,勾选以下选项,如下图所示

如果使用无IDFA版本
JPush 3.2.2、3.2.4两个版本,如果使用 JCore 2.1.4 及以上版本,使用方式如下(以 JPush 3.2.4 版本为例):
    pod 'JCore', '2.1.4-noidfa' // 必选项
    pod 'JPush', '3.2.4-noidfa' // 必选项
JPush 3.2.2、3.2.4两个版本,如果使用 JCore 2.1.2 及以下版本,使用方式如下(以 JPush 3.2.4 版本为例):
    pod 'JCore', '2.1.2'    // 必选项
    pod 'JPush', '3.2.4-noidfa' // 必选项
JPush 3.2.6及以上版本,如果使用 JCore 2.1.4 及以上版本,使用方式如下(以 JPush 3.2.6 版本为例):
pod 'JCore', '2.1.4-noidfa' // 必选项
pod 'JPush', '3.2.6'    // 必选项
JPush 3.2.6及以上版本,如果使用 JCore 2.1.2 及以下版本,使用方式如下(以 JPush 3.2.6 版本为例):
pod 'JCore', '2.1.2'    // 必选项
pod 'JPush', '3.2.6'    // 必选项
2、 AppDelegate.m 文件添加头文件
// 引入 JPush 功能所需头文件
#import "JPUSHService.h"
// iOS10 注册 APNs 所需头文件
#ifdef NSFoundationVersionNumber_iOS_9_x_Max
#import
#endif
// 如果需要使用 idfa 功能所需要引入的头文件(可选)
#import
请将以下代码添加到 -(BOOL)application:(UIApplication *)application didFinishLaunchingWithOptions:(NSDictionary *)launchOptions
  //Required
  //notice: 3.0.0 及以后版本注册可以这样写,也可以继续用之前的注册方式
  JPUSHRegisterEntity * entity = [[JPUSHRegisterEntity alloc] init];
  entity.types = JPAuthorizationOptionAlert|JPAuthorizationOptionBadge|JPAuthorizationOptionSound|JPAuthorizationOptionProvidesAppNotificationSettings;
  if ([[UIDevice currentDevice].systemVersion floatValue] >= 8.0) {
    // 可以添加自定义 categories
    // NSSet *categories for iOS10 or later
    // NSSet *categories for iOS8 and iOS9
  }
  [JPUSHService registerForRemoteNotificationConfig:entity delegate:self];

// Optional
  // 获取 IDFA
  // 如需使用 IDFA 功能请添加此代码并在初始化方法的 advertisingIdentifier 参数中填写对应值
  NSString *advertisingId = [[[ASIdentifierManager sharedManager] advertisingIdentifier] UUIDString];

  // Required
  // init Push
  // notice: 2.1.5 版本的 SDK 新增的注册方法,改成可上报 IDFA,如果没有使用 IDFA 直接传 nil
  [JPUSHService setupWithOption:launchOptions appKey:appKey
                        channel:channel
               apsForProduction:isProduction
          advertisingIdentifier:advertisingId];
请在 AppDelegate.m 实现该回调方法并添加回调方法中的代码
- (void)application:(UIApplication *)application
didRegisterForRemoteNotificationsWithDeviceToken:(NSData *)deviceToken {

  /// Required - 注册 DeviceToken
  [JPUSHService registerDeviceToken:deviceToken];
}
请在 AppDelegate.m 实现该回调方法并添加回调方法中的代码
#pragma mark- JPUSHRegisterDelegate

// iOS 12 Support
- (void)jpushNotificationCenter:(UNUserNotificationCenter *)center openSettingsForNotification:(UNNotification *)notification{
  if (notification && [notification.request.trigger isKindOfClass:[UNPushNotificationTrigger class]]) {
    //从通知界面直接进入应用
  }else{
    //从通知设置界面进入应用
  }
}

// iOS 10 Support
- (void)jpushNotificationCenter:(UNUserNotificationCenter *)center willPresentNotification:(UNNotification *)notification withCompletionHandler:(void (^)(NSInteger))completionHandler {
  // Required
  NSDictionary * userInfo = notification.request.content.userInfo;
  if([notification.request.trigger isKindOfClass:[UNPushNotificationTrigger class]]) {
    [JPUSHService handleRemoteNotification:userInfo];
  }
  completionHandler(UNNotificationPresentationOptionAlert); // 需要执行这个方法,选择是否提醒用户,有 Badge、Sound、Alert 三种类型可以选择设置
}

// iOS 10 Support
- (void)jpushNotificationCenter:(UNUserNotificationCenter *)center didReceiveNotificationResponse:(UNNotificationResponse *)response withCompletionHandler:(void (^)())completionHandler {
  // Required
  NSDictionary * userInfo = response.notification.request.content.userInfo;
  if([response.notification.request.trigger isKindOfClass:[UNPushNotificationTrigger class]]) {
    [JPUSHService handleRemoteNotification:userInfo];
  }
  completionHandler();  // 系统要求执行这个方法
}

- (void)application:(UIApplication *)application didReceiveRemoteNotification:(NSDictionary *)userInfo fetchCompletionHandler:(void (^)(UIBackgroundFetchResult))completionHandler {

  // Required, iOS 7 Support
  [JPUSHService handleRemoteNotification:userInfo];
  completionHandler(UIBackgroundFetchResultNewData);
}

- (void)application:(UIApplication *)application didReceiveRemoteNotification:(NSDictionary *)userInfo {

  // Required, For systems with less than or equal to iOS 6
  [JPUSHService handleRemoteNotification:userInfo];
}
关于 IDFA
r2.1.5 版本增加一个上传IDFA字符串的接口
 + (void)setupWithOption:(NSDictionary *)launchingOption
                  appKey:(NSString *)appKey
                 channel:(NSString *)channel
        apsForProduction:(BOOL)isProduction
   advertisingIdentifier:(NSString *)advertisingId;
如果不使用 IDFA,仍可使用接口
+ (void)setupWithOption:(NSDictionary *)launchingOption
                  appKey:(NSString *)appKey
                 channel:(NSString *)channel
        apsForProduction:(BOOL)isProduction;
demo下载:点我跳极光demo下载界面
四、个推介绍
1、CocoaPods 导入
如果使用标准版本:
target 'GtSdkDemo-objc' do
    platform :ios, "8.0"
    pod 'GTSDK'
end
target 'NotificationService' do
    platform :ios, "10.0"
    pod 'GTExtensionSDK'
end
如果使用无 IFDA 版本:
target 'GtSdkDemo-objc' do
    platform :ios, "8.0"
    pod 'GTSDK', '2.4.1.0-noidfa'
end

target 'NotificationService' do
    platform :ios, "10.0"
    pod 'GTExtensionSDK'
end
DFA版SDK注意事项说明
在 App 内无广告情况下还是建议开发者使用获取 IDFA 版本,可参考下图中所说的方式提交 AppStore 审核。当然,如果开发者不想使用 IDFA 或者担忧采集 IDFA 而未集成任何广告服务遭到 Apple 拒绝,我们也准备了该无 IDFA 版本供开发者集成。
注意事项:
(1)、在 App 内投放广告,获取 IDFA 可通过苹果审核。
(2)、App 内无广告,但由于先前投放的特定广告,可参考如下勾选,通过苹果审核
需勾选如图:

2、集成代码
为AppDelegate增加回调接口类。在iOS 10以前的设备,回调事件通过GeTuiSdkDelegate来进行,在 iOS 10以后,可以使用UserNotifications框架来实现。示例代码如下:
// AppDelegate.h

#import
#import      // GetuiSdk头文件应用

// iOS10 及以上需导入 UserNotifications.framework
#if __IPHONE_OS_VERSION_MAX_ALLOWED >= __IPHONE_10_0
#import
#endif

/// 使用个推回调时,需要添加"GeTuiSdkDelegate"
/// iOS 10 及以上环境,需要添加 UNUserNotificationCenterDelegate 协议,才能使用 UserNotifications.framework 的回调
@interface AppDelegate : UIResponder
在[AppDelegate didFinishLaunchingWithOptions]方法中调用个推sdk初始化方法,传入个推平台分配的 AppID、AppKey、AppSecret。同时,调用APNs注册方法,尝试获取APNs DeviceToken。示例代码如下:
/// 个推开发者网站中申请App时,注册的AppId、AppKey、AppSecret
#define kGtAppId           @"iMahVVxurw6BNr7XSn9EF2"
#define kGtAppKey          @"yIPfqwq6OMAPp6dkqgLpG5"
#define kGtAppSecret       @"G0aBqAD6t79JfzTB6Z5lo5"

- (BOOL)application:(UIApplication *)application didFinishLaunchingWithOptions:(NSDictionary *)launchOptions {
    // 通过个推平台分配的appId、 appKey 、appSecret 启动SDK,注:该方法需要在主线程中调用
    [GeTuiSdk startSdkWithAppId:kGtAppId appKey:kGtAppKey appSecret:kGtAppSecret delegate:self];
    // 注册 APNs
    [self registerRemoteNotification];
    return YES;
}
注册APNs获取DeviceToken的流程,根据项目设置的不同以及手机系统版本的不同,注册代码会有所区别,可以参考如下方式进行适配:
/** 注册 APNs */
- (void)registerRemoteNotification {
    /*
     警告:Xcode8 需要手动开启"TARGETS -> Capabilities -> Push Notifications"
     */

    /*
     警告:该方法需要开发者自定义,以下代码根据 APP 支持的 iOS 系统不同,代码可以对应修改。
     以下为演示代码,注意根据实际需要修改,注意测试支持的 iOS 系统都能获取到 DeviceToken
     */
    if ([[UIDevice currentDevice].systemVersion floatValue] >= 10.0) {
#if __IPHONE_OS_VERSION_MAX_ALLOWED >= __IPHONE_10_0 // Xcode 8编译会调用
        UNUserNotificationCenter *center = [UNUserNotificationCenter currentNotificationCenter];
        center.delegate = self;
        [center requestAuthorizationWithOptions:(UNAuthorizationOptionBadge | UNAuthorizationOptionSound | UNAuthorizationOptionAlert | UNAuthorizationOptionCarPlay) completionHandler:^(BOOL granted, NSError *_Nullable error) {
            if (!error) {
                NSLog(@"request authorization succeeded!");
            }
        }];

        [[UIApplication sharedApplication] registerForRemoteNotifications];
#else // Xcode 7编译会调用
        UIUserNotificationType types = (UIUserNotificationTypeAlert | UIUserNotificationTypeSound | UIUserNotificationTypeBadge);
        UIUserNotificationSettings *settings = [UIUserNotificationSettings settingsForTypes:types categories:nil];
        [[UIApplication sharedApplication] registerForRemoteNotifications];
        [[UIApplication sharedApplication] registerUserNotificationSettings:settings];
#endif
    } else if ([[[UIDevice currentDevice] systemVersion] floatValue] >= 8.0) {
        UIUserNotificationType types = (UIUserNotificationTypeAlert | UIUserNotificationTypeSound | UIUserNotificationTypeBadge);
        UIUserNotificationSettings *settings = [UIUserNotificationSettings settingsForTypes:types categories:nil];
        [[UIApplication sharedApplication] registerForRemoteNotifications];
        [[UIApplication sharedApplication] registerUserNotificationSettings:settings];
    } else {
        UIRemoteNotificationType apn_type = (UIRemoteNotificationType)(UIRemoteNotificationTypeAlert |
                                                                       UIRemoteNotificationTypeSound |
                                                                       UIRemoteNotificationTypeBadge);
        [[UIApplication sharedApplication] registerForRemoteNotificationTypes:apn_type];
    }
}
为了免除开发者维护DeviceToken的麻烦,个推SDK可以帮开发者管理好这些繁琐的事务。应用开发者只需调用个推SDK的接口汇报最新的DeviceToken,即可通过个推平台推送 APNs 消息。示例代码如下:
/** 远程通知注册成功委托 */
- (void)application:(UIApplication *)application didRegisterForRemoteNotificationsWithDeviceToken:(NSData *)deviceToken {
    // [3]:向个推服务器注册deviceToken 为了方便开发者,建议使用新方法
    [GeTuiSdk registerDeviceTokenData:deviceToken];
}
五、总结
1、接口集成:MobPush对于回调的封装处理更加简洁,集成更加方便
2、安全:极光和个推会有含有IDFA的版本,会影响App Store审核,需要另做处理,MobPush不会影响App Store审核
3、推送到达率:测试3款SDK基本都在98%以上
4、费用:MobPush是免费,不限制推送测次数、速度和频率;个推的群推定时推送、专享推送通道、厂商通道、服务端tcp链接SDK等是收费的,享受高推送速度也是收费的,极光推送:享受高推送速度是要收费的,更多push api 调用次数,游戏丰富支持、分享的SDK插件、提高api调用频率消息送达统计api,在线设备查询api等 是需要收费的
5、技术支持:三家的技术支持都会帮忙问题,MobPush是24小时提供技术支持,回复和处理问题较为积极,给MobPush的技术支持点个赞
参考链接:
https://www.jianshu.com/p/48c3d6ecab8a
https://cloud.tencent.com/developer/article/1336415
http://www.cocoachina.com/ios/20161017/17769.html
https://www.jianshu.com/p/78ef7bc04655
https://www.jianshu.com/p/174b55d5e313
远程推送:https://blog.csdn.net/leiyutinghua/article/details/79122803