只写自己目前的笔记
React
要构建React环境使用Facebook官方脚手架 create-react-app
npm i -g create-react-app
state
React存储数据的地方,当此属性发生改变会触发生命周期更新视图
props
跟state差不多,通过标签属性传入数据
组件的两种创建方式
函数式组件
// 组件首字母大写
function Component(props){
// 可以有一个props参数代表可以通过标签传递属性
// 返回的是jsx语法格式的React元素
return (Hello React
)
}
对象式组件的创建
class Component extends React.component{
render(){
// 生命周期render方法用于渲染组件
// 返回的是jsx语法格式的React元素
return (Hello React
)
}
}
两种创建组件的方式各有千秋,函数式组件创建的方式非常简单,功能有很简单适合一些轻量的静态的页面元素,对象类创建组件的方式可以实现多种可能 ,很复杂非常适合制作与用户进行交互或者需要操作大量数据的动态元素
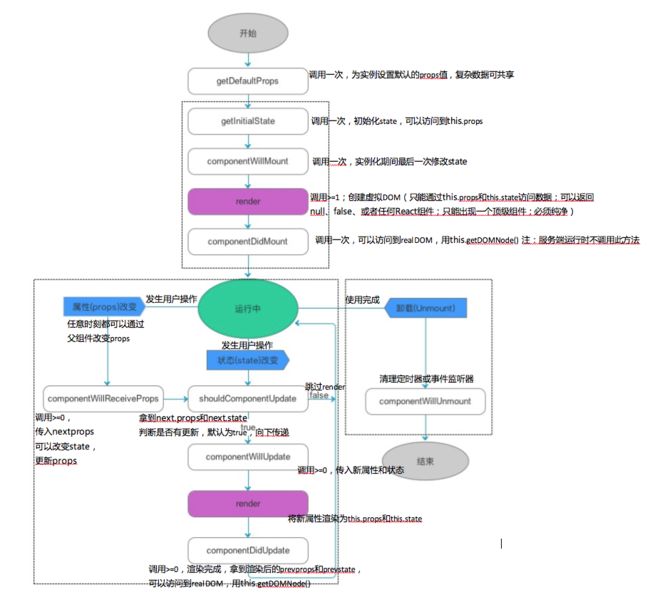
组件生命周期
Redux
A predictable state container for JavaScript apps.
Redux是一个可预测的JavaScript App状态管理容器
是用来存储和操作state的
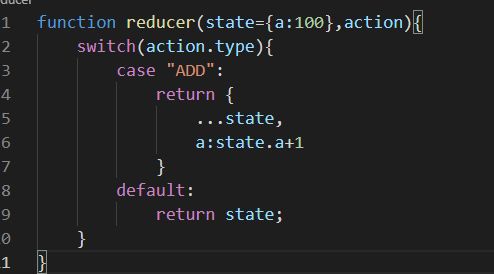
因为所有对于state的可能操作都会一一罗列在reducer中,所以对于所有的操作都是可预测的(除了罗列中的可能的操作,不会在对数据进行其他的操作)
这就是一个reducer中间通过对action的type值不同对数据进行不同的操作,如图除了可以对a值+1之外,不会再出现对a值其他的操作
reducer是一个纯函数,每一次修改的数据都是以返回一个新的对象的形式实现
想要触发reducer修改数据需要使用store的dispatch函数
通过reducer创建store
然后创建一个render函数,当数据发生改变时调用 (使用subscribe注册render函数)
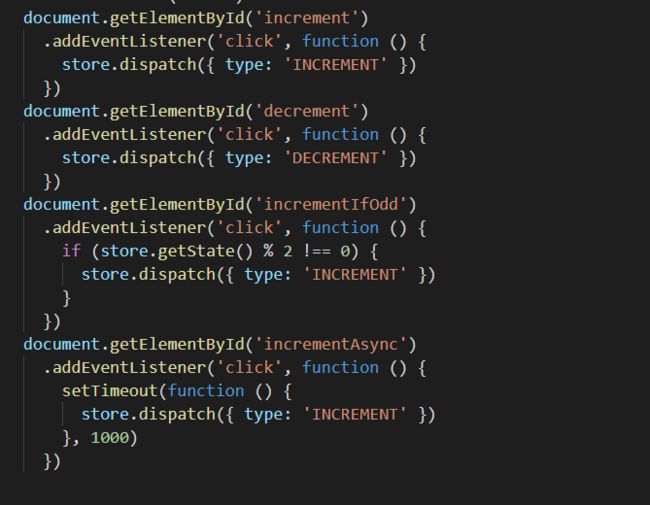
最后根据不同的按钮绑定点击事件分配不同的action
dispatch函数的参数就是一个action对象,type属性是必须的,可以传递其他的数据给action,比如我这里写一个 a:100
我就可以在reducer中使用action.a接收此值,但是需要注意的是不同的type可能传递的数据不相同,所以需要在对应的type属性下获取对应的数据 (称之为payload)
安装Reduxnpm i redux
关于redux的简单学习到此结束
接下来是redux和react的结合,首先需要使用一个react-redux的包用于连接react和redux npm i react-redux
因为之前辛苦写的文章无缘无故的被锁定了 (没告诉锁定的原因) 所以只能一切从简了
这里贴一些核心的代码
import React from 'react'
import ReactDOM from 'react-dom'
import App from './App'
import {createStore,applyMiddleware} from "redux"
import {Provider} from "react-redux"
import reducer from "./reducers/index"
import thunk from 'redux-thunk'

const store = createStore(reducer,applyMiddleware(thunk))

ReactDOM.render(


,
document.getElementById('root'))
在index.js文件中引入createStore函数还有来自react-redux的Provider组件,我们通过引入外部的reducer(通过es6 export导出reducer函数)进行创建store,然后使用Provider组件包裹主组件App提供store属性,对于store的初始化就到此结束了
App.js
import React from 'react';
import { connect } from "react-redux";
// 拆分actions
import { bindActionCreators } from "redux";
import * as counterActions from "./actions/counterActions"
import * as studentActions from "./actions/studentActions"
class App extends React.Component {
render() {
return (
{this.props.v}
{this.props.m}
{this.props.counterActions.add(1)}} />
学生管理系统
this.idInput=idInput} />
this.nameInput=nameInput}/>
{this.props.studentActions.ADDstudent(this.idInput.value,this.nameInput.value)}}/>
{
this.props.studentsList.map((item,index)=>{
return (- {item.id}{item.name}
)
})
}
)
}
}
export default connect(
(state)=>{
const {v,m} = state.counterReducers;
const {studentsList} = state.studentReducers
return {
v,m,studentsList
}
}
,
(dispatch) => {
return {
counterActions: bindActionCreators(counterActions, dispatch),
studentActions: bindActionCreators(studentActions, dispatch)
}
}
)(App);
connect函数用于连接redux store和react 组件 props之间关系的桥梁,此函数一共有两个参数都是函数,第一个函数提供一个state(reducer数据)返回的值将绑定到组件props上,并且会订阅state的更新,每一次state更新都会执行此函数绑定对应组件的props然后通过组件props的更新触发组件的生命周期更新virtual DOM更新页面,第二个函数提供一个dispatch参数,对于所有可能的对store的操作都必须在此函数中提供同样的返回的值绑定到组件的props上,因为提供有dispatch所以才能更新store (更新store的唯一方式就是dispatch一个action)
关于connect函数介绍到此,最后就是拆分了,拆分这里不是很想多写,就是一个SPA APP只有一个store当我们的项目越做越大越做越复杂我们就完全可以想象到这一个store这一个action会是多么的庞大了,非常不便于我们的阅读和维护,所以我们需要对reducers和action进行拆分,将不同组件使用的reducer和action拆分出来这样就会在后期便于我们维护并且对于项目数据流动一目了然,不想多写了(可以去看看其他的文章)
Redux-thunk
最后我们可以想象得到,我们的项目实际上肯定不会是使用本地的模拟的假数据的,肯定是通过发送请求向服务器fetch数据下来的,这个时候就会出现异步的问题,因为我们的项目已经被拆分了无法获取到dispatch就无法准确的在数据请求下来的时候发送action,所以无法进行渲染界面,这个时候就需要redux-thunk这个库了
npm i redux-thunk
安装完成此包后,我们首先引入
import React from 'react'
import ReactDOM from 'react-dom'
import App from './App'
// 同时在redux包中多引入一个applyMiddleware函数
import {createStore,applyMiddleware} from "redux"
import {Provider} from "react-redux"
import reducer from "./reducers/index"
// 引入redux-thunk
import thunk from 'redux-thunk'
// 创建store时注册thunk,完成
const store = createStore(reducer,applyMiddleware(thunk))

ReactDOM.render(


,
document.getElementById('root'))
然后我们就可以在action中执行异步操作了
// 一个函数返回一个函数,返回的函数提供一个dispatch函数,并且可以使返回的函数成为异步函数
export const addAPINumber = () => async dispatch => {
    // 可以同步的执行异步操作
    let dataPromise = await fetch("/counterNumber");

    if(dataPromise.ok){
        dataPromise.text().then(num=>{
            // 因为这里明确提供了dispatch,所以我们完全不用担心异步的问题,因为数据多久回来我多久dispatch,如果没有thunk包就无法实现异步
            dispatch({type:"ADD",num:Number.parseInt(num)})
        })
    }
}
Redux-saga
Redux-saga也是一个redux解决异步问题的一个包,redux-thunk有一个很大的问题就是每一个action所对应的所有异步操作都必须在一个函数中完成,我们完全可以想象得到当我们的请求非常复杂时这个函数也是非常臃肿的。。。
所以这个时候我们需要使用Redux-saga了(因为dva就是封装的redux+redux-saga)所以一定要先了解redux-saga才能开始了解dvajs,Redux-saga的写法非常直观每一个文件都是一个单独的功能(好吧,我也不是很懂,会用就行吧)
我们接下来使用Redux-saga重新制作一个计数器小案例,我直接上代码了,因为实在不想在写koa了(麻烦)所以直接使用了一个延时+1的操作(定时器绝对异步),模拟异步操作了
首先给大家看看文件的整体结构
然后是我indexjs代码
import React from 'react';
import ReactDOM from 'react-dom';
import App from './Components/App';
import * as serviceWorker from './serviceWorker';
import { createStore, applyMiddleware } from "redux";
import createSagaMiddleware from "redux-saga"
import {Provider} from "react-redux"
import mainSaga from "./Sagas"

const initialState = {
    v: 1314,
    m: 520
}

function reducer(state = initialState, action) {
    switch (action.type) {
        case "ADD":
            return {
                ...state,
                v: state.v + 1
            }
        case "MINUS":
            return {
                ...state,
                v: state.v - 1
            }
        default:
            return state;
    }
}

const sagaMiddleware = createSagaMiddleware();
const store = createStore(reducer, applyMiddleware(sagaMiddleware))
sagaMiddleware.run(mainSaga);

ReactDOM.render(


    , document.getElementById('root'));

// If you want your app to work offline and load faster, you can change
// unregister() to register() below. Note this comes with some pitfalls.
// Learn more about service workers: https://bit.ly/CRA-PWA
serviceWorker.unregister();
App.js代码
import React from 'react';
import {connect} from "react-redux"

class App extends React.Component{
  render(){
    return (

        v: {this.props.v}
        m: {this.props.m}


    )
  }
}
export default connect(
  ({v,m})=>({v,m}),
  (dispatch)=>{
    return {
      add(){
        dispatch({type:"ADD",num:1})
      },
      minus(){
        dispatch({type:"MINUS",num:1})
      },
      // redux-saga监听以下dispatch,所以不必要写对应的reducer,结果也是由saga dispatch对应的普通函数
      add_delay(){
        // add
        dispatch({type:"ADD_DELAY"})
      },
      minus_delay(){
        // minus
        dispatch({type:"MINUS_DELAY"})
      }
    }
  }
)(App);
sagajs代码
import {put,fork,takeLatest,all, delay} from "redux-saga/effects"

function* ADD_Delay(){
    yield delay(1000)
    // 使用此函数put一个action对象
    yield put({type:"ADD"})
}

function* MINUS_Delay(){
    yield delay(1000)
    yield put({type:"MINUS"})
}

function* watchADD_Delay(){
    // 第一个参数为监听的type类型,第二个参数为执行对应的函数
    yield takeLatest("ADD_DELAY",ADD_Delay)
}

function* watchMINUS_Delay(){
    yield takeLatest("MINUS_DELAY",MINUS_Delay)
}

export default function* mainSaga (){
    yield all([
        fork(watchADD_Delay),
        fork(watchMINUS_Delay)
    ])
}
已经非常尽量的再写注释了
redux-saga的实现方式其实就是监听dispatch ,所以我们首先需要创建正常action(add)之外的异步action(add_delay),然后我们不需要为异步action创建对应的reducer,然后去saga注册对应异步action type,saga监听到dispatch的action type属性有对应的就会执行相应的函数(saga中所有函数都是生成器函数)我们就可以在对应函数写任意异步语句(delay)最后将获取到的数据通过put函数(接收一个对象,就是action)绑定到action上并put对应正常的action type然后这大致上就是saga的流程了,如果大家不是很懂,请自己敲一遍这个counter,保证会(因为你都会敲了)
react-router
首先我们使用官方脚手架工具初始化一个react项目,然后复制官方文档的一个起步代码,然后我这里使用的是HashRouter来代替BrowserRouter(懒得配置服务器)当然因为这里使用的是react脚手架搭建的实时刷新服务器,所以可以使用BrowserRouter(给你配置好了)
import React from "react";
import { BrowserRouter as Router, Route, Link } from "react-router-dom";
function App() {
return (
);
}
function Home() {
return Home
;
}
function About() {
return About
;
}
function Topic({ match }) {
return Requested Param: {match.params.id}
;
}
function Topics({ match }) {
return (
Topics
-
{/* 此标签在 topics路由时渲染,后面的参数/components可以子路由,也可以是传参,这里是传参 */}
Components
-
Props v. State
{/* 不要问这里没有被router wrap,请思考标签被渲染时的位置*/}
Please select a topic.
}
/>
);
}
function Header() {
return (
-
Home
-
About
-
Topics
);
}
export default App;
这个时候一个非常非常简单的路由就已经搭建完毕了,尽力理解一下吧
那么学习React-router我觉得最好的方法就是去啃官方的example了,所以我们接下来直接将官方的example讲解一遍,那么基本上大多数情况下的router问题就解决了
React-router example
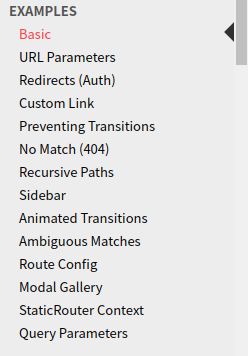
官方有这么多example,我们一个一个解构出来
(我们首先观看官方的example源码然后直接手写出来,我们要做的就是吃透每一个example那么关于react-router的学习就可以基本熟悉了,而熟悉每一个example就是需要手写出来)
每一个react组件都是每一个单词首字母大写的
URL Parameters
import React from "react"
import { BrowserRouter as Router, Route, Link } from"react-router-dom"
class App extends React.Component {
render() {
return (
-
home
-
about
-
user
-
example
)
}
}
function Home() {
return (Home
)
}
function About() {
return (About
)
}
function User() {
return (User
)
}
function Example({match}) {
return (
-
aaa
-
bbb
-
ccc
(please select id
)}>
)
}
// 解构props
function exampleApp( {match} ){
return (
id:{match.params.id}
)
}
export default App
然后后面的example就不发了,不然就是水文章了,大家可以自行观看官方example记住一定要自己手写,不然就是永远停留在理论的阶段
这里先一个一个的介绍一下react-router中常用的组件和其属性
BrowserRouter
A pushState, replaceState and the popstate event) to keep your UI in sync with the URL.
Router组件使用的是HTML5的history API来保持你的UI和URL同步
basename:string
组件下所有link组件to属性跳转的基地址,类似于
getUserConfirmation: funcunc)
导航到此Router前执行此函数,具体就是在导航Router之前可以调用此函数做一些事情
...
const getConfirmation = (message, callback) => {
  const allowTransition = window.confirm(message)
  callback(allowTransition)
}

class App extends React.Component {

  render() {
    return (
      {
        console.log(d);
      })}>
.......
forceRefresh : bool
当浏览器不支持 HTML5 的 history API 时强制刷新页面
const supportsHistory = 'pushState' in window.history
keyLength: number
设置它里面路由的 location.key 的长度。默认是6。(key的作用:点击同一个链接时,每次该路由下的 location.key都会改变,可以通过 key 的变化来刷新页面,一般默认就行了)
children: node ---> 渲染唯一子元素
Link
to:string 要跳转到的路由
to:object:要跳转到的路由,对象形式
pathname:指定要跳转到的路由地址
search:一个字符串用来表示 query parameter(get传参)
state:传递一个state到目标路由location上
hash:一个hash值将追加在URL最后面用于防止浏览器缓存问题
login
// 此组件必须为Router组件的子组件
login
)
}
replace:bool 如果为true用于替换当前的历史记录,比如说我们的路由分别依次点击了 /a /b /c 那么我们回退过来就是 /c /b /a 这符合我们的预期,但是如果我在/c上面加上replace之后回退就会变成 /c /a它替换了前面的一个历史记录(历史记录不会增加)
innerRef: function 用来访问当前组件实例
 (console.log(node))}>home
//输出    home
innerRef:object 用来获取当前组件实例
about


let Test = React.createRef();


  componentDidMount(){
    console.log(Test);
  }
控制台输出
NavLink 一个特殊版本的Link组件
activeClassName: string
导航选中激活时候应用的样式名,默认样式名为 active
about
如果当前匹配了/about路由
(可以使用来做类似于导航栏之类的高亮效果)
activeStyle: object 如果不想使用样式名就直接写style
about
exact 精确匹配
例如你的path为 /login/231222,那么这个Route当你的url路由地址是/login时就会被匹配到,添加精确匹配就不会被匹配到
strict: bool
如果为 true,则在确定位置是否与当前 URL 匹配时,将考虑位置的路径名后面的斜杠
login
isActive:func 判断链接是否链接是否处于active状态的额外逻辑函数
Redirect 一放入页面将立即redirect
to:string 同link-to
to:object 同link-to
push:tool 如果添加此属性,重定向将会想历史记录追加一个条目而不是替换当前条目
from:string 用来指定路由的原始值,如果不是给定的字符串,那么不渲染,反之渲染,只能用于switch组件中
exact:bool 同link
strict:bool 同NavLink
sensitive: bool 大小写敏感匹配
Route
Route的作用就是用来渲染路由匹配的组件,路由渲染有三种方式,每一种方式都可以传递match,location,history对象
component
用来渲染组件
render
用来渲染函数式组件,可以防止重复渲染组件
children
和render差不多,不过可以用来动态的展示组件,差別之处在于,children会在路径不匹配的时候也调用回调从而渲染函数,而render只会在路径匹配的时候触发回调
属性
path,exact,strict,sensitive
location
传递route对象,和当前的route对象对比,如果匹配则跳转,如果不匹配则不跳转。另外,如果route包含在swicth组件中,如果route的location和switch的location匹配,那么route的location会被switch的location替代
Switch
组件内部可以是Route或者Redirect,只会渲染第一个匹配的元素
location:Switch可以传递一个location对象,路由匹配将和这个location对象进行比较
location
location对象表示当前的路由位置信息,主要包含如下属性
{
    hash: undefined,
    key: "k9r4i3",
    pathname: "/c",
    state: undefined,
    search: ""
}
match
match对象表示当前的路由地址是怎么跳转过来的,包含的属性如下
{
    isExact: true, // 表示匹配到当前路径是否是完全匹配
    params: {}, // 表示路径的动态参数值
    path: '/c', // 匹配到的原始路径
    url: '/c' // 匹配到的实际路径
}
matchPath
matchPath也是和后端相关的,主要作用就是生成一个match对象
import { matchPath } from 'react-router'
const match = matchPath('/a/123',{
    path: '/a/:id',
    exact: true,
    strict: false
})
第一个参数是pathname
第二个参数是一个对象,里面的属性和route的属性类似,用来和pathname做对比
如果匹配的话,就产生一个match对象,反之,null
withRouter
当一个非路由组件也想访问到当前路由的match,location,history对象,那么withRouter将是一个非常好的选择
import { withRouter } from 'react-router'
const MyComponent = (props) => {
    const { match, location, history } = this.props
     return (
        {props.location.pathname}
    )
}
const FirstTest = withRouter(MyComponent)
有些组件并没有直接被路由匹配就被渲染(例如 / 一般不会匹配 / 路由,直接渲染一些组件,那么这些组件因为没有经过Route渲染所以无法访问Route提供的props三个对象(match,history,location)我们可以使用withRouter函数包装组件获取这三个对象
参考文档
latest update:2019-06-14 11:46:04


