在做App开发的时候,我们往往会用到即时通讯,而其中最常用的就是单聊了。
今天就给大家分享一下最新的环信3.x单聊集成。在文章结束处有Demo地址。
首先要有一个环信账号
点击到环信官网注册按照官方文档来完成注册开发者账号和注册项目
制作并上传证书
按照文档注册证书
如果不需要实现离线推送功能,请忽略这步。一般我们都需要离线功能。
SDK导入
通过Cocoapods下载地址
不包含实时语音版本SDK(HyphenateSDK),引用时 #import
pod 'HyphenateSDK', :git => 'https://github.com/easemob/hyphenate-cocoapods.git'
包含实时语音版本SDK(HyphenateFullSDK),引用时 #import
pod 'HyphenateFullSDK', :git => 'https://github.com/easemob/hyphenate-full-cocoapods.git'
注意导入的SDK中不包含EaseUI,如果要使用EaseUI,要导入如下文件,ChatView是一个官方的单聊控制器文件夹,如果不需要可以不导入
初始化SDK和EaseUI
#import "AppDelegate.h"
#import

@interface AppDelegate ()

@end

@implementation AppDelegate

- (BOOL)application:(UIApplication *)application didFinishLaunchingWithOptions:(NSDictionary *)launchOptions
{
    //AppKey:注册的appKey(在你创建项目的时候会获得appKey)
    //apnsCertName:推送证书名(不需要加后缀)
    EMOptions *options = [EMOptions optionsWithAppkey:@"mmengyiqu#will"];
    options.apnsCertName = @"istore_dev";
    [[EMClient sharedClient] initializeSDKWithOptions:options];

    //初始化EaseUI
    [[EaseSDKHelper shareHelper] easemobApplication:application
                      didFinishLaunchingWithOptions:launchOptions
                                             appkey:@"mmengyiqu#will"
                                       apnsCertName:@"istore_dev"
                                        otherConfig:@{kSDKConfigEnableConsoleLogger:[NSNumber numberWithBool:YES]}];

    return YES;
}
// App进入后台
- (void)applicationDidEnterBackground:(UIApplication *)application
{
    [[EMClient sharedClient] applicationDidEnterBackground:application];
}

// App将要从后台返回
- (void)applicationWillEnterForeground:(UIApplication *)application
{
    [[EMClient sharedClient] applicationWillEnterForeground:application];
}
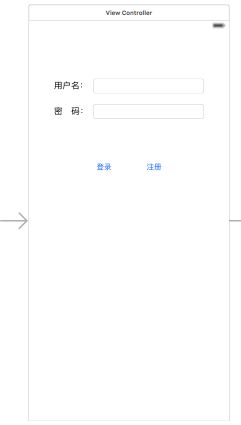
登录界面
代码如下
#import "ViewController.h"
#import

@interface ViewController ()
@property (weak, nonatomic) IBOutlet UITextField *nameTextField;//用户名
@property (weak, nonatomic) IBOutlet UITextField *passwordTextField;//密码

@end

@implementation ViewController

- (void)viewDidLoad {
    [super viewDidLoad];

}
- (IBAction)loginAction:(UIButton *)sender {

    //登录
    EMError *error = [[EMClient sharedClient] loginWithUsername:self.nameTextField.text password:self.passwordTextField.text];
    if (!error) {
        NSLog(@"登陆成功");

        //从数据库中获得数据
        [[EMClient sharedClient].chatManager loadAllConversationsFromDB];

        UINavigationController* nv=[[UIStoryboard storyboardWithName:@"Main" bundle:nil] instantiateViewControllerWithIdentifier:@"FriendListNavigationController"];
        [self presentViewController:nv animated:YES completion:^{

        }];
    }else{
        NSLog(@"登录失败");
    }
}

-(void)touchesBegan:(NSSet *)touches withEvent:(UIEvent *)event
{
    [self.view endEditing:YES];
}
- 登录时掉用这个接口,username是用户名,password是密码
EMError *error = [[EMClient sharedClient] loginWithUsername: password: ];if (!error) { NSLog(@"登陆成功");}
- 登录成功之后从数据库中获得之前的聊天记录,如果没有这句,那么每当你退出之后再进入聊天,记录就消失了
[[EMClient sharedClient].chatManager loadAllConversationsFromDB];
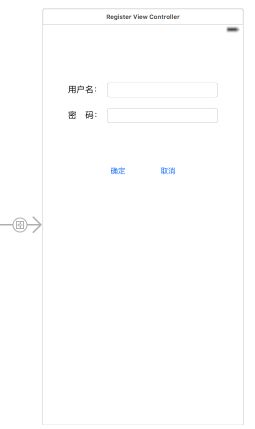
注册界面
代码如下
#import "RegisterViewController.h"
#import

@interface RegisterViewController ()
@property (weak, nonatomic) IBOutlet UITextField *nameTextField;//用户名
@property (weak, nonatomic) IBOutlet UITextField *password;//密码

@end

@implementation RegisterViewController

- (void)viewDidLoad {
    [super viewDidLoad];

}
- (IBAction)SureAction:(UIButton *)sender {

    //注册
    EMError *error = [[EMClient sharedClient] registerWithUsername:self.nameTextField.text password:self.password.text];
    if (error==nil) {
        NSLog(@"注册成功");
        [self dismissViewControllerAnimated:YES completion:^{

        }];

    }else{
        NSLog(@"注册失败");
    }
}

- (IBAction)cancelAction:(UIButton *)sender {
    [self dismissViewControllerAnimated:YES completion:^{

    }];
}

-(void)touchesBegan:(NSSet *)touches withEvent:(UIEvent *)event
{
    [self.view endEditing:YES];
}
- 注册时调用这个接口,username是用户名,password是密码
EMError *error = [[EMClient sharedClient] registerWithUsername: password: ];if (error==nil) { NSLog(@"注册成功");}
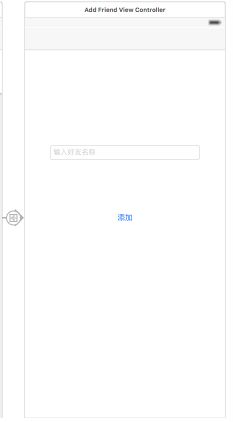
添加好友页
代码如下
#import "AddFriendViewController.h"
#import

@interface AddFriendViewController ()
@property (weak, nonatomic) IBOutlet UITextField *nameTextField;

@end

@implementation AddFriendViewController

- (void)viewDidLoad {
    [super viewDidLoad];

}

- (IBAction)addFriendAction:(UIButton *)sender {

    //发送添加好友申请
    EMError *error = [[EMClient sharedClient].contactManager addContact:self.nameTextField.text message:@"我想加您为好友"];
    if (!error) {
        NSLog(@"添加成功");

        [self.navigationController popViewControllerAnimated:YES];
    }else{
        NSLog(@"添加好友失败-------%@",error);
    }
}

-(void)touchesBegan:(NSSet *)touches withEvent:(UIEvent *)event
{
    [self.view endEditing:YES];
}
- 发送添加好友申请
EMError *error = [[EMClient sharedClient].contactManager addContact:@"6001" message:@"我想加您为好友"];
if (!error) { NSLog(@"添加成功");}
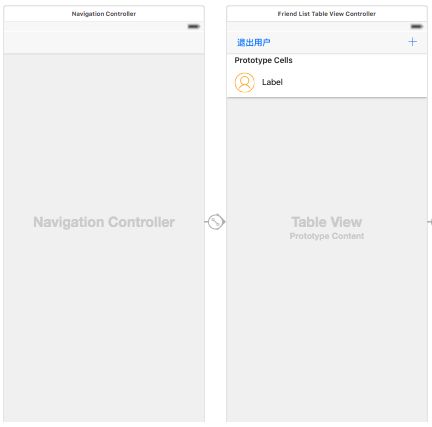
好友界面
代码如下
#import "FriendListTableViewController.h"
#import
#import "FriendListTableViewCell.h"
#import "EaseMessageViewController.h"//单聊基础界面
#import "ChatViewController.h"//单聊chat界面

@interface FriendListTableViewController ()
{
    NSMutableArray* _nameArr;//接收好友列表
}

@end

@implementation FriendListTableViewController

- (void)viewDidLoad {
    [super viewDidLoad];

    self.title=@"我的好友";
    self.tableView.backgroundColor=[UIColor whiteColor];
    _nameArr=[[NSMutableArray alloc]init];

    [self getFridendListAndReloadTableView];//获取好友列表并刷新tableView

    //注册好友回调
    [[EMClient sharedClient].contactManager addDelegate:self delegateQueue:nil];
}

//获取好友列表并刷新tableView
-(void)getFridendListAndReloadTableView
{
    //获取好友列表
    EMError *error = nil;
    NSArray *userlist = [[EMClient sharedClient].contactManager getContactsFromServerWithError:&error];
    if (!error) {
        NSLog(@"好友获取成功 -- %@",userlist);

        [_nameArr removeAllObjects];
        [_nameArr addObjectsFromArray:userlist];
        [self.tableView reloadData];
    }
}

#pragma mark - 监听添加好友回调
//监听回调
/*!
 *  用户A发送加用户B为好友的申请,用户B会收到这个回调
 *
 *  @param aUsername   用户名
 *  @param aMessage    附属信息
 */
- (void)didReceiveFriendInvitationFromUsername:(NSString *)aUsername
                                       message:(NSString *)aMessage
{
    UIAlertController * alertController = [UIAlertController alertControllerWithTitle:[NSString stringWithFormat:@"收到来自%@的请求", aUsername] message:aMessage preferredStyle:(UIAlertControllerStyleAlert)];

    UIAlertAction * acceptAction = [UIAlertAction actionWithTitle:@"好" style:(UIAlertActionStyleDefault) handler:^(UIAlertAction * _Nonnull action)
    {

        // 同意好友请求的方法
        EMError *agreeError = [[EMClient sharedClient].contactManager acceptInvitationForUsername:aUsername];
        if (!agreeError) {
            NSLog(@"发送同意成功");

            [self getFridendListAndReloadTableView];//获取好友列表并刷新tableView
        }
    }];

    UIAlertAction * rejectAction = [UIAlertAction actionWithTitle:@"NO" style:(UIAlertActionStyleCancel) handler:^(UIAlertAction * _Nonnull action) {

        // 拒绝好友请求的方法
        EMError *rejectError = [[EMClient sharedClient].contactManager declineInvitationForUsername:aUsername];
        if (!rejectError) {
            NSLog(@"发送拒绝成功");
        }
    }];

    [alertController addAction:acceptAction];
    [alertController addAction:rejectAction];
    [self showDetailViewController:alertController sender:nil];
}

//好友申请处理结果回调
//监听回调
- (void)didReceiveAgreedFromUsername:(NSString *)aUsername
{
    NSLog(@"%@同意了我的好友请求",aUsername);

    [self getFridendListAndReloadTableView];//获取好友列表并刷新tableView
}
- (void)didReceiveDeclinedFromUsername:(NSString *)aUsername
{
    NSLog(@"%@拒绝了我的好友请求",aUsername);
}

#pragma mark -
- (IBAction)exitAction:(UIBarButtonItem *)sender {

    //退出登录
    EMError *error = [[EMClient sharedClient] logout:YES];
    if (!error) {
        NSLog(@"退出成功");
        [self dismissViewControllerAnimated:YES completion:^{
        }];
    }else{
        NSLog(@"退出失败");
    }

}

#pragma mark - Table view data source

- (NSInteger)tableView:(UITableView *)tableView numberOfRowsInSection:(NSInteger)section {
    return _nameArr.count;
}

- (UITableViewCell *)tableView:(UITableView *)tableView cellForRowAtIndexPath:(NSIndexPath *)indexPath {

    FriendListTableViewCell *cell = [tableView dequeueReusableCellWithIdentifier:@"FriendListTableViewCell" forIndexPath:indexPath];

    NSString* username=_nameArr[indexPath.row];
    cell.nameLabel.text=username;

    return cell;
}

- (void)tableView:(UITableView *)tableView didSelectRowAtIndexPath:(NSIndexPath *)indexPath
{
//    //创建聊天会话,传递用户或群id和会话类型(EMConversationType)
//    EaseMessageViewController *chatController = [[EaseMessageViewController alloc] initWithConversationChatter:_nameArr[indexPath.row] conversationType:EMConversationTypeChat];
//    chatController.title=_nameArr[indexPath.row];
//    [self.navigationController pushViewController:chatController animated:YES];


    //创建聊天会话,传递用户或群id和会话类型(EMConversationType)
    ChatViewController *chatController = [[ChatViewController alloc] initWithConversationChatter:_nameArr[indexPath.row] conversationType:EMConversationTypeChat];
    chatController.title=_nameArr[indexPath.row];
    [self.navigationController pushViewController:chatController animated:YES];

}
- 获取好友列表
EMError *error = nil; NSArray *userlist = [[EMClient sharedClient].contactManager getContactsFromServerWithError:&error];
- 好友申请
- 发送加好友申请
如果您已经发过,并且对方没有处理,您将不能再次发送
EMError *error = [[EMClient sharedClient].contactManager addContact:@"6001" message:@"我想加您为好友"];
if (!error) { NSLog(@"添加成功");}
- 监听加好友请求
当您收到好友请求,如果您没有处理,请自己保存数据,新协议下不会每次都发送
//注册好友回调
[[EMClient sharedClient].contactManager addDelegate:self delegateQueue:nil];
//移除好友回调
[[EMClient sharedClient].contactManager removeDelegate:self];
- 监听回调
用户A发送加用户B为好友的申请,用户B会收到这个回调
aUsername 用户名
aMessage 附属信息
-(void)didReceiveFriendInvitationFromUsername:(NSString *)aUsername message:(NSString *)aMessage;
- 同意加好友申请
EMError *error = [[EMClient sharedClient].contactManager acceptInvitationForUsername:@"8001"];
if (!error) { NSLog(@"发送同意成功");}
- 拒绝加好友申请
EMError *error = [[EMClient sharedClient].contactManager declineInvitationForUsername:@"8001"];
if (!error) { NSLog(@"发送拒绝成功");}
- 好友申请处理结果回调
监听回调
用户A发送加用户B为好友的申请,用户B同意后,用户A会收到这个回调
-(void)didReceiveAgreedFromUsername:(NSString *)aUsername;
用户A发送加用户B为好友的申请,用户B拒绝后,用户A会收到这个回调
-(void)didReceiveDeclinedFromUsername:(NSString *)aUsername;
- 退出登录
EMError *error = [[EMClient sharedClient] logout:YES];
if (!error) { NSLog(@"退出成功");}
- 大家可能注意到了,我导入了这2个文件
#import "EaseMessageViewController.h"//单聊基础界面
#import "ChatViewController.h"//单聊chat界面
这2个控制器都是环信提供给我们的单聊控制器,EaseMessageViewController这是基础的控制器,如果我们想要使用这个控制器,但又觉得这个控制器满足不了我们的要求的话,我们有2个办法。1.使用ChatViewController 2.我们可以仿照ChatViewController写一个继承EaseMessageViewController的控制器。
如果你对控制器有更高定制要求的话,可以根据文档来自己实现相应的功能,而不局限于EaseMessageViewController
注意
- 有一个bug,用模拟器播放录音会崩溃,在手机上播放就没问题
- 环信不会保存我们的头像,所以我们可以从app服务器获取头像
- 比如我们使用的是
ChatViewController,我们可以在ChatViewController.m文件的EaseMessageViewControllerDataSource中的
-(id)messageViewController:(EaseMessageViewController *)viewController
                           modelForMessage:(EMMessage *)message
{
}
中来改变头像
-(id)messageViewController:(EaseMessageViewController *)viewController
                           modelForMessage:(EMMessage *)message
{
    id model = nil;
    model = [[EaseMessageModel alloc] initWithMessage:message];

    if (model.isSender) {//自己的头像 昵称
        model.avatarImage=[UIImage imageNamed:@"蜡笔小新.jpg"];
        model.nickname=@"我";
    }else{
        model.avatarImage=[UIImage imageNamed:@"美女.jpg"];
    }

    model.failImageName = @"imageDownloadFail";
    return model;
}
我们可以通过model.avatarURLPath=@""来从网络获取头像
也可以通过model.avatarImage来改变头像
- 改变气泡,还是拿
ChatViewController举例,我们可以在ChatViewController.m的viewDidLoad中,改变此处的图片名称
    [[EaseBaseMessageCell appearance] setSendBubbleBackgroundImage:[[UIImage imageNamed:@"chat_sender_bg"] stretchableImageWithLeftCapWidth:5 topCapHeight:35]];
    [[EaseBaseMessageCell appearance] setRecvBubbleBackgroundImage:[[UIImage imageNamed:@"chat_receiver_bg"] stretchableImageWithLeftCapWidth:35 topCapHeight:35]];
这样我们就简单的集成了3.x的单聊,在此点击下载Demo
界面在Main.storyboard中,选中左侧一列。
注:相关内容我会继续更新。如果想找一些iOS方面的代码可以关注我的,我会持续更新,大家一起探讨探讨
在此谢谢大家阅读

