比较常见的就是QQ、微信及新浪微博的分享。
第一步:
集成shareSDK,我使用的是CocoaPods,导入所需三方即可。
# 主模块(必须)
pod'ShareSDK3'
# Mob 公共库(必须)
pod'MOBFoundation'
# UI模块(非必须,需要用到ShareSDK提供的分享菜单栏和分享编辑页面需要以下1行)
pod'ShareSDK3/ShareSDKUI'
# 平台SDK模块(对照一下平台,需要的加上。如果只需要QQ、微信、新浪微博,只需要以下3行)
pod'ShareSDK3/ShareSDKPlatforms/QQ'
pod'ShareSDK3/ShareSDKPlatforms/SinaWeibo'
pod'ShareSDK3/ShareSDKPlatforms/WeChat'
第二步:
在 "AppDelegate.m" 文件中导入:
#import
#import
//腾讯开放平台(对应QQ和QQ空间)SDK头文件
#import
#import
//微信SDK头文件
#import"WXApi.h"
//新浪微博SDK头文件
#import"WeiboSDK.h"
//新浪微博SDK需要在项目Build Settings中的Other Linker Flags添加"-ObjC"
第三步:
在 "AppDelegate.m" 文件中编写代码:
在- (BOOL)application:(UIApplication*)application didFinishLaunchingWithOptions:(NSDictionary*)launchOptions {
// 此处应填入微信的appId
[WXApiregisterApp:@"wx3be9e948cd67b3af"];
[self share ];
}
- (void)share{
/**
*设置ShareSDK的appKey,如果尚未在ShareSDK官网注册过App,请移步到http://mob.com/login登录后台进行应用注册,
*在将生成的AppKey传入到此方法中。
*方法中的第二个第三个参数为需要连接社交平台SDK时触发,
*在此事件中写入连接代码。第四个参数则为配置本地社交平台时触发,根据返回的平台类型来配置平台信息。
*如果您使用的时服务端托管平台信息时,第二、四项参数可以传入nil,第三项参数则根据服务端托管平台来决定要连接的社交SDK。
*/
[ShareSDKregisterApp:@"1c12345678ff4"
activePlatforms:@[
@(SSDKPlatformTypeSinaWeibo),
@(SSDKPlatformTypeWechat),
@(SSDKPlatformTypeQQ),
]
onImport:^(SSDKPlatformTypeplatformType)
{
switch(platformType)
{
caseSSDKPlatformTypeWechat:
[ShareSDKConnectorconnectWeChat:[WXApiclass]];
break;
caseSSDKPlatformTypeQQ:
[ShareSDKConnectorconnectQQ:[QQApiInterfaceclass]tencentOAuthClass:[TencentOAuthclass]];
break;
caseSSDKPlatformTypeSinaWeibo:
[ShareSDKConnectorconnectWeibo:[WeiboSDKclass]];
break;
default:
break;
}
}
onConfiguration:^(SSDKPlatformTypeplatformType,NSMutableDictionary*appInfo)
{
switch(platformType)
{
caseSSDKPlatformTypeSinaWeibo:
//设置新浪微博应用信息,其中authType设置为使用SSO+Web形式授权
[appInfoSSDKSetupSinaWeiboByAppKey:@"3239212345"
appSecret:@"cc88dbf7cf6678c12345c64e48d1b8a1"
redirectUri:@"http://www.weibo.com"
authType:SSDKAuthTypeBoth];
break;
caseSSDKPlatformTypeWechat:
[appInfoSSDKSetupWeChatByAppId:@"wx4fd1234e1bbbe871"
appSecret:@"12bf06ff7f31acb3456bb17f5f4bf76c"];
break;
caseSSDKPlatformTypeQQ:
[appInfoSSDKSetupQQByAppId:@"1106012345"
appKey:@"ZqwHCqweviEabc4"
authType:SSDKAuthTypeBoth];
break;
default:
break;
}
}];
}
第四步:
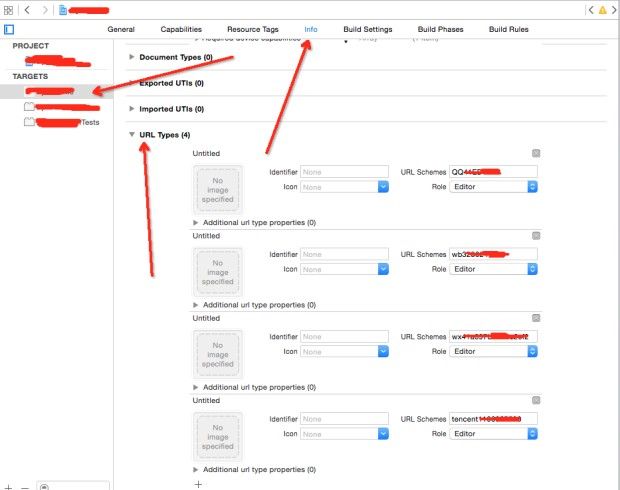
在 URL Types 添加相关参数:
QQ +(QQ平台的)AppKey的16进制;
content + (QQ平台的)AppKey的10进制;
(微信平台的)AppId;
wb+(新浪微博的)AppKey;
第五步:
封装分享方法,通过不同的平台参数来分享到不同的平台:
/**
*
QQ平台(好友)(SSDKPlatformTypeQQ)
QQ空间(SSDKPlatformSubTypeQZone)
微信平台(好友)(SSDKPlatformTypeWechat)
微信朋友圈(SSDKPlatformSubTypeWechatTimeline)
新浪微博(SSDKPlatformTypeSinaWeibo)
*/
+ (void)SharePlatform:(SSDKPlatformType)platformType urlStr:(NSString*)urlStr titleStr:(NSString*)titleStr picStr:(NSString*)picStr{
//1、创建分享参数(必要)
NSMutableDictionary*shareParams = [NSMutableDictionarydictionary];
[shareParamsSSDKEnableUseClientShare];
NSArray* imageArray =@[[UIImageimageNamed:@"logo"]];
[shareParamsSSDKSetupShareParamsByText:titleStr
images:imageArray
url:[NSURLURLWithString:urlStr]
title:@"标题"
type:SSDKContentTypeAuto];
//进行分享
[ShareSDKshare:platformType
parameters:shareParams
onStateChanged:^(SSDKResponseStatestate,NSDictionary*userData,SSDKContentEntity*contentEntity,NSError*error) {
switch(state) {
caseSSDKResponseStateSuccess:
{
// 分享成功
break;
}
caseSSDKResponseStateFail:
{
// 分享失败
break;
}
caseSSDKResponseStateCancel:
{
// 分享已取消
break;
}
default:
break;
}
}];
}
