《Tasting Dagger 2 on Android》
译文:
Hey!Finally I decided that was a good time to get back to the blog and share what I have dealing with for the last weeks. In this occasion I would like to talk a bit about my experience with Dagger 2, but first I think that really worth a quick explanation about whyI believe that dependency injection is important and why we should definitely use it in our android applications.
大家好!巴拉巴拉巴拉...... 先说说为什么依赖注入对项目来说至关重要以至于我们必须用它。
By the way, I assume that you have have a basic knowledge about dependency injection in general and tools like Dagger/Guice, otherwise I would suggest you to check some of the very good tutorials out there. Let’s get our hands dirty then!
如果不了解依赖注入或没听过Dagger/Guice的自己先去补补课吧 开始动手吧
Why dependency injection?
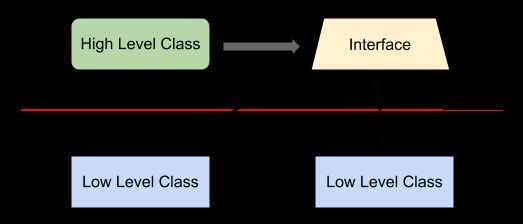
The first(and indeed most important)thing we should know about it is that has been there for a long time and uses Inversion of Control principle, which basically states that the flow of your application depends on the object graph that is built up during program execution, and such a dynamic flow is made possible by object interactions being defined through abstractions. This run-time binding is achieved by mechanisms such as dependency injection or a service locator.
为什么要使用依赖注入?
这个要从“控制反转”这个设计原则开始说起,控制反转意思是:对象行为的交互依赖于接口的定义,而非具体类。这种运行时绑定的实现是基于依赖注入或service locator。【回头再来翻译】。
Said that we can get to the conclusion that dependency injection brings us important benefits:
* Since dependencies can be injected and configured externally we can reuse those components.
* When injecting abstractions as collaborators, we can just change the implementation of any object without having to make a lot of changes in our codebase, since that object instantiation resides in one place isolated and decoupled.
* Dependencies can be injected into a component: it is possible to inject mock implementations of these dependencies which makes testing easier.
依赖注入带来的好处:
* 接口依赖关系在业务逻辑代码以外实现(注入或配置),因此我们可以直接重用业务逻辑代码。
* 后边再翻译
* 方便测试 后边再翻译
One thing that we will see is that we can manage the scope of our instances created, which is something really cool and from my point of view, any object or collaborator in your app should not know anything about instances creation and lifecycle and this should be managed by our dependency injection framework.
(作者觉得)能管理创建对象的范围本身就是很赞的一件事,任何对象和collaborator?都不应该关心其它实例对象的创建过程或生命周期,这应该是依赖注入框架的事儿。
What is JSR-330?
Basically dependency injection for Java defines a standard set of annotations (and one interface) for use on injectable classes in order to to maximize reusability, testability and maintainability of java code.
Both Dagger 1 and 2 (also Guice) are based on this standard which brings consistency and an standard way to do dependency injection.
JSR-330:为Java依赖注入定义的一套注解(或接口)
Dagger 1
I will be very quick here because this version is out of the purpose of this article. Anyway, Dagger 1 has a lot to offer and I would say that nowadays is the most popular dependency injector used on Android. It has been created by Square inspired by Guice.
Its fundamentals are:
* Multiple injection points: dependencies, being injected.
* Multiple bindings: dependencies, being provided.
* Multiple modules: a collection of bindings thatimplementa feature.
* Multiple object graphs: a collection of modules that implement a scope.
Dagger 1 uses compile time to figure out bindings but also uses reflection, and although it is not used to instantiate objects, it is used for graph composition. All this process happens at runtime, where Dagger tries to figure out how everything fits together, so there is a price to pay:inefficiency sometimes and difficulties when debugging.
Dagger 2
Dagger 2 is a fork from Dagger 1 under heavy development by Google, currently version 2.0. It was inspired by AutoValue project (https://github.com/google/auto, useful if you are tired of writing equals and hash code methods everywhere).
Dagger2 是Dagger1的开发分支,主要由Google来开发,当前版本是2.0. XXXX
From the beginning, the basic idea behind Dagger 2, was to make problems solvable by using code generation, hand written code, as if we were writing all the code that creates and provides our dependencies ourselves.
XXXXX
If we compare this version with its predecessor, both are quite similar in many aspects but there are also important differences that worth mentioning:
* No reflection at all: graph validation, configurations and preconditions at compile time.
* Easy debugging and fully traceable: entirely concrete call stack for provision and creation.
* More performance: according to google they gained 13% of processor performance.
* Code obfuscation: it uses method dispatch, like hand written code.
Of course all this cool features come with a price, which makes it less flexible: for instance, there is no dynamism due to the lack of reflection.
Dagger2的优点(相比Dagger1):
* 完全不依赖反射:对象图谱验证,配置和preconditions都是在编译时进行;
* 易于调试
* 效率更高
* 代码易读
Diving deeper
深入了解
To understand Dagger 2 it is important (and probably a bit hard in the beginning) to know about the fundamentals of dependency injection and the concepts of each one of these guys (do not worry if you do not understand them yet, we will see examples):
先来了解一下基本概念
@Inject: Basically with this annotation we request dependencies. In other words, you use it to tell Dagger that the annotated class or field wants to participate in dependency injection. Thus, Dagger will construct instances of this annotated classes and satisfy their dependencies.
@Inject: 通过这个注解来请求依赖注入,获取依赖的对象实例
@Module: Modules are classes whose methods provide dependencies, so we define a class and annotate it with @Module, thus, Dagger will know where to find the dependencies in order to satisfy them when constructing class instances. One important feature of modules is that they have been designed to be partitioned and composed together (for instance we will see that in our apps we can have multiple composed modules).
@Module: 这个注解负责提供被依赖的对象。通过定义一个类,标记为@Module,Dagger就知道要从这个类中去初始化并提供被依赖的对象。module的一个重要特性就是可以被拆解或组合,用户可以根据需要自行组装。
@Provide: Inside modules we define methods containing this annotation which tells Dagger how we want to construct and provide those mentioned dependencies.
@Provide: 在module里通过Provide这个注解来说明某个方法的作用是对象初始化并提供对象实例。跟@Inject注解形成对称,一个是请求依赖、一个是提供依赖。
@Component: Components basically are injectors, let’s say a bridge between @Inject and @Module, which its main responsibility is to put both together. They just give you instances of all the types you defined, for example, we must annotate an interface with @Component and list all the @Modules that will compose that component, and if any of them is missing, we get errors at compile time.All the components are aware of the scope of dependencies it provides through its modules.
@Component: Components是注解器,是连接@Inject和@Module的桥梁。Component是接口类,通过@Component声明依赖的module(提供依赖),在接口类中声明需要依赖的方法(请求依赖)。
@Scope: Scopes are very useful and Dagger 2 has a more concrete way to do scoping through custom annotations. We will see an example later, but this is a very powerful feature, because as pointed out earlier, there is no need that every object knows about how to manage its own instances. An scope example would be a class with a custom @PerActivity annotation, so this object will live as long as our Activity is alive. In other words, we can define the granularity of your scopes(@PerFragment, @PerUser, etc).
@Scope: Scope非常有用,并且Dagger2支持自定义Scope。继续翻译
@Qualifier: We use this annotation when the type of class is insufficient to identify a dependency. For example in the case of Android, many times we need different types of context, so we might define a qualifier annotation “@ForApplication” and “@ForActivity”, thus when injecting a context we can use those qualifiers to tell Dagger which type of context we want to be provided.
@Qualifier:
Shut up and show me the code!
I guess it is too much theory for now, so let’s see Dagger 2 in action, although it is a good idea to first set it up by adding the dependencies in our build.gradle file:
As you can see we are adding javax annotations, compiler, the runtime library and the apt plugin, which is necessary, otherwise the dagger annotation processor might not work properly, especiallyI encountered problems on Android Studio.
动手做吧!
在build.gradle中添加第三方库依赖:
javax annotations
dagger-compiler
apt-plugin
Our example
A few months ago I wrote an article about how to implement uncle bob’s clean architecture on Android, which I strongly recommend to read so you get a better understanding of what we are gonna do here. Back then, I faced a problem when constructing and providing dependencies of most of the objects involved in my solution, which looked something like this(check out the comments):
项目实例
先去读读作者之前写的关于理解《Clean Architecture》的文章吧 两篇文章链接,读懂第一篇就不用读第二篇了