级别: ★★☆☆☆
标签:「iOS」「多线程」「NSOperation」
作者: dac_1033
审校: QiShare团队
上一篇介绍了NSThread,本篇将介绍“iOS多线程之NSOperation”。
一、线程池
多线程处理任务的过程中,频繁的创建/销毁线程会很大程度上影响处理效率,新起的线程数过多会降低系统性能甚至引起app崩溃。在Java和C#开发过程中可以使用线程池来解决这些问题,线程池缓存一些线程,在接到任务的时候,系统就在线程池中调度一个闲置的线程来处理这个任务,免去了频繁创建/销毁的过程。从NSOperation的使用过程就能体会到,它和线程池非常类似,下面我们就来介绍一下NSOperation的使用。
二、NSOperation简介
NSOperation是一个抽象类,实际开发中需要使用其子类NSInvocationOperation、NSBlockOperation。首先创建一个NSOperationQueue,再建多个NSOperation实例(设置好要处理的任务、operation的属性和依赖关系等),然后再将这些operation放到这个queue中,线程就会被依次启动。苹果官网对于NSOperation的介绍
NSOperation及其子类中的常用方法如下:
//// NSOperation
@property (readonly, getter=isCancelled) BOOL cancelled;
@property (readonly, getter=isExecuting) BOOL executing;
@property (readonly, getter=isFinished) BOOL finished;
@property (readonly, getter=isReady) BOOL ready;

@property NSOperationQueuePriority queuePriority;
@property (readonly, copy) NSArray *dependencies;

@property (nullable, copy) NSString *name;
@property (nullable, copy) void (^completionBlock)(void);

- (void)start;
- (void)main;
- (void)cancel;

- (void)addDependency:(NSOperation *)op;
- (void)removeDependency:(NSOperation *)op;

- (void)waitUntilFinished;
下面我们依次介绍NSInvocationOperation、NSBlockOperation的使用过程,并自定义一个继承于NSOperation的子类并实现内部相应的方法。
2.1 NSInvocationOperation
NSInvocationOperation继承于NSOperation,NSInvocationOperation的定义如下:
@interface NSInvocationOperation : NSOperation {
@private
    id _inv;
    id _exception;
    void *_reserved2;
}

- (nullable instancetype)initWithTarget:(id)target selector:(SEL)sel object:(nullable id)arg;
- (instancetype)initWithInvocation:(NSInvocation *)inv NS_DESIGNATED_INITIALIZER;property (readonly, retain) NSInvocation *invocation;

@property (nullable, readonly, retain) id result;

@end
下面使用NSInvocationOperation来加载一张图片,示例方法如下:
- (void)loadImageWithMultiThread {
    /*创建一个调用操作
     object:调用方法参数
    */
    NSInvocationOperation *invocationOperation=[[NSInvocationOperation alloc]initWithTarget:self selector:@selector(loadImage) object:nil];
    //创建完NSInvocationOperation对象并不会调用,它由一个start方法启动操作,但是注意如果直接调用start方法,则此操作会在主线程中调用,一般不会这么操作,而是添加到NSOperationQueue中
//    [invocationOperation start];

    //创建操作队列
    NSOperationQueue *operationQueue=[[NSOperationQueue alloc]init];
    //注意添加到操作队后,队列会开启一个线程执行此操作
    [operationQueue addOperation:invocationOperation];
}
2.2 NSBlockOperation
NSBlockOperation继承于NSOperation,NSBlockOperation的定义如下:
@interface NSBlockOperation : NSOperation {
@private
    id _private2;
    void *_reserved2;
}

+ (instancetype)blockOperationWithBlock:(void (^)(void))block;

- (void)addExecutionBlock:(void (^)(void))block;
@property (readonly, copy) NSArray *executionBlocks;

@end
下面我们来使用NSOperation,实现多个线程加载图片,示例代码如下:
//// 首先 定义一个OperationImage的Model

@interface OperationImage : NSObject

@property (nonatomic, assign) NSInteger index;
@property (nonatomic, strong) NSData *imgData;

@end

@implementation OperationImage

@end


//// 使用NSOperation实现多线程加载图片

#define ColumnCount    4
#define RowCount       5
#define Margin         10

@interface MultiThread_NSOperation1 ()

@property (nonatomic, strong) NSMutableArray *imageViews;

@end

@implementation MultiThread_NSOperation1

- (void)viewDidLoad {

    [super viewDidLoad];
    [self setTitle:@"NSOperation1"];
    [self.view setBackgroundColor:[UIColor whiteColor]];
    self.edgesForExtendedLayout = UIRectEdgeNone;

    [self layoutViews];
}

- (void)layoutViews {

    CGSize size = self.view.frame.size;
    CGFloat imgWidth = (size.width - Margin * (ColumnCount + 1)) / ColumnCount;

    _imageViews=[NSMutableArray array];
    for (int row=0; row 0) {// 设置依赖
            [blockOperation addDependency:tempOperation];
        }
        [operationQueue addOperation:blockOperation];
        tempOperation = blockOperation;
    }
}

#pragma mark - 将图片显示到界面

-(void)updateImage:(OperationImage *)operationImg {

    UIImage *image = [UIImage imageWithData:operationImg.imgData];
    UIImageView *imageView = _imageViews[operationImg.index];
    imageView.image = image;
}


#pragma mark - 请求图片数据

- (NSData *)requestData {

    NSURL *url = [NSURL URLWithString:@"https://store.storeimages.cdn-apple.com/8756/as-images.apple.com/is/image/AppleInc/aos/published/images/a/pp/apple/products/apple-products-section1-one-holiday-201811?wid=2560&hei=1046&fmt=jpeg&qlt=95&op_usm=0.5,0.5&.v=1540576114151"];
    NSData *data = [NSData dataWithContentsOfURL:url];
    return data;
}


#pragma mark - 加载图片

- (void)loadImg:(OperationImage *)operationImg {

    // 请求数据
    operationImg.imgData = [self requestData];

    // 更新UI界面(mainQueue是UI主线程)
    [[NSOperationQueue mainQueue] addOperationWithBlock:^{
        [self updateImage:operationImg];
    }];

    // 打印当前线程
    NSLog(@"current thread: %@", [NSThread currentThread]);
}

@end
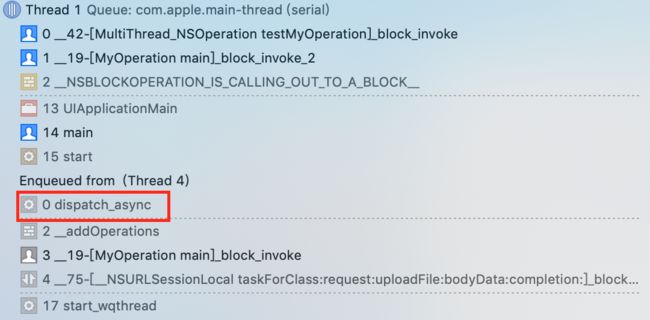
在加载网络图片的代码上打一个断点,查看断点信息,从的运行过程可以看出NSOperation底层涉及到对GCD的封装:
三、关于自定义封装NSOperation
我们用到的很多三方库都自定义封装NSOperation,如MKNetworkOperation、SDWebImage等。自定义封装抽象类NSOperation只需要重写其中的main或start方法,在多线程执行任务的过程中需要注意线程安全问题,我们还可以通过KVO监听isCancelled、isExecuting、isFinished等属性,确切的回调当前任务的状态。下面就是对NSOperation的自定义封装代码:
@interface MyOperation ()

//要下载图片的地址
@property (nonatomic, copy) NSString *urlString;
//执行完成后,回调的block
@property (nonatomic, copy) void (^finishedBlock)(NSData *data);

// 自定义变量,用于重写父类isFinished的set、get方法
@property (nonatomic, assign) BOOL taskFinished;

@end

@implementation MyOperation

+ (instancetype)downloadDataWithUrlString:(NSString *)urlString finishedBlock:(void (^)(NSData *data))finishedBlock {

    MyOperation *operation = [[MyOperation alloc] init];
    operation.urlString = urlString;
    operation.finishedBlock = finishedBlock;
    return operation;
}

// 监听/重写readonly属性的set、get方法
- (void)setTaskFinished:(BOOL)taskFinished {
    [self willChangeValueForKey:@"isFinished"];
    _taskFinished = taskFinished;
    [self didChangeValueForKey:@"isFinished"];
}

- (BOOL)isFinished {

    return self.taskFinished;
}

//- (void)main {
//
//    // 打印当前线程
//    NSLog(@"%@", [NSThread currentThread]);
//
//    //判断是否被取消,取消正在执行的操作
//    if (self.cancelled) {
//        return;
//    }
//
//    NSURLSessionTask *task = [NSURLSession.sharedSession dataTaskWithRequest:[NSURLRequest requestWithURL:[NSURL URLWithString:self.urlString]] completionHandler:^(NSData * _Nullable data, NSURLResponse * _Nullable response, NSError * _Nullable error) {
//        //回到主线程更新UI
//
//        [[NSOperationQueue mainQueue] addOperationWithBlock:^{
//            self.finishedBlock(data);
//        }];
//    }];
//    [task resume];
//}

- (void)start {

    // 打印当前线程
    NSLog(@"%@", [NSThread currentThread]);

    //判断是否被取消,取消正在执行的操作
    if (self.cancelled) {
        return;
    }

    NSURLSessionTask *task = [NSURLSession.sharedSession dataTaskWithRequest:[NSURLRequest requestWithURL:[NSURL URLWithString:self.urlString]] completionHandler:^(NSData * _Nullable data, NSURLResponse * _Nullable response, NSError * _Nullable error) {
        //回到主线程更新UI

        [[NSOperationQueue mainQueue] addOperationWithBlock:^{
            self.finishedBlock(data);
        }];

    self.taskFinished = YES;
    }];
    [task resume];
}

@end
调用MyOperation中的方法:
- (void)testMyOperation {

    _queue = [[NSOperationQueue alloc] init];
    _queue.maxConcurrentOperationCount = 3;

    MyOperation *temp = nil;
    for (NSInteger i=0; i<500; i++) {
        MyOperation *operation = [MyOperation downloadDataWithUrlString:@"https://www.so.com" finishedBlock:^(NSData * _Nonnull data) {
            NSLog(@"--- %d finished---", (int)i);
        }];
        if (temp) {
            [operation addDependency:temp];
        }
        temp = operation;
        [_queue addOperation:operation];
    }
}
说明:
- 在运行上面的代码时,我们发现同时重写start和main方法时,start方法优先执行,main方法不会被执行;如果只重写main方法,则main方法会被执行。
- 因为isFinished是readonly属性,因此我们通过自定义变量taskFinished来重写isFinished的set、get方法,实现方式详见代码。
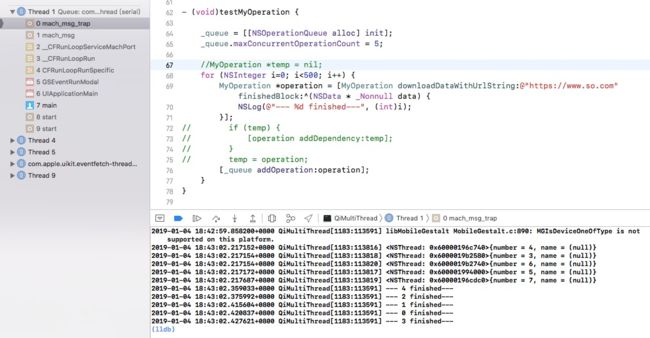
- 如果只重写start方法,并且其中没有self.taskFinished = YES时,且在testMyOperation设置如下:
可以看到log只能能打出来执行了5次(正好是maxConcurrentOperationCount的值),之后便卡死不动。如果不设置maxConcurrentOperationCount或将maxConcurrentOperationCount设置的足够大,则可正常执行至结束。如果打开start方法中的self.taskFinished = YES,则也可正常执行至结束。可见start方法中的任务执行结束后,系统并没有将线程的isFinished置为YES,导致之后的任务无法对其重用。
- 如果只重写main方法,并且其中没有self.taskFinished = YES时,testMyOperation方法都是可以正常执行的,也就是说main执行结束时系统将线程的isFinished置为YES了,其余任务可对其重用。
- 比较start与main方法,两个方法的执行过程都是并行的;start方法更容易通过KVO监听到任务的执行状态,但是需要手动设置一些状态;main自动化程度更高。
- 使用NSOperationQueue时,我们打印代码执行,过程中的线程,发现线程池中线程的最大个数在66个左右。
以上验证过程,得到了昆哥的指教,非常感谢!
四、NSOperation中的依赖
用NSThread来实现多线程时,线程间的执行顺序很难控制,但是使用NSOperation时可以通过设置操作的依赖关系来控制执行顺序。假设操作A依赖于操作B,线程操作队列在启动线程时就会首先执行B操作,然后执行A。例如在第三节testMyOperation方法中,我们从第二个任务一次设置了关系:
MyOperation *temp = nil;
    for (NSInteger i=0; i<500; i++) {
        MyOperation *operation = [MyOperation downloadDataWithUrlString:@"https://www.so.com" finishedBlock:^(NSData * _Nonnull data) {
            NSLog(@"--- %d finished---", (int)i);
        }];
        if (temp) {
            [operation addDependency:temp];
        }
        temp = operation;
        [_queue addOperation:operation];
    }
PS:
- NSOperationQueue的maxConcurrentOperationCount一般设置在5个以内,数量过多可能会有性能问题。maxConcurrentOperationCount为1时,队列中的任务串行执行,maxConcurrentOperationCount大于1时,队列中的任务并发执行;
- 不同的NSOperation实例之间可以设置依赖关系,不同queue的NSOperation之间也可以创建依赖关系 ,但是要注意不要“循环依赖”;
- NSOperation实例之间设置依赖关系应该在加入队列之前;
- 在没有使用 NSOperationQueue时,在主线程中单独使用 NSBlockOperation 执行(start)一个操作的情况下,操作是在当前线程执行的,并没有开启新线程,在其他线程中也一样;
- NSOperationQueue可以直接获取mainQueue,更新界面UI应该在mainQueue中进行;
- 区别自定义封装NSOperation时,重写main或start方法的不同;
- 自定义封装NSOperation时需要我们完全重载start,在start方法里面,我们还要查看isCanceled属性,确保start一个operation前,task是没有被取消的。如果我们自定义了dependency,我们还需要发送isReady的KVO通知。
工程源码GitHub地址
了解更多iOS及相关新技术,请关注我们的公众号:
小编微信:可加并拉入《QiShare技术交流群》。关注我们的途径有:
QiShare()
QiShare(掘金)
QiShare(知乎)
QiShare(GitHub)
QiShare(CocoaChina)
QiShare(StackOverflow)
QiShare(微信公众号)
推荐文章:
iOS Winding Rules 缠绕规则
iOS 签名机制
iOS 扫描二维码/条形码
iOS 了解Xcode Bitcode
iOS 重绘之drawRect
奇舞周刊


