iOS数据持久化方案有很多,比如FMDB,Realm,CoreData等,FMDB需要自己写SQL语句,很传统很经典的数据库操作,关于FMDB我在两年前写过一篇数据库操作之FMDB,那时候还是使用的swift2,感兴趣的可以参考参考。CoreData是Apple提供的数据持久化框架,使用起来步骤稍微繁杂,数据模型可图形化。realm是一个开源框架,用于取代SQLite和CoreData,我比较习惯也比较喜欢的一个框架。以后有时间我会介绍realm的集成与使用,不过今天主角是CoreData,关于CoreData,很久以前我写过数据持久化存储—CoreData使用,朋友说语言版本较老,也较复杂,于是就有了这篇新作,作为iOS开发者,CoreData的运用是必备技能,虽然使用的场景不多(若没有要求,我不会采用),但是需要掌握,这也是很多面试官都喜欢问的点,因此,本次用更简单的文字和例子阐述其使用方法,让每个开发者都能看个明白,本次采用swift4,包含了模型嵌套存储,一对一,一对多关系。
项目中CoreData的嵌入
嵌入CoreData很简单,如果是还未创建工程,那么在创建工程时勾选上Use Core Data,工程就会自动生成一个与工程名字相同的.xcdatamodeld文件,以及在AppDelegate文件中自动生成相应代码。

如果已经创建了工程也不要紧,command + n找到Data Model并创建,创建的名字最好与工程名相同,否则可能会出现未知错误,不过作为例子我这里就随便起一个了。

创建完成后在文件目录中会多出一个.xcdatamodeld文件,现在先不忙管它,进入AppDelegate文件,import CoreData并添加相关代码,NSPersistentContainer(name:)中的参数必须与工程名一致,完事后如下:
import UIKit
import CoreData

@UIApplicationMain
class AppDelegate: UIResponder, UIApplicationDelegate {

    var window: UIWindow?


    func application(_ application: UIApplication, didFinishLaunchingWithOptions launchOptions: [UIApplicationLaunchOptionsKey: Any]?) -> Bool {
        // Override point for customization after application launch.
        return true
    }

    // MARK: - Core Data stack

    lazy var persistentContainer: NSPersistentContainer = {
        /*
         The persistent container for the application. This implementation
         creates and returns a container, having loaded the store for the
         application to it. This property is optional since there are legitimate
         error conditions that could cause the creation of the store to fail.
         */
        let container = NSPersistentContainer(name: "TestCoreData2")
        container.loadPersistentStores(completionHandler: { (storeDescription, error) in
            if let error = error as NSError? {
                // Replace this implementation with code to handle the error appropriately.
                // fatalError() causes the application to generate a crash log and terminate. You should not use this function in a shipping application, although it may be useful during development.

                /*
                 Typical reasons for an error here include:
                 * The parent directory does not exist, cannot be created, or disallows writing.
                 * The persistent store is not accessible, due to permissions or data protection when the device is locked.
                 * The device is out of space.
                 * The store could not be migrated to the current model version.
                 Check the error message to determine what the actual problem was.
                 */
                fatalError("Unresolved error \(error), \(error.userInfo)")
            }
        })
        return container
    }()

    // MARK: - Core Data Saving support

    func saveContext () {
        let context = persistentContainer.viewContext
        if context.hasChanges {
            do {
                try context.save()
            } catch {
                // Replace this implementation with code to handle the error appropriately.
                // fatalError() causes the application to generate a crash log and terminate. You should not use this function in a shipping application, although it may be useful during development.
                let nserror = error as NSError
                fatalError("Unresolved error \(nserror), \(nserror.userInfo)")
            }
        }
    }


}
到此,CoreData算是导入到工程中了。
CoreData的使用
CoreData为我们提供基本数据类型存储,可供选择的选项有14个,我这里就不一一列举,下文会有一张图能看到支持的类型。虽然只有14个选项,但是在我看来,CoreData是没有什么数据不能存储的,因为有个选项是Transformable,从字面意思就知道这个是可以转换的类型,从代码中用option可以查到它显示的类型是NSObject,这就很好办了,iOS中的所有对象都继承自NSObject,那我就可以将任意类型的数据转为NSObject再存储了,不过在转之前要注意:数据类型必须遵守NSCoding协议,这也是CoreData最大的诟病,需要自己实现协议中的encode和decode方法,如果模型有很多属性,就需要多写很多代码。
创建模型
找到之前的.xcdatamodeld文件并打开,选择Add Entity创建一个模型并取名,我这里取作TBModel1,右侧第一栏Attributes就是模型的属性了,可以选择模型属性类型。

简单的创建几个属性,因为CoreData不存在主键一说,所以自己设置一个id属性作为主键,这个id的唯一性由开发者自己保证。

有时候一个模型会嵌套多个模型怎么处理?比如TBModel1需要拥有另一个模型,那就再创建一个GFModel(GirlFriendModel ?? true)。

点击下方Editor Style可以切换视图,可以看到此时TBModel1和GFModel并无任何关联(不由自主的想到了歌词:十年之前,我不认识你,你不属于我~~)

此时需要牵线搭桥给他们建立关系,切换回表格视图在Relationships中点击+号做如下操作

再次切换视图就发现他们有了联系

好了,可视化模型操作就结束了,接下来是coding环节。
增
在需要使用CoreData的文件中import CoreData
增删改查前需要先获取CoreData的上下文,为了方便,这里先作为文件内部全局变量
fileprivate let context = (UIApplication.shared.delegate as! AppDelegate).persistentContainer.viewContext
然后存储一个带girlfriend的TBModel1(一对一)
import UIKit
import CoreData

class ViewController: UIViewController {

    fileprivate let context = (UIApplication.shared.delegate as! AppDelegate).persistentContainer.viewContext

    override func viewDidLoad() {
        super.viewDidLoad()

        insert()
    }

    func insert(){

        let data = NSEntityDescription.insertNewObject(forEntityName: "TBModel1", into: context) as! TBModel1
        let girlfriend = NSEntityDescription.insertNewObject(forEntityName: "GFModel", into: context) as! GFModel
        girlfriend.name = "翠花"
        girlfriend.age = 18
        data.desc = "测试CoreData"
        data.girlfriend = girlfriend
        data.id = 0
        //保存
        do {
            try context.save()
            print("保存成功!")
        } catch {
            fatalError("不能保存:\(error)")
        }
    }
}
运行程序会看到控制台输出保存成功
如果TBModel1有多个朋友怎么办(一对多),那就先定义一个朋友模型,遵循NSCoding协议并实现协议方法
class TBFriendModel: NSObject, NSCoding{

    var name = ""
    var age = 18

    func encode(with aCoder: NSCoder) {

        aCoder.encode(name, forKey: "TBCore_name");
        aCoder.encode(age, forKey: "TBCore_age");
    }

    required init?(coder aDecoder: NSCoder) {

        name = (aDecoder.decodeObject(forKey: "TBCore_name") as? String) ?? "无名氏"
        age = (aDecoder.decodeObject(forKey: "TBCore_age") as? Int) ?? 18
    }

    override init() {
        super.init()
    }

}
修改一下刚才的insert方法并运行程序,控制台输出保存成功
func insert(){

        let data = NSEntityDescription.insertNewObject(forEntityName: "TBModel1", into: context) as! TBModel1
        let girlfriend = NSEntityDescription.insertNewObject(forEntityName: "GFModel", into: context) as! GFModel
        girlfriend.name = "翠花"
        girlfriend.age = 18
        data.desc = "测试CoreData"
        data.girlfriend = girlfriend
        data.id = 0

        let friend1 = TBFriendModel()
        friend1.name = "小明"
        friend1.age = 20

        let friend2 = TBFriendModel()
        friend2.name = "小黄"
        friend2.age = 22

        data.anyObject = [friend1, friend2] as NSObject


        //保存
        do {
            try context.save()
            print("保存成功!")
        } catch {
            fatalError("不能保存:\(error)")
        }
    }
查
现在来查询一下刚才保存的模型(如果运行过最初的insert方法,需要先卸载APP重新运行修改后的insert方法,因为运行两次后会有两个id为0的模型,其中一个没有anyObject)
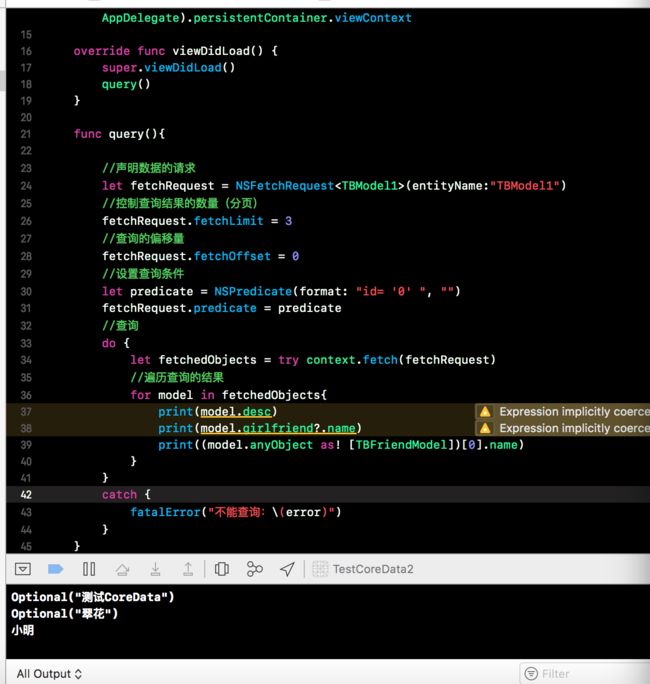
func query(){

        //声明数据的请求
        let fetchRequest = NSFetchRequest(entityName:"TBModel1")
        //控制查询结果的数量(分页)
        fetchRequest.fetchLimit = 3
        //查询的偏移量
        fetchRequest.fetchOffset = 0
        //设置查询条件(可以采用正则)
        let predicate = NSPredicate(format: "id= '0' ", "")
        fetchRequest.predicate = predicate
        //查询
        do {
            let fetchedObjects = try context.fetch(fetchRequest)
            //遍历查询的结果
            for model in fetchedObjects{
                print(model.desc)
                print(model.girlfriend?.name)
                print((model.anyObject as! [TBFriendModel])[0].name)
            }
        }
        catch {
            fatalError("不能查询:\(error)")
        }
    }
运行程序控制台输出如下:
改
简单修改一下数据,其实修改数据就是先查询,更新数据后重新保存
func update(){

        let fetchRequest = NSFetchRequest(entityName:"TBModel1")

        let predicate = NSPredicate(format: "id= '0' ", "")
        fetchRequest.predicate = predicate

        do {
            let fetchedObjects = try context.fetch(fetchRequest)
            for model in fetchedObjects{
                model.girlfriend?.name = "翠翠翠花"
                (model.anyObject as! [TBFriendModel])[0].name = "小小小明"
                //重新保存
                try context.save()
            }
        }
        catch {
            fatalError("不能更新:\(error)")
        }
    }
更新后再查询结果如下

删
删除和更新机制一样,先查询后再将模型删除
func delete(){

        let fetchRequest = NSFetchRequest(entityName:"TBModel1")
        let predicate = NSPredicate(format: "id= '0' ", "")
        fetchRequest.predicate = predicate

        do {
            let fetchedObjects = try context.fetch(fetchRequest)
            for model in fetchedObjects{
                //删除对象
                context.delete(model)
            }
        }
        catch {
            fatalError("不能删除:\(error)")
        }
    }