下面来介绍一下UILocalizedIndexedCollation的使用步骤
1、首先新建一个model类,例如:我新建一个Person类,为了简单点我就添加一个name属性。回到你的Controller里面进行控件初始化,这里就不多说了。
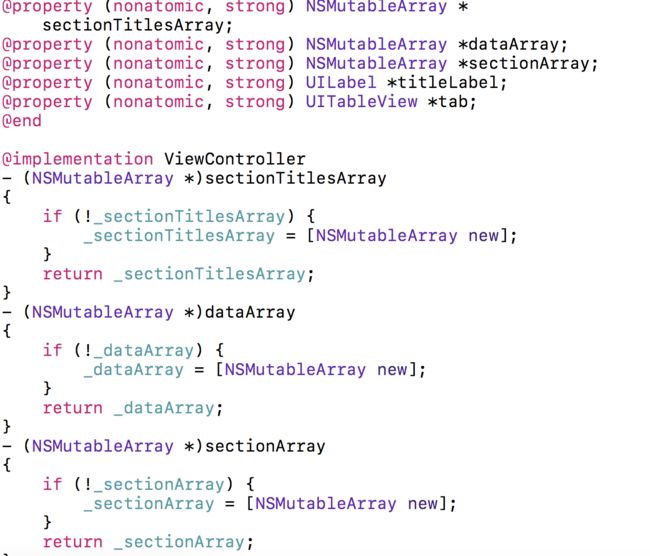
2、初始化数据源数组,例如:初始化存储索引标题的数组、每个索引下的section的数组、数据源数组,具体见下图。
本地新建一个数组作为数据源,例如: NSArray *localArray = @[@"林雨", @"林宏伟", @"周董", @"周树人", @"周杰", @"阿华", @"阿梨", @"安冬", @"杨国栋", @"赵华", @"叶青", @"王晓敏", @"党国倾", @"吴晓慧", @"任年华", @"陈庚", @"付海波", @"迪拜", @"滴华", @"鹤庆", @"杰斯", @"杰斌", @"牛羊"];
然后for循环添加并赋值Person类的name属性保存到data数组里,例如下面代码:
for (int i=0; i
Person *model = [Person new];
model.name = localArray[i];
[self.dataArray addObject:model];
}
3、下面开始对UILocalizedIndexedCollation进行初始化。
UILocalizedIndexedCollation *collation = [UILocalizedIndexedCollation currentCollation];
// 获取collation的索引
NSUInteger sectionNumb = [[collation sectionTitles] count];
NSMutableArray *sectionArray = [[NSMutableArray alloc] init];
// 循环索引,初始化空数组并加入到数据数组
for (NSInteger index = 0; index
[sectionArray addObject:[[NSMutableArray alloc] init]];
}
// 1.便利数组中的元素
// 2.获取name值的首字母在26个字母中所在的位置
// 3.把model对象加到相对应的字母下的数组中去
for(Person *model in self.dataArray){
NSUInteger sectionIndex = [collation sectionForObject:model collationStringSelector:@selector(name)];
[sectionArray[sectionIndex] addObject:model];
}
// 对每个section中的数组按照name属性进行检索排序(快速索引)
// 1.获取每个section下的数组
// 2.对每个section下的数组进行字母排序
for(NSInteger index=0; index
NSMutableArray *personArrayForSection = sectionArray[index];
NSArray *sortedPersonArrayForSection = [collation sortedArrayFromArray:personArrayForSection collationStringSelector:@selector(name)];
sectionArray[index] = sortedPersonArrayForSection;
}
// 新建一个temp空的数组(目的是为了在调用enumerateObjectsUsingBlock函数的时候把空的数组添加到这个数组里,在将数据源空数组移除,或者在函数调用的时候进行判断,空的移除)
NSMutableArray *temp = [NSMutableArray new];
[sectionArray enumerateObjectsUsingBlock:^(NSArray *arr, NSUInteger idx, BOOL *stop) {
if (arr.count == 0) {
[temp addObject:arr];
} else {
[self.sectionTitlesArray addObject:[collation sectionTitles][idx]];
}
}];
[sectionArray removeObjectsInArray:temp];
self.sectionArray = sectionArray;
4、代理事项
#pragma mark 检索返回标题数组个数
- (NSInteger)numberOfSectionsInTableView:(UITableView *)tableView {
return self.sectionTitlesArray.count;
}
#pragma mark 返回每组下有多少条数据
- (NSInteger)tableView:(UITableView *)tableView numberOfRowsInSection:(NSInteger)section {
return [self.sectionArray[section] count];
}
- (UITableViewCell *)tableView:(UITableView *)tableView cellForRowAtIndexPath:(NSIndexPath *)indexPath {
static NSString *ID = @"Identifier";
UITableViewCell *cell = [tableView dequeueReusableCellWithIdentifier:ID];
if (!cell) {
cell = [[UITableViewCell alloc] initWithStyle:UITableViewCellStyleDefault reuseIdentifier:ID];
}
NSUInteger section = indexPath.section;
NSUInteger row = indexPath.row;
Person *model = self.sectionArray[section][row];
cell.textLabel.text = model.name;
cell.accessoryType = UITableViewCellAccessoryNone;
return cell;
}
// 按顺序显示tableview的HeaderInSection标题
- (NSString *)tableView:(UITableView *)tableView titleForHeaderInSection:(NSInteger)section{
return [self.sectionTitlesArray objectAtIndex:section];
}
// 按顺序显示检索字母(不返回就不显示右边索引内容)
- (NSArray*)sectionIndexTitlesForTableView:(UITableView *)tableView{
return self.sectionTitlesArray;
}
// 点击右边索引执行的代理方法,可以在这里设置显示手指滑动时候索引的标题(sectionIndexColor是设置字体颜色,sectionIndexBackgroundColor背景颜色)
- (NSInteger)tableView:(UITableView *)tableView sectionForSectionIndexTitle:(NSString *)title atIndex:(NSInteger)index{
self.titleLabel.hidden = NO;
self.titleLabel.text = title;
NSString *key = [self.sectionTitlesArray objectAtIndex:index];
for (UIView *view in tableView.subviews) {
NSLog(@"_________%@",view);
if ([view isKindOfClass:NSClassFromString(@"UITableViewIndex")]) {
}
}
return [[UILocalizedIndexedCollation currentCollation] sectionForSectionIndexTitleAtIndex:index];
}
- (CGFloat)tableView:(UITableView *)tableView heightForRowAtIndexPath:(NSIndexPath *)indexPath{
return 60;
}
- (CGFloat)tableView:(UITableView *)tableView heightForHeaderInSection:(NSInteger)section{
return 35;
}
做完这些就已经完成UILocalizedIndexedCollation智能分组排序了,样式就如下效果图。

