原文链接
作者:AppCoda
原文日期:2016-03-22
看新闻我们也知道,比起历史上任何一个时刻,健身和健康在今天越来越重要了。说起了也挺好笑的,我似乎记得几天前新闻告诉我同样的事情,也许是因为年纪越来越大的缘故,更需要健康和健身了。不管怎么说,这是一个热门话题。随着技术的不断进步,手机应用和硬件在世界范围内都变得流行起来,这些都把日益流行的健身健康话题加入了新的元素。
HealthKit 是苹果公司的重要桥梁,把重要的跟踪的健康数据同有健康意识的科技消费者、运动迷、平常使用 iPhone 的人连接了起来。这很酷,用户可以很容易的就追踪衡量一段时间内的健身和健康数据,除了意识到的好处之外,我们看到图标中的向上走的曲线,就能给我们极大的鼓励,激励我们继续运动。
正如我们能想象到的,在管理健康信息时,数据安全成为非常重要的因素。HealthKit 对于所有的 HealthKit 信息有绝对的控制权,会直接传递到用户手中。用户可以准许或者拒绝任何 App 获取他们的健康数据的请求。
对于开发者来说,我们需要请求许可方能读取或者写入 HealthKit 数据。实际上,我们需要特别声明一下,我们想影响获取具体哪些数据。另外,任何使用 HealthKit 的 App 必须要包含一份 Privacy Policy(隐私协议),这样用户在进行信息交易时会觉得更舒服一些。
关于 OneHourWalker 走路一小时
今天,我们要创建一个非常有趣的 App,既能读取 HealthKit 中的信息,也能写入新的数据。看一下 OneHourWalker 的外表吧:
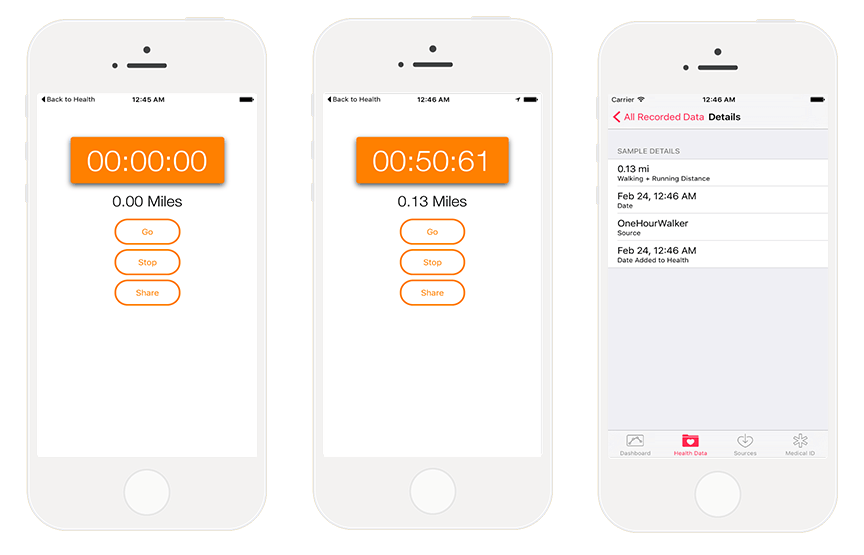
OneHourWalker 是健身 App,能够跟踪用户在一个小时内走路或跑步的距离。用户可以分享距离到 HealthKit上,就会被其他的健康 App 收集到数据。我知道,一小时听起来不太积极,至少对我而言是这样。最后,用户可以提早结束健身,仍然可以分享距离。
所以,听起来只需要把数据写入 HealthKit 即可。不过我们要读取的数据是什么?
好问题!当我走路时,我有可能是在羊肠小道上步行,也可能在森林中漫步。我常常穿越一些 low-hanging branches 区域。Being as I am 6’4”,这会带来一些问题。我们的解决方案是:我们会从 HealthKit 中读取用户的高度,然后显示到 Label 控件上。这样会比较友好地提示用户的限制,这样他或她就能避免在走路时纠缠在一起。
为了方便开始,这里有一个 OneHourWalker 的初始工程,下载然后运行,看起来好像 App 可以运行。计时器和定位系统都已经在运行了,所以我们只需要将注意力放在实施 HealthKit上,注意一下,六十分钟后,计时器和定位系统就会自动停止。
开启 HealthKit
第一步就是在应用中开启 HealthKit 功能,在 Project Navigator 中,选中 OneHourWalker,然后点击 Targets 下方的 OneHourWalker。接着,在屏幕上方的 tab 栏中点击 Capabilities。
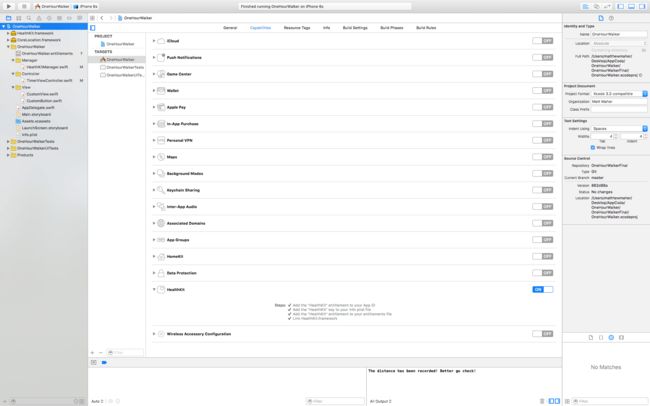
找到 Capabilities 清单底下,把 HealthKit 调到 On 状态。这个动作表示:把 HealthKit 资格添加到 App ID 中,把 HealthKit key 添加到 info plist 文件里,把 HealthKit 资格添加到资格文件中,以及连接 HealthKit.framework。就是这么简单。
开始写代码吧
找到 TimerViewController.swift,开始把 HealthKit 引入 OneHourWalker。首先,让我们创建一个 HealthKitManager 实例。
import UIKit
import CoreLocation
import HealthKit

class TimerViewController: UIViewController, CLLocationManagerDelegate {

    @IBOutlet weak var timerLabel: UILabel!
    @IBOutlet weak var milesLabel: UILabel!
    @IBOutlet weak var heightLabel: UILabel!

    var zeroTime = NSTimeInterval()
    var timer : NSTimer = NSTimer()

    let locationManager = CLLocationManager()
    var startLocation: CLLocation!
    var lastLocation: CLLocation!
    var distanceTraveled = 0.0

    let healthManager:HealthKitManager = HealthKitManager()
HealthKitManager.swift 里包含了所有有关 HealthKit 的操作。里面有一些重要的方法,我们马上就要开始在这个文件里进行编程了。
正如我们在开头介绍的那样,我们需要获取用户的许可来读取和写入他们的健康数据。在 ViewDidLoad(),开始获取许可吧:
    override func viewDidLoad() {
        super.viewDidLoad()

        locationManager.requestWhenInUseAuthorization();

        if CLLocationManager.locationServicesEnabled(){
            locationManager.delegate = self
            locationManager.desiredAccuracy = kCLLocationAccuracyBest
        }
        else {
            print("Need to Enable Location");
        }

        // We cannot access the user's HealthKit data without specific permission.
        getHealthKitPermission()
    }
getHealthKitPermission() 方法会调用 manager 的 authorizeHealthKit() 方法。如果一切顺利,我们可以调用 setHeight() 方法,不过很快我们就会需要更多方法了。
    func getHealthKitPermission() {

        // Seek authorization in HealthKitManager.swift.
        healthManager.authorizeHealthKit { (authorized,  error) -> Void in
            if authorized {

                // Get and set the user's height.
                self.setHeight()
            } else {
                if error != nil {
                    print(error)
                }
                print("Permission denied.")
            }
        }
    }
在 HealthKitManager.swift 文件里,我们创建 authorizeHealthKit() 方法。除此之外,我们还需要创建 HealthKit store,将 App 连接到 HealthKit 数据。
    let healthKitStore: HKHealthStore = HKHealthStore()

    func authorizeHealthKit(completion: ((success: Bool, error: NSError!) -> Void)!) {

        // State the health data type(s) we want to read from HealthKit.
        let healthDataToRead = Set(arrayLiteral: HKObjectType.quantityTypeForIdentifier(HKQuantityTypeIdentifierHeight)!)

        // State the health data type(s) we want to write from HealthKit.
        let healthDataToWrite = Set(arrayLiteral: HKObjectType.quantityTypeForIdentifier(HKQuantityTypeIdentifierDistanceWalkingRunning)!)

        // Just in case OneHourWalker makes its way to an iPad...
        if !HKHealthStore.isHealthDataAvailable() {
            print("Can't access HealthKit.")
        }

        // Request authorization to read and/or write the specific data.
        healthKitStore.requestAuthorizationToShareTypes(healthDataToWrite, readTypes: healthDataToRead) { (success, error) -> Void in
            if( completion != nil ) {
                completion(success:success, error:error)
            }
        }
    }
当我们请求授权获取用户健康数据时,我们需要特别表明我们只是想读取和写入数据。对于我们来说,我们想读取用户的高度,所以他们可以避免容易实现误导动作。希望 HealthKit 能够提供一个 HKObject 参数,可以获取一个可理解的高度数据。我们也需要请求许可方能写入 HKObject 参数,获取用户的走路或者跑步距离。
在处理了 OneHourWalker 的所有可能性后,我们在一个 iPad 真机上测试了一下,制作正式的的请求。
在 HealthKitManager.swift 文件中创建 getHeight() 方法,能够读取用户的高度数据。
    func getHeight(sampleType: HKSampleType , completion: ((HKSample!, NSError!) -> Void)!) {

        // Predicate for the height query
        let distantPastHeight = NSDate.distantPast() as NSDate
        let currentDate = NSDate()
        let lastHeightPredicate = HKQuery.predicateForSamplesWithStartDate(distantPastHeight, endDate: currentDate, options: .None)

        // Get the single most recent height
        let sortDescriptor = NSSortDescriptor(key: HKSampleSortIdentifierStartDate, ascending: false)

        // Query HealthKit for the last Height entry.
        let heightQuery = HKSampleQuery(sampleType: sampleType, predicate: lastHeightPredicate, limit: 1, sortDescriptors: [sortDescriptor]) { (sampleQuery, results, error ) -> Void in

                if let queryError = error {
                    completion(nil, queryError)
                    return
                }

                // Set the first HKQuantitySample in results as the most recent height.
                let lastHeight = results!.first

                if completion != nil {
                    completion(lastHeight, nil)
                }
        }

        // Time to execute the query.
        self.healthKitStore.executeQuery(heightQuery)
    }
我们第一步就是查询高度数据来创建一个猜测的时间参数,我们获取一段时间内的所有高度信息,从过去到现在,当然了,这就会返回给我们一个数组。我们只想要最近的高度,所以我们会让数据中最新的数据排在最前面。
在创建查询的过程中,我们会限制数组的总数为一。把可能出错的情况计算在内,我们把第一个也是唯一一个 item 作为 lastHeight 的结果。接着,我们搞定 getHeight() 方法。最后,执行查询对应用户的健康数据。
回到 TimerViewController.swift,在 App 出现在用户之前,我们假设已经获取了用户的准许,setHeight() 在 getHealthKitPermission() 被调用。
var height: HKQuantitySample?
首先,我们需要声明一个高度变量作为 HKQuantitySample 的实例。
    func setHeight() {
        // Create the HKSample for Height.
        let heightSample = HKSampleType.quantityTypeForIdentifier(HKQuantityTypeIdentifierHeight)

        // Call HealthKitManager's getSample() method to get the user's height.
        self.healthManager.getHeight(heightSample!, completion: { (userHeight, error) -> Void in

            if( error != nil ) {
                print("Error: \(error.localizedDescription)")
                return
            }

            var heightString = ""

            self.height = userHeight as? HKQuantitySample

            // The height is formatted to the user's locale.
            if let meters = self.height?.quantity.doubleValueForUnit(HKUnit.meterUnit()) {
                let formatHeight = NSLengthFormatter()
                formatHeight.forPersonHeightUse = true
                heightString = formatHeight.stringFromMeters(meters)
            }

            // Set the label to reflect the user's height.
            dispatch_async(dispatch_get_main_queue(), { () -> Void in
                self.heightLabel.text = heightString
            })
        })

    }
上面的 share() 方法,我们会创建我们的 setHeigth() 方法。高度数据例子表明我们请求之后返回的一个 HKQuantity,它的 identifier 也就是 HKQuantityTypeIdentifierHeight。
下一步,我们调用 getHeight() 方法,也就是我们在 manager 中创建的。有了高度,我们需要将它转换成合适的字符串,展示到我们的 Label 控件中。照例,我们要考虑所有可能的错误。
就这点而言,用户能够打开 App,看一下他们的高度,假设这里有记录高度的 App,开始计时器,然后追踪跑步或者走路的距离。下一步就是处理写入数据,所以用户可以记录所有的健身数据。
60分钟后或更短时间内用户完成运动,他/她会点击 Share 按钮将他们的距离发送到 Health 应用里。所以,在 share() 方法中,让我们调用 HealthKitManager.swift 里的 saveDistance() 方法,这样,数据和日期都能被归档,用户可以明天试着去挑战他/她自己的记录!
    @IBAction func share(sender: AnyObject) {
        healthManager.saveDistance(distanceTraveled, date: NSDate())
    }
回到 manager,我们创建 saveDistance() 方法,首先,我们需要让 HealthKit 知道我们想写入跑步距离和走路步数,接着,我们将计量单位换成英里,分配正式的数量。HealthKit 的 saveObject() 方法将会写入用户的健康数据。
    func saveDistance(distanceRecorded: Double, date: NSDate ) {

        // Set the quantity type to the running/walking distance.
        let distanceType = HKQuantityType.quantityTypeForIdentifier(HKQuantityTypeIdentifierDistanceWalkingRunning)

        // Set the unit of measurement to miles.
        let distanceQuantity = HKQuantity(unit: HKUnit.mileUnit(), doubleValue: distanceRecorded)

        // Set the official Quantity Sample.
        let distance = HKQuantitySample(type: distanceType!, quantity: distanceQuantity, startDate: date, endDate: date)

        // Save the distance quantity sample to the HealthKit Store.
        healthKitStore.saveObject(distance, withCompletion: { (success, error) -> Void in
            if( error != nil ) {
                print(error)
            } else {
                print("The distance has been recorded! Better go check!")
            }
        })
    }
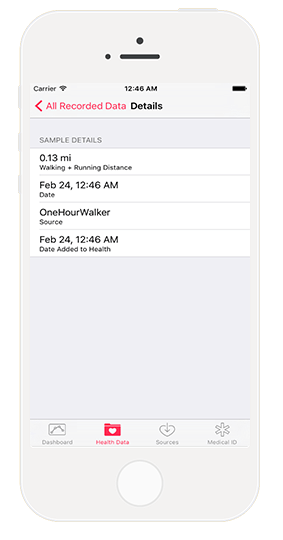
回到 Health 应用里,记录的数据会包含在 Walking + Running Distance 里。当然,我们也能看到一个具体的例子:Health Data tab > Fitness > Walking + Running Distance > Show All Data。我们的数据就在这清单里。点击一行,然后就会看到我们的图标(目前还空着)。再次点击这一行,就会出现所有的详细信息。
有了 OneHourWalker,我们已经成功地为全世界的 iOS 用户的健康贡献了我们的力量。然而,这仅仅是一个开始。仍然有更多利用 HealthKit 读取和写入健康数据的事情需要我们来做。
当然,能够获取用户的所有跟踪信息也是非常棒的,人们可以非常容易的进行每天和每天的比较,周和周的对比,以及其他朝着目标推进的对比。真正伟大之处在于,开发者能够提供全新的、有创造力的、有趣的方式来捕获这些数据。
同样的,HealthKit 应用是最有趣的测试了!
这里是我们最终版本的 OneHourWalker。
本文由 SwiftGG 翻译组翻译,已经获得作者翻译授权。