作者:MATTHEW MAHER,原文链接,原文日期:2015-11-12
译者:CoderAFI;校对:Cee;定稿:Channe
随着移动互联网快速发展,想要自己做一款用户喜欢的应用程序越来越困难。而且苹果提供的开发工具和资源也越发不能满足开发者在数据服务方面的需求。于是 BaaS 服务(Backend-as-a-Service)给开发者带来了新的选择。
谷歌的 Firebase 是目前最流行的 BaaS 服务。Firebase 在性能、易用性、可维护性方面做得都非常好。Firebase 的特色服务是实时同步的 JSON 结构数据库。这种数据库可以迅速感知数据变化并立马同步到其他的客户端和设备。换句话说,Firebase 同步功能快如闪电。
Firebase 同时提供了基于加密 SSL 链接的用户授权认证服务。在认证方面,你可以选择邮箱和密码、Facebook、Twitter、Github、Google 或者自定义这些组合来进行认证。
不仅仅是在 iOS 上,Firebase 还在 Android 和 JavaScript 平台上提供了 SDK。全平台共用一套实时数据库,Firebase 统一来管理数据,自动进行数据同步。
我们很难想象,拥有众多功能的 Firebase 会是一个经济实惠的选择。所以下面要揭露一下价格上不好的地方……
其实并没有。在写这篇教程的时候,Firebase 免费支持同时 100 个并发连接。这个并发数已经算比较大了。同时 100 个并发连接可以支持一个非常好的应用程序了。当然,如果每月付费 49 美元,就不会有上面的限制了。
FirebaseJokes 简介
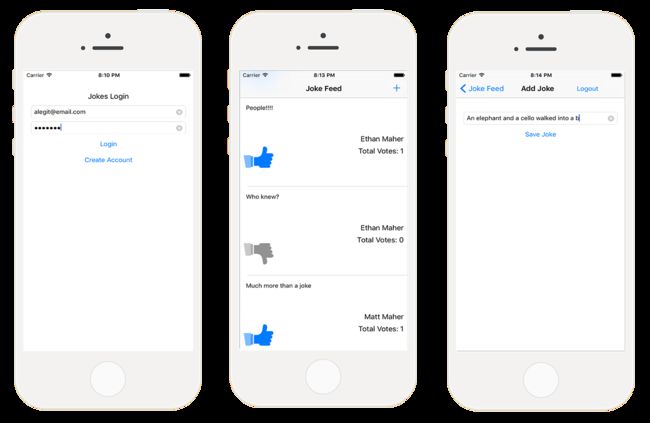
今天,我就带领大家用 Firebase 来做一款发布笑话的应用程序。这款应用允许用户用邮箱和密码进行注册和登录。登录成功之后就可以发布笑话,然后显示笑话的 tableview 会立刻更新。同样,如果其他人也发布了笑话,界面也会立马更新。为了增加应用程序的互动性,添加了点赞功能。如果笑话很有意思就会得到大家的赞誉。
下面是我们即将在 FirebaseJokes 中实现的功能列表:
- 创建帐号
- 邮箱密码登录
- 登出
- 对于登录用户跳过登录环节
- 发布新笑话
- 使用 UITableView 展示笑话、作者和点赞数
- 对好笑话进行点赞
现在,让我们下载初始工程。
首先打开 Main.Storyboard,App 的总体框架如下:
在我们开发这款应用过程中,我们会逐步了解 Firebase 的相关的用法和概念。由于 Firebase 使用起来非常简单,所以我们只需要花时间来开发 FirebaseJokes 业务部分就可以。
Firebase 概览
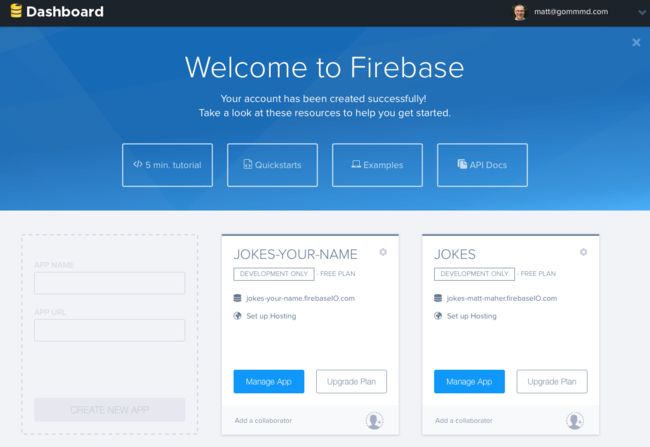
我们打开 Firebase 主页并注册一个账号,或者如果你已经有账号了可以直接登录。当然也支持谷歌账号注册登录。注册成功后,我们直接跳过官方为 JavaScript 准备的五分钟简明教程。我们在这里只需要查看 iOS 的版本即可。
想了解 Firebase 究竟有哪些功能,我们只需要点击 My First App 中的 Manage App 按钮。这个新页面就是 Firebase 控制台(Firebase Forge)。它是一个非常酷的可视化调试工具,并且值得我们观看新手引导教程。教程会指引你如何创建键、值数据,甚至可以用加号按钮来创建子节点数据。这是不是很像 JSON 呢?通过点按左上角的 Dashboard 图标便可以退出新手引导教程。
创建应用程序
现在,让开始创建 FirebaseJokes 吧。在 My First App 的左边,有个颜色较淡的框就是用来创建新应用的。在 APP NAME 的文本框中,输入「Jokes」;APP URL 的文本框中,输入「jokes-你的名字」。这样可以保证每个应用都有唯一的 url。最后点击 CREATE NEW APP 按钮,成功之后点击 Manage App 按钮。
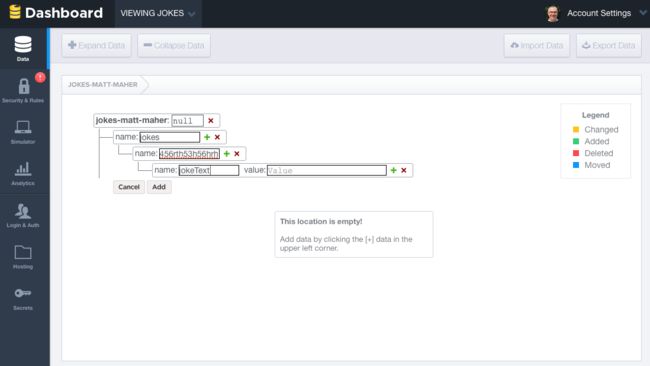
接下来,我们就进入了这个应用的控制中心界面。在这里,我们可以看到当前应用程序数据的实时更新变化。我们也可以在控制中心直接修改数据。为了更好的理解应用程序的工作流程,我们造一些假数据来模拟下,步骤如下:
- 在应用名称旁边点击小加号按钮;
- 在文本框中输入「jokes」;
- 在新建的「jokes」上再次点击加号来新创建一行;
- 在新的文本框中输入一些随机数;
- 在创建的随时数上点击加号再新创建一行;
- 输入「jokeText」作为键;
- 输入「What did one computer say to the other? 11001001010101」作为值。
上图就是在控制中心创建一条笑话后的样子。我们不仅仅需要创建「笑话」,也需要创建「用户」,但其实两者都非常类似。时不时的回来看下控制台上的应用程序的数据变化是一个非常好的习惯。
有一点我要指出的是 Firebase 上的数据都是以 JSON 对象的形式存储的。而 Parse 是采用表格的形式来存储的。当我们向 Firebase 的数据库中添加数据其实就是向现有 JSON 结构中添加一组键值对结构。刚刚我们创建的数据 JSON 结构如下:
json
{
  "jokes" : {
    "e32e223r44" : {
      "jokeText" : "What did one computer say to the other? 11001001010101"
    }
  }
}
现在你已经基本了解了 Firebase 数据的存储方式,让我们继续吧。
记住在我们开始验证用户信息之前,先把之前创建的假数据删掉,因为接下来我们会在 app 中编写这些数据。
在 FirebaseJokes 中,我们将会用邮箱和密码注册登录来进行授权认证。点击控制中心左边的「Login & Auth」面板来开启这个功能。在「Email & Password」选项卡下,选择「Enable Email & Password Authentication」复选框。选择完成后在复选框下面会出现密码重置的相关设置信息。同时,你也可以点击其他选项卡了解下其他登录授权方式。
安装 Firebase SDK 并配置 Base URL
我们返回到控制中心,就可以看到 Firebase 应用的 base url。这个 url 正是我们 app 中需要的那一个 url,所以我们打开 Xcode,将它复制并粘贴到 Constants.swift 中的 BASE_URL 处。
import Foundation

let BASE_URL = "https://jokes-matt-maher.firebaseio.com"
现在,我们终于可以在工程中集成 Firebase SDK 了。在此之前我们需要安装 CocoaPods。如果你没用过 CocoaPods,你可以去 CocoaPods 的官网上找到一些安装的指南。
CocoaPods 安装好后,打开终端,在你的工程目录下运行如下命令来初始化 Cocoapods 配置文件:
sh
cd
pod init
运行完后,会出现一个 Podfile 的文件。运行如下命令,在 Xcode 中打开 Podfile 文件:
sh
open -a Xcode Podfile
接下来,像这样编辑 Podfile 文件:
sh
platform :ios, '8.0'
use_frameworks!

pod 'Firebase', '>= 2.5.0'
最后,在工程目录下运行如下命令,下载安装 Firebase SDK:
sh
pod install
跳转到工程目录,双击打开 FirebaseJokes.xcworkspace 就可以开始敲代码了。
使用Firebase SDK
首先,我们在 DataService.swift 中做一些配置,为之后的所要做的事情铺路。最重要的就是定义一些引用。
import Foundation
import Firebase

class DataService {
    static let dataService = DataService()

    private var _BASE_REF = Firebase(url: "\(BASE_URL)")
    private var _USER_REF = Firebase(url: "\(BASE_URL)/users")
    private var _JOKE_REF = Firebase(url: "\(BASE_URL)/jokes")

    var BASE_REF: Firebase {
        return _BASE_REF
    }

    var USER_REF: Firebase {
        return _USER_REF
    }

    var CURRENT_USER_REF: Firebase {
        let userID = NSUserDefaults.standardUserDefaults().valueForKey("uid") as! String

        let currentUser = Firebase(url: "\(BASE_REF)").childByAppendingPath("users").childByAppendingPath(userID)

        return currentUser!
    }

    var JOKE_REF: Firebase {
        return _JOKE_REF
    }
}
导入 Firebase 框架后就可以使用 Firebase SDK 中的接口了。上面的 DataService 其实是一个和 Firebase 交互的服务类。为了能够读写数据,我们引用了 base url 来创建了一个 Firebase 的数据库。接下来,我们会将用户和笑话当做子节点来存储。获取这些子节点的内容,我们只要在 base url 后拼接上节点名称(例如 name)就可以访问了。为了让子节点操作更方便,我们也创建了对子节点的引用。
注意:创建一个数据库引用并不意味着就创建了一个 Firebase 服务的数据库连接。如果没有发起读和写的操作是无法获取数据的。
创建一个新账户
我们从创建 CreateAccountViewController.swift 文件来开始。对于要用 Firebase 的类,必须要在文件顶部导入 Firebase 框架。
import UIKit
import Firebase

class CreateAccountViewController: UIViewController {
在 createAccount() 方法中,我们将用户输入的文本用来创建新的用户。该方法其实是调用了 Firebase 的 createUser() 方法,代码如下:
@IBAction func createAccount(sender: AnyObject) {
    let username = usernameField.text
    let email = emailField.text
    let password = passwordField.text

    if username != "" && email != "" && password != "" {

        // Set Email and Password for the New User.

        DataService.dataService.BASE_REF.createUser(email, password: password, withValueCompletionBlock: { error, result in

            if error != nil {

                // There was a problem.
                self.signupErrorAlert("Oops!", message: "Having some trouble creating your account. Try again.")

            } else {

                // Create and Login the New User with authUser
                DataService.dataService.BASE_REF.authUser(email, password: password, withCompletionBlock: {
                    err, authData in

                    let user = ["provider": authData.provider!, "email": email!, "username": username!]

                    // Seal the deal in DataService.swift.
                    DataService.dataService.createNewAccount(authData.uid, user: user)
                })

                // Store the uid for future access - handy!
                NSUserDefaults.standardUserDefaults().setValue(result ["uid"], forKey: "uid")

                // Enter the app.
                self.performSegueWithIdentifier("NewUserLoggedIn", sender: nil)
            }
        })

    } else {
        signupErrorAlert("Oops!", message: "Don't forget to enter your email, password, and a username.")
    }

}
如果用户输入的信息无误,就可以注册并登录到 app 中。如果信息缺失,就会展示一些相应的提示信息。下面的代码来展示错误信息:
func signupErrorAlert(title: String, message: String) {

    // Called upon signup error to let the user know signup didn't work.

    let alert = UIAlertController(title: title, message: message, preferredStyle: UIAlertControllerStyle.Alert)
    let action = UIAlertAction(title: "Ok", style: .Default, handler: nil)
    alert.addAction(action)
    presentViewController(alert, animated: true, completion: nil)
}
实际上,创建用户是在 DataService.swift 的 createNewAccount() 方法中:
func createNewAccount(uid: String, user: Dictionary) {

    // A User is born.

    USER_REF.childByAppendingPath(uid).setValue(user)
}
要向 Firebase 数据库中保存数据,你只需要调用 setValue 方法。在上面的代码中,将会根据 uid 保存一个新的 user 对象到 users 中(例如 /users/1283834)。
除了将用户存储到 Firebase 数据库,我们还需要在本地用 NSUserDefaults 来存储用户的 uid。这样可以实时跟踪当前登录用户。
用户登录
在我们深入探讨之前,我们在 LoginViewController.swift 文件中引入 Firebase 框架。在这个类中我们将会判断用户是否登录过,如果没用登录则跳转到登录界面。
在 viewDidAppear() 方法中,我们会检查存储的 uid 是否为空,以此来验证用户是否登录。如果检查通过,则可以直接跳过登录;反之进行登录授权。
override func viewDidAppear(animated: Bool) {
    super.viewDidAppear(animated)

    // If we have the uid stored, the user is already logger in - no need to sign in again!

    if NSUserDefaults.standardUserDefaults().valueForKey("uid") != nil && DataService.dataService.CURRENT_USER_REF.authData != nil {
        self.performSegueWithIdentifier("CurrentlyLoggedIn", sender: nil)
    }
}
当用户点击 Login 按钮时,tryLogin() 方法就会执行。在该方法中加入如下代码并添加一个 loginErrorAlert 的辅助方法:
@IBAction func tryLogin(sender: AnyObject) {

    let email = emailField.text
    let password = passwordField.text

    if email != "" && password != "" {

        // Login with the Firebase's authUser method

        DataService.dataService.BASE_REF.authUser(email, password: password, withCompletionBlock: { error, authData in

            if error != nil {
                print(error)
                self.loginErrorAlert("Oops!", message: "Check your username and password.")
            } else {

                // Be sure the correct uid is stored.

                NSUserDefaults.standardUserDefaults().setValue(authData.uid, forKey: "uid")

                // Enter the app!

                self.performSegueWithIdentifier("CurrentlyLoggedIn", sender: nil)
            }
        })

    } else {

        // There was a problem

        loginErrorAlert("Oops!", message: "Don't forget to enter your email and password.")
    }
}

func loginErrorAlert(title: String, message: String) {

    // Called upon login error to let the user know login didn't work.

    let alert = UIAlertController(title: title, message: message, preferredStyle: UIAlertControllerStyle.Alert)
    let action = UIAlertAction(title: "Ok", style: .Default, handler: nil)
    alert.addAction(action)
    presentViewController(alert, animated: true, completion: nil)
}
Firebase 默认支持用户邮箱和密码进行用户授权认证。tryLogin() 方法调用了 Firebase 的 authUser() 方法来检查当前邮箱和密码是否已经注册过。如果注册过,就能获取用户的 uid ,登录成功进入 app。如果没有,我们则给出一些其他尝试的提示。
既然现在 app 已经完成了用户注册和登录功能,接下来我们就来看看如何对笑话数据进行处理。
笑话的数据模型
什么是笑话?这个哲学问题我们可以以后再回答,或者看下 FirebaseJokes 上的一个笑话就会明白了。对我们而言,抽象出一个 Joke 数据模型更加重要。
我们在 Joke.swift 中导入 Firebase 框架。在我们的数据库中,一个 joke 对象映射一个唯一编号。这个自动生成的编号包含了 joke 中的如下属性:
- jokeText
- jokeVotes
- username(笑话的作者)
我们将笑话的 id、key 和内容,以字典的形式作为参数,通过 init() 方法来新建一个笑话对象。
class Joke {
    private var _jokeRef: Firebase!

    private var _jokeKey: String!
    private var _jokeText: String!
    private var _jokeVotes: Int!
    private var _username: String!

    var jokeKey: String {
        return _jokeKey
    }

    var jokeText: String {
        return _jokeText
    }

    var jokeVotes: Int {
        return _jokeVotes
    }

    var username: String {
        return _username
    }

    // Initialize the new Joke

    init(key: String, dictionary: Dictionary) {
        self._jokeKey = key

        // Within the Joke, or Key, the following properties are children

        if let votes = dictionary["votes"] as? Int {
            self._jokeVotes = votes
        }

        if let joke = dictionary["jokeText"] as? String {
            self._jokeText = joke
        }

        if let user = dictionary["author"] as? String {
            self._username = user
        } else {
            self._username = ""
        }

        // The above properties are assigned to their key.

        self._jokeRef = DataService.dataService.JOKE_REF.childByAppendingPath(self._jokeKey)
    }
}
添加新的笑话
在 AddJokeViewController.swift 文件中,是时候引入 Firebase 框架了。在这个类中,我们将完成让用户添加一个笑话,发送到 Firebase 服务上,然后立刻推送到各个设备上进行同步展示。
首先在 viewDidLoad() 方法中,我们首先获取当前用户的用户名,来当做新创建笑话的作者,代码如下:
override func viewDidLoad() {
    super.viewDidLoad()

    // Get username of the current user, and set it to currentUsername, so we can add it to the Joke.

    DataService.dataService.CURRENT_USER_REF.observeEventType(FEventType.Value, withBlock: { snapshot in

        let currentUser = snapshot.value.objectForKey("username") as! String

        print("Username: \(currentUser)")
        self.currentUsername = currentUser
        }, withCancelBlock: { error in
            print(error.description)
    })
}
当 saveJoke() 方法被调用时,将会创建一个新的笑话的字典对象。这个字典对象会包含由 jokeField 中的文字组成的笑话的内容、投票数(默认为 0)以及作者名(当前用户的用户名)。这些值将通过 DataSerivce 中的 createNewJoke() 方法发送到服务器来进行存储。
在 AddJokeViewController 类中声明如下变量:
var currentUsername = ""
更新 saveJoke() 方法:
@IBAction func saveJoke(sender: AnyObject) {

    let jokeText = jokeField.text

    if jokeText != "" {

        // Build the new Joke.
        // AnyObject is needed because of the votes of type Int.

        let newJoke: Dictionary = [
            "jokeText": jokeText!,
            "votes": 0,
            "author": currentUsername
        ]

        // Send it over to DataService to seal the deal.

        DataService.dataService.createNewJoke(newJoke)

        if let navController = self.navigationController {
            navController.popViewControllerAnimated(true)
        }
    }
}
我们用一个字典对象来临时存储笑话数据。并将该字典传递给 DataService 中的 createNewJoke() 方法来发送到服务器端进行存储。在 DataSerivce.swift 文件中,添加 createNewJoke() 方法:
func createNewJoke(joke: Dictionary) {

    // Save the Joke
    // JOKE_REF is the parent of the new Joke: "jokes".
    // childByAutoId() saves the joke and gives it its own ID.

    let firebaseNewJoke = JOKE_REF.childByAutoId()

    // setValue() saves to Firebase.

    firebaseNewJoke.setValue(joke)
}
我们是通过 Firebase 的 setValue() 方法来存储的笑话对象。但是也不要忽略我们调用了 Joke 数据库引用对象的 childByAutoId 方法。通过调用此方法,Firebase 会为每一个笑话生成唯一的编号,来确保笑话存储的唯一性。
用户登出
这个功能通常会出现在设置和个人简介部分。但是我们就姑且把登出功能放在 AddJokeViewController.swift 类中吧。或者说,这就是一个最大的笑话。
logout() 方法实际上是调用了 Firebase 的 unauth() 方法来让用户退出登录。在用户登出的同时,我们需要删除在 LoginViewController 中存储在本地的 uid 。
像这样更新 logout 部分的方法:
@IBAction func logout(sender: AnyObject) {

    // unauth() is the logout method for the current user.

    DataService.dataService.CURRENT_USER_REF.unauth()

    // Remove the user's uid from storage.

    NSUserDefaults.standardUserDefaults().setValue(nil, forKey: "uid")

    // Head back to Login!

    let loginViewController = self.storyboard!.instantiateViewControllerWithIdentifier("Login")
    UIApplication.sharedApplication().keyWindow?.rootViewController = loginViewController
}
如果没有删除用户的 uid,可能会导致用户再次登录的时候出现问题,这里要注意一下。
展示所有的笑话
最后就是从 Firebase 上获取笑话数据展示出来。我们将会在 JokesFeedTableViewController.swift 文件中用一个 UITableView 来展示所有的笑话。在这里我们还是要先导入 Firebasde 框架。
在 viewDidLoad() 方法中,配置 observeEventType() 方法。Firebase 是通过数据库的引用对象来异步监听数据变化来获取更新数据的。这个方法是在导航到 JokesFeedTableViewController.swift 界面时,在 viewDidLoad() 方法中被调用的。当数据库有任何笑话数据变化时这个监听方法就会被调用,代码如下:
var jokes = [Joke]()

override func viewDidLoad() {
   super.viewDidLoad()

   // observeEventType is called whenever anything changes in the Firebase - new Jokes or Votes.
   // It's also called here in viewDidLoad().
   // It's always listening.

   DataService.dataService.JOKE_REF.observeEventType(.Value, withBlock: { snapshot in

       // The snapshot is a current look at our jokes data.

       print(snapshot.value)

       self.jokes = []

       if let snapshots = snapshot.children.allObjects as? [FDataSnapshot] {

           for snap in snapshots {

               // Make our jokes array for the tableView.

               if let postDictionary = snap.value as? Dictionary {
                   let key = snap.key
                   let joke = Joke(key: key, dictionary: postDictionary)

                   // Items are returned chronologically, but it's more fun with the newest jokes first.

                   self.jokes.insert(joke, atIndex: 0)
               }
           }

       }

       // Be sure that the tableView updates when there is new data.

       self.tableView.reloadData()
   })
}
在回调方法中返回了一些笑话对象。我们用一个数组来存储这些对象,并展示在 tableView 上。我们想让最新的笑话保持在顶部,但是 Firebase 返回的笑话数据是按照时间排序的,所以我们必须将数据反向插入。
每次当笑话更新的时候,我们别忘了调用 tableView 的 reloadData 方法,这样才能让新的数据展示出来。
我们剩下的工作就是在 tableView:cellForRowAtIndexPath: 方法中指定自定义 cell:JokeCellTableViewCell.swift。在 JokeCellTableViewCell.swift 文件中创建一个 configureCell() 方法,当执行 tableView:cellForRowAtIndexPath: 时调用该方法,代码如下:
override func numberOfSectionsInTableView(tableView: UITableView) -> Int {

    return 1
}

override func tableView(tableView: UITableView, numberOfRowsInSection section: Int) -> Int {

    return jokes.count
}


override func tableView(tableView: UITableView, cellForRowAtIndexPath indexPath: NSIndexPath) -> UITableViewCell {

    let joke = jokes[indexPath.row]

    // We are using a custom cell.

    if let cell = tableView.dequeueReusableCellWithIdentifier("JokeCellTableViewCell") as? JokeCellTableViewCell {

        // Send the single joke to configureCell() in JokeCellTableViewCell.

        cell.configureCell(joke)

        return cell

    } else {

        return JokeCellTableViewCell()

    }
}
在 JokeCellTableViewCell.swift 文件中的 configureCell() 方法里,我们需要设置 label 标签以及添加监听投票的点按逻辑。
func configureCell(joke: Joke) {
    self.joke = joke

    // Set the labels and textView.

    self.jokeText.text = joke.jokeText
    self.totalVotesLabel.text = "Total Votes: \(joke.jokeVotes)"
    self.usernameLabel.text = joke.username

    // Set "votes" as a child of the current user in Firebase and save the joke's key in votes as a boolean.

    voteRef = DataService.dataService.CURRENT_USER_REF.childByAppendingPath("votes").childByAppendingPath(joke.jokeKey)

    // observeSingleEventOfType() listens for the thumb to be tapped, by any user, on any device.

    voteRef.observeSingleEventOfType(.Value, withBlock: { snapshot in

        // Set the thumb image.

        if let thumbsUpDown = snapshot.value as? NSNull {

            // Current user hasn't voted for the joke... yet.

            print(thumbsUpDown)
            self.thumbVoteImage.image = UIImage(named: "thumb-down")
        } else {

            // Current user voted for the joke!

            self.thumbVoteImage.image = UIImage(named: "thumb-up")
        }
    })
}
UITapGestureRecognizer 手势监听是在 awakeFromNib() 方法中添加的。在类的顶部,同时要加上 Firebase 和 Joke 对象的引用。
var joke: Joke!
var voteRef: Firebase!

override func awakeFromNib() {
    super.awakeFromNib()

    // UITapGestureRecognizer is set programatically.

    let tap = UITapGestureRecognizer(target: self, action: "voteTapped:")
    tap.numberOfTapsRequired = 1
    thumbVoteImage.addGestureRecognizer(tap)
    thumbVoteImage.userInteractionEnabled = true
}
在 voteTapped() 方法中,有另外一个监听者在等待着用户点击后触发回调。在这个方法中,将会把投票数通过 configureCell() 方法中的 voteRef 对象存储到对应笑话下键为 votes 的字段值中。
func voteTapped(sender: UITapGestureRecognizer) {

    // observeSingleEventOfType listens for a tap by the current user.

    voteRef.observeSingleEventOfType(.Value, withBlock: { snapshot in

        if let thumbsUpDown = snapshot.value as? NSNull {
            print(thumbsUpDown)
            self.thumbVoteImage.image = UIImage(named: "thumb-down")

            // addSubtractVote(), in Joke.swift, handles the vote.

            self.joke.addSubtractVote(true)

            // setValue saves the vote as true for the current user.
            // voteRef is a reference to the user's "votes" path.

            self.voteRef.setValue(true)
        } else {
            self.thumbVoteImage.image = UIImage(named: "thumb-up")
            self.joke.addSubtractVote(false)
            self.voteRef.removeValue()
        }

    })
}
voteTapped() 方法也会通过一个布尔值调用 addSubtractVote() 函数来更新 Joke.swift 中的投票数。如果参数是 True,则代表用户给这个笑话投票了;反之,False 则代表没有投过票。
// Add or Subtract a Vote from the Joke.

func addSubtractVote(addVote: Bool) {

    if addVote {
        _jokeVotes = _jokeVotes + 1
    } else {
        _jokeVotes = _jokeVotes - 1
    }

    // Save the new vote total.

    _jokeRef.childByAppendingPath("votes").setValue(_jokeVotes)

}
在 Joke.swift 的文件中,addSubtractVote() 方法使用了这个布尔值完成对票数的加减。Firebase 所提供的 setValue() 方法用来更新当前笑话的投票数到远端数据库。
测试
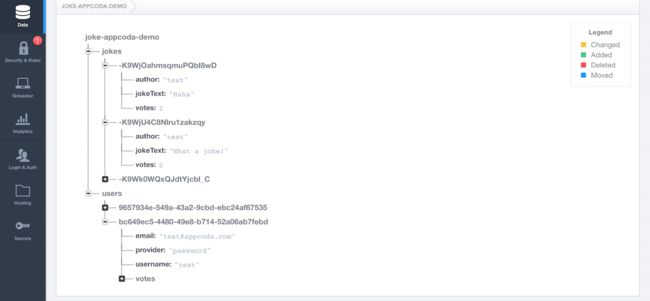
现在,可以对这个应用进行测试了。创建一个新用户并创建一些笑话。也可以对这些笑话进行投票点赞。然后回到 Firebase 的控制中心,就可以看到刚刚创建的用户和笑话,如下图:
总结
完成了!我们基于 Firebase 开发了一个用户体验不错的小应用。很有成就感吧!
这里是完成后的代码。
这个应用只是一个小的开始,基于 Firebase 服务来开发应用程序将会有无限可能。
尝试下为 FirebaseJokes 添加用户授权的功能;也可以添加聊天的功能;你会发现 Firebase 提供了无穷无尽的可能性。
关于图片存储的建议:Firebase 存储服务也有其局限性,像图片文件就不太适合用 Firebase 来存储,应该存储在单独的图片服务器上。像上面的纯文本存储型应用使用 Firebase 是没有问题的,但是如果应用要存储大型文件,最好做一套单独的文件服务。
好了,现在就是加入 Firebase 服务阵营的最好时机,行动起来吧。
本文由 SwiftGG 翻译组翻译,已经获得作者翻译授权,最新文章请访问 http://swift.gg。


