本节学习内容:
1.导航控制的基本概念
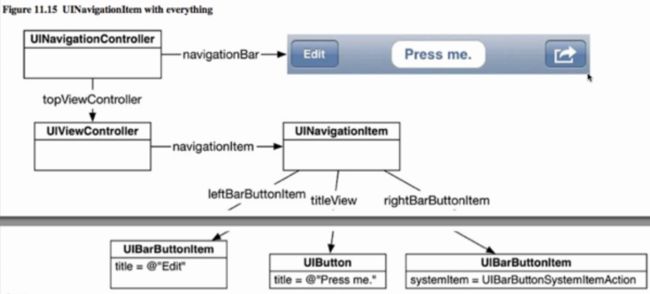
2.导航控制器的基本原理
3.导航控制器的实现
创建一个视图控制器 命名为VCRoot
【VCRoot.m】
#import "VCRoot.h"
-(void)viewDidLoad{
self.view.backgroundColor=[UIColor yellowColor];
//设置导航栏的标题文字
self.title=@"根视图";
//设置导航元素项目的标题,如果navigationItem.title为空,系统使用self.title作为标题,如果不navigationItem.title不为空,将navigationItem.title设为标题内容
self.navigationItem.title=@"Title";
//创建一个导航栏左侧按钮,根据title文字来创建按钮,P1按钮上的文字,P2:按钮风格,P3:事件拥有者 ,P4:按钮事件
UIBarButtonItem* leftBtn=[[UIBarButtonItem alloc]initWithTitle:@"返回" style:UIBarButtonItemStyleDone target:self action:@selector(pressLeft)];
//将导航元素项的左侧按钮赋值
self.navigationItem.leftBarButtonItem=leftBtn;
//创建一个导航栏右侧按钮,根据系统风格来创建按钮,只需要指定风格样式,系统峁格的按钮内容或者标题文字不能改变;P2:按钮风格,P3:事件拥有者 ,P4:按钮事件
UIBarButtonItem* rightBtn=[[UIBarButtonItem alloc]initWithVarButtonSystemItem:UIBarButtonSystemItemAdd target:self action:@selector(pressRight)];
self.navigationItem.rightBarButtonItem=rightBtn;
//标签对象
UILable* label=[[UILabel alloc]initWithFrame:CGRectMake(10,10,50,40)];
label.text=@"test";
label.textAlignment=NSTextALignmentCenter;
label.textColor=[UIColor blueColor];
//将任何类型的控件添加到导航按钮的方法
UIBarButtonItem* item03=[UIBarButtonItem alloc]initWithCustomeView:label];
//创建按钮数组
NSArray* arrayBtn[NSArray arrayWithObjects:rightBtn,item03,nil];
//将右侧按钮数组赋值
self.navigationItem.rightBarButtonItems=arrayBtn;
}
-(void)pressLeft{
NSLog(@"左侧按钮被按下!");
}
-(void)pressRight{
NSLog(@"右侧按钮被按下!");
}
【AppDelegate.m】
-(Bool)application:(UIApplication *)application didFinishLaunchingWithOptios:(NSDictionary *)launchOptions{
//创建window
self.window=[[UIWindow alloc] initWithFrame:[UIScreen mainScreen].bounds];
//创建一个根视图控制器
VCRoot* root=[[VCRoot alloc]init];
//创建导航控制器,导航控制器主要用来管理多个视图控制器的切换,层级的方式来管理多个视图控制器,创建控制器时,一定要有一个根视图控制器。参数1:就是做导航控制的根视图控是器
UINavigationConroller* nav=[UINavingationConroller alloc]initWithRootViewConroller:root)
//将window的根视图设置为导般控制器
self.window.rootViewConroller=nav;
[self.window makekeyAndVisble];
return YES;
}
