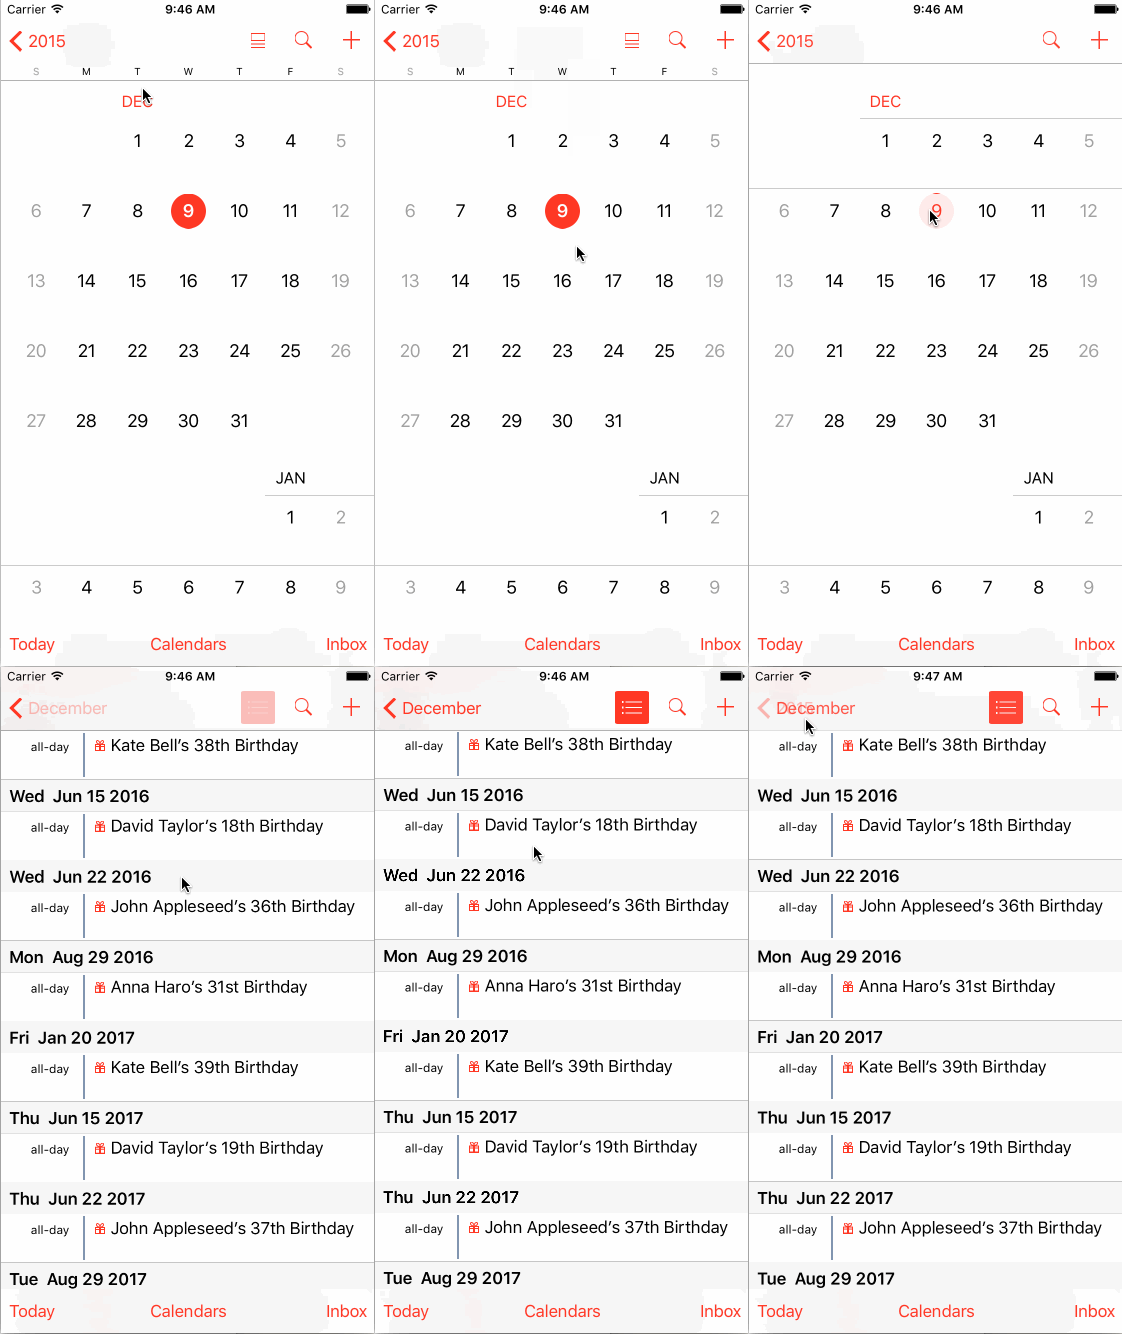
先看看系统日历的Transition效果
这里面包含了好几个动画
- 在push的时候,前面一个Controller从中间截断;后面的Conntroller则从中间位置上升。
- 在pop的时候,以相反的动画显示
- navigationBar包含了一个淡入淡出的效果
得益于iOS 7新增UIViewControllerAnimatedTransitioning,用现有的Core Animation就可用轻松实现。值得一提的是,《iOS 7 by Tutorials》对这方面点讲解非常透彻;还有VCTransitionsLibrary这个库,实现了很多特效,我很多代码就是参考他里面的实现。更深层次,WWDC 2013 #218——Custom Transitions Using View Controllers,然而对初学者并不适用。
要实现一个自定义的Transition,概括起来有3个步骤:
- 创建一个animation controller。这个controller只是一个普通NSObject对象,但要实现
UIViewControllerAnimatedTransitioning协议,这个协议有一个重要的方法- (void)animateTransition:(id,参数transitionContext对象包含了所有动画需要的UIView_Nonnull)transitionContext - 设置self.navigationController.delegate。它的作用就是,在push、pop、present Controller时,返回上面的animation controller,替换系统默认的效果
- 最后,在animation controller实现动画。
animation controller是transition的核心。可以理解它是一个临时controller,在这个里面有一个containerView,以及前、后controller的view。把前、后的view放在containerView里做动画,这就是Transition。
下面从0开始,一步一步完成这个自定义Transition。
首先建一个Single View的工程calenderAnimator。我不太习惯用storyboard,一般我会删掉它,然后在AppDelegate.m加上下面代码
- (BOOL)application:(UIApplication *)application didFinishLaunchingWithOptions:(NSDictionary *)launchOptions {
    // Override point for customization after application launch.
    ViewController *mainViewController = [[ViewController alloc] init];

    UINavigationController *navigationController = [[UINavigationController alloc] initWithRootViewController:mainViewController];

    self.window = [[UIWindow alloc] initWithFrame:[[UIScreen mainScreen] bounds]];
    [self.window setRootViewController:navigationController];
    [self.window setBackgroundColor:[UIColor whiteColor]];
    [self.window makeKeyAndVisible];

    return YES;
}
增加一个UINavigationController,方便实现push和pop动作。然后在ViewConrtoller.m里添加代码
- (void)viewDidLoad {
    [super viewDidLoad];
    CGFloat r = RND_COLOR;
    CGFloat g = RND_COLOR;
    CGFloat b = RND_COLOR;
    self.view.backgroundColor = [UIColor colorWithRed:r green:g blue:b alpha:1];

    self.title = [NSString stringWithFormat:@"#%0X%0X%0X", (int)(r*255), (int)(g*255), (int)(b*255)];

    UIImageView *imageView = [[UIImageView alloc] initWithImage:[UIImage imageNamed:@"CatInBin"]];
    imageView.center = self.view.center;
    [self.view addSubview:imageView];

}

- (void)viewDidAppear:(BOOL)animated
{
    NSUInteger count = self.navigationController.viewControllers.count;
    if (count > 1) {
        self.navigationController.navigationBar.tintColor = self.navigationController.viewControllers[count - 2].view.backgroundColor;
    }
}

- (void)touchesBegan:(NSSet *)touches withEvent:(UIEvent *)event
{
    [self.navigationController pushViewController:[ViewController new] animated:YES];
}
给ViewController加上随机背景色和一张图片。任意点击一次就push一个新的ViewController。设置navigationController的tintColor,方便观察上一个ViewController的背景色。
到目前为止,这些代码都是我们熟悉的操作。Transition效果也是默认的左右滑入,下面就来实现这3个步骤。
步骤1:创建CalenderAnimationController
@interface CalenderAnimationController : NSObject

@property (nonatomic, assign) BOOL reverse;

@end
@implementation CalenderAnimationController

- (NSTimeInterval)transitionDuration:(id)transitionContext
{
    return 1.0;
}

- (void)animateTransition:(id)transitionContext
{
    UIViewController *fromVC = [transitionContext viewControllerForKey:UITransitionContextFromViewControllerKey];
    UIViewController *toVC = [transitionContext viewControllerForKey:UITransitionContextToViewControllerKey];
    UIView *toView = toVC.view;
    UIView *fromView = fromVC.view;

    if(self.reverse){
        [self executeReverseAnimation:transitionContext fromVC:fromVC toVC:toVC fromView:fromView toView:toView];
    } else {
        [self executeForwardsAnimation:transitionContext fromVC:fromVC toVC:toVC fromView:fromView toView:toView];
    }
}
@end
reverse属性用于区分push还是pop,对应不同的动画实现。CalenderAnimationController实现了两个方法。transitionDuration:返回的时动画时长;animateTransition:是动画的回调方法,这里我们通过2个key已经拿到了fromView和toView。
步骤2:设置delegate
在ViewController加上代码
@interface ViewController ()

@property CalenderAnimationController *animationController;

@end

@implementation ViewController

- (void)viewDidLoad {
    //保持原样
    self.animationController = [[CalenderAnimationController alloc] init];
}

- (void)viewDidAppear:(BOOL)animated
{
    self.navigationController.delegate = self;
    //保持原样
}
- (id) navigationController:(UINavigationController *)navigationController
                                   animationControllerForOperation:(UINavigationControllerOperation)operation
                                                fromViewController:(UIViewController *)fromVC
                                                  toViewController:(UIViewController *)toVC
{
    self.animationController.reverse = (operation == UINavigationControllerOperationPop);
    return self.animationController;
}
@end
在viewDidAppear:设置navigationController.delegate = self。不能在viewDidLoad设置,因为所有的ViewController共享一个navigationController,当pop出去的controller被回收时,navigationController.delegate就会被置为nil,也就没有了动画。
ViewController新加了一个方法
- (nullable id )navigationController:(UINavigationController *)navigationController
                                   animationControllerForOperation:(UINavigationControllerOperation)operation
                                                fromViewController:(UIViewController *)fromVC
                                                  toViewController:(UIViewController *)toVC  NS_AVAILABLE_IOS(7_0);
这个方法返回前面创建出来的animationController,并通过operation得到当前的操作类型。步骤2的主要目的,就是让系统回调这个方法。
步骤3:实现动画
前面的所有工作只是铺垫,为的是让系统使用我们自己实现的动画,而非默认动画。我们要的动画有3个:1、前面的View分为两半对开移动;2、后面的View从中间开始向上移动;3、导航条的Fade效果。
动画3其实不需要写任何代码,当我们接管了系统的transition,导航条就自动有这个效果。动画2用简单的隐式动画就能完成。动画1没有对应的隐式动画,麻烦一点。如果把前面的View拆分为2个单独的View,各自完成一个移动的动画就简单很多了。而拆分的过程,用UIView的snapshot来截屏即可。
- (void)executeForwardsAnimation:(id)transitionContext fromVC:(UIViewController *)fromVC toVC:(UIViewController *)toVC fromView:(UIView *)fromView toView:(UIView *)toView
{
    UIView *containerView = [transitionContext containerView];

    [containerView addSubview:fromView];
    fromView.frame = CGRectOffset(toView.frame, toView.frame.size.width, 0);
    [containerView addSubview:toView];

    CGRect upRegion = CGRectMake(0, 0, fromView.frame.size.width, fromView.frame.size.height/2);
    UIView *upView = [fromView resizableSnapshotViewFromRect:upRegion afterScreenUpdates:NO withCapInsets:UIEdgeInsetsZero];
    upView.frame = upRegion;
    [containerView addSubview:upView];

    CGRect downRegion = CGRectMake(0, fromView.frame.size.height/2, fromView.frame.size.width, fromView.frame.size.height/2);
    UIView *downView = [fromView resizableSnapshotViewFromRect:downRegion afterScreenUpdates:NO withCapInsets:UIEdgeInsetsZero];
    downView.frame = downRegion;
    [containerView addSubview:downView];

    toView.frame = CGRectOffset(toView.frame, 0, toView.frame.size.height/2);

    NSTimeInterval duration = [self transitionDuration:transitionContext];

    [UIView animateWithDuration:duration
                          delay:0.0
                        options:UIViewAnimationOptionCurveEaseOut
                     animations:^{
                         upView.frame = CGRectOffset(upView.frame, 0, -upView.frame.size.height);
                         downView.frame = CGRectOffset(downView.frame, 0, downView.frame.size.height);

                         toView.frame = CGRectOffset(toView.frame, 0, -toView.frame.size.height/2);
                     }
                     completion:^(BOOL finished) {
                         [upView removeFromSuperview];
                         [downView removeFromSuperview];
                         fromView.frame = containerView.frame;
                         [transitionContext completeTransition:![transitionContext transitionWasCancelled]];
                     }];
}
第一步,先获得containerView,再把fromView和toView添加进来。这一步是需要手动完成的,containerView默认是没有subview。fromView我们先隐藏起来,等动画完成了再显示。
接下来创建upView和downView,利用iOS 7新加的- (UIView *)resizableSnapshotViewFromRect:(CGRect)rect afterScreenUpdates:(BOOL)afterUpdates withCapInsets:(UIEdgeInsets)capInsets,它可以截取UIView任意的一部分,拷贝到另一个UIView。
真正的动画部分就只有upView、downView和toView的frame操作,3行代码。等动画完成后,upView和downView就没有存在的意义,从contrainerView移除。再调用[transitionContext completeTransition:![transitionContext transitionWasCancelled]],通知系统transition全部完成。至此,animation controller就完成了它的使命。
- (void)executeReverseAnimation:(id只是上一个动画的反转,在此就不贴代码了。
完整代码
