本篇博客仅供学习,没有实际项目意义,仅供学习之用
Ansible中文权威指南:http://www.ansible.com.cn/
- 实验目的:
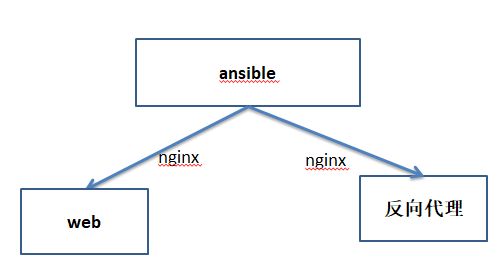
配置中心服务器自动配置两台机器分别部署为nginx的反响为例服务和nginx的web服务。
配置密钥连接:
进入用户的ssh密钥路径
cd /root/.ssh/
生成公私钥
ssh-keygen -t rsa -b 4096
将公钥发送给远程目标主机
ssh-copy-id -i id_rsa.pub [email protected]
测试连接
ssh [email protected]
定义角色的路径:默认位置
[root@localhost ~]# less /etc/ansible/ansible.cfg
# additional paths to search for roles in, colon separated
#roles_path    = /etc/ansible/roles
创建相应的目录:
~]# cd /etc/ansible/roles/
[root@localhost roles]#  mkdir -pv ./nginx/{files,templates,tasks,handlers,vars,meta,dafault}
创建的目录结构
[root@localhost roles]# tree
├── memcached
            ├── dafault
            ├── files
            ├── handlers
            ├── meta
            ├── tasks
            ├── templates
            └── vars
配置nginx思路:
安装程序包,复制配置文件,启动服务。
配置/etc/ansible/hosts
[root@localhost nginx]# vim /etc/ansible/hosts
[tomcat]
10.10.11.133
[web]
10.10.11.2
yaml文件,play_books文件,
编辑:/nginx/tasks/main.yml文件(设置任务列表)
[root@localhost nginx]# vim tasks/main.yml
- name: install epel-release package
    yum: name=epel-release state=installed
- name: install nginx package
    yum: name=nginx state=installed
       #准备目录路径
- name: create doc root
    file: path={{ docroot }} state=directory
    when: servertype == 'web'
- name: install home page
    copy: src=index.html dest={{ docroot }}/
    when: servertype == 'web'
      #自动会去templates目录下找j2文件
     #复制带变量的文件需要使用templates来执行
- name: install web conf file
    template: src=server.conf.j2 dest=/etc/nginx/conf.d/server.conf
    when: servertype == 'web'
    notify: reload nginx
    #新加proxy部分配置段
- name: install proxy conf file
    template: src=proxy.conf.j2 dest=/etc/nginx/conf.d/server.conf
    when: servertype == 'proxy'
    notify: reload nginx
- name: start nginx service
    service: name=nginx enabled=true state=started
使用templates复制文件时的路劲设置方式:
  相对于etc/ansible/roles/nginx的相对路径
  template: copy: src=templates/server.conf.j2 dest=/etc/nginx/conf.d/server.conf
  完全绝对路径
  template: copy: src=/etc/ansible/roles/nginx/templates/server.conf.j2 dest=/etc/nginx/conf.d/server.conf
  需要自动去templates目录下自动识别
  template: src=server.conf.j2 dest=/etc/nginx/conf.d/server.conf
nginx的模版配置文件(.j2文件)
[root@localhost nginx]# vim templates/server.conf.j2
server {
                listen 80;
                server_name {{ ansible_fqdn }} {{ ansible_hostname  }};

                location / {
                                root {{ docroot }};
                                index index.jsp index.html;
                }
}
创建proxy的模版文件
[root@localhost nginx]# vim templates/proxy.conf.j2
server {
                listen 80;
                server_name {{ ansible_fqdn }} {{ ansible_hostname }};
                location / {
                                proxy_pass {{ backendurl }};
                }
}
触发器文件配置
[root@localhost nginx]# vim handlers/main.yml
- name: reload nginx
    server: name=nginx state=reloaded
这个nginx wed服务,需要测试页,编辑网站的主页:
[root@localhost nginx]# vim files/index.html
Welcome to nginx
定义变量:
[root@localhost nginx]# vim vars/main.yml
servertype: web
#设置变量,代理服务器的代理目标主机变量
backendurl: 'http://127.0.0.1:8080'
    #定义网站主页的路径
docroot: /data/nginx/
yaml文件play_books文件
- hosts: tomcat
  remote_user: root
  roles:
  - { role: nginx, servertype: proxy }

 - hosts: web
   remote_user: root
   roles:
   - nginx
  注意:缩紧要对其否则会出现格式错误
进行语法检测:
[root@localhost ansible]# ansible-playbook --syntax-check nginx.yml
进行测试执行:
[root@localhost ansible]# ansible-playbook --check nginx.yml
最后的目录结构如下:
[root@localhost nginx]# tree
.
├── dafault
├── files
│   └── index.html
├── handlers
│   └── main.yml
├── meta
├── tasks
│   └── main.yml
├── templates
│   ├── proxy.conf.j2
│   └── server.conf.j2
└── vars
        └── main.yml
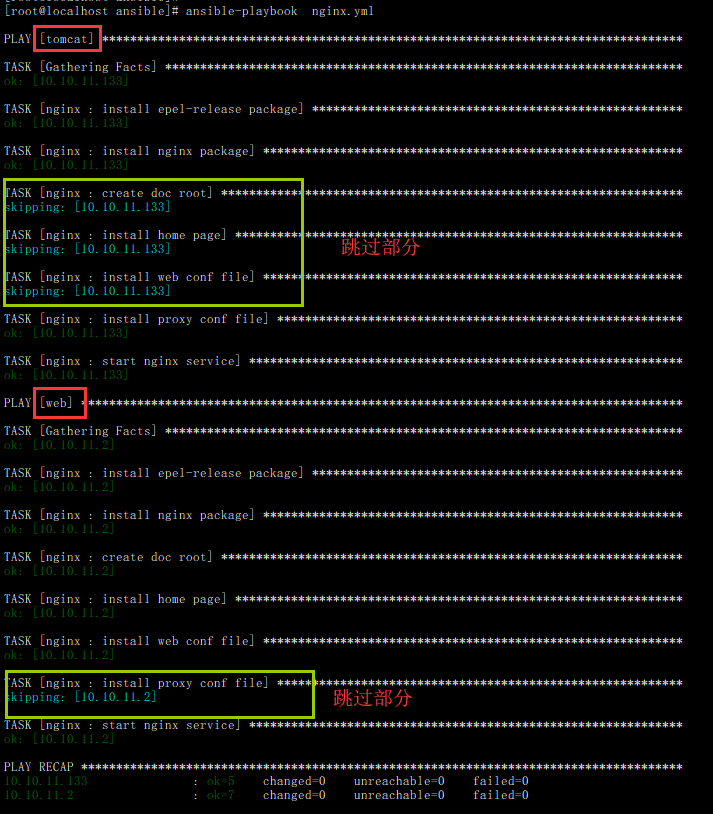
执行结果
去执行命令的节点查看
查看端口
[root@localhost ~]# ss -ntlp |grep 80
LISTEN     0      128          *:80                       *:*                   users:(("nginx",pid=11368,fd=6),("nginx",pid=11314,fd=6))
查看配置文件
[root@localhost ~]#  cat /etc/nginx/conf.d/server.conf
server {
    listen 80;
    server_name localhost.localdomain localhost;

    location / {
        root /data/nginx/;
        index index.jsp index.html;
    }
}

