iOS 系统提供了文件共享支持
当手机通过数据线连接到 Mac 的 iTunes 时, 可以在 iTunes 将电脑上的文件传输到 App 的沙盒目录当中. 为 App 添加离线数据. 也可以将 App 沙盒目录下保存的文件通过 iTunes 导出到电脑当中.
官方文档中的描述
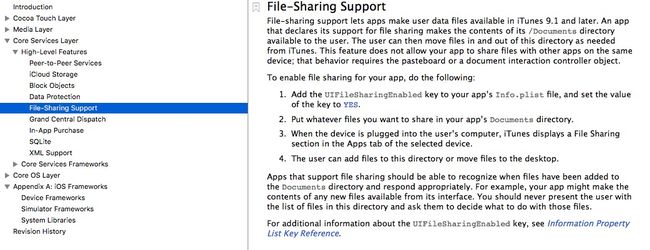
在 "iOS 9.3 Documentation" > "General" > "Guides" > "iOS Technology Overview" 文章中, 对 iOS 系统中相关技术做了大致的介绍. 其中 Core Services 层里面, 可以查找到 File-Sharing Support的相关说明.
以下是官方文档的原始描述
File-sharing support lets apps make user data files available in iTunes 9.1 and later. An app that declares its support for file sharing makes the contents of its /Documents directory available to the user. The user can then move files in and out of this directory as needed from iTunes. This feature does not allow your app to share files with other apps on the same device; that behavior requires the pasteboard or a document interaction controller object.
To enable file sharing for your app, do the following:
- Add the UIFileSharingEnabled key to your app’s Info.plist file, and set the value of the key to YES.
- Put whatever files you want to share in your app’s Documents directory.
- When the device is plugged into the user’s computer, iTunes displays a File Sharing section in the Apps tab of the selected device.
- The user can add files to this directory or move files to the desktop.
Apps that support file sharing should be able to recognize when files have been added to the Documents directory and respond appropriately. For example, your app might make the contents of any new files available from its interface. You should never present the user with the list of files in this directory and ask them to decide what to do with those files.
For additional information about the UIFileSharingEnabled key, see Information Property List Key Reference.
简单总结一下:
- File-sharing support是在 iTunes9.1 及之后的版本开始支持的.
- 该功能支持将 App 沙盒目录下 Document 文件夹中的内容进行共享, 即可以通过 iTunes 软件对 App 的 Document 文件夹的内容进行操作, 比如添加,删除, 导出 Document 中的文件.
- File-sharing support并不支持与该设备上其它 App 进行文件共享
- 支持文件共享的 App 应该识别添加到 Document 目录中的文件并做出适当的响应. 比如当有新的文件可用时, App 可以在界面上显示新的内容, 但不应该向用户展示新添加文件列表并询问用户对该文件做出什么操作.
使用方式:
- 其实开发当中需要做的配置就一步, 其它都是引导用户怎么去使用文件共享功能
在 Info.plist 文件中添加 UIFileSharingEnabled 这个Key, 并设置该值为 YES 即可
-
在填写完 UIFileSharingEnabled 并回车后, 发现会自动更正为 Application supports iTunes file sharing , 将值设置为 YES 即可
-
引导用户如何使用 iTunes 与 App 进行文件共享
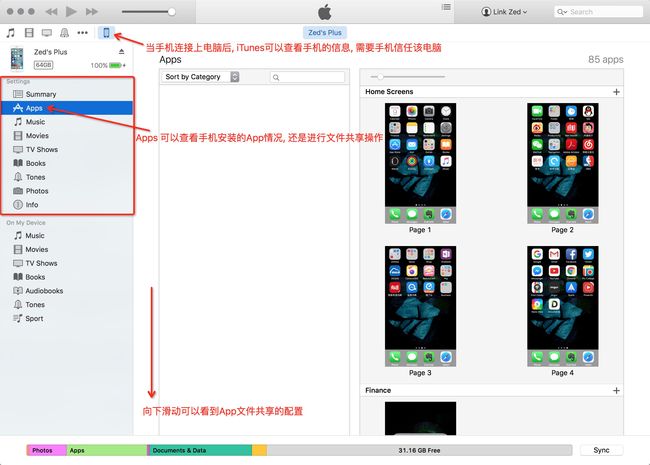
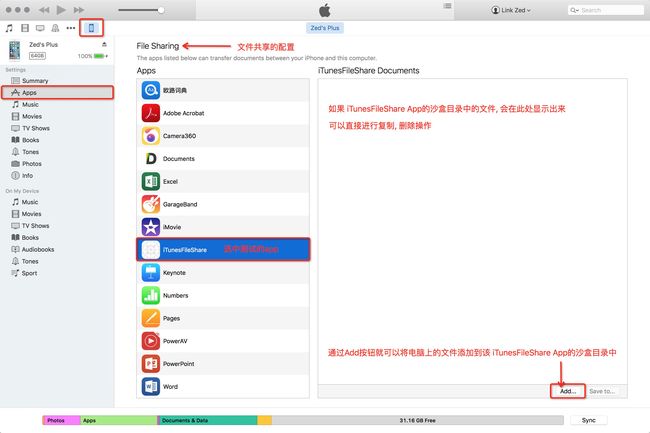
当设备连接到用户电脑时, iTunes会在选中设备的Apps标签页显示文件共享的会话
可以添加, 复制, 删除指定App的沙盒目录中的文件, 最后执行"Sync"按钮进行数据同步
监听Document目录的文件改动
使用GCD 与 file descriptor 实现对文件夹内容的修改进行监听, 实现的关键代码如下
// 这里边需要定义两个成员变量
{
    dispatch_queue_t _zDispatchQueue;
    dispatch_source_t _zSource;
}

// 开始监听Document目录文件改动, 一旦发生修改则发出一个名为ZFileChangedNotification的通知
- (void)startMonitoringDocumentAsynchronous
{
    // 获取沙盒的Document目录
    NSString *docuPath = [NSSearchPathForDirectoriesInDomains(NSDocumentDirectory, NSUserDomainMask, YES) lastObject];

    [self startMonitoringDirectory:docuPath];
}

// 监听指定目录的文件改动
- (void)startMonitoringDirectory:(NSString *)directoryPath
{
    // 创建 file descriptor (需要将NSString转换成C语言的字符串)
    // open() 函数会建立 file 与 file descriptor 之间的连接
    int filedes = open([directoryPath cStringUsingEncoding:NSASCIIStringEncoding], O_EVTONLY);

    // 创建 dispatch queue, 当文件改变事件发生时会发送到该 queue
    _zDispatchQueue = dispatch_queue_create("ZFileMonitorQueue", 0);

    // 创建 GCD source. 将用于监听 file descriptor 来判断是否有文件写入操作
    _zSource = dispatch_source_create(DISPATCH_SOURCE_TYPE_VNODE, filedes, DISPATCH_VNODE_WRITE, _zDispatchQueue);

    // 当文件发生改变时会调用该 block
    dispatch_source_set_event_handler(_zSource, ^{
        // 在文件发生改变时发出通知
        // 在子线程发送通知, 这个通知触发的方法会在子线程当中执行
        [[NSNotificationCenter defaultCenter] postNotificationName:ZFileChangedNotification object:nil userInfo:nil];
    });

    // 当文件监听停止时会调用该 block
    dispatch_source_set_cancel_handler(_zSource, ^{
        // 关闭文件监听时, 关闭该 file descriptor
        close(filedes);
    });

    // 开始监听文件
    dispatch_resume(_zSource);
}

// 停止监听指定目录的文件改动
- (void)stopMonitoringDocument
{
    dispatch_cancel(_zSource);
}
获取Document目录下的所有文件
这里边DirectoryWatcher是做成一个单例的工具类, 具体代码就不全部写上了. 关键的实现代码也比较简单. 只要监听ZFileChangedNotification并做出相应处理即可
- (void)viewDidLoad
{
    [super viewDidLoad];

    // 监听Document目录的文件改动
    [[DirectoryWatcher defaultWatcher] startMonitoringDocumentAsynchronous];
    [[NSNotificationCenter defaultCenter] addObserver:self selector:@selector(fileChanageAction:) name:ZFileChangedNotification object:nil];
}

- (void)dealloc
{
    // 取消监听Document目录的文件改动
    [[DirectoryWatcher defaultWatcher] stopMonitoringDocument];
    [[NSNotificationCenter defaultCenter] removeObserver:ZFileChangedNotification];
}

- (void)fileChanageAction:(NSNotification *)notification
{
    // ZFileChangedNotification 通知是在子线程中发出的, 因此通知关联的方法会在子线程中执行
    NSLog(@"文件发生了改变, %@", [NSThread currentThread]);

    NSFileManager *fileManager = [NSFileManager defaultManager];

    NSString *filePath = [NSSearchPathForDirectoriesInDomains(NSDocumentDirectory, NSUserDomainMask, YES) lastObject];

    NSError *error;
    // 获取指定路径对应文件夹下的所有文件
    NSArray  *fileArray = [fileManager contentsOfDirectoryAtPath:filePath error:&error];
    NSLog(@"%@", fileArray);
}


