UIButton
1.按钮之概述
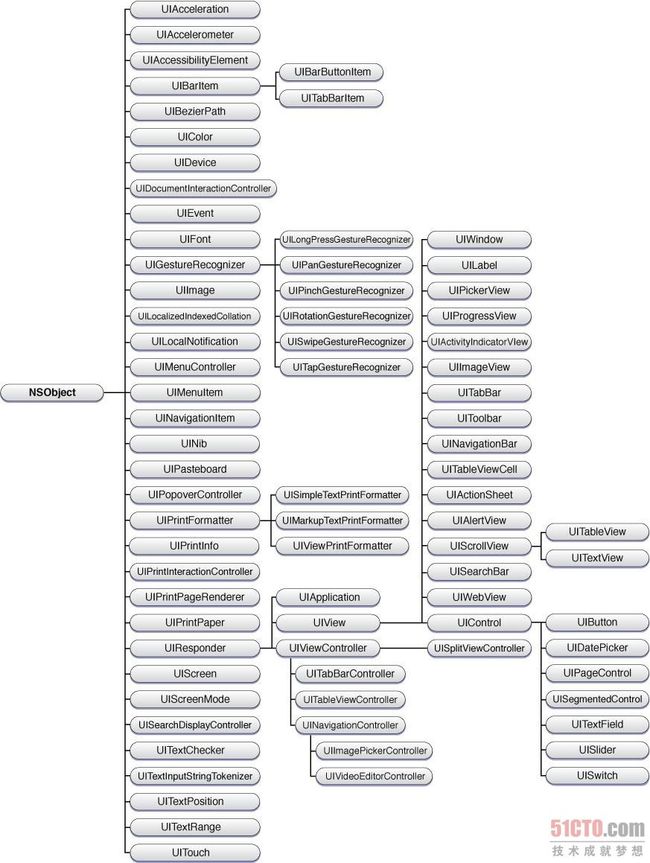
1.UIButton继承自UIControl,而UIControl又继承自UIView,所以UIButton本质上是一个UIView,可以认为是一个容器View
2.所以在IB里面,UIButton有“Image” 和“Background”两个属性可以设置,并且都可以设置图片,其中这个“Image”其实只是按钮的一部分,还可以追加一段标题。如图中:背景设置成蓝色,一个图标以及一个标题“Pause”
3.UIButton的基本结构如图:
包含一个图标UIImage,一个标题UILabel
2.UIButton和UILabel的区别和联系
3.使用
按钮设置字体位置:
属性:contentHorizontalAlignment
例:button.contentHorizontalAlignment = UIControlContentHorizontalAlignmentRight;
4.UIButton的常用事件和状态
下面的例子中我们在窗口上放置一个标签和一个按钮,通过点击按钮修改标签上的文字,效果如下图所示:
#import "AppDelegate.h"

@interface AppDelegate () {
    NSArray *infos;
}

@end

@implementation AppDelegate


- (instancetype)init {
    if(self = [super init]) {
        infos = @[@"Hello, world!", @"How are you?", @"Nice to meet you!", @"See you!", @"Good night!"];
    }
    return self;
}


- (BOOL)application:(UIApplication *)application didFinishLaunchingWithOptions:(NSDictionary *)launchOptions {

    self.window = [[UIWindow alloc]initWithFrame:[UIScreen mainScreen].bounds];
    self.window.backgroundColor = [UIColor whiteColor];

    CGRect screenRect = [[UIScreen mainScreen] bounds];
    CGPoint centerPoint = CGPointMake(screenRect.size.width / 2.0, screenRect.size.height / 2.0);

    UILabel *infoLabel = [[UILabel alloc] initWithFrame:CGRectMake(0, 0, 200, 40)];
    centerPoint.y -= 50;
    infoLabel.center = centerPoint;
    infoLabel.textAlignment = NSTextAlignmentCenter;
    infoLabel.font = [UIFont systemFontOfSize:36];
    infoLabel.text = infos[0];
    infoLabel.textColor = [UIColor redColor];
    infoLabel.tag = 101;
    infoLabel.adjustsFontSizeToFitWidth = YES;

    UIButton *okButton = [UIButton buttonWithType:UIButtonTypeSystem];
    okButton.frame = CGRectMake(0, 0, 80, 40);
    centerPoint.y += 100;
    okButton.center = centerPoint;
    [okButton setTitle:@"OK" forState:UIControlStateNormal];
    okButton.layer.borderColor = [UIColor blackColor].CGColor;
    okButton.layer.borderWidth = 1;
    okButton.layer.cornerRadius = 5;

    [okButton addTarget:self action:@selector(okButtonClicked) forControlEvents:UIControlEventTouchUpInside];

    [self.window addSubview:infoLabel];
    [self.window addSubview:okButton];

    [self.window makeKeyAndVisible];

    return YES;
}

- (void) okButtonClicked {
    UILabel *infoLabel = (id)[self.window viewWithTag:101];
    int randomIndex = arc4random() % [infos count];
    infoLabel.text = infos[randomIndex];
}

@end
效果:
5.自定义UIButton
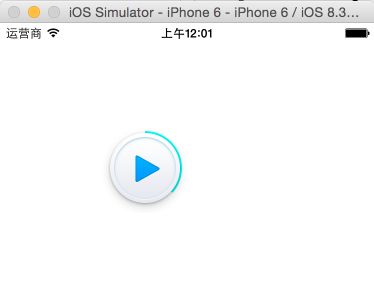
为什么需要定制按钮呢,如果大家用过酷狗音乐就知道,它的播放按键是带进度提示功能的,这样的按钮肯定需要我们自行定制,看看下面的例子:
#import

/**带进度的按钮*/
@interface CDMyPlayButton : UIButton

/**完成进度(0.0-1.0)*/
@property (nonatomic, assign) double value;

@end
#import "CDMyPlayButton.h"

@implementation CDMyPlayButton

// Only override drawRect: if you perform custom drawing.
// An empty implementation adversely affects performance during animation.
- (void)drawRect:(CGRect)rect {
    // Drawing code
    UIBezierPath *bezierPath = [[UIBezierPath alloc] init];
    CGFloat centerX = rect.size.width / 2.0;
    CGFloat centerY = rect.size.height / 2.0;
    CGFloat radius = centerX;
    [bezierPath addArcWithCenter:CGPointMake(centerX, centerY) radius:radius * 0.8 startAngle:-M_PI_2 endAngle:M_PI * 2 * self.value - M_PI_2 clockwise:YES];

    [[UIColor cyanColor] setStroke];
    bezierPath.lineWidth = 2;
    [bezierPath stroke];
}

@end
6.设置按钮左边图片右边文字
按钮的title和imageView的设置注意
1)布局的参照物同普通的布局一样。比如图左字右,图先布局以整个按钮为准,标题布局,左边以图片为参照,上|下|右以按钮为参照
2)四个参数分别是上左下右,表示距离参照物边界,与普通布局一样
button.imageEdgeInsets = UIEdgeInsetsMake(0,1 , 2, 3);
button.titleEdgeInsets = UIEdgeInsetsMake(0,1 , 2, 3);
top : 为正数的时候,是往下偏移,为负数的时候往上偏移;
left : 为正数的时候往右偏移,为负数的时候往左偏移;
bottom : 为正数的时候往上偏移,为负数的时候往下偏移;
right :为正数的时候往左偏移,为负数的时候往右偏移;
实现按钮文字在左边,图片在右边
Demo:
    UIButton *leftBtn = [[UIButton alloc] init];
    [leftBtn setTitle:@"北京" forState:UIControlStateNormal];
    [leftBtn setImage:[UIImage imageNamed:@"选择城市箭头"] forState:UIWindowLevelNormal];
    leftBtn.titleLabel.font = kFont(13);
    leftBtn.frame = CGRectMake(0, 0, 40, 44);
    leftBtn.showsTouchWhenHighlighted = YES;
    leftBtn.contentEdgeInsets = UIEdgeInsetsMake(0, -5, 0, 0);
    // 重点位置开始
    leftBtn.imageEdgeInsets = UIEdgeInsetsMake(0, leftBtn.titleLabel.width + 2.5, 0, -leftBtn.titleLabel.width - 2.5);
    leftBtn.titleEdgeInsets = UIEdgeInsetsMake(0, -leftBtn.currentImage.size.width, 0, leftBtn.currentImage.size.width);
    // 重点位置结束
    leftBtn.contentHorizontalAlignment = UIControlContentHorizontalAlignmentLeft;
    UIBarButtonItem *leftItemBtn = [[UIBarButtonItem alloc] initWithCustomView:leftBtn];
    self.navigationItem.leftBarButtonItem = leftItemBtn;
- 实例:
效果如下: 图片在上面,按钮在下面
    self.bottomBackgroundView = [[UIView alloc]init];
    self.bottomBackgroundView.backgroundColor = [UIColor whiteColor];
    [self addSubview:self.bottomBackgroundView];
    [self.bottomBackgroundView mas_makeConstraints:^(MASConstraintMaker *make) {

        make.left.equalTo(@(0));
        make.right.equalTo(@(0));
        make.height.equalTo(@(140));
        make.bottom.equalTo(@(0));
    }];
    UIButton *camerBtn = [UToButton buttonWithType:UIButtonTypeCustom];
    [_bottomBackgroundView addSubview:camerBtn];
    [camerBtn setTitle:@"拍照" forState:0];
    camerBtn.titleLabel.font = [UToFont defaultFontWithSize:16];
    [camerBtn setTitleColor:[UToColor greenColor] forState:0];
    [camerBtn setImage:[UIImage imageNamed:@"camera"] forState:0];
    [camerBtn setImage:[UIImage imageNamed:@"camera"] forState:UIControlStateHighlighted];
    [camerBtn addTarget:self action:@selector(camerClicked) forControlEvents:UIControlEventTouchUpInside];
    [camerBtn mas_makeConstraints:^(MASConstraintMaker *make) {

        make.top.mas_equalTo(30);
        make.bottom.mas_equalTo(-33);
        make.width.mas_equalTo(100);
        make.left.mas_equalTo(70);
    }];
    [camerBtn layoutIfNeeded];
    UIImageView *imageView = camerBtn.imageView;
    UILabel *titleLabel = camerBtn.titleLabel;
    camerBtn.imageEdgeInsets = UIEdgeInsetsMake(-titleLabel.intrinsicContentSize.height*0.5, titleLabel.intrinsicContentSize.width*0.5, titleLabel.intrinsicContentSize.height*0.5, -titleLabel.intrinsicContentSize.width*0.5);
    camerBtn.titleEdgeInsets = UIEdgeInsetsMake(imageView.intrinsicContentSize.height*0.6, -imageView.intrinsicContentSize.width*0.5, -imageView.intrinsicContentSize.height*0.6, imageView.intrinsicContentSize.width*0.5);
    UIButton *photoBtn = [UToButton buttonWithType:UIButtonTypeCustom];
    [_bottomBackgroundView addSubview:photoBtn];
    [photoBtn setTitle:@"相册" forState:0];
    photoBtn.titleLabel.font = [UToFont defaultFontWithSize:16];
    [photoBtn setTitleColor:[UToColor greenColor] forState:0];
    [photoBtn setImage:[UIImage imageNamed:@"pic"] forState:0];
    [photoBtn setImage:[UIImage imageNamed:@"pic"] forState:UIControlStateHighlighted];
    [photoBtn addTarget:self action:@selector(photoClicked) forControlEvents:UIControlEventTouchUpInside];
    [photoBtn mas_makeConstraints:^(MASConstraintMaker *make) {

        make.top.mas_equalTo(30);
        make.bottom.mas_equalTo(-33);
        make.width.mas_equalTo(100);
        make.right.mas_equalTo(-70);
    }];
    [photoBtn layoutIfNeeded];
    UIImageView *imgView = photoBtn.imageView;
    UILabel *tleLabel = photoBtn.titleLabel;
    photoBtn.imageEdgeInsets = UIEdgeInsetsMake(-tleLabel.intrinsicContentSize.height*0.5, tleLabel.intrinsicContentSize.width*0.5, tleLabel.intrinsicContentSize.height*0.5, -tleLabel.intrinsicContentSize.width*0.5);
    photoBtn.titleEdgeInsets = UIEdgeInsetsMake(imgView.intrinsicContentSize.height*0.6, -imgView.intrinsicContentSize.width*0.5, -imgView.intrinsicContentSize.height*0.6, imgView.intrinsicContentSize.width*0.5);
相关链接:
自定义UIButton中image和title布局:http://www.jianshu.com/p/550c2cb93036
调整UIButton 图片(imageView)与文字(titleLabel)的位置:https://www.jianshu.com/p/225ea7a564c1
7.防止按钮快速点击造成多次响应的避免方法
有时候有些操作是防止用户在一次响应结束中再响应下一个。但有些测试用户就要猛点,狂点。像这种恶意就要进行防止。
当然有些异步操作时,可以在调用前enable 掉。等CallBACK 后再enable起来。过程中按钮是不能点的。
1、可以使用:

- (void) timeEnough {

   UIButton *btn=(UIButton*)[self.view viewWithTag:33];
   btn.selected=NO;
   [timer invalidate];
   timer=nil;
}

 - (void) btnDone:(UIButton*)btn  {

   if(btn.selected) return;
   btn.selected=YES;
   [self performSelector:@selector(timeEnough) withObject:nil afterDelay:3.0];
   //使用延时进行限制。
}
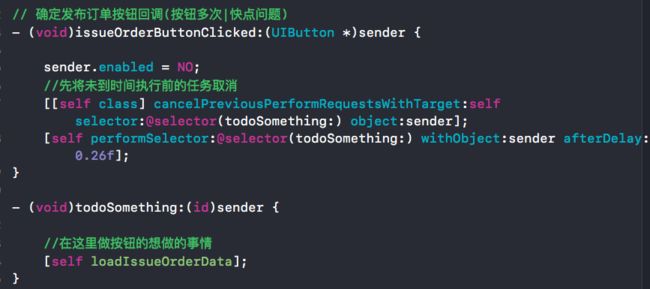
2、个人觉得这种方法更为好用些。
- (void)todoSomething:(id)sender {

    //在这里做按钮的想做的事情。
}

- (void)starButtonClicked:(id)sender {

    //先将未到时间执行前的任务取消。
    [[self class] cancelPreviousPerformRequestsWithTarget:self selector:@selector(todoSomething:) object:sender];
    [self performSelector:@selector(todoSomething:) withObject:sender afterDelay:0.2f];
}
第二种方法例子如下:
对于第二种方法,快速点击N次,只要每次间隔在0.2秒内的都不响应操作,等到停下点击到达0.2秒后再执行。所以按照自己的需要设置响应时间,狂点吧。只响应一次。。
8.按钮边框相关
[button.layer setMasksToBounds:YES];
[button.layer setCornerRadius:5];
[button.layer setBorderWidth:1.0];
[button.layer setBorderColor:[UToColor greenColor].CGColor];

或者也可写成:
button.clipsToBounds = YES;
button.layer.cornerRadius = 5;
button.layer.borderWidth = 1.0;
button.layer.borderColor = [UToColor greenColor].CGColor;
9.扩大按钮点击范围
如图:这是一个cell,如果不去扩大按钮点击范围也可以,直接将按钮的点击事件在cell的点击方法里加上即可实现点击一整条即响应添加方法
法1:此处扩大按钮的点击范围思路:可以使用假象:上面再添加一个大的透明按钮到cell上,方法添加到大按钮上,小按钮只是展示作用
法2:相关链接:http://www.jianshu.com/p/5eef36c24f53
法3:https://itony.me/129.html
10.按钮的边框角设置
1.默认设置四个角:
self.button.layer.cornerRadius = 5;
[button.layer setMasksToBounds:YES];// 必须写
其中要是想设置圆角:将cornerRadius设置成控件的宽度的一半
2.设置按钮部分角(比如一个或两个角)
方法就是用贝塞尔曲线画,代码如下所示:
    UIButton * bottomBtn = [UIButton new];
    bottomBtn.frame = CGRectMake(100, 100, 200, 45);
    UIBezierPath * maskPath = [UIBezierPath bezierPathWithRoundedRect:bottomBtn.layer.bounds byRoundingCorners:UIRectCornerTopLeft | UIRectCornerBottomLeft cornerRadii:CGSizeMake(10.0f, 10.0f)];
    CAShapeLayer * maskLayer = [CAShapeLayer new];
    maskLayer.frame = bottomBtn.layer.bounds;
    maskLayer.path = maskPath.CGPath;
    bottomBtn.layer.mask = maskLayer;
    [self.view addSubview:bottomBtn];
    [bottomBtn setBackgroundColor:[UIColor colorWithRed:0.13 green:0.72 blue:0.71 alpha:1]];
效果图:
其中枚举如下:
typedef NS_OPTIONS(NSUInteger, UIRectCorner) {
    UIRectCornerTopLeft     = 1 << 0,
    UIRectCornerTopRight    = 1 << 1,
    UIRectCornerBottomLeft  = 1 << 2,
    UIRectCornerBottomRight = 1 << 3,
    UIRectCornerAllCorners  = ~0UL
};
相关链接:
百度教程:http://jingyan.baidu.com/article/60ccbceb59d10564cbb1975d.html
韩俊强博客:http://blog.csdn.net/qq_31810357/article/details/73498310
11.两个按钮之间切换选中状态
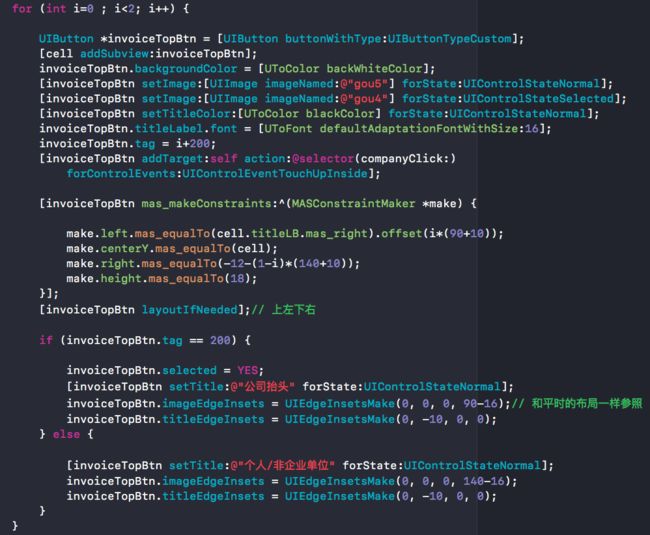
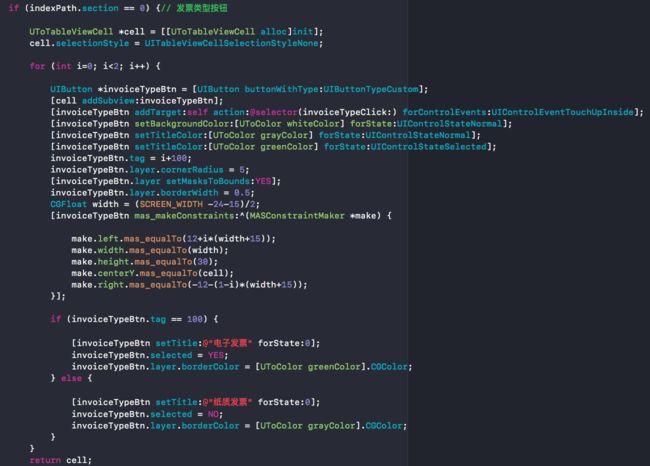
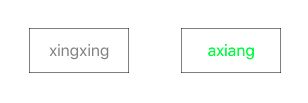
效果如下:刚开始进来默认选中第一个按钮,选中的按钮不能再点击;然后再点击另一个按钮,切换为选中状态,之前选中的变为不选中状态。
效果图:
代码如下所示:
- 循环for创建
方法二:通过中间按钮
代码如下:
http://www.jianshu.com/p/2fc9f9a3c220
12.按钮点击泛光动画
UToRippleButton.h
#import

@interface UToRippleButton : UIButton

@property (nonatomic, strong) UIColor *flashColor;

@end
UToRippleButton.m
#import "UToRippleButton.h"

const CGFloat WZFlashInnerCircleInitialRaius = 30;

@interface UToRippleButton()

@property (nonatomic, strong)id circleShape;

@end

@implementation UToRippleButton

- (instancetype)init {

    self = [super init];

    if (self) {

        self.flashColor = [UIColor whiteColor];
        self.clipsToBounds = YES;
    }
    return self;
}

- (void)setFlashColor:(UIColor *)flashColor {

    _flashColor = flashColor;
}

- (BOOL)beginTrackingWithTouch:(UITouch *)touch withEvent:(nullable UIEvent *)event {


    CGFloat width = self.bounds.size.width, height = self.bounds.size.height;
    CGFloat scale = 1.0f;
    CGFloat biggerEdge = width > height ? width : height, smallerEdge = width > height ? height : width;
    CGFloat radius = (smallerEdge) / 2 > WZFlashInnerCircleInitialRaius ? WZFlashInnerCircleInitialRaius : smallerEdge / 2;

    scale = biggerEdge / radius + 0.5;
    self.circleShape = [self createCircleShapeWithPosition:CGPointMake(self.bounds.size.width/2, self.bounds.size.height/2) pathRect:CGRectMake(0, 0, radius * 2, radius * 2) radius:radius];
    [self.layer addSublayer:self.circleShape];
    return YES;
}

- (void)endTrackingWithTouch:(nullable UITouch *)touch withEvent:(nullable UIEvent *)event {

    CGPoint point = [touch locationInView:self];

    if (point.x<0||point.y<0||point.x>self.bounds.size.width||point.y>self.bounds.size.height) {

        [self.circleShape removeFromSuperlayer];
    } else {

        CGFloat scale = 2.5f;
        CAAnimationGroup *groupAnimation = [self createFlashAnimationWithScale:scale duration:0.5f];
        [groupAnimation setValue:self.circleShape forKey:@"circleShaperLayer"];
        [self.circleShape addAnimation:groupAnimation forKey:nil];
    }
}

- (CALayer *)createImageShapeWithPosition:(CGPoint)position pathRect:(CGRect)rect{
    CALayer *imageLayer = [CALayer layer];
    [imageLayer setBounds:rect];
    [imageLayer setPosition:position];
    return imageLayer;
}

- (CAShapeLayer *)createCircleShapeWithPosition:(CGPoint)position pathRect:(CGRect)rect radius:(CGFloat)radius {

    CAShapeLayer *circleShape = [CAShapeLayer layer];
    circleShape.path = [self createCirclePathWithRadius:rect radius:radius];
    circleShape.position = position;
    circleShape.bounds = CGRectMake(0, 0, radius * 2, radius * 2);
    circleShape.fillColor = self.flashColor ? self.flashColor.CGColor : [UIColor whiteColor].CGColor;
    circleShape.opacity = 0;
    circleShape.lineWidth = 1;
    return circleShape;
}

- (CAAnimationGroup *)createFlashAnimationWithScale:(CGFloat)scale duration:(CGFloat)duration {

    CABasicAnimation *scaleAnimation = [CABasicAnimation animationWithKeyPath:@"transform.scale"];
    scaleAnimation.fromValue = [NSValue valueWithCATransform3D:CATransform3DIdentity];
    scaleAnimation.toValue = [NSValue valueWithCATransform3D:CATransform3DMakeScale(scale, scale, 1)];

    CABasicAnimation *alphaAnimation = [CABasicAnimation animationWithKeyPath:@"opacity"];
    alphaAnimation.fromValue = @1;
    alphaAnimation.toValue = @0;

    CAAnimationGroup *animation = [CAAnimationGroup animation];
    animation.animations = @[scaleAnimation, alphaAnimation];
    animation.duration = duration;
    animation.timingFunction = [CAMediaTimingFunction functionWithName:kCAMediaTimingFunctionEaseOut];
    return animation;
}

- (CGPathRef)createCirclePathWithRadius:(CGRect)frame radius:(CGFloat)radius {

    return [UIBezierPath bezierPathWithRoundedRect:frame cornerRadius:radius].CGPath;
}

#pragma mark - CAAnimationDelegate
- (void)animationDidStop:(CAAnimation *)anim finished:(BOOL)flag {

    CALayer *layer = [anim valueForKey:@"circleShaperLayer"];

    if (layer) {

        [layer removeFromSuperlayer];
    }
}

@end
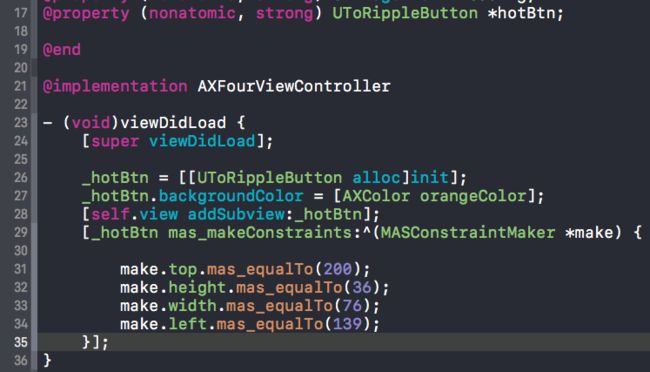
控制器中调用:创建就可以了
效果图:
13.按钮的文字对齐方式
contentHorizontalAlignment
例如:像右边对齐
_hintBtn.contentHorizontalAlignment = UIControlContentHorizontalAlignmentRight;
UIControl
1.概述
1.UIControl是UIView的子类,当然也是UIResponder的子类。UIControl是诸如UIButton、UISwitch、UITextField等控件的父类,它本身也包含了一些属性和方法,但是不能直接使用UIControl类,它只是定义了子类都需要使用的方法。
2.UIControl对象采用了一种新的事件处理机制,将前一节直接处理的触摸事件转换成简单操作,这样可以无需关心用户访问控件的具体方式。触摸事件到达UIControl对象(由响应者链派遣)后,在UIResponder的方法中(如touchBegan:withEvent)中,UIControl将标准的触摸事件转换为特殊的控件事件,简单的理解就是,UIControl把复杂的触摸事件封装成了简单的易于使用的控件事件。例如通过UIControl对象处理后,按下按钮的事件就被封装成一个控件事件,而不用去判断触摸屏幕的整个操作过程。


