在 dribbble.com 搜索 timeline 可以搜到不少优秀的原型设计。在 Github 上找了下好像没有现成的布局,有一个实现了类似 Path 的效果但不是使用布局实现,有一个是用于 Mac 平台的,于是动手实现了下,Demo 地址:TimelineLayout。本以为这类布局可以通用的,动手实现了两个例子发现很难实现一个非常通用的布局,需要根据具体的场景进行选择。
初次接触这类布局的人最大的疑惑估计是怎么生成那条轴线,其实线只不过是宽度比较小的矩形而已,这么说你就明白了吧。那么这类布局里这条轴线可以用多种方法实现,SupplementaryView (也就是通常说的 HeaderView 和 FooterView)和 DecorationView 都可用来实现这条线,甚至使用 Cell 来实现这条线也是可以的,具体要看你的场景要求来进行选择。
在 dribbble.com 上很多针对 iPhone 设计的时间轴布局用 UITableView 来实现更方便一点,比如下面几种,这几种的共同特点是,元素的种类相同,位置相对固定。实现时在固定位置插入窄矩形视图当作线条,当节点的圆形用图片搞定或者代码画出来,基本用不上布局,用 UICollectionView 实现就是多此一举了。
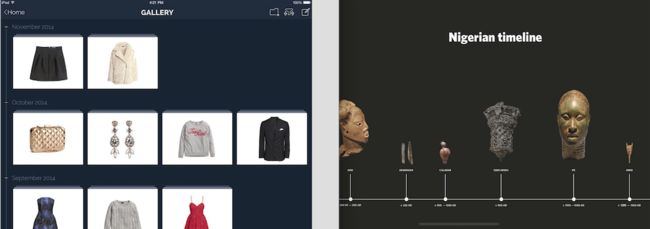
下面这两种就需要 UICollectionView 了,左边的链接在这里,右边的链接在这里。这两个布局其实是很普通的 FlowLayout,左边的是垂直滚动的 FlowLayout 加上了一条轴线,右边的是横向滚动的 FlowLayout 加一条轴线。DecorationView 非常适合用来实现这种轴线。Demo 地址:TimelineLayout。
DecorationView 的使用场景较少,特别是扁平化设计普及后更加少见了,也很少看到有关使用 DecorationView 的教程,不过 DecorationView 在时间轴这类布局里非常有用。Mark Pospesel 的这篇三年前的文章 How to Add a Decoration View to a UICollectionView 依然值得一看,而这篇文章的主体 IntroducingCollectionViews 实现了多种布局并包含了一份详细介绍 UICollectionView 各部分的 keynote,值得一颗星。
只使用 FlowLayout 本身自然是无法实现上述的布局的,这意味着使用UICollectionViewFlowLayout子类,关于自定义布局入门,推荐官方文档,详细说明了布局流程,什么时候自定义布局以及需要重写哪些方法;还有 Objc.io 出品的自定义 Collection View 布局也是好文章。
自定义布局的主要流程是:
1.prepareLayout:做一些准备工作。
2.collectionViewContentSize:返回 collectionView 的内容尺寸用于滚动。
3.layoutAttributesForElementsInRect::最关键的部分,返回指定区域(也就是可视区域)内所有的布局属性,根据这些属性来配置所有 Cell, SupplementaryView 和 DecorationView 的布局。
DecorationView 并不是数据驱动的视图,它的数量以及布局完全由 CollectionView 的布局属性决定。上面的两种布局主要在 FlowLayout 的基础上添加了 DecorationView 布局属性,这三个方法只用重写第3个方法,外带实现 DecorationView 的默认布局。
添加 DecorationView
DecorationView 必须是UICollectionReusableView的子类,添加前必须在UICollectionViewLayout里注册,有两种注册方法:
func registerClass(_ viewClass: AnyClass?, forDecorationViewOfKind elementKind: String)
func registerNib(_ nib: UINib?, forDecorationViewOfKind elementKind: String)
方法里的elementKind参数和 Cell 中的 ReuseIdentifier 作用相同。在两个例子里我自定义了UICollectionReusableView的子类LineView类,唯一的作用是将其背景色设置为白色。在自定义的UICollectionViewLayout类初始化方法里注册LineView:
self.registerClass(LineView.self, forDecorationViewOfKind: "LineView")
同时,记得在自定义布局类中提供 DecorationView 布局对象的默认实现,即使只是提供一个空的布局对象。文档告诉我们应该这么做,我没在意,直接生成了空的布局对象,绝大部分情况下都没有问题,但后来掉进了某个坑里,所以切记重写这个方法,下面的例子里都提供下面的空布局实现:
override func layoutAttributesForDecorationViewOfKind(elementKind: String, atIndexPath indexPath: NSIndexPath) -> UICollectionViewLayoutAttributes? {
    return UICollectionViewLayoutAttributes(forDecorationViewOfKind: elementKind, withIndexPath: indexPath)
}
在自定义 FlowLayout 的layoutAttributesForElementsInRect:里添加需要的 DecorationView 布局属性即可:
override func layoutAttributesForElementsInRect(rect: CGRect) -> [UICollectionViewLayoutAttributes]? {
    let layoutAttrs = super.layoutAttributesForElementsInRect(rect)
    ......
    let decorationViewLayoutAttr = self.layoutAttributesForDecorationViewOfKind("LineView", atIndexPath: headerLayoutAttr.indexPath)
    if decorationViewLayoutAttr != nil{
        layoutAttrs?.append(decorationViewLayoutAttr!)
    }
    /*修改 decorationViewLayoutAttr 的属性满足你的需求*/
    ......
    return layoutAttrs
}
这样就添加了一个 DecorationView 到 CollectionView 里。
时间轴布局1
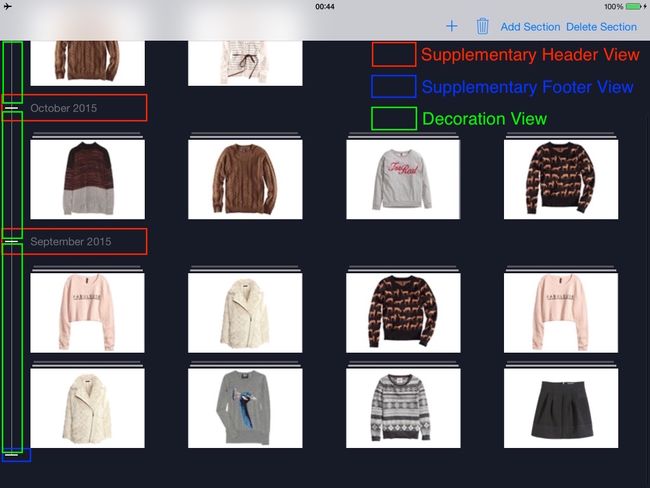
Demo 地址:TimelineLayout,实际效果以及结构分解:
看图说话,这样一来也没什么好解释了的吧。在这个布局里,使用 DecorationView 来作为轴线是最优解。至于前面的 section 只有 Header 没有 Footer,这个好办,让 CollectionView 的 delegate 对象遵守UICollectionViewDelegateFlowLayout协议并提供相关的尺寸信息就好了。
func collectionView(collectionView: UICollectionView, layout collectionViewLayout: UICollectionViewLayout, referenceSizeForFooterInSection section: Int) -> CGSize {
    if section == sectionCount - 1{
        //实际上这里的提供的 width 并不能决定 FooterView 的宽度,只不是0或负数都可以。实际的值在 Layout 里决定。
        //默认情况下 FooterView 的 width 与 CollectionView 的 contentSize 的 width 值一致。
        return CGSize(width: 50, height: 2)
    }else{
        //尺寸为 Zero 时没有 FooterView,实际上返回的 CGSize 中的 width 或 height 只要有一个为0或负数也会有同样的效果。
        return CGSizeZero
    }
}
HeaderView 和 FooterView 的尺寸效应是一样的。
在布局里,需要 Cell, SupplementaryView, DecorationView 这三种视图在布局上精准配合防止露馅,同时修改 sectionInset 为 DecorationView 留出视觉上的空间。最核心的layoutAttributesForElementsInRect:方法如下:
override func layoutAttributesForElementsInRect(rect: CGRect) -> [UICollectionViewLayoutAttributes]? {
    //在父类的基础上调整布局,不需要全部重新计算
    var layoutAttrs = super.layoutAttributesForElementsInRect(rect)

    let headerLayoutAttrs = layoutAttrs?.filter({ $0.representedElementKind == UICollectionElementKindSectionHeader })
    if headerLayoutAttrs?.count > 0{
        let sectionCount = (self.collectionView?.dataSource?.numberOfSectionsInCollectionView!(self.collectionView!))!
        for headerLayoutAttr in headerLayoutAttrs!{
            //生成一个空的 DecorationView 布局对象,然后通过 header 和 footer 的布局来计算属性。
            let decorationViewLayoutAttr = self.layoutAttributesForDecorationViewOfKind(decorationLineViewKind, atIndexPath: headerLayoutAttr.indexPath)
            if decorationViewLayoutAttr != nil{
                layoutAttrs?.append(decorationViewLayoutAttr!)
            }

            let headerSize = headerLayoutAttr.size
            var lineLength: CGFloat = 0

            if headerLayoutAttr.indexPath.section < sectionCount - 1{
                //如果不是最后的 section,获取下一段的 header
                let nexHeaderLayoutAttr = ......
                lineLength = nexHeaderLayoutAttr.frame.origin.y - headerLayoutAttr.frame.origin.y
            }else{
                // 来到最后一段,获取当前可视区域中的 footer,并调整 footerView 的位置和尺寸,至多只有一个 footer
                let footerLayouts = layoutAttrs?.filter({ $0.representedElementKind == UICollectionElementKindSectionFooter && $0.indexPath.section == headerLayoutAttr.indexPath.section})
                if footerLayouts?.count == 1{
                    let footerLayoutAttr = footerLayouts!.first
                    footerLayoutAttr!.frame = CGRect(x: footerXOffset, y: footerLayoutAttr!.frame.origin.y, width: 20, height: 2)
                    lineLength =  footerLayoutAttr!.frame.origin.y - headerLayoutAttr.frame.origin.y - headerSize.height / 2
                }else{//如果 footerView 尚未出现,则 line 一直延伸到可视区域的底部或者直接获取默认的 footer 布局,此时的 origin 与我们修改过后的一致,见代码。
                    lineLength = rect.height + rect.origin.y - headerLayoutAttr.frame.origin.y - headerSize.height / 2
                }
            }
            //在非 retina 屏幕上,当视图的宽度<0.54时肉眼不可见,保险起见使用0.55;在 retina 屏幕的极限则是0.27
            decorationViewLayoutAttr?.frame = CGRect(x: decorationLineXOffset, y: (headerLayoutAttr.frame.origin.y + headerSize.height / 2), width: 0.55, height: lineLength)
        }
    }

    return layoutAttrs
}
这里的实现是使用多个 DecorationView 来构成轴线,也可以只使用一个 DecorationView 从头至尾贯穿,代码会更少。我也实现了 DecorationView 和 FooterView 的布局动画用于它们初次出现在屏幕上时避免突兀的视图变化,有兴趣可以看看代码。关于布局动画,推荐 Objc.io 出品的 CollectionView 动画;我实现了另外一种效果:CollectionView 添加/删除动画。
PS: 注意需要重写func shouldInvalidateLayoutForBoundsChange(newBounds: CGRect) -> Bool方法来应对屏幕方向变化,不然会轴线缺失和 FooterView 没有调整的奇特 Bug。
时间轴布局2
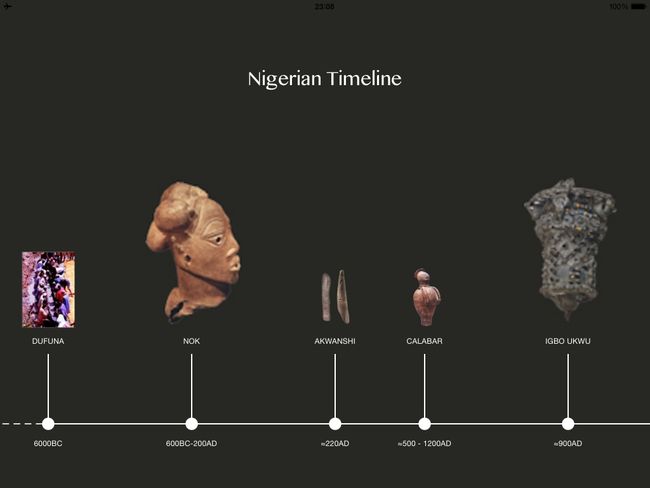
Demo 地址:TimelineLayout,实际效果:
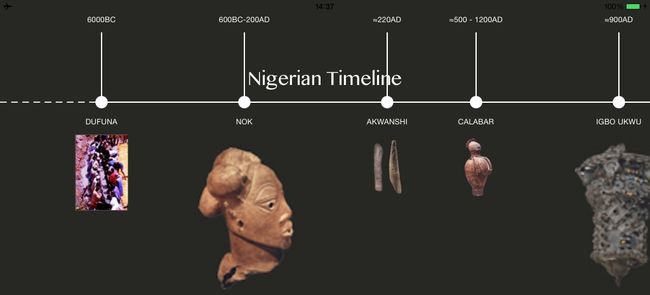
这个布局比上面的稍微麻烦一些,这是一个横向滚动的 FlowLayout,圆形的节点可以在 Cell 里实现,头尾的虚线分别由 HeaderView 和 FooterView 担当,中间的轴线有两种方法:HeaderView(或FooterView) 和 DecorationView。同时这也是一个基于内容的布局,时间轴的间隔和年代有关,我的实现里没有那么严格计算间隔。
使用 HeaderView 来充当轴线时,在中部区域滚动时可能会出现一些轴线缺失的情况,因为在两侧 HeaderView 可能不处于可视区域内,我们通过延长 HeaderView 宽度的作弊手段可能失效,这与节点的间隔长度有关。为了最大程度解决这种情况,使用两种 Cell,头尾段的 Cell 使用左边的,中间段的 Cell 使用右边的,如下所示:
即使加上上面的补救措施,依然有可能出现轴线缺失的情况,不完美。其实,这个布局我首选的是DecorationView 充当轴线,但最后遇到了严重的NSInternalInconsistencyException,不得已使用 HeaderView 实现了一次,好在最终解决了这个 bug,解决方法见这里。
现在就说说使用 DecorationView 实现轴线。经过上面的例子的练手,我决定在这里使用单个 DecorationView 来贯穿头尾。轴线在 X 轴方向的起始位置为首段里节点 Cell 的center.x(或者从节点 Cell 的圆形右侧边缘往左边一点点),终点位置为末段节点 Cell 的center.x(或者从节点 Cell 的圆形左侧边缘往右边一点点);在 Y 轴方向,与节点 Cell 的圆心在同一高度。
另外,横向滚动的 FlowLayout 的 Cell 的起始布局是从上往下,我们需要将其逆转。
重写layoutAttributesForElementsInRect:方法:
override func layoutAttributesForElementsInRect(rect: CGRect) -> [UICollectionViewLayoutAttributes]? {
    var layoutAttrs = super.layoutAttributesForElementsInRect(rect)

    //逆转 Cell 的位置
    let cellLayoutAttrs = layoutAttrs?.filter({ $0.representedElementCategory == .Cell })
    let fixedHeight = self.collectionView!.bounds.height - self.sectionInset.top - self.sectionInset.bottom
    var isCalculated = false
    var timelineY: CGFloat = 0.0//时间轴在 Y 轴方向的位置
    if cellLayoutAttrs?.count > 0{
        for layoutAttribute in cellLayoutAttrs!{
            layoutAttribute.center = CGPoint(x: layoutAttribute.center.x, y: fixedHeight - layoutAttribute.center.y)
            if layoutAttribute.indexPath.item == 1 && !isCalculated{
                timelineY = layoutAttribute.frame.origin.y + layoutAttribute.size.height - nodeRadius - lineThickness / 2
                isCalculated = true
            }
        }
    }

    //添加 DecorationView并调整位置和尺寸
    if let decorationViewLayoutAttr = self.layoutAttributesForDecorationViewOfKind(decorationLineViewKind, atIndexPath: NSIndexPath(forItem: 0, inSection: 0)){
        let sectionCount = self.collectionView!.dataSource!.numberOfSectionsInCollectionView!(self.collectionView!)
        let firstNodeCellAttr = self.layoutAttributesForItemAtIndexPath(NSIndexPath(forItem: 1, inSection: 0))
        let lastNodeCellAttr = self.layoutAttributesForItemAtIndexPath(NSIndexPath(forItem: 1, inSection: sectionCount - 1))
        let timelineStartX = firstNodeCellAttr!.center.x
        let timelineEndX = lastNodeCellAttr!.center.x
        decorationViewLayoutAttr.frame = CGRect(x: timelineStartX, y: timelineY, width: timelineEndX - timelineStartX, height: lineThickness)

        layoutAttrs?.append(decorationViewLayoutAttr)
    }
    /*
    调整头尾段的 HeaderView 和 FooterView 的布局属性,见代码。
    */
    return layoutAttrs
}
自定义布局 Tips
- Layout 会预加载沿滚动方向可视区域后面的布局信息,可以通过观察
layoutAttributesForElementsInRect(rect: CGRect)里 rect 的值得知,但是 Layout 只负责可视区域的布局。这样一来,Layout 可能无法处理可视区域前面的布局,这样就解释了在上面的案例2中使用 SupplementaryView 实现轴线时当 SupplementaryView 恰好离开可视区域边缘造成轴线缺失的情况。 -
layoutAttributesForElementsInRect:返回的布局属性才决定视图布局,即使你重写了下面两个方法,这个方法不一定会调用你的版本,除非你明确调用。
layoutAttributesForCellWithIndexPath:
layoutAttributesForSupplementaryViewOfKind:withIndexPath: - 尽管 FlowLayout 能够正确应对屏幕方向变化造成的布局变化,你仍然应该在你定义的 FlowLayout 子类里重写
func shouldInvalidateLayoutForBoundsChange(newBounds: CGRect) -> Bool方法。 - 在 CollectionView 的顶部和底部时,不要让某个位置的布局属性发生变化,不然会触发
layout attributes changed from xxx to xxx without invalidating the layout
这种NSInternalInconsistencyException。这么说你可能不明白,如果你遇到了这个问题,可以参考我解决这个问题的经历。 - 尽管 CollectionView 每个 section 里至多只可以有一个 Header 和一个 Footer,但 CollectionView 并不限制 SupplementaryView 的种类,和 Cell 的管理方式相同,只不过在 storyboard 里由于限制至多也只能注册一个 Header 和一个 Footer,剩下的只能通过代码注册了。
- 文档里要求重写的方法切记重写,不然可能就哪儿出问题了,具体是哪些方法看官方文档。


