- pthread
- NSThread
- GCD
1. 同步、异步、并发、串行讲解
2. 创建队列的几种方式
3. 栅栏函数
4. 队列组
5. GCD快速迭代 - NSOperation和NSOperationQueue
1. NSInvocationOperation和NSBlockOperation
2. NSOperationQueue
3. 任务依赖 - 多线程的安全隐患
关于多线程,在 iOS 中目前有 4 套方案,他们分别是:
下面我们分别来为大家一一介绍上述方案:
方案一:pthread
#import


      //创建线程对象
        pthread_t thread = NULL;

        //传递的参数
        id str = @"i'm pthread param";

        //创建线程
        /* 参数一:线程对象 传递线程对象的地址
           参数二:线程属性 包括线程的优先级等
           参数三:子线程需要执行的方法
           参数四:需要传递的参数
         */
        int result = pthread_create(&thread, NULL, operate, (__bridge void *)(str));
        if (result == 0) {
            NSLog(@"创建线程 OK");
        } else {
            NSLog(@"创建线程失败 %d", result);
        }
        //手动把当前线程结束掉
        // pthread_detach:设置子线程的状态设置为detached,则该线程运行结束后会自动释放所有资源。
        pthread_detach(thread);
void *operate(void *params){
    NSString *str = (__bridge NSString *)(params);

    NSLog(@"%@ - %@", [NSThread currentThread], str);

    return NULL;
}
方案二:NSThread
- 先创建线程类,再启动
 // 创建
  NSThread *thread = [[NSThread alloc] initWithTarget:self selector:@selector(run:) object:nil];

  // 启动
  [thread start];
- 创建后立即启动
[NSThread detachNewThreadSelector:@selector(run:) toTarget:self withObject:nil];
方案三:GCD
它是苹果为多核的并行运算提出的解决方案,所以它会自动合理地利用更多的CPU内核,最重要的是它会自动管理线程的生命周期(比如创建线程、调度任务、销毁线程)
1. 同步、异步、并发、串行讲解
GCD中有2个用来执行任务的函数
用同步的方式执行任务
//queue:队列  block:任务
dispatch_sync(dispatch_queue_t queue, dispatch_block_t block);
用异步的方式执行任务
dispatch_async(dispatch_queue_t queue, dispatch_block_t block);
容易混淆的术语
有4个术语比较容易混淆:同步、异步、并发、串行
同步和异步主要影响:能不能开启新的线程
同步:在当前线程中执行任务,不具备开启新线程的能力
异步:在新的线程中执行任务,具备开启新线程的能力(但是不一定能够开启新线程,比如异步在主队列中执行任务)
并发和串行主要影响:任务的执行方式
并发:多个任务并发(同时)执行
串行:一个任务执行完毕后,再执行下一个任务
各种队列的执行效果
注意:使用sync函数往当前串行队列中添加任务,会卡住当前的串行队列(产生死锁)
2. 创建队列的几种方式
- 主队列: 它是一个特殊的
串行队列, 任何需要刷新 UI 的工作都要在主队列执行。
dispatch_queue_t queue = dispatch_get_main_queue();
- 自定义队列: 自己可以创建
串行队列, 也可以创建并行队列。
  //串行队列
  dispatch_queue_t queue = dispatch_queue_create("test1", NULL);
  dispatch_queue_t queue = dispatch_queue_create("test2", DISPATCH_QUEUE_SERIAL);

  //并行队列
  dispatch_queue_t queue = dispatch_queue_create("test3", DISPATCH_QUEUE_CONCURRENT);
- 全局并行队列
dispatch_queue_t queue = dispatch_get_global_queue(DISPATCH_QUEUE_PRIORITY_DEFAULT, 0);
3. 验证一下所学知识
下面我们来看看下面几段代码,猜一猜运行之后结果是个啥子嘛。。。
考题一:
    NSLog(@"任务一");
    dispatch_sync(dispatch_get_main_queue(), ^{
         NSLog(@"任务二");
    });
    NSLog(@"任务三");
额。。。知道结果了么?下面我们来揭晓答案
执行结果:
为什么会这样呢?
因为同步任务会阻塞当前线程,然后把 Block 中的任务放到主队列中执行,队列是FIFO,所以Block中的任务只有等到dispatch_sync执行完毕后才会执行,但是dispatch_sync要想执行完成必须Block中的任务执行完毕后才会结束.这就是非常经典的死锁现象.
考题二:
看了考题一的分析 我相信考题二难不住你的,我们来看看打印结果:
其实原因跟上一个例子我们分析的原因类似,记住这句结论就好:
注意:使用sync函数往当前串行队列中添加任务,会卡住当前的串行队列(产生死锁)
3. 栅栏函数
dispatch_barrier_async:在进程管理中起到一个栅栏的作用,该函数需要同dispatch_queue_create函数生成的并发队列一起使用才能生效。
 dispatch_queue_t queue = dispatch_queue_create("barrier", DISPATCH_QUEUE_CONCURRENT);
        dispatch_async(queue, ^{
            for (int i=0; i<2; i++) {
                NSLog(@"----1-----%@", [NSThread currentThread]);
            }
        });
        dispatch_async(queue, ^{
            for (int i=0; i<2; i++) {
                NSLog(@"----2-----%@", [NSThread currentThread]);
            }
        });

        dispatch_barrier_async(queue, ^{
            NSLog(@"----barrier-----%@", [NSThread currentThread]);
        });

        dispatch_async(queue, ^{
            NSLog(@"----3-----%@", [NSThread currentThread]);
        });
        dispatch_async(queue, ^{
            NSLog(@"----4-----%@", [NSThread currentThread]);
        });
打印结果:
可以看出在执行完栅栏前面的操作之后才执行栅栏操作,然后再执行栅栏后边的操作
4. 队列组
现在我们有一个需求 :
异步并发执行任务A和任务B
任务A和任务B都执行完毕之后回到主线程执行任务C
比如下面的例子:
   //1.创建队列组
    dispatch_group_t group = dispatch_group_create();

    //2.创建全局并发队列
    dispatch_queue_t queue = dispatch_get_global_queue(DISPATCH_QUEUE_PRIORITY_DEFAULT, 0);

    //3.在并发队列中执行3次A任务
   dispatch_group_enter(group);//切记,一定要enter 和leave
    dispatch_group_async(group, queue, ^{
        for (NSInteger i = 0; i < 3; i++) {
            NSLog(@"任务A- %@", [NSThread currentThread]);
        }
       dispatch_group_leave(group);
    });

    //3.1.在并发队列中执行2次B任务
 dispatch_group_enter(group);//切记,一定要enter 和leave
    dispatch_group_async(group, queue, ^{
        for (NSInteger i = 0; i < 2; i++) {
            NSLog(@"任务B - %@", [NSThread currentThread]);
        }
     dispatch_group_leave(group);
    });

    //4.A任务和B任务执行完成之后回到主线程执行C任务
    dispatch_group_notify(group, dispatch_get_main_queue(), ^{
        NSLog(@"任务C - %@", [NSThread currentThread]);
    });
打印结果
在每个网络请求开始前使用
dispatch_group_enter来进行标识,网络请求有回调后使用dispatch_group_leave来进行标识,这样就能保证group_notify在所有网络请求都有回调之后才调用
我们可以看到这正是我们想要的结果。同时,这里用栅栏函数也可以实现。
5. GCD快速迭代
我们知道for循环中的代码是串行执行的,如果此时我们有一系列的耗时操作需要执行,此时我们可以使用Dispatch_apply函数,他可以异步执行,同时可以利用多核优势,完美替代for循环。
  dispatch_apply(10, dispatch_get_global_queue(0, 0), ^(size_t index) {
        NSLog(@"%zd = %@",index,[NSThread currentThread]);
    });
执行结果如下:
可以看到上述循环是在多个线程中并发执行的。
6. 考题:猜测打印结果
考题一:
- (void)test{
    NSLog(@"任务B");
}
- (void)viewDidLoad {
    [super viewDidLoad];
    dispatch_async(dispatch_get_global_queue(0, 0), ^{
        NSLog(@"任务A");
        [self performSelector:@selector(test) withObject:nil afterDelay:1.0];
         NSLog(@"任务C");
    });
}
知道结果了么?
我们来看看打印结果:
为什么只输出了任务A和任务C而没有任务B呢?其实这里涉及到了
RunLoop的知识,因为
performSelector:withObject:afterDelay:的本质是向
RunLoop中添加定时器,而子线程中默认是没有开启
RunLoop的,所以这里我们需要稍微改动下代码,如下;
-(void)touchesBegan:(NSSet *)touches withEvent:(UIEvent *)event
{
    dispatch_async(dispatch_get_global_queue(0, 0), ^{
        NSLog(@"任务A");

        [self performSelector:@selector(hahha) withObject:nil afterDelay:1.0];

        NSLog(@"任务C");
        [[NSRunLoop currentRunLoop] addPort:[[NSPort alloc] init] forMode:NSDefaultRunLoopMode];
        [[NSRunLoop currentRunLoop] run];
    });
}
关于RunLoop 有兴趣的朋友可以看看我的这篇文章: RunLoop的使用
考题二:
- (void)test{
    NSLog(@"任务B");
}
-(void)touchesBegan:(NSSet *)touches withEvent:(UIEvent *)event
{
    NSThread *thread = [[NSThread alloc] initWithBlock:^{
        NSLog(@"任务A");
    }];
    [thread start];
    [self performSelector:@selector(test) onThread:thread withObject:nil waitUntilDone:YES];
}
执行结果:
[73860:11959832] 任务A
[73860:11959410] *** Terminating app due to uncaught exception 'NSDestinationInvalidException', reason: '*** -[ViewController performSelector:onThread:withObject:waitUntilDone:modes:]: target thread exited while waiting for the perform'
因为我们在执行完[thread start];的时候执行任务A,此时线程就被销毁了,如果我们要在thread线程中执行test方法需要保住该线程的命,即线程保活,代码需要修改如下:
-(void)touchesBegan:(NSSet *)touches withEvent:(UIEvent *)event
{
    NSThread *thread = [[NSThread alloc] initWithBlock:^{
        NSLog(@"任务A");

        [[NSRunLoop currentRunLoop] addPort:[[NSPort alloc] init] forMode:NSDefaultRunLoopMode];
        [[NSRunLoop currentRunLoop] run];
    }];
    [thread start];
    [self performSelector:@selector(test) onThread:thread withObject:nil waitUntilDone:YES];
}
方案四:NSOperation和NSOperationQueue
NSOperation 是苹果公司对 GCD面向对象的封装,所以使用起来非常方便。
NSOperation和NSOperationQueue分别对应 GCD 的 任务 和 队列 。
使用步骤大致如下:
- 先将需要执行的操作封装到一个NSOperation对象中
- 然后将NSOperation对象添加到NSOperationQueue中
- 系统会⾃动将NSOperationQueue中的NSOperation取出来
- 将取出的NSOperation封装的操作放到⼀条新线程中执⾏
1. 任务
NSOperation只是一个抽象类,所以不能封装任务。
但是我们可以使用它的两个子类对象:NSInvocationOperation、NSBlockOperation。
- NSInvocationOperation : 需要传入一个方法名。
 //1.创建NSInvocationOperation对象
  NSInvocationOperation *operation = [[NSInvocationOperation alloc] initWithTarget:self selector:@selector(run) object:nil];

  //2.开始执行
  [operation start];
打印结果:
其实等价于[self run];在主线程中执行。
如果我们想让任务在子线程中执行,我们需要创建一个NSOperationQueue,如下:
     // 创建队列
     NSOperationQueue *queue = [[NSOperationQueue alloc] init];
       // 创建操作
    NSInvocationOperation *operation = [[NSInvocationOperation alloc] initWithTarget:self selector:@selector(run) object:nil];
       // 添加操作到队列中,会自动异步执行
    [queue addOperation:operation];
打印结果:
注意:操作对象默认在主线程中执行,只有将NSOperation放到一个 NSOperationQueue中,才会异步执行操作
- NSBlockOperation:用来并发的执行一个或者多个Block对象。
注意:addExecutionBlock:该方法只要NSBlockOperation封装的操作数 > 1,就会异步执行操作
       //1.创建NSBlockOperation对象
    NSBlockOperation *operation = [NSBlockOperation blockOperationWithBlock:^{
        NSLog(@"%@", [NSThread currentThread]);
    }];

    //2.开始任务
    [operation start];
打印结果:
{number = 1, name = main}
addExecutionBlock方式添加多个任务:
    NSBlockOperation *operation = [[NSBlockOperation alloc] init];

    [operation addExecutionBlock:^{
        //---下载图片----1---{number = 1, name = main}
        NSLog(@"---下载图片----1---%@", [NSThread currentThread]);
    }];//这种方式只有第一个是主线程,其余都是子线程

    [operation addExecutionBlock:^{
        //---下载图片----2---{number = 3, name = (null)}
        NSLog(@"---下载图片----2---%@", [NSThread currentThread]);
    }];

    [operation addExecutionBlock:^{
        //---下载图片----3---{number = 4, name = (null)}
        NSLog(@"---下载图片----3---%@", [NSThread currentThread]);
    }];

    [operation start];
2. 队列
通过上面的介绍我们知道调用NSOperation对象的start()方法可以启动任务,但是这样做他们默认是 同步执行 的。即使是addExecutionBlock方法,也会在 当前线程和其他线程 中执行,也就是说还是会占用当前线程。此时我们就需要用到NSOperationQueue了。
只要任务添加到队列,便会自动调用任务的start()方法
      //1.创建队列
    NSOperationQueue *queue = [[NSOperationQueue alloc] init];
    NSBlockOperation *operation = [NSBlockOperation blockOperationWithBlock:^{
        NSLog(@"---下载图片----1---%@", [NSThread currentThread]);
    }];
    [operation addExecutionBlock:^{
        NSLog(@"---下载图片----2---%@", [NSThread currentThread]);
    }];

    // 2.添加操作到队列中(自动异步执行)
    [queue addOperation:operation];
打印结果:
任务依赖
需求:此时有 3 个任务,这三个任务因为比较耗时,所以需要异步并发执行。
任务一: 从服务器上下载一张图片
任务二:给这张图片加个水印
任务三:把图片返回给服务器。
这时候就需要控制任务的执行顺序了
//1.任务一:下载图片
NSBlockOperation *operation1 = [NSBlockOperation blockOperationWithBlock:^{
    NSLog(@"下载图片 - %@", [NSThread currentThread]);
    [NSThread sleepForTimeInterval:1.0];
}];

//2.任务二:打水印
NSBlockOperation *operation2 = [NSBlockOperation blockOperationWithBlock:^{
    NSLog(@"打水印   - %@", [NSThread currentThread]);
    [NSThread sleepForTimeInterval:1.0];
}];

//3.任务三:上传图片
NSBlockOperation *operation3 = [NSBlockOperation blockOperationWithBlock:^{
    NSLog(@"上传图片 - %@", [NSThread currentThread]);
    [NSThread sleepForTimeInterval:1.0];
}];

//4.设置依赖
[operation2 addDependency:operation1];      //任务二依赖任务一
[operation3 addDependency:operation2];      //任务三依赖任务二

//5.创建队列并加入任务
NSOperationQueue *queue = [[NSOperationQueue alloc] init];
[queue addOperations:@[operation3, operation2, operation1] waitUntilFinished:NO];
打印结果
- 注意:不能添加相互依赖,比如 A依赖B,B又依赖A,否则会造成死锁
1. 从其他线程回到主线程的方法
我们都知道在其他线程操作完成后必须到主线程更新UI。所以,介绍完所有的多线程方案后,我们来看看有哪些方法可以回到主线程。
- NSThread
[self performSelectorOnMainThread:@selector(run) withObject:nil waitUntilDone:NO];
- GCD
dispatch_async(dispatch_get_main_queue(), ^{

});
- NSOperationQueue
[[NSOperationQueue mainQueue] addOperationWithBlock:^{

}];
2. 延迟执行方案
公用延迟执行方法
- (void)delayMethod{
    NSLog(@"delayMethodEnd");
}
线程阻塞式
1.NSThread线程的sleep
[NSThread sleepForTimeInterval:2.0];
此方法是一种阻塞执行方式,建议放在子线程中执行,否则会卡住界面。但有时还是需要阻塞执行,比如进入欢迎界面需要沉睡2秒才进入主界面时。
非阻塞执行方式
performSelector
[self performSelector:@selector(delayMethod) withObject:nil afterDelay:2.0];
NSTimer定时器
NSTimer *timer = [NSTimer scheduledTimerWithTimeInterval:2.0 target:self selector:@selector(delayMethod) userInfo:nil repeats:NO];
-
GCD的方式
dispatch_time_t delayTime = dispatch_time(DISPATCH_TIME_NOW, (int64_t)(2.0  NSEC_PER_SEC));
dispatch_after(delayTime, dispatch_get_main_queue(), ^{
    [weakSelf delayMethod];
});
此方法可以在参数中选择执行的线程,是一种非阻塞执行方式
多线程的安全隐患
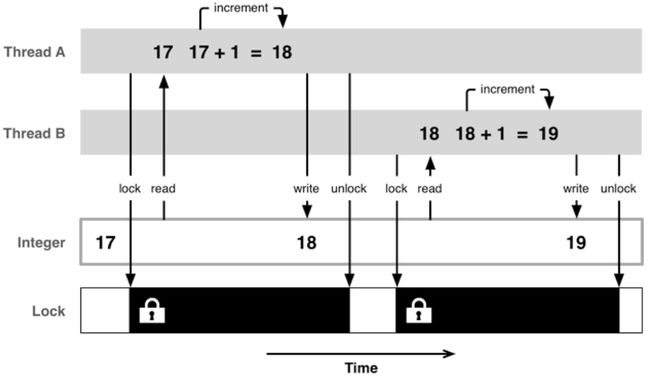
当多个线程同时访问同一个资源时,很容易引发数据错乱和数据安全问题,比如下图:
那么我们该如何去解决这个问题呢?
我们可以使用线程同步技术。所谓同步,就是协同步调,按预定的先后次序进行。常见的线程同步技术就是加锁
关于锁的实现方案 网上有很多,这里我就不再列举了,可以参考:
iOS中保证线程安全的几种方式与性能对比
iOS 常见知识点(三):Lock
深入理解iOS开发中的锁


