Plotting data on a map 在地图上用数据作图
[原文地址](https://matplotlib.org/basemap/users/examples.html)
Basemap是python附加的一个可以在地图上作图的可视化工具。
由于我的学习路径是通过Python for Data Analysis一书, 所以都在Jupyter notebook下进行编译。
为了图省事也不是在标准python下而是用了Anaconda(一个用于科学计算的Python发行版,支持Linux, Mac, Windows系统,提供了包管理与环境管理的功能,可以很方便地解决多版本python并存、切换以及各种第三方包安装问题。)在此环境下使用Basemap只需要在Anaconda Prompt中键入:conda install basemap; condat install pyproj 就可以下载这两个包了。
首先介绍的是basemap中的一些实例对象:
-
contour(): draw contour lines.(画轮廓线) -
contourf(): draw filled contours.(画填充后的轮廓线) -
imshow(): draw an image.(在地图上画图) -
pcolor(): draw a pseudocolor plot.(伪色图) -
pcolormesh(): draw a pseudocolor plot (faster version for regular meshes). -
plot(): draw lines and/or markers.(在地图上画线绘图) -
scatter(): draw points with markers.(在地图上画散点图) -
quiver(): draw vectors.(画向量图,三维就是曲面图) -
barbs(): draw wind barbs (画风羽图) -
drawgreatcircle(): draw a great circle(画大圆航线)
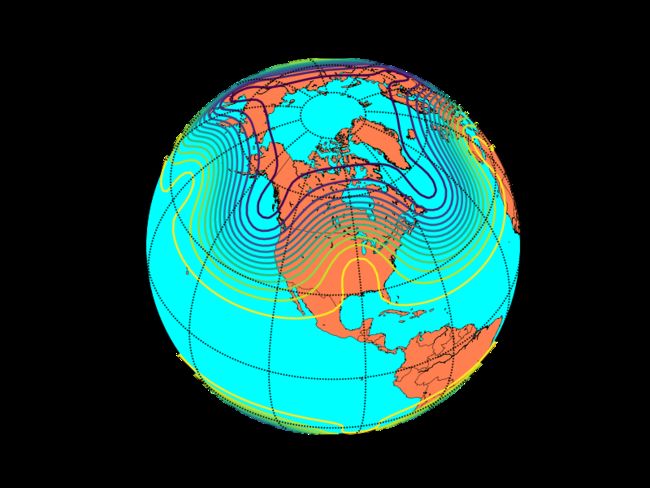
在地图上画轮廓线
from mpl_toolkits.basemap import Basemap
import matplotlib.pyplot as plt
import numpy as np
# 常规操作, 导入numpy, matplotlib.pyplot和basemap
map = Basemap(projection='ortho',lat_0=45,lon_0=-100,resolution='l')
# 设置地图正射投影点为北纬50度, 西经100度,海岸线的分辨率为低
# draw coastlines, country boundaries, fill continents.
map.drawcoastlines(linewidth=0.25)
# 画出海岸线(描边)
map.drawcountries(linewidth=0.25)
# 画出国境线(描边)
map.fillcontinents(color='coral',lake_color='aqua')
# 填充大陆, 大陆颜色为珊瑚色, 湖泊颜色为水色
map.drawmapboundary(fill_color='aqua')
# 画出地图边界,海洋区域颜色为水色
map.drawmeridians(np.arange(0,360,30))
map.drawparallels(np.arange(-90,90,30))
# 每三十度画出经纬度线
nlats = 73; nlons = 145; delta = 2.*np.pi/(nlons-1)
lats = (0.5*np.pi-delta*np.indices((nlats,nlons))[0,:,:])
lons = (delta*np.indices((nlats,nlons))[1,:,:])
wave = 0.75*(np.sin(2.*lats)**8*np.cos(4.*lons))
mean = 0.5*np.cos(2.*lats)*((np.sin(2.*lats))**2 + 2.)
# 在规则网格上填充数据
x, y = map(lons*180./np.pi, lats*180./np.pi)
#投影到球面上
cs = map.contour(x,y,wave+mean,15,linewidths=1.5)
# 以x,y为基准协调画出wave+mean的轮廓线, 轮廓线条数为15. 参数详情见
# https://matplotlib.org/devdocs/api/_as_gen/matplotlib.pyplot.contour.html
plt.title('contour lines over filled continent background')
plt.show()
plt.savefig('contour lines over continent.jpg')
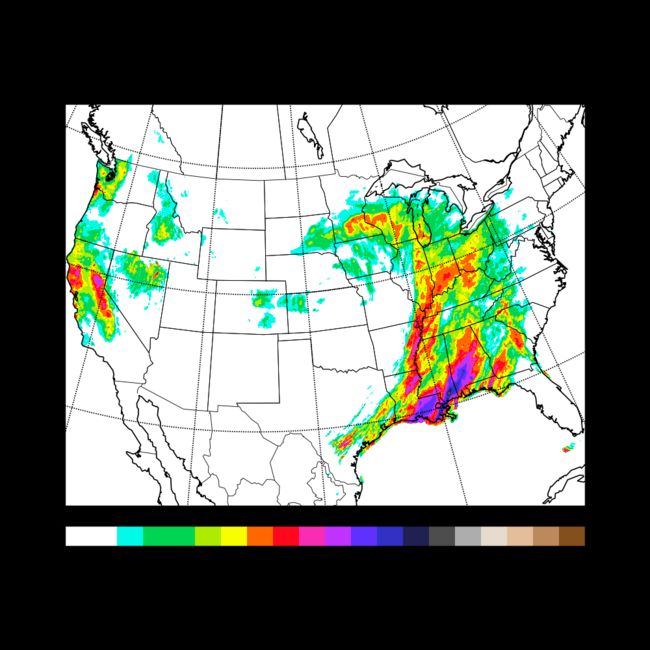
用填充轮廓线作的降水量图
from mpl_toolkits.basemap import Basemap, cm
# cm(colormap)库提供一系列彩色地图
from netCDF4 import Dataset as NetCDFFile
import numpy as np
import matplotlib.pyplot as plt
#同上文,导入numpy, matplotlib.pyplot,导入netCDF4中的Dataset处理网络通用
#数据格式(net common data form)

nc = NetCDFFile('nws_precip_conus_20061222.nc')
#首先在http://water.weather.gov/precip/中下载2006年12月22日的美国本土
#(不含阿拉斯加与夏威夷)的降水量数据
#导入我们需要用到的dataset, 值得注意的是该网站17年3月后的数据格式更新,
#通过查询变量名发现数据格式与之前有很大差异
print nc.variables.keys()
# 输出查看数据中的变量名
prcpvar = nc.variables['amountofprecip']
data = 0.01*prcpvar[:]
latcorners = nc.variables['lat'][:]
loncorners = -nc.variables['lon'][:]
lon_0 = -nc.variables['true_lon'].getValue()
lat_0 = nc.variables['true_lat'].getValue()
# 标准化降水量与提取经纬度参数
fig = plt.figure(figsize=(8,8))
ax = fig.add_axes([0.1,0.1,0.8,0.8])
#创建图像对象,设置图像大小与轴线起始位置
# create polar stereographic Basemap instance.
m = Basemap(projection='stere',lon_0=lon_0,lat_0=90.,lat_ts=lat_0,\
            llcrnrlat=latcorners[0],urcrnrlat=latcorners[2],\
            llcrnrlon=loncorners[0],urcrnrlon=loncorners[2],\
            rsphere=6371200.,resolution='l',area_thresh=10000)
#画立体投影图, 设置图形上下左右四个边界点经纬度参数坐标,中心点经纬度参
#数坐标,定义地图投影的球面半径(默认值为6370997米,近似于地球的半径),
#分辨率以及阈值
# 注: area_thresh = 10000 意味着面积小于10000平方公里的湖泊等对象将不被作图
m.drawcoastlines()
m.drawstates()
m.drawcountries()
# 画海岸线,州界, 国界线
parallels = np.arange(0.,90,10.)
m.drawparallels(parallels,labels=[1,0,0,0],fontsize=10)
#以10度为间隔画出0度到北纬90度纬线, 并且在图像左侧设置纬线标签
meridians = np.arange(180.,360.,10.)
#以10度为间隔画出西经180度到本初子午线经线, 并且在图像下侧设置经线标签
m.drawmeridians(meridians,labels=[0,0,0,1],fontsize=10)
ny = data.shape[0]; nx = data.shape[1]
lons, lats = m.makegrid(nx, ny)
# 经纬线空间均匀
x, y = m(lons, lats)
clevs = [0,1,2.5,5,7.5,10,15,20,30,40,50,70,100,150,200,250,300,400,500,600,750]
cs = m.contourf(x,y,data,clevs,cmap=cm.s3pcpn)
# 添加参数表,以x,y为基准画出data的轮廓线,等轮廓线参数为clevs,填充颜色画出填充后的轮廓线
cbar = m.colorbar(cs,location='bottom',pad="5%")
#添加色标, 每个色标占5%(一共20个色标)
cbar.set_label('mm')
# 添加标签 单位:毫米
plt.title(prcpvar.long_name+' for period ending '+prcpvar.dateofdata)
# 添加图像名
plt.show()
plt.savefig('24hrs rainfall of 20061222 for CONUS.jpg')
绘制Argo浮标
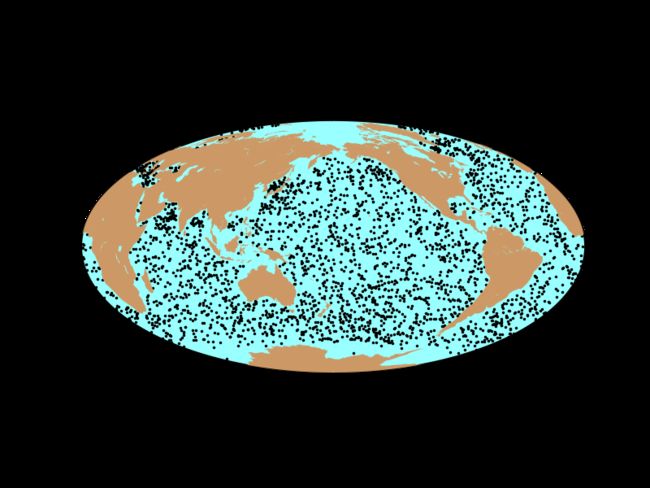
Argo在全球海域放置了3800个浮标用于检测浅层海(2000米内)海洋的温度与盐度。这项计划是的我们能够模拟检测浅层海的温度,盐度与海水流动速率。此图我们通过数据定位Argo浮标位置并将其绘制在地图上。
from netCDF4 import Dataset, num2date
import time, calendar, datetime, numpy
from mpl_toolkits.basemap import Basemap
import matplotlib.pyplot as plt
import urllib, os
#因为此次绘图需要用到时间数据所以专门引入了datetime, num2date等工具, urllib用于从网页提取数据(from url)
# os 这个模块提供了一种方便的使用操作系统函数的方法(暂未理解)
filename, headers = urllib.urlretrieve('http://coastwatch.pfeg.noaa.gov/erddap/tabledap/apdrcArgoAll.nc?longitude,latitude,time&longitude>=0&longitude<=360&latitude>=-90&latitude<=90&time>=2017-12-07&time<=2017-12-14&distinct()')
#urllib.urlretrieve从取出网址对应内容并存放在临时位置
dset = Dataset(filename)
# print dset
# 打印测试:查看数据
# print dset.variables.keys
# 打印测试: 查看数据中的参数
lats = dset.variables['latitude'][:]
lons = dset.variables['longitude'][:]
time = dset.variables['time']
times = time[:]
t1 = times.min(); t2 = times.max()
#将原始数据中的经纬度与时间提取出来
date1 = num2date(t1, units=time.units)
date2 = num2date(t2, units=time.units)
date1 = date1.strftime("%x")
date2 = date2.strftime("%x")
#将原始数据中的数字格式时间转化为标准datatime时间并将datetime转化为月/日/年格式
dset.close()
os.remove(filename)
#删除之前用urlretrieve临时存取的文件
m = Basemap(projection='hammer',lon_0=180)
#这里的hammer图我真不知道如何翻译...
x, y = m(lons,lats)
m.drawmapboundary(fill_color='#99ffff')
m.fillcontinents(color='#cc9966',lake_color='#99ffff')
#投影到图上, 画地图边界,填充大陆图色
m.scatter(x,y,1,marker='o',color='k')
#根据坐标点绘制Argo浮标散点, 第三个参数1指代散点大小(可以将数字1理解为单位半径,数字越大散点越大),散点形状设定为圆形,颜色设置为黑色
plt.title('Locations of %s ARGO floats active between %s and %s' %\
        (len(lats),date1,date2),fontsize=12)
# 设定图像名称 注: 分别提取了经纬度参数长度(浮标数量),起始与末尾日期插入构建图像名
plt.show()


