这个是第一个Cloudformation的新手练习,简单记录一下流程。这个练习是为了大致的熟悉一下基本流程
Cloudformation是AWS的一个很重要的服务,简单的说他的功能就是为了实现 infrastructure as code。管理员通过创建template文件,在cloudformation里面执行,就可以生成对应的stack。这里的关系有点类似于面向对象编程里面,类和实例化的对象一样。用户可以通过参数传入值,然后根据template(类)生成 stack(实例化的对象)。
管理员可以通过JSON或者YAML两种格式来模板。AWS里面,这两种格式可以互相切换。YAML的重要优势在于可以在文档里面写注释,而JSON不可以,所以未来的趋势肯定是YAML。模板里面可以定义9个部分,但是除了resource是必须的话,其他都是可选的配置。
https://docs.aws.amazon.com/AWSCloudFormation/latest/UserGuide/template-anatomy.html
下面来看看具体的例子
AWSTemplateFormatVersion: 2010-09-09
Description: >-
  This template creates an EC2 instance based on the region and selection of an
  AMI ID. It also will create a Security Group.
Parameters:
  MySubnet:
    Description: My subnet from my VPC
    Type: String
    Default: subnet-YYYYYYYY
  MySG:
    Description: My Security Group from my VPC
    Type: String
    Default: SG-YYYYYYYY
  KeyName:
    Description: Name of an existing EC2 KeyPair to enable SSH access to the instance
    Type: 'AWS::EC2::KeyPair::KeyName'
    ConstraintDescription: must be the name of an existing EC2 KeyPair.
  InstanceType:
    Description: WebServer EC2 instance type
    Type: String
    Default: t2.small
    AllowedValues:
      - t1.micro
      - t2.nano
      - t2.micro
      - t2.small
      - t2.medium
      - t2.large
      - m1.small
      - m1.medium
      - m1.large
      - m1.xlarge
      - m2.xlarge
      - m2.2xlarge
      - m2.4xlarge
      - m3.medium
      - m3.large
      - m3.xlarge
      - m3.2xlarge
      - m4.large
      - m4.xlarge
      - m4.2xlarge
      - m4.4xlarge
      - m4.10xlarge
      - c1.medium
      - c1.xlarge
      - c3.large
      - c3.xlarge
      - c3.2xlarge
      - c3.4xlarge
      - c3.8xlarge
      - c4.large
      - c4.xlarge
      - c4.2xlarge
      - c4.4xlarge
      - c4.8xlarge
      - g2.2xlarge
      - g2.8xlarge
      - r3.large
      - r3.xlarge
      - r3.2xlarge
      - r3.4xlarge
      - r3.8xlarge
      - i2.xlarge
      - i2.2xlarge
      - i2.4xlarge
      - i2.8xlarge
      - d2.xlarge
      - d2.2xlarge
      - d2.4xlarge
      - d2.8xlarge
      - hi1.4xlarge
      - hs1.8xlarge
      - cr1.8xlarge
      - cc2.8xlarge
      - cg1.4xlarge
    ConstraintDescription: must be a valid EC2 instance type.
  SSHLocation:
    Description: The IP address range that can be used to SSH to the EC2 instances
    Type: String
    MinLength: '9'
    MaxLength: '18'
    Default: 0.0.0.0/0
    AllowedPattern: '(\d{1,3})\.(\d{1,3})\.(\d{1,3})\.(\d{1,3})/(\d{1,2})'
    ConstraintDescription: must be a valid IP CIDR range of the form x.x.x.x/x.
Mappings:
  AWSInstanceType2Arch:
    t1.micro:
      Arch: HVM64
    t2.nano:
      Arch: HVM64
    t2.micro:
      Arch: HVM64
    t2.small:
      Arch: HVM64
    t2.medium:
      Arch: HVM64
    t2.large:
      Arch: HVM64
    m1.small:
      Arch: HVM64
    m1.medium:
      Arch: HVM64
    m1.large:
      Arch: HVM64
    m1.xlarge:
      Arch: HVM64
    m2.xlarge:
      Arch: HVM64
    m2.2xlarge:
      Arch: HVM64
    m2.4xlarge:
      Arch: HVM64
    m3.medium:
      Arch: HVM64
    m3.large:
      Arch: HVM64
    m3.xlarge:
      Arch: HVM64
    m3.2xlarge:
      Arch: HVM64
    m4.large:
      Arch: HVM64
    m4.xlarge:
      Arch: HVM64
    m4.2xlarge:
      Arch: HVM64
    m4.4xlarge:
      Arch: HVM64
    m4.10xlarge:
      Arch: HVM64
    c1.medium:
      Arch: HVM64
    c1.xlarge:
      Arch: HVM64
    c3.large:
      Arch: HVM64
    c3.xlarge:
      Arch: HVM64
    c3.2xlarge:
      Arch: HVM64
    c3.4xlarge:
      Arch: HVM64
    c3.8xlarge:
      Arch: HVM64
    c4.large:
      Arch: HVM64
    c4.xlarge:
      Arch: HVM64
    c4.2xlarge:
      Arch: HVM64
    c4.4xlarge:
      Arch: HVM64
    c4.8xlarge:
      Arch: HVM64
    g2.2xlarge:
      Arch: HVMG2
    g2.8xlarge:
      Arch: HVMG2
    r3.large:
      Arch: HVM64
    r3.xlarge:
      Arch: HVM64
    r3.2xlarge:
      Arch: HVM64
    r3.4xlarge:
      Arch: HVM64
    r3.8xlarge:
      Arch: HVM64
    i2.xlarge:
      Arch: HVM64
    i2.2xlarge:
      Arch: HVM64
    i2.4xlarge:
      Arch: HVM64
    i2.8xlarge:
      Arch: HVM64
    d2.xlarge:
      Arch: HVM64
    d2.2xlarge:
      Arch: HVM64
    d2.4xlarge:
      Arch: HVM64
    d2.8xlarge:
      Arch: HVM64
    hi1.4xlarge:
      Arch: HVM64
    hs1.8xlarge:
      Arch: HVM64
    cr1.8xlarge:
      Arch: HVM64
    cc2.8xlarge:
      Arch: HVM64
  AWSInstanceType2NATArch:
    t1.micro:
      Arch: NATHVM64
    t2.nano:
      Arch: NATHVM64
    t2.micro:
      Arch: NATHVM64
    t2.small:
      Arch: NATHVM64
    t2.medium:
      Arch: NATHVM64
    t2.large:
      Arch: NATHVM64
    m1.small:
      Arch: NATHVM64
    m1.medium:
      Arch: NATHVM64
    m1.large:
      Arch: NATHVM64
    m1.xlarge:
      Arch: NATHVM64
    m2.xlarge:
      Arch: NATHVM64
    m2.2xlarge:
      Arch: NATHVM64
    m2.4xlarge:
      Arch: NATHVM64
    m3.medium:
      Arch: NATHVM64
    m3.large:
      Arch: NATHVM64
    m3.xlarge:
      Arch: NATHVM64
    m3.2xlarge:
      Arch: NATHVM64
    m4.large:
      Arch: NATHVM64
    m4.xlarge:
      Arch: NATHVM64
    m4.2xlarge:
      Arch: NATHVM64
    m4.4xlarge:
      Arch: NATHVM64
    m4.10xlarge:
      Arch: NATHVM64
    c1.medium:
      Arch: NATHVM64
    c1.xlarge:
      Arch: NATHVM64
    c3.large:
      Arch: NATHVM64
    c3.xlarge:
      Arch: NATHVM64
    c3.2xlarge:
      Arch: NATHVM64
    c3.4xlarge:
      Arch: NATHVM64
    c3.8xlarge:
      Arch: NATHVM64
    c4.large:
      Arch: NATHVM64
    c4.xlarge:
      Arch: NATHVM64
    c4.2xlarge:
      Arch: NATHVM64
    c4.4xlarge:
      Arch: NATHVM64
    c4.8xlarge:
      Arch: NATHVM64
    g2.2xlarge:
      Arch: NATHVMG2
    g2.8xlarge:
      Arch: NATHVMG2
    r3.large:
      Arch: NATHVM64
    r3.xlarge:
      Arch: NATHVM64
    r3.2xlarge:
      Arch: NATHVM64
    r3.4xlarge:
      Arch: NATHVM64
    r3.8xlarge:
      Arch: NATHVM64
    i2.xlarge:
      Arch: NATHVM64
    i2.2xlarge:
      Arch: NATHVM64
    i2.4xlarge:
      Arch: NATHVM64
    i2.8xlarge:
      Arch: NATHVM64
    d2.xlarge:
      Arch: NATHVM64
    d2.2xlarge:
      Arch: NATHVM64
    d2.4xlarge:
      Arch: NATHVM64
    d2.8xlarge:
      Arch: NATHVM64
    hi1.4xlarge:
      Arch: NATHVM64
    hs1.8xlarge:
      Arch: NATHVM64
    cr1.8xlarge:
      Arch: NATHVM64
    cc2.8xlarge:
      Arch: NATHVM64
  AWSRegionArch2AMI:
    us-east-1:
      HVM64: ami-0080e4c5bc078760e
      HVMG2: ami-0aeb704d503081ea6
    us-west-2:
      HVM64: ami-01e24be29428c15b2
      HVMG2: ami-0fe84a5b4563d8f27
    us-west-1:
      HVM64: ami-0ec6517f6edbf8044
      HVMG2: ami-0a7fc72dc0e51aa77
    eu-west-1:
      HVM64: ami-08935252a36e25f85
      HVMG2: ami-0d5299b1c6112c3c7
    eu-west-2:
      HVM64: ami-01419b804382064e4
      HVMG2: NOT_SUPPORTED
    eu-west-3:
      HVM64: ami-0dd7e7ed60da8fb83
      HVMG2: NOT_SUPPORTED
    eu-central-1:
      HVM64: ami-0cfbf4f6db41068ac
      HVMG2: ami-0aa1822e3eb913a11
    eu-north-1:
      HVM64: ami-86fe70f8
      HVMG2: ami-32d55b4c
    ap-northeast-1:
      HVM64: ami-00a5245b4816c38e6
      HVMG2: ami-09d0e0e099ecabba2
    ap-northeast-2:
      HVM64: ami-00dc207f8ba6dc919
      HVMG2: NOT_SUPPORTED
    ap-northeast-3:
      HVM64: ami-0b65f69a5c11f3522
      HVMG2: NOT_SUPPORTED
    ap-southeast-1:
      HVM64: ami-05b3bcf7f311194b3
      HVMG2: ami-0e46ce0d6a87dc979
    ap-southeast-2:
      HVM64: ami-02fd0b06f06d93dfc
      HVMG2: ami-0c0ab057a101d8ff2
    ap-south-1:
      HVM64: ami-0ad42f4f66f6c1cc9
      HVMG2: ami-0244c1d42815af84a
    us-east-2:
      HVM64: ami-0cd3dfa4e37921605
      HVMG2: NOT_SUPPORTED
    ca-central-1:
      HVM64: ami-07423fb63ea0a0930
      HVMG2: NOT_SUPPORTED
    sa-east-1:
      HVM64: ami-05145e0b28ad8e0b2
      HVMG2: NOT_SUPPORTED
    cn-north-1:
      HVM64: ami-053617c9d818c1189
      HVMG2: NOT_SUPPORTED
    cn-northwest-1:
      HVM64: ami-0f7937761741dc640
      HVMG2: NOT_SUPPORTED
Resources:
  EC2Instance:
    Type: 'AWS::EC2::Instance'
    Properties:
      InstanceType: !Ref InstanceType
      SubnetId: !Ref MySubnet
      SecurityGroupIds:
        - !Ref MySG
      KeyName: !Ref KeyName
      ImageId: !FindInMap
        - AWSRegionArch2AMI
        - !Ref 'AWS::Region'
        - !FindInMap
          - AWSInstanceType2Arch
          - !Ref InstanceType
          - Arch
Outputs:
  InstanceId:
    Description: InstanceId of the newly created EC2 instance
    Value: !Ref EC2Instance
  AZ:
    Description: Availability Zone of the newly created EC2 instance
    Value: !GetAtt
      - EC2Instance
      - AvailabilityZone
  PublicDNS:
    Description: Public DNSName of the newly created EC2 instance
    Value: !GetAtt
      - EC2Instance
      - PublicDnsName
  PublicIP:
    Description: Public IP address of the newly created EC2 instance
    Value: !GetAtt
      - EC2Instance
      - PublicIp
写好template之后,登录控制台,选择 Create Stack -> Create Template in Designer
在Designer里面可以通过拖曳来创建,这里我们之间复制粘贴准备好的文件就可以了
刷新一下,确认语法无误 就可以上传了
他自动提交到一个AWS的S3 Bucket里面
选择下一步 就进入stack的参数配置页面。对照前面的YAML文件的Parameters 部分,这些都是一一对应的
自定义一下
下一部分选择默认配置即可,注意权限,如果不指定对应的role,那么就按照当前用户的权限进行配置
值得一提的是默认设置是安装失败自动回滚,删除stack的时候自动删除所有资源
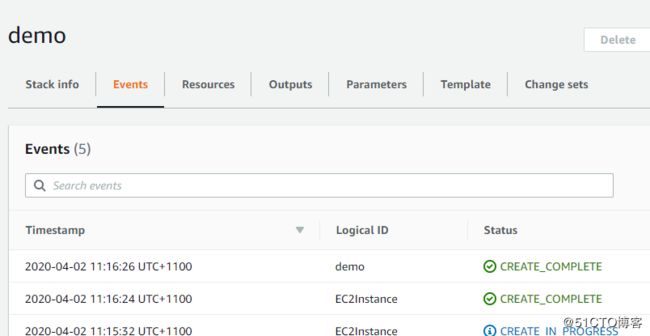
创建完毕,可以查看Event
Resource
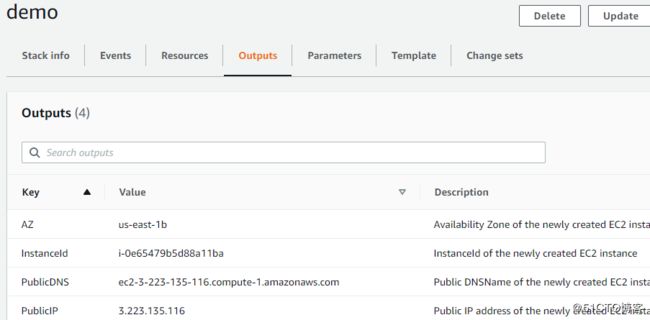
Output, 注意这些值都是和我们上面定义的YAML文件吻合的
输入的参数
Yaml文件
创建的EC2
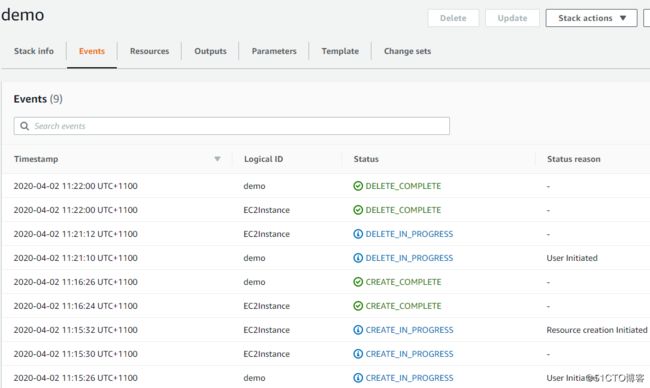
最后试试看 删除
删除stack会自动删除对应的EC2
查看EC2确实已经被删掉了
练习结束


