开始之前
本篇讲述的是compiler的第一步——parse,就是将模板template转化为AST的这一步,在开始之前先做一些准备工作,方便等一下我们学习的时候可以参考
首先是上一篇提到的在web平台上的baseOptions,我们再次拿出来,因为里面的属性可能会在之后的内容多次出现。
{
  expectHTML: true, // 是否期望HTML,不知道是啥反正web中的是true
  modules, // klass和style,对模板中类和样式的解析
  directives, // v-model、v-html、v-text
  isPreTag, // v-pre标签
  isUnaryTag, // 单标签,比如img、input、iframe
  mustUseProp, // 需要使用props绑定的属性,比如value、selected等
  canBeLeftOpenTag, // 可以不闭合的标签,比如tr、td等
  isReservedTag, // 是否是保留标签,html标签和SVG标签
  getTagNamespace, // 命名空间,svg和math
  staticKeys: genStaticKeys(modules) // staticClass,staticStyle。
}
然后我们这部分主要学习src/compiler/parser/index.js , src/compiler/parser/html-parser.js 和 src/compiler/parser/text-parser.js,里面有一些正则表达式我们先提前在这里展示一下,方便我们之后的学习~ emmm。。。其实我一看到正则就晕,但是还是坚持把它翻译完了,假如有错误之处请及时指出,谢谢~
src/compiler/parser/index.js
// @和v-on 事件绑定
const onRE = /^@|^v-on:/

// v-xxx, @, : 事件/数据绑定
const dirRE = /^v-|^@|^:/

// v-for 中的属性值,如 (item, index) of items
const forAliasRE = /(.*?)\s+(?:in|of)\s+(.*)/

// v-for 中的前部分,如 (item, index)
const forIteratorRE = /\((\{[^}]*\}|[^,]*),([^,]*)(?:,([^,]*))?\)/

// : 绑定属性
const argRE = /:(.*)$/

// 以:或者v-bind: 开头的属性
const bindRE = /^:|^v-bind:/

// .修饰符
const modifierRE = /\.[^.]+/g
src/compiler/parser/html-parser.js
// 标准命名规范
const ncname = '[a-zA-Z_][\\w\\-\\.]*'

// 捕获整体内容
const qnameCapture = `((?:${ncname}\\:)?${ncname})`

// 开始标签开头
const startTagOpen = new RegExp(`^<${qnameCapture}`)

// 开始标签结尾
const startTagClose = /^\s*(\/?)>/

// 结束标签
const endTag = new RegExp(`^<\\/${qnameCapture}[^>]*>`)

// DOCTYPE
const doctype = /^]+>/i

// 注释 ,从‘-->’后开始读取
if (comment.test(html)) {
    const commentEnd = html.indexOf('-->')

    if (commentEnd >= 0) {
    if (options.shouldKeepComment) {
        options.comment(html.substring(4, commentEnd))
    }
    // 3 是 ‘-->’的长度
    advance(commentEnd + 3)
    continue
    }
}

// 过滤注释的内容
if (conditionalComment.test(html)) {
    const conditionalEnd = html.indexOf(']>')

    if (conditionalEnd >= 0) {
    advance(conditionalEnd + 2)
    continue
    }
}

// 过滤Doctype:
const doctypeMatch = html.match(doctype)
if (doctypeMatch) {
    advance(doctypeMatch[0].length)
    continue
}

// 结束标签处理
const endTagMatch = html.match(endTag)
if (endTagMatch) {
    const curIndex = index
    advance(endTagMatch[0].length)
    parseEndTag(endTagMatch[1], curIndex, index)
    continue
}

// 开始标签处理
const startTagMatch = parseStartTag()
if (startTagMatch) {
    // 处理startTagMatch
    handleStartTag(startTagMatch)
    if (shouldIgnoreFirstNewline(lastTag, html)) {
    advance(1)
    }
    continue
}
这段函数主要是过滤作用,对注释和Doctype进行过滤,endTagMatch的判断到后面再讲,接着是startTagMatch,我们看看函数parseStartTag
  function parseStartTag () {
    const start = html.match(startTagOpen)
    if (start) {
      const match = {
        tagName: start[1],
        attrs: [],
        start: index
      }
      advance(start[0].length)
      let end, attr
      while (!(end = html.match(startTagClose)) && (attr = html.match(attribute))) {
        advance(attr[0].length)
        match.attrs.push(attr)
      }
      if (end) {
        match.unarySlash = end[1]
        advance(end[0].length)
        match.end = index
        return match
      }
    }
  }
一开始我们讲到了正则startTagOpen是开始标签的开头,我们匹配到了div标签,接着是定义了一个变量match,我们输出一下看看结果:
match = {
    tagName: "div",
    attrs: [" class='div'", "class", "=", undefined, "div", undefined, index: 0, input: " class='div'>↵                我是最普通的<文本>↵         …   这是我的链接↵
"],
start: 0,
unarySlash: "",
end: 17}
这个函数的大致操作就是读取开始标签中的属性值并用一个数组存起来,然后索引值跳到标签之后,处理完成。
然后回到原函数中,handleStartTag对刚才返回的结果startTagMatch进行处理,继续看看函数handleStartTag。
function handleStartTag (match) {
    const tagName = match.tagName
    const unarySlash = match.unarySlash

    if (expectHTML) {
      if (lastTag === 'p' && isNonPhrasingTag(tagName)) {
        parseEndTag(lastTag)
      }
      if (canBeLeftOpenTag(tagName) && lastTag === tagName) {
        parseEndTag(tagName)
      }
    }

    const unary = isUnaryTag(tagName) || !!unarySlash

    const l = match.attrs.length
    const attrs = new Array(l)
    for (let i = 0; i < l; i++) {
      const args = match.attrs[i]
      if (IS_REGEX_CAPTURING_BROKEN && args[0].indexOf('""') === -1) {
        if (args[3] === '') { delete args[3] }
        if (args[4] === '') { delete args[4] }
        if (args[5] === '') { delete args[5] }
      }
      const value = args[3] || args[4] || args[5] || ''
      const shouldDecodeNewlines = tagName === 'a' && args[1] === 'href'
        ? options.shouldDecodeNewlinesForHref
        : options.shouldDecodeNewlines
      attrs[i] = {
        name: args[1],
        value: decodeAttr(value, shouldDecodeNewlines)
      }
    }

    if (!unary) {
      stack.push({ tag: tagName, lowerCasedTag: tagName.toLowerCase(), attrs: attrs })
      lastTag = tagName
    }

    if (options.start) {
      options.start(tagName, attrs, unary, match.start, match.end)
    }
}
它的大致流程就是先循环遍历match中的属性数组attrs进行格式封装,接着是if(!unary)对于非单标签元素的话,将他们封装后再入栈,然后是进行执行start操作。此时输出一下attrs和stack你们看看
attrs = [
    {
        name: 'class',
        value: 'div'
    }
]
stack = [
    {
        tag: 'div',
        lowerCasedTag: 'div',
        attrs
    }
]
start操作是作为参数传入的,这次我们分析一下start。由于代码过长我就不贴代码了,我先说说整体的流程,然后你们对着源码一起看。
start整体流程:
{
  type: 1, // type = 1 为dom节点
  tag, // 标签名
  attrsList: attrs, // 属性数组
  attrsMap: makeAttrsMap(attrs), // 属性映射
  parent, // 父节点
  children: [] // 子节点节点
}
start函数就是慢慢地给这个AST进行装饰,添加更多的属性和标志
preTransforms预处理操作是将动态类型绑定v-model展开成v-if-else链,在我们的小栗子中可以忽略。
- 对vue的指令进行处理v-pre、v-if、v-for、v-once、slot、key、ref
对于指令的处理我们到时候另开篇章讲述~
对根节点进行约束处理,不能是slot,template,v-for这些多元素标签,但是允许用v-if,v-else-if 和 v-else。
绑定父子关系,也就是设置parent和children的值。
假如不是个单标签元素就讲这个AST入栈
不知道是啥,,找都找不到
看完start,我们看看结束标签的处理parseEndTag。
  function parseEndTag(tagName, start, end) {
    let pos, lowerCasedTagName
    if (start == null) start = index
    if (end == null) end = index

    if (tagName) {
      lowerCasedTagName = tagName.toLowerCase()
    }

    // 找出最靠近的同类型标签
    if (tagName) {
      for (pos = stack.length - 1; pos >= 0; pos--) {
        if (stack[pos].lowerCasedTag === lowerCasedTagName) {
          break
        }
      }
    } else {
      pos = 0
    }

    if (pos >= 0) {
      // 出栈
      for (let i = stack.length - 1; i >= pos; i--) {
        if (options.end) {
          options.end(stack[i].tag, start, end)
        }
      }
      stack.length = pos
      lastTag = pos && stack[pos - 1].tag
    } else if (lowerCasedTagName === 'br') {
      if (options.start) {
        options.start(tagName, [], true, start, end)
      }
    } else if (lowerCasedTagName === 'p') {
      if (options.start) {
        options.start(tagName, [], false, start, end)
      }
      if (options.end) {
        options.end(tagName, start, end)
      }
    }
  }
大致操作就是为结束标签寻找对应的开始标签,进行出栈操作,执行options.end(tagName, start, end),我们看看end函数的出栈操作
// 出栈
    end () {
      // 取出stack中的最后一个元素
      const element = stack[stack.length - 1]
      // 取出该元素的最后一个子元素
      const lastNode = element.children[element.children.length - 1]
      // 如果最后一个子元素是纯文本' '则删除,这是因为我们的模板一般都会缩进,都会有换行,所以这里是清除换行等添加的内容
      if (lastNode && lastNode.type === 3 && lastNode.text === ' ' && !inPre) {
        element.children.pop()
      }
      // stack长度减一
      stack.length -= 1
      // currentParent变为栈中最后一个元素
      currentParent = stack[stack.length - 1]
      // 处理v-pre或pre的结束标签
      endPre(element)
    },
挺简单的,都在注释里解释清楚了。
对于栈的处理,我也console.table出来了,在我们的栗子中,就是
div
div + p
div
div + a
div
这是个不断出栈入栈取出元素进行处理的过程~
再说说一些我们还没说到的细节,先是chars函数。
chars (text: string) {
  const children = currentParent.children
  text = inPre || text.trim()
    ? isTextTag(currentParent) ? text : decodeHTMLCached(text)
    : preserveWhitespace && children.length ? ' ' : ''
  if (text) {
    let expression
    if (!inVPre && text !== ' ' && (expression = parseText(text, delimiters))) {
      children.push({
        type: 2,
        expression,
        text
      })
    } else if (text !== ' ' || !children.length || children[children.length - 1].text !== ' ') {
      children.push({
        type: 3,
        text
      })
    }
  }
}
chars函数主要是对文本进行解析,分两种情况,一种是文本需要解析type = 2,例如栗子中{{msg}},这就要执行parseText函数,一种是纯文本type = 3。看看parseText,在text-parser.js文件中。
export function parseText (
  text: string,
  delimiters?: [string, string]
): string | void {
  // 分隔符正则
  const tagRE = delimiters ? buildRegex(delimiters) : defaultTagRE
  if (!tagRE.test(text)) {
    return
  }
  const tokens = []
  let lastIndex = tagRE.lastIndex = 0
  let match, index
  while ((match = tagRE.exec(text))) {
    index = match.index
    // 存入文本
    if (index > lastIndex) {
      tokens.push(JSON.stringify(text.slice(lastIndex, index)))
    }
    // 存入解析文本以 _s(xxxx) 的形式
    const exp = parseFilters(match[1].trim())
    tokens.push(`_s(${exp})`)
    lastIndex = index + match[0].length
  }
  // 存入尾部文本
  if (lastIndex < text.length) {
    tokens.push(JSON.stringify(text.slice(lastIndex)))
  }
  // 用 + 拼接所有文本
  return tokens.join('+')
}
注释里说得很明白啦,需要解析的文本转换为_s(xxxx)的形式,然后用+符合拼接起来。
最后是comment函数。
comment (text: string) {
  currentParent.children.push({
    type: 3,
    text,
    isComment: true
  })
}
也就是添加注释类型的子节点。
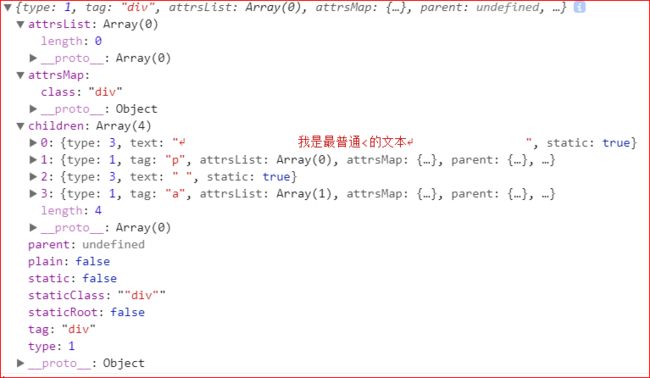
最后输出给你们看看这棵树的大致结构,由于太长了就不具体展开啦你们可以自己弄一个试试:
与parser相关的知识我们基本都过了一遍,我建议大家还是自己写个小demo,在需要的地方或者你觉得不懂的地方进行console,可以从输出的东西更直观地理解这个解析过程~~
下一篇文章中我们会继续讲解compiler的优化过程optimize和生成render代码的过程~ 若有理解错误之处请随时提出,谢谢!
谢谢你们这么好看还来看我的文章~ 一起努力一起成长~

