课程笔记文集地址:Udemy课程:The Complete iOS 9 Developer Course - Build 18 Apps
在这一节课里,要开发一个可以知道用户位置的应用,同时具体显示用户的地址。用坐标转换成地址,需要用到 Geolocation 技术。
最终效果图如下:
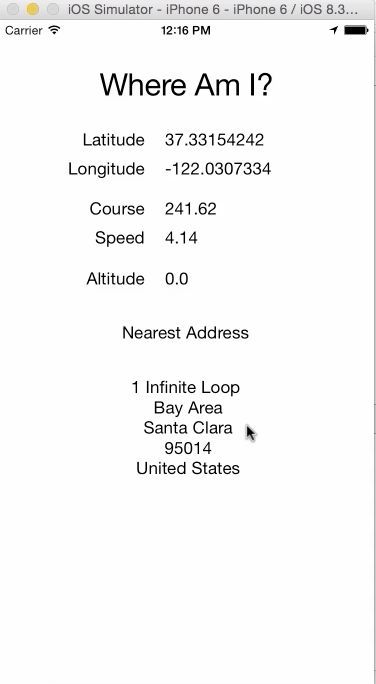
从效果图可以看到,前面几个 UILabel 显示的信息都好处理,我们之前的课程里已经学习了,只需要将这些数值转换为 String 格式,就可以显示到 Label 上了。
难点在于显示地址,将坐标值转换为地址,也就是上面提到的 Geolocation 技术。
一、Storyboard 界面
新建工程,布局 Storyboard,设置 AutoLayout 约束,最后创建 Outlet 连接。
至少要有多少个 Outlet 连接呢:
    @IBOutlet var latitudeLabel: UILabel!
    @IBOutlet var longitudeLabel: UILabel!
    @IBOutlet var courseLabel: UILabel!
    @IBOutlet var speedLabel: UILabel!
    @IBOutlet var altitudeLabel: UILabel!
    @IBOutlet var addressLabel: UILabel!
6个 Outlet 连接,注意,效果图最后一部分 Nearest Address 下面那些地址,实际上都是在一个 Label 里的。

二、与位置有关的初始设置
1、引入 CoreLocation.framework
步骤如下图,5步点击 + 号按钮:

点击 + 后,弹出框里输入查询:
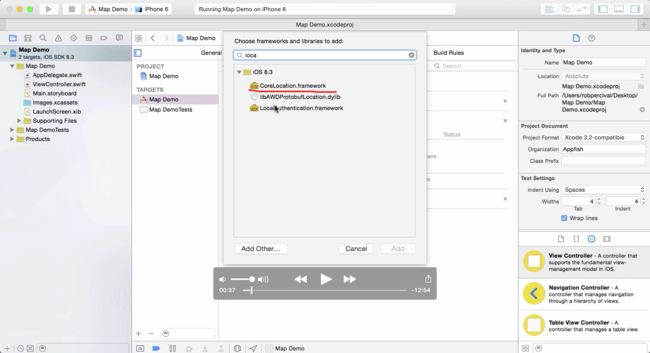
选择 CoreLocation.framework,最终效果如下图:

这两个地方有了变化。
2、设置 plist 文件,请求用户权限
两种情况,1)是一直获取用户的位置信息,NSLocationAlwaysUsageDescription;2)只在需要用的时候才获取用户的位置信息,NSLocationWhenInUseUsageDescription
1)一般用在导航软件上,开车导航的时候,哪怕你在打电话或者听音乐,App 在后台也会不断的获取你的位置,从而进行导航。
2)用在一般情况的应用里,偶尔可能需要记录一下用户信息,比如购物团购应用,可能需要知道你所处的城市和地点,才能推荐给你附近的美食或者娱乐项目。
根据你应用的需求进行设置即可,如下图:
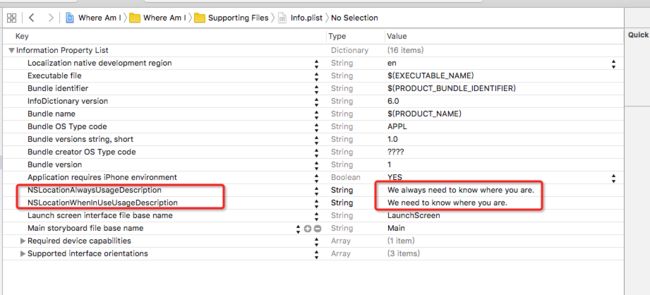
Value 一栏输入的内容,是你在想用户请求获取位置信息权限时,显示给用户的一段内容,这段内容的目的是告诉用户为什么要使用你的位置,从而用户能够根据你说的理由决定是否给你这个权限。
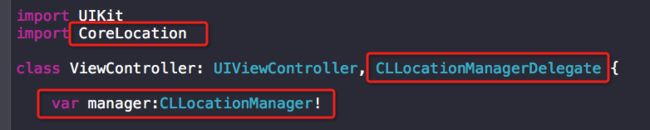
3、类文件的设置
如下图中所标出的内容:
三、代码处理有关位置地址的各种操作
1、首先获取用户的地址
这一步的代码都是我们之前课程中学到的:
    override func viewDidLoad() {
        super.viewDidLoad()
        //创建实例
        manager = CLLocationManager()
        //协议委托
        manager.delegate = self
        //设置用户位置的精确度
        manager.desiredAccuracy = kCLLocationAccuracyBest
        //请求权限(这里和plist文件里的设置要一致)
        manager.requestWhenInUseAuthorization()
        //开始获取位置
        manager.startUpdatingLocation()
    }
将获取来的信息显示到对应的 Label 控件上:
    func locationManager(manager: CLLocationManager, didUpdateLocations locations: [CLLocation]) {
        //获取用户的当前地址
        let userLocation:CLLocation = locations[0]
        //纬度
        self.latitudeLabel.text = "\(userLocation.coordinate.latitude)"
        //经度
        self.longitudeLabel.text = "\(userLocation.coordinate.longitude)"
        //方向
        self.courseLabel.text = "\(userLocation.course)"
        //速度
        self.speedLabel.text = "\(userLocation.speed)"
        //海拔高度
        self.altitudeLabel.text = "\(userLocation.altitude)"
    }
关于 userLocation.course 多说一下,文档里对 course 描述是:
The direction in which the device is traveling.
Course values are measured in degrees starting at due north and continuing clockwise around the compass. Thus, north is 0 degrees, east is 90 degrees, south is 180 degrees, and so on. Course values may not be available on all devices. A negative value indicates that the direction is invalid.
In iOS, this property is declared as nonatomic. In OS X, it is declared as atomic.
2、获取用户的地址:Geolocation
剩下的就是最后的难点了,实际上非常简单,记住这一个方法就可以了:
CLGeocoder().reverseGeocodeLocation
这个方法带一个闭包,在闭包里进行处理接下来的事情:
 CLGeocoder().reverseGeocodeLocation(userLocation, completionHandler: { (placemarks, error) -> Void in

})
完整代码如下:
func locationManager(manager: CLLocationManager, didUpdateLocations locations: [CLLocation]) {
        ......

        CLGeocoder().reverseGeocodeLocation(userLocation, completionHandler: { (placemarks, error) -> Void in
            if (error != nil) {
                print(error)
            } else {
                if let p = placemarks?[0] {
                    var subThoroughfare:String = ""
                    if (p.subThoroughfare != nil) {
                        subThoroughfare = p.subThoroughfare!
                    }
                    self.addressLabel.text = "\(subThoroughfare) \(p.thoroughfare) \n \(p.subLocality) \n \(p.subAdministrativeArea) \n \(p.postalCode) \n \(p.country)"
                }
            }
        })
}
也就是说,获取到这个 placemarks 最重要了,里面的属性大约有:

里面属性不少,具体可以去看文档,我在这里说一下作者用到的属性
subThoroughfare 多少号(比如幸福大街72号里的72号)
thoroughfare 街道名称
subLocality 区(例如朝阳区)
subAdministrativeArea 这个可能中国没有,苹果公司所在地的这个属性的值为“Santa Clara””
postalCode 邮政编码
country 国家
四、结束
OK,到此 App 就开发完了。
不过这个 CLGeocoder().reverseGeocodeLocation 方法获取的地址,在中国可能有些问题,我将作者的程序运行到我的手机上,可是却显示不出来一些信息。估计是我用的是测试机,没有手机 sim 卡,获取的位置信息不全吧。