本文将介绍如何在.NET Core3环境下使用MVVM框架Prism的使用区域管理器对于View的管理
一.区域管理器
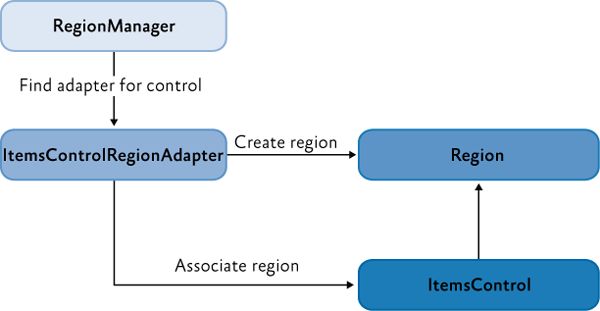
我们在之前的Prism系列构建了一个标准式Prism项目,这篇文章将会讲解之前项目中用到的利用区域管理器更好的对我们的View进行管理,同样的我们来看看官方给出的模型图:
现在我们可以知道的是,大致一个区域管理器RegionMannager对一个控件创建区域的要点:
- 创建Region的控件必须包含一个RegionAdapter适配器
- region是依赖在具有RegionAdapter控件身上的
其实后来我去看了下官方的介绍和源码,默认RegionAdapter是有三个,且还支持自定义RegionAdapter,因此在官方的模型图之间我做了点补充:
二.区域创建与视图的注入
我们先来看看我们之前项目的区域的划分,以及如何创建区域并且把View注入到区域中:
我们把整个主窗体划分了四个区域:
- ShowSearchPatientRegion:注入了ShowSearchPatient视图
- PatientListRegion:注入了PatientList视图
- FlyoutRegion:注入了PatientDetail和SearchMedicine视图
- ShowSearchPatientRegion:注入了ShowSearchPatient视图
在Prism中,我们有两种方式去实现区域创建和视图注入:
- ViewDiscovery
- ViewInjection
1.ViewDiscovery
我们截取其中PatientListRegion的创建和视图注入的代码(更仔细的可以去观看demo源码):
MainWindow.xaml:
这里相当于在后台MainWindow.cs:
RegionManager.SetRegionName(ContentControl, "PatientListRegion");
PatientModule.cs:
 public class PatientModule : IModule
 {
    public void OnInitialized(IContainerProvider containerProvider)
    {
         var regionManager = containerProvider.Resolve();
         //PatientList
         regionManager.RegisterViewWithRegion(RegionNames.PatientListRegion, typeof(PatientList));
         //PatientDetail-Flyout
         regionManager.RegisterViewWithRegion(RegionNames.FlyoutRegion, typeof(PatientDetail));

     }

    public void RegisterTypes(IContainerRegistry containerRegistry)
    {

    }
 }
2.ViewInjection
我们在MainWindow窗体的Loaded事件中使用ViewInjection方式注入视图PatientList
MainWindow.xaml:
MainWindowViewModel.cs:
private IRegionManager _regionManager;
private IRegion _paientListRegion;
private PatientList _patientListView;

private DelegateCommand _loadingCommand;
public DelegateCommand LoadingCommand =>
     _loadingCommand ?? (_loadingCommand = new DelegateCommand(ExecuteLoadingCommand));

void ExecuteLoadingCommand()
{
     _regionManager = CommonServiceLocator.ServiceLocator.Current.GetInstance();
     _paientListRegion = _regionManager.Regions[RegionNames.PatientListRegion];
     _patientListView = CommonServiceLocator.ServiceLocator.Current.GetInstance();
     _paientListRegion.Add(_patientListView);

 }
我们可以明显的感觉到两种方式的不同,ViewDiscovery方式是自动地实例化视图并且加载出来,而ViewInjection方式则是可以手动控制注入视图和加载视图的时机(上述例子是通过Loaded事件),官方对于两者的推荐使用场景如下:
ViewDiscovery:
- 需要或要求自动加载视图
- 视图的单个实例将加载到该区域中
ViewInjection:
- 需要显式或编程控制何时创建和显示视图,或者您需要从区域中删除视图
- 需要在区域中显示相同视图的多个实例,其中每个视图实例都绑定到不同的数据
- 需要控制添加视图的区域的哪个实例
- 应用程序使用导航API(后面会讲到)
三.激活与失效视图
Activate和Deactivate
首先我们需要控制PatientList和MedicineMainContent两个视图的激活情况,上代码:
MainWindow.xaml:
MainWindowViewModel.cs:
  private IRegionManager _regionManager;
  private IRegion _paientListRegion;
  private IRegion _medicineListRegion;
  private PatientList _patientListView;
  private MedicineMainContent _medicineMainContentView;

  private bool _isCanExcute = false;
  public bool IsCanExcute
  {
     get { return _isCanExcute; }
     set { SetProperty(ref _isCanExcute, value); }
  }

  private DelegateCommand _loadingCommand;
  public DelegateCommand LoadingCommand =>
      _loadingCommand ?? (_loadingCommand = new DelegateCommand(ExecuteLoadingCommand));

  private DelegateCommand _activePaientListCommand;
  public DelegateCommand ActivePaientListCommand =>
      _activePaientListCommand ?? (_activePaientListCommand = new DelegateCommand(ExecuteActivePaientListCommand));

  private DelegateCommand _deactivePaientListCommand;
  public DelegateCommand DeactivePaientListCommand =>
      _deactivePaientListCommand ?? (_deactivePaientListCommand = new DelegateCommand(ExecuteDeactivePaientListCommand));

   private DelegateCommand _activeMedicineListCommand;
   public DelegateCommand ActiveMedicineListCommand =>
      _activeMedicineListCommand ?? (_activeMedicineListCommand = new DelegateCommand(ExecuteActiveMedicineListCommand)
      .ObservesCanExecute(() => IsCanExcute));

   private DelegateCommand _deactiveMedicineListCommand;
   public DelegateCommand DeactiveMedicineListCommand =>
       _deactiveMedicineListCommand ?? (_deactiveMedicineListCommand = new DelegateCommand(ExecuteDeactiveMedicineListCommand)
      .ObservesCanExecute(() => IsCanExcute));

   private DelegateCommand _loadMedicineModuleCommand;
   public DelegateCommand LoadMedicineModuleCommand =>
       _loadMedicineModuleCommand ?? (_loadMedicineModuleCommand = new DelegateCommand(ExecuteLoadMedicineModuleCommand));

 ///
 /// 窗体加载事件
 ///
 void ExecuteLoadingCommand()
 {
      _regionManager = CommonServiceLocator.ServiceLocator.Current.GetInstance();
      _paientListRegion = _regionManager.Regions[RegionNames.PatientListRegion];
      _patientListView = CommonServiceLocator.ServiceLocator.Current.GetInstance();
      _paientListRegion.Add(_patientListView);
      _medicineListRegion = _regionManager.Regions[RegionNames.MedicineMainContentRegion];
 }

  ///
  /// 失效medicineMainContent视图
  ///
  void ExecuteDeactiveMedicineListCommand()
  {
      _medicineListRegion.Deactivate(_medicineMainContentView);
  }

  ///
  /// 激活medicineMainContent视图
  ///
  void ExecuteActiveMedicineListCommand()
  {
      _medicineListRegion.Activate(_medicineMainContentView);
  }

  ///
  /// 失效patientList视图
  ///
  void ExecuteDeactivePaientListCommand()
  {
       _paientListRegion.Deactivate(_patientListView);
  }

  ///
  /// 激活patientList视图
  ///
  void ExecuteActivePaientListCommand()
  {
       _paientListRegion.Activate(_patientListView);
  }

  ///
  /// 加载MedicineModule
  ///
  void ExecuteLoadMedicineModuleCommand()
  {
       _moduleManager.LoadModule("MedicineModule");
       _medicineMainContentView = (MedicineMainContent)_medicineListRegion.Views
            .Where(t => t.GetType() == typeof(MedicineMainContent)).FirstOrDefault();
       this.IsCanExcute = true;
   }
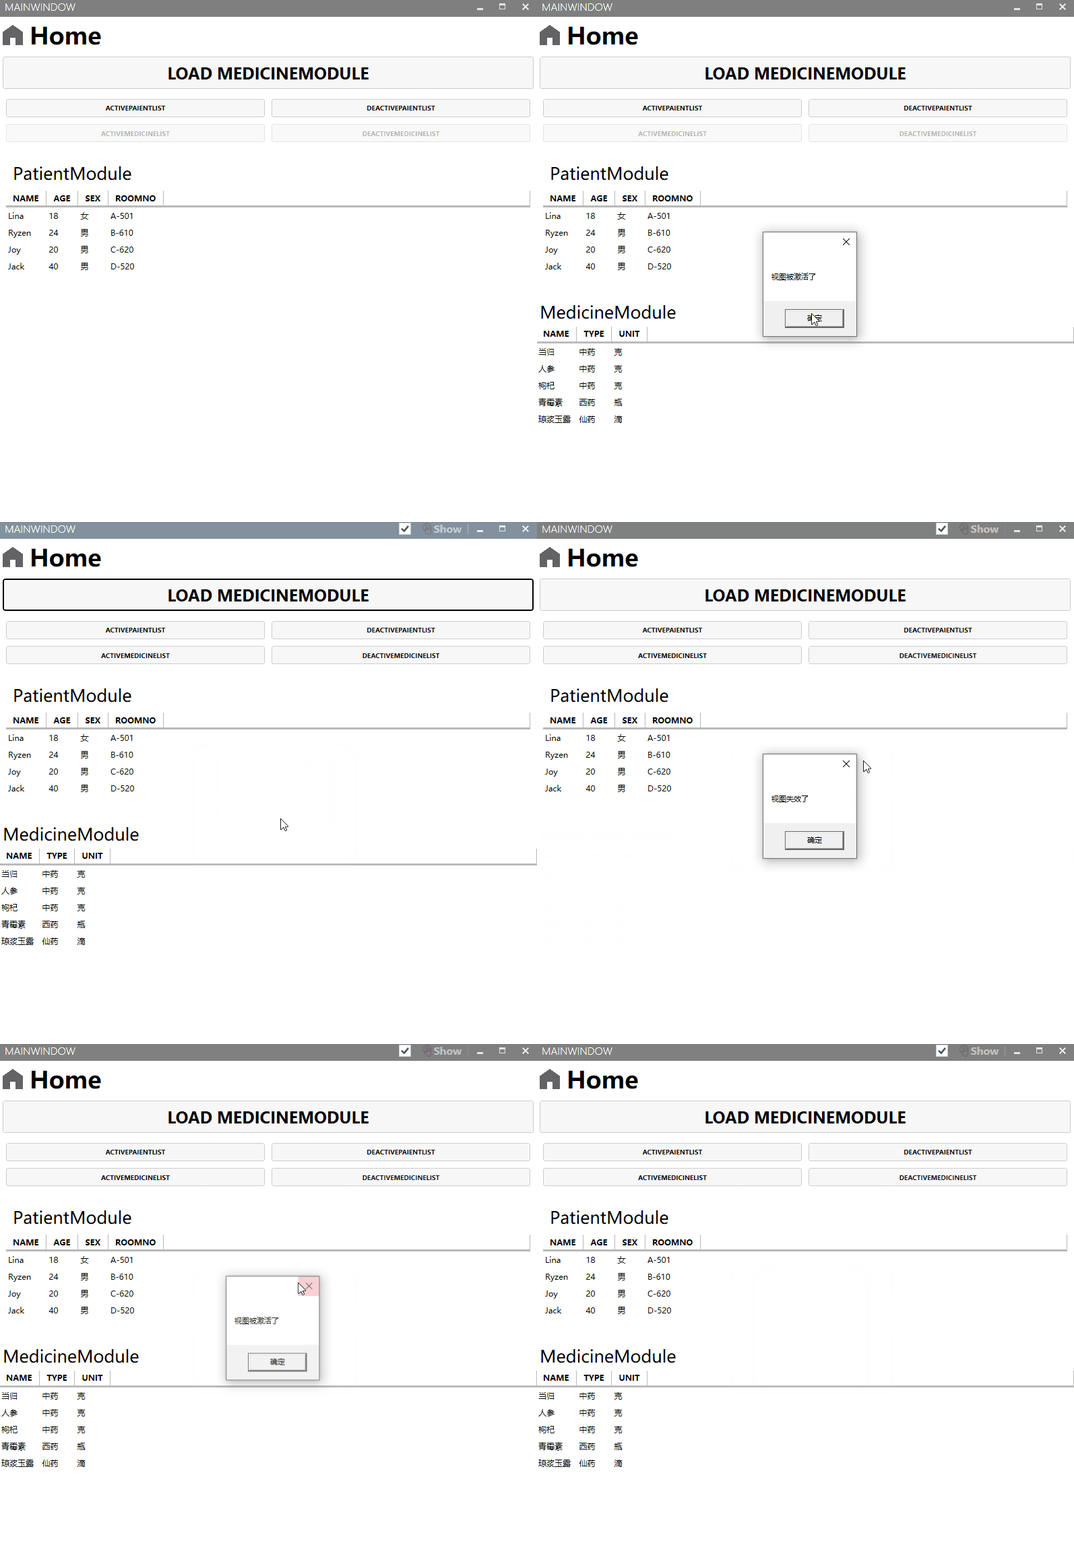
效果如下:
监控视图激活状态
Prism其中还支持监控视图的激活状态,是通过在View中继承IActiveAware来实现的,我们以监控其中MedicineMainContent视图的激活状态为例子:
MedicineMainContentViewModel.cs:
 public class MedicineMainContentViewModel : BindableBase,IActiveAware
 {
     public event EventHandler IsActiveChanged;

     bool _isActive;
     public bool IsActive
     {
         get { return _isActive; }
         set
         {
             _isActive = value;
             if (_isActive)
             {
                 MessageBox.Show("视图被激活了");
             }
             else
             {
                 MessageBox.Show("视图失效了");
             }
             IsActiveChanged?.Invoke(this, new EventArgs());
          }
      }

  }
Add和Remove
上述例子用的是ContentControl,我们再用一个ItemsControl的例子,代码如下:
MainWindow.xaml:
MainWindow.cs:
 public MainWindow()
 {
    InitializeComponent();
    var regionManager= ServiceLocator.Current.GetInstance();
    if (regionManager != null)
    {
       SetRegionManager(regionManager, this.flyoutsControlRegion, RegionNames.FlyoutRegion);
       //创建WindowCommands控件区域
       SetRegionManager(regionManager, this.rightWindowCommandsRegion, RegionNames.ShowSearchPatientRegion);
    }
 }

 void SetRegionManager(IRegionManager regionManager, DependencyObject regionTarget, string regionName)
 {
     RegionManager.SetRegionName(regionTarget, regionName);
     RegionManager.SetRegionManager(regionTarget, regionManager);
 }
ShowSearchPatient.xaml:
ShowSearchPatientViewModel.cs:
 private IApplicationCommands _applicationCommands;
 private readonly IRegionManager _regionManager;
 private ShowSearchPatient _showSearchPatientView;
 private IRegion _region;

 public IApplicationCommands ApplicationCommands
 {
      get { return _applicationCommands; }
      set { SetProperty(ref _applicationCommands, value); }
 }

 private bool _isShow=true;
 public bool IsShow
 {
      get { return _isShow=true; }
      set
      {
          SetProperty(ref _isShow, value);
          if (_isShow)
          {
               ActiveShowSearchPatient();
          }
          else
          {
               DeactiveShowSearchPaitent();
          }
      }
 }

 private DelegateCommand _showSearchLoadingCommand;
 public DelegateCommand ShowSearchLoadingCommand =>
         _showSearchLoadingCommand ?? (_showSearchLoadingCommand = new DelegateCommand(ExecuteShowSearchLoadingCommand));

 void ExecuteShowSearchLoadingCommand()
 {
        _region = _regionManager.Regions[RegionNames.ShowSearchPatientRegion];
        _showSearchPatientView = (ShowSearchPatient)_region.Views
            .Where(t => t.GetType() == typeof(ShowSearchPatient)).FirstOrDefault();
 }


  public ShowSearchPatientViewModel(IApplicationCommands applicationCommands,IRegionManager regionManager)
  {
        this.ApplicationCommands = applicationCommands;
        _regionManager = regionManager;
  }

  ///
  /// 激活视图
  ///
  private void ActiveShowSearchPatient()
  {
       if (!_region.ActiveViews.Contains(_showSearchPatientView))
       {
           _region.Add(_showSearchPatientView);
       }
  }

  ///
  /// 失效视图
  ///
   private async void DeactiveShowSearchPaitent()
   {
        _region.Remove(_showSearchPatientView);
        await Task.Delay(2000);
        IsShow = true;
   }
效果如下:
这里的WindowCommands 的继承链为:WindowCommands <-- ToolBar <-- HeaderedItemsControl <--ItemsControl,因此由于Prism默认的适配器有ItemsControlRegionAdapter,因此其子类也继承了其行为
这里重点归纳一下:
- 当进行模块化时,加载完模块才会去注入视图到区域(可参考MedicineModule视图加载顺序)
- ContentControl控件由于Content只能显示一个,在其区域中可以通过Activate和Deactivate方法来控制显示哪个视图,其行为是由ContentControlRegionAdapter适配器控制
- ItemsControl控件及其子控件由于显示一个集合视图,默认全部集合视图是激活的,这时候不能通过Activate和Deactivate方式来控制(会报错),通过Add和Remove来控制要显示哪些视图,其行为是由ItemsControlRegionAdapter适配器控制
- 这里没讲到Selector控件,因为也是继承自ItemsControl,因此其SelectorRegionAdapter适配器和ItemsControlRegionAdapter适配器异曲同工
- 可以通过继承IActiveAware接口来监控视图激活状态
四.自定义区域适配器
我们在介绍整个区域管理器模型图中说过,Prism有三个默认的区域适配器:ItemsControlRegionAdapter,ContentControlRegionAdapter,SelectorRegionAdapter,且支持自定义区域适配器,现在我们来自定义一下适配器
1.创建自定义适配器
新建类UniformGridRegionAdapter.cs:
public class UniformGridRegionAdapter : RegionAdapterBase
{
    public UniformGridRegionAdapter(IRegionBehaviorFactory regionBehaviorFactory) : base(regionBehaviorFactory)
    {

    }

    protected override void Adapt(IRegion region, UniformGrid regionTarget)
    {
        region.Views.CollectionChanged += (s, e) =>
        {
          if (e.Action==System.Collections.Specialized.NotifyCollectionChangedAction.Add)
          {
              foreach (FrameworkElement element in e.NewItems)
              {
                   regionTarget.Children.Add(element);
              }
          }
        };
    }

    protected override IRegion CreateRegion()
    {
        return new AllActiveRegion();
    }
 }
2.注册映射
App.cs:
protected override void ConfigureRegionAdapterMappings(RegionAdapterMappings regionAdapterMappings)
{
    base.ConfigureRegionAdapterMappings(regionAdapterMappings);
    //为UniformGrid控件注册适配器映射
    regionAdapterMappings.RegisterMapping(typeof(UniformGrid),Container.Resolve());
}
3.为控件创建区域
MainWindow.xaml:
4.为区域注入视图
这里用的是ViewInjection方式:
MainWindowViewModel.cs
  void ExecuteLoadingCommand()
  {
         _regionManager = CommonServiceLocator.ServiceLocator.Current.GetInstance();

         var uniformContentRegion = _regionManager.Regions["UniformContentRegion"];
         var regionAdapterView1 = CommonServiceLocator.ServiceLocator.Current.GetInstance();
         uniformContentRegion.Add(regionAdapterView1);
         var regionAdapterView2 = CommonServiceLocator.ServiceLocator.Current.GetInstance();
         uniformContentRegion.Add(regionAdapterView2);
  }
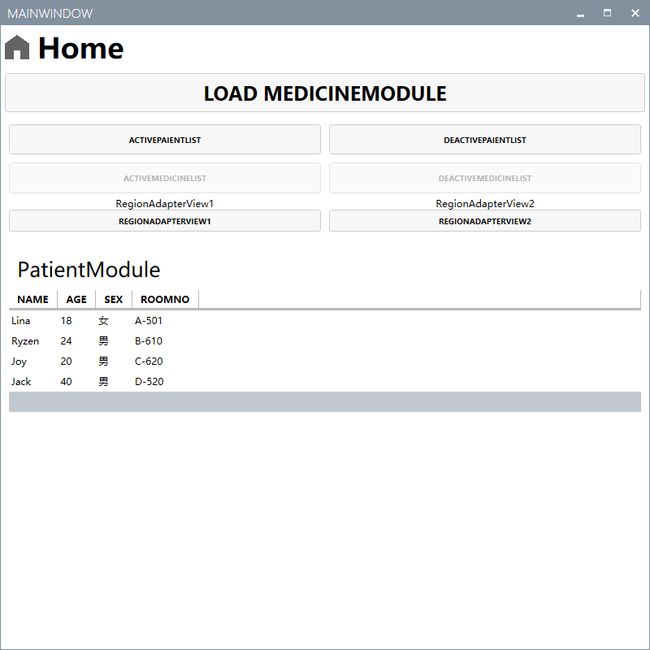
效果如图:
我们可以看到我们为UniformGrid创建区域适配器,并且注册后,也能够为UniformGrid控件创建区域,并且注入视图显示,如果没有该区域适配器,则是会报错,下一篇我们将会讲解基于区域Region的prism导航系统。
五.源码
最后,附上整个demo的源代码:PrismDemo源码


