原文链接:http://www.yiidian.com/springboot/springboot-freemarker.html
本文讲解如何在Spring Boot整合FreeMarker。
1 创建项目,导入依赖
    4.0.0

    com.yiidian
    ch03_05_springboot_freemarker
    1.0-SNAPSHOT


        org.springframework.boot
        spring-boot-starter-parent
        2.1.11.RELEASE


            org.springframework.boot
            spring-boot-starter-web


            org.springframework.boot
            spring-boot-starter-freemarker
这里记得要到FreeMarker的依赖,否则无法运行!
2 编写Controller
package com.yiidian.controller;
import java.util.ArrayList;
import java.util.List;

import com.yiidian.domain.User;
import org.springframework.stereotype.Controller;
import org.springframework.ui.Model;
import org.springframework.web.bind.annotation.RequestMapping;

import javax.servlet.http.HttpServletRequest;

/**
 * 控制器
 * 一点教程网 - www.yiidian.com
 */
@Controller
public class UserController {

	/**
	 * 用户列表展示
	 */
	@RequestMapping("/list")
	public String list(Model model){
		//模拟用户数据
		List list = new ArrayList();
		list.add(new User(1,"小张",18));
		list.add(new User(2,"小李",20));
		list.add(new User(3,"小陈",22));

		//把数据存入model
		model.addAttribute("list", list);

		//跳转到freemarker页面: list.ftl
		return "list";
	}
}
在Controller把数据传递到FreeMarker模板渲染
3 编写FreeMarker模板文件
FreeMarker模板文件必须放在/resources/templates目录下,后缀名为.ftl,内容如下:
	一点教程网-用户列表展示


		用户列表展示


				编号
				姓名
				年龄

			<#list list as user>

				${user.id}
				${user.name}
				${user.age}
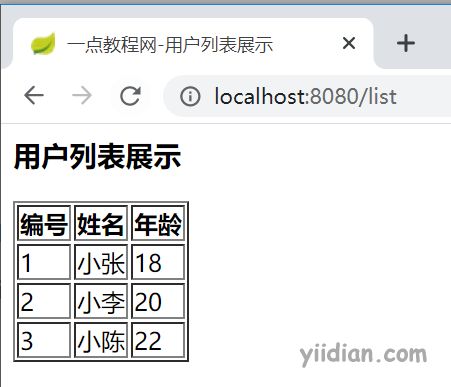
4 运行测试
http://localhost:8080/list
源码下载:https://pan.baidu.com/s/10WaOAfrWHG-v2M8QFe2zMA
欢迎关注我的公众号::一点教程。获得独家整理的学习资源和日常干货推送。
如果您对我的系列教程感兴趣,也可以关注我的网站:yiidian.com


