之所以在用惯了snapKit之后仍谈这个话题,是因为在很比如demo、代码段或stack overflow中回答别人等情况下,你需要使用autolayout并使它们生效,必须使用Apple的API进行编码。
我们这里不对autolayout进行基础解析,只做实际应用。分为纯API和VFL两种方式进行记录。
使用API纯代码写autolayout
Apple提供的API相对简单,不过使用上代码较长,暂且不讨论使用方便性。Apple提供的API有两套:一套是iOS9之前用的使用NSLayoutConstraint,Apple可能是因为发现了使用NSLayoutConstraint代码过长的问题,在iOS9推出了NSLayoutAnchor,不仅让约束声明更加清晰明了,而且还通过静态类型检查以确保约束能够正常工作。
1. NSLayoutConstraint
只需要创建一个NSLayoutConstraint,然后激活,添加到对应的view即可。不过,是每一个约束都要创建,所以代码较长。创建一个NSLayoutConstraint只需要一个方法,为了方便,我们对每一个参数进行注释:
NSLayoutConstraint.init(item: Any, //要约束的目标(比如 redView)

attribute: NSLayoutAttribute, //要约束的属性(比如top)

relatedBy: NSLayoutRelation, //约束类型(比如equal)

toItem: Any?,//相对于哪个目标(比如superView)

attribute: NSLayoutAttribute, //相对于这个目标的属性(比如bottom)

multiplier: CGFloat, //倍数(比如一半为0.5)

constant: CGFloat)//常数(差值,比如-10)
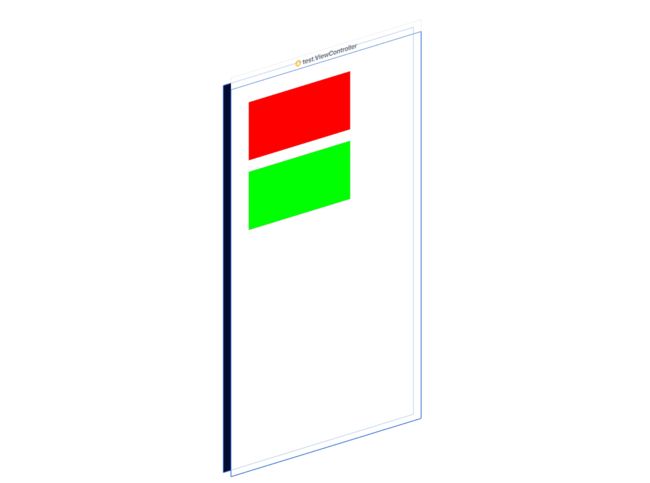
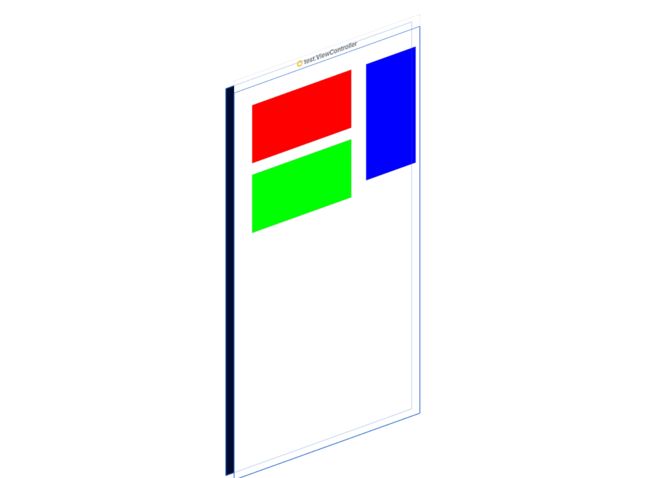
试验添加一个红色的view到界面上,距上距左各20,宽200,高100.
//创建一个红色的view添加到界面上
let redView = UIView()
redView.backgroundColor = .red
redView.translatesAutoresizingMaskIntoConstraints = false
view.addSubview(redView)

//添加距离顶部20
let topConstraint = NSLayoutConstraint.init(item: redView, attribute: .top, relatedBy: .equal, toItem: view, attribute: .top, multiplier: 1.0, constant: 20)
topConstraint.isActive = true

//添加距离左边20
 let leftConstraint = NSLayoutConstraint.init(item: redView, attribute: .left, relatedBy: .equal, toItem: view, attribute: .left, multiplier: 1.0, constant: 20)
leftConstraint.isActive = true

//添加宽为200
let widthConstraint = NSLayoutConstraint.init(item: redView, attribute: .width, relatedBy: .equal, toItem: nil, attribute: .notAnAttribute, multiplier: 1.0, constant: 200)
widthConstraint.isActive = true

//添加高为100
let heightConstraint = NSLayoutConstraint.init(item: redView, attribute: .height, relatedBy: .equal, toItem: nil, attribute: .notAnAttribute, multiplier: 1.0, constant: 100)
heightConstraint.isActive = true

Holy shit!这种最简单的约束,竟然需要写这么多代码,想象下你需要一个复杂界面的时候..let me die..
2. NSLayoutAnchor
iOS9之后,Apple推出了NSLayoutAnchor。NSLayoutAnchor用来创建NSLayoutConstraint对象,使用这些对象从而实现自动布局。但是一般不会直接创建NSLayoutConstraint对象,而是用UIView(NSView)或者其子类,或者UILayoutGuide的某个anchor属性(比如centerXAnchor),这些属性对应Auto Layout中主要的NSLayoutAttribute值(InterfaceBuilder下属性栏可以看到),所以也可以用NSLayoutAnchor子类创建这些NSLayoutAttribute值.
注意:UIView本身并没有提供anchor属性对应Auto Layout的margin属性,但是UILayoutGuide有这样的属性与之对应。这些属性对应Auto Layout中主要的NSLayoutAttribute值(InterfaceBuilder下属性栏可以看到),所以也可以用NSLayoutAnchor子类创建这些NSLayoutAttribute值.
使用方法也很简单:
greenView.topAnchor.constraint(equalTo: view.topAnchor, constant: 140)
看代码,语意非常清晰了已经。需要注意的是,不同的约束使用的方法(参数)不同,输入greenView.topAnchor.constraint后会有代码提示的,这里不再过多展示。
我们试试使用NSLayoutAnchor继续添加一个绿色的view到界面上,距上40,距左20,宽200,高100.
//创建一个绿色的view
let greenView = UIView()
greenView.backgroundColor = .green
greenView.translatesAutoresizingMaskIntoConstraints = false
view.addSubview(greenView)
//添加约束
greenView.topAnchor.constraint(equalTo: view.topAnchor, constant: 140).isActive = true
greenView.leftAnchor.constraint(equalTo: view.leftAnchor, constant: 20).isActive = true
greenView.widthAnchor.constraint(equalToConstant: 200).isActive = true
greenView.heightAnchor.constraint(equalToConstant: 100).isActive = true
OK,Fine,代码量比去snapKit确实还是不少。需要注意的是,每一条约束,仍需要激活,可以使用
NSLayoutConstraint.activate([NSLayoutConstraint])方法,也可以直接在约束语句后设置
isActive为
true。
3. VFL
VFL(Visual Format Language)是Apple为了缩减NSLayoutConstant代码推出的,以文本格式描述布局,可视化效果很好,比如:
H:|-20-[redView(50)]
水平方向:左边框-距离20pt-长50pt的redview。
这句话表示水平长度为50pt的redview距离左侧边框20pt。
所谓的可视化,也就可读性上,自己去写,倒要费一番功夫了。VFL的使用的方法:
NSLayoutConstraint.constraints(withVisualFormat: String, options: NSLayoutFormatOptions, metrics: [String : Any]?, views: [String : Any])
它的API短了一些,但是要凑齐参数可不是很轻便的事。参数如下:
/**
 *  VFL创建约束的API
 *
 *  @param format  传入某种格式构成的字符串,用以表达想要添加的约束,如@"H:|-margin-[redView(50)]",水平方向上,redView与父控件左边缘保持“margin”间距,redView的宽为50
 *  @param opts    对齐方式,是个枚举值
 *  @param metrics 一般传入以间距为KEY的字典,如: @{ @"margin":@20},KEY要与format参数里所填写的“margin”相同
 *  @param views   传入约束中提到的View,也是要传入字典,但是KEY一定要和format参数里所填写的View名字相同,如:上面填的是redView,所以KEY是@“redView”
 *
 *  @return 返回约束的数组
 */
咱们再用VFL试试,写一个蓝色的view到界面上,距上20,距左250,宽100,高200.
let blueView = UIView()
blueView.backgroundColor = .blue
blueView.translatesAutoresizingMaskIntoConstraints = false
view.addSubview(blueView)
//用VFL添加约束
let hVfl = "H:|-left-[blueView(100)]"
let vVfl = "V:|-top-[blueView(200)]"
let metrics = ["top":20,"left":250]
let views = ["blueView":blueView]

let ops = NSLayoutFormatOptions.alignAllLeft
let hConsts = NSLayoutConstraint.constraints(withVisualFormat: hVfl, options: ops, metrics: metrics, views: views)
let vConsts = NSLayoutConstraint.constraints(withVisualFormat: vVfl, options: ops, metrics: metrics, views: views)
view.addConstraints(hConsts)
view.addConstraints(vConsts)
What? 说好的更简洁呢?现在看来,Apple为了让你理解面向对象和理解布局的过程,还是煞费苦心,看来在能用massnory或者snapKit的情况,应该没人愿意使用Apple的API。
这里需要注意的是,在所有autolayout中,约束都是添加到父视图上的,如果关联的有多个视图,则约束需要添加到被约束视图的共有父视图上的。
在ScrollView中使用autolayout
在scrollview中使用autolayout时,可能稍微有些容易出错,是因为scrollView需要确定自己的contentSize,所以需要能确定子视图的大小,子视图的大小就是scrollView的contentSize。
也就是说,你需要能撑起来scrollView,且水平和竖直硬性支撑。用代表表示,就是scrollView上下左右均有约束,且子视图的宽高一定能通过约束计算出特定的大小。
用一个实例,在scrollView中添加3个view,可左右滑动,pageEnable为true。
let scrollView = UIScrollView()
scrollView.translatesAutoresizingMaskIntoConstraints = false
scrollView.backgroundColor = .gray
scrollView.isPagingEnabled = true
view.addSubview(scrollView)
scrollView.topAnchor.constraint(equalTo: view.topAnchor, constant: 0).isActive = true
scrollView.rightAnchor.constraint(equalTo: view.rightAnchor, constant: 0).isActive = true
scrollView.bottomAnchor.constraint(equalTo: view.bottomAnchor, constant: 0).isActive = true
scrollView.leftAnchor.constraint(equalTo: view.leftAnchor, constant: 0).isActive = true

let bgColor = [UIColor.red,UIColor.green,UIColor.yellow]

var leftView:UIView? = nil
for i in 0..<3{
  let view = UIView()
  view.translatesAutoresizingMaskIntoConstraints = false
  view.backgroundColor = bgColor[i]
  scrollView.addSubview(view)
  if let left = leftView{
    view.leftAnchor.constraint(equalTo: left.rightAnchor, constant: 0).isActive = true
  }else{
    view.leftAnchor.constraint(equalTo: scrollView.leftAnchor, constant: 0).isActive = true
  }
  view.topAnchor.constraint(equalTo: scrollView.topAnchor, constant: 0).isActive = true
  view.bottomAnchor.constraint(equalTo: scrollView.bottomAnchor, constant: 0).isActive = true
  view.widthAnchor.constraint(equalTo: scrollView.widthAnchor, multiplier: 1.0).isActive = true
  view.heightAnchor.constraint(equalTo: scrollView.heightAnchor, multiplier: 1.0).isActive = true
  leftView = view
}
//所有的view都是上左右约束到scrollView,且宽高与scrollView相同,但是scrollView右侧还没有被关联约束
//添加右侧的约束
if let left = leftView{
  left.rightAnchor.constraint(equalTo: scrollView.rightAnchor, constant: 0).isActive = true
}

如果是xib或者storyboard也拖出来遵循这个规则就好啦。再来重复一下需要满足的条件:
- 约束能撑起来scrollView。就是scrollView
上下左右均有约束, - 且水平和竖直硬性支撑。所有子视图的所需的最大宽高
一定能通过约束计算出特定的值。
autolayout做动画
与在frame中布局不同的是,需要在animate方法中,写self.view.layoutIfNeeded(),仅此而已。
另外使用了autolayout的布局中,直接过去view的frame可能得到错误值,在didLayoutSubviews方法中再获取。
UIView.animate(withDuration: 0.3) {
    //
    self.view.layoutIfNeeded()
}
文中代码下载: [https://github.com/xueyongwei/AutpLayoutAPI]