一、RHCS简介
RHCS是Red Hat Cluster Suite的缩写, 也就是红帽子集群套件. RHCS是一个能够提供高可用性、高可靠性、负载均衡、存储共享且经济廉价的集群工具集合, 它将集群系统中散打集群架构融合一体, 可以给web应用、数据库应用等提供安全、稳定的运行环境。
二、RHCS集群的功能和组成
RHCS的核心功能就是提供高可用性集群, 当其中的节点出现故障的时候, RHCS可以通过高可用性服务管理组建自动、快速从一个节点切换到另一个节点, 从而保证应用持续、不间断的对外提供服务, 从而实现RHCS高可用集群实现的功能.
RHCS是一个集群套件, 其主要包括如下及部分:
1. 集群架构管理器: RHCS的基础套件, 提供集群的基本功能, 主要包括分布式集群管理器(CMAN)、锁管理(DLM)、配置文件管理(CSS)、栅设备(FENCE);
2. ramanager高可用服务管理: 提供节点服务监控和服务故障移动功能, 当一个节点服务出现故障时, 将服务转移到另一个健康节点;
3. 集群管理工具: RHCS通过system-config-cluster来进行配置, 这是一个基于图形界面的工具, 可以很简单、明了的进行配置;
4. 负载均衡工具: RHCS通过LVS实现服务之间的负载均衡, LVS是系统内核中的套件, 所有性能比较好;
5. GFS: 集群文件系统, 这是由RedHat公司开发的, GFS文件系统允许多个服务同时读写一个磁盘分区, 通过GFS可以实现数据的集中管理, 免去了数据同步和拷贝的麻烦, 但GFS并不能孤立的存在, 安装GFS需要RHCS的底层组建支持;
6. Cluster Logical Volume Manager: Cluster逻辑卷管理, 即CLVM, 是LVM的扩展, 这种扩展允许Cluster中的机器使用LVM来管理共享存储, 但是配置之前需要开启LVM支持集群功能;
7. iscsi: iscsi是一种在Internet协议上, 利用TCP/IP机制对fc、fc-xx等进行封装后在网络中进行传输. iscsi是基于C/S架构的, 数据首先被封装成scsi报文, 在封装成iscsi报文, 最后封装tcp/ip报文进行传输. iscsi是基于tcp的, 通过监听端口3260向外提供tcp/ip服务, iscsi的会话是一直保存监利的, 知道会话介绍在端口. RHCS可以通过ISCSI技术来导出和分配共享存储的使用.
四、搭建RHCS高可用集群
主 机 名: 192.168.15.21(rhel1服务端、客户端) 192.168.15.22(rhel2客户端)
操作系统: Red Hat 6.4 2.6.32-358.el6.x86_64 Red Hat 6.4 2.6.32-358.el6.x86_64
1. 配置本地hosts; (rhel1、rhel2都做如下配置)
[root@rhel1 ~]# cat /etc/hosts
………………/省略
192.168.15.21   rhel1.rhcs.com  rhel1
192.168.15.22   rhel2.rhcs.com  rhel2
[root@rhel1 ~]# scp /etc/hosts [email protected]:/etc/hosts
2. 配置主机ssh秘钥登录; (rhel1、rhel2都做如下配置)
[root@rhel1 ~]# ssh-keygen -t rsa                    #出现提示按enter;
[root@rhel1 ~]# ssh-copy-id -i ~/.ssh/id_rsa.pub root@rhel2
3. 同步系统时间; (rhel1、rhel2都做如下配置)
[root@rhel1 ~]# date -s "20150328 14:59:00"
4. 配置本地yum源; (rhel1、rhel2都做如下配置)
[root@rhel1 ~]# mount /dev/cdrom /media                        #挂载系统光盘
[root@rhel1 .ssh]# cd /etc/yum.repos.d/
[root@rhel1 yum.repos.d]# mv rhel-source.repo rhel-source.repo.bak
[root@rhel1 yum.repos.d]# vim rhel-debuginfo.repo
[Server]
baseurl=file:///media
enabled=1
gpgcheck=0
gpgkey=file:///media/RPM-GPG-KEY-redhat-release
[root@rhel1 ~]# yum -y install httpd      #安装http服务;
[root@rhel1 ~]# service httpd start       #开启httpd服务;
[root@rhel1 ~]# chkconfig httpd on        #将httpd服务加入到开机启动;
[root@rhel1 ~]# vim yum.sh                #如下是一个将本地光盘内容全部提取出来的脚本;
#!/bin/bash
#desc: get file from directory
#example: sh getfilefromdir.sh A B
INIT_PATH=${1%/}
SAVE_PATH=${2%/}
function checksavepath() {
    if [ -d $SAVE_PATH ]
    then
        rm -rf $SAVE_PATH
    fi
    mkdir ${SAVE_PATH}
    touch $SAVE_PATH".log"
}
function getfilefromdir(){
    for file in ` ls $1`
    do
        if [ -d $1"/"$file ]
        then
            getfilefromdir $1"/"$file
        else
            local path="$1/$file"
            local name=$file
            if [ ! -f $SAVE_PATH"/"$name ]
            then
                echo "cp ${path} to ${SAVE_PATH}/${name}"
                cp ${path} "${SAVE_PATH}/${name}"
            else
                echo "${path} file already exists"
                echo "${path}" >> $SAVE_PATH".log" 2>&1
            fi
        fi
    done
}
checksavepath
for sfol in ${INIT_PATH}
do
    getfilefromdir ${sfol}
done
[root@rhel1 ~]# chmod +x yum.sh                 #给脚本添加可执行权限;
[root@rhel1 ~]# mkdir /var/www/html/yum
[root@rhel1 ~]# ./yum.sh /media /var/www/html/yum
[root@rhel1 ~]# yum install createrepo          #安装组装依赖包所需用到的软件;
[root@rhel1 ~]# cd /var/www/html/yum
[root@rhel1 yum]# createrepo ./                 #重建依赖包关系;
[root@rhel1 yum]# sed -i s@baseurl=file:///media@baseurl=http://192.168.15.21/yum@g /etc/yum.repos.d/rhel-debuginfo.repo
[root@rhel1 yum.repos.d]# scp /etc/yum.repos.d/rhel-debuginfo.repo root@rhel2:/etc/yum.repos.d/
[root@rhel2 ~]# cd /etc/yum.repos.d/
[root@rhel2 yum.repos.d]# mv rhel-source.repo rhel-source.repo.bak
[root@rhel1 yum.repos.d]# vim rhel-debuginfo.repo
[Server]
baseurl=http://192.168.15.21/yum
enabled=1
gpgcheck=0
gpgkey=file:///media/RPM-GPG-KEY-redhat-release
5. 安装RHCS服务端和客户端
[root@rhel1 ~]# yum clean all                          #清除缓存
[root@rhel1 ~]# yum install luci                       #安装服务端工具;
[root@rhel1 ~]# chkconfig luci on                      #将luci设置为开机启动;
                         PS: 如下操作需要在rhel1、rhel2主机执行
============================================================================
[root@rhel1 ~]# yum clean all                           #清除缓存
[root@rhel1 ~]# yum install ricci                       #安装客户端工具;
[root@rhel1 ~]# chkconfig ricci on                      #将ricci设置为开机启动;
[root@rhel1 ~]#  service ricci start                    #启动ricci服务;
[root@rhel1 ~]#  service luci start                     #启动luci服务;
[root@rhel1 ~]# passwd ricci #安装完ricci客户端会生成一个ricci系统用户, 现在给ricci设置密码;
[root@rhel1 ~]# service NetworkManager stop
[root@rhel1 ~]# chkconfig NetworkManager off
[root@rhel1 ~]# service iptables stop
[root@rhel1 ~]#chkconfig iptables off3
============================================================================
五、web配置
1. 登录到web端;
PS: 关于用户授权, 登录进入后点击Admin
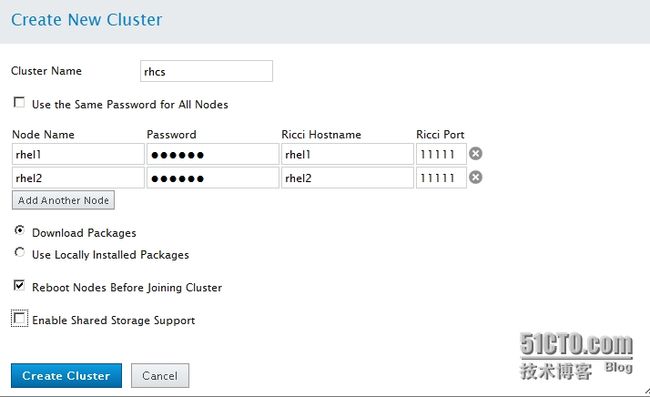
2. 创建集群组;
点击"Manage Clusters ->Create"
Cluster Name: 集群名;
Node Name : 主机名称或者IP地址;
Passwd : 为ricci用户密码;
Downlocad Packages: 下载rhcs集群所需软件包;
Reboot Nodes Before Joining Cluster: 下载完后自动重启;
Enable Shaerd Storage Support: 是否连接存储;
PS: 如果创建集群失败, 错误信息如:"is already a member of a cluster named RHCS", 到cluster下查看配置文件,
[root@rhel1 ~]# cd /etc/cluster/
[root@rhel1 cluster]# cat cluster.conf
[root@rhel1 cluster]# mv cluster.conf cluster.conf.bak
ps: 两个节点在安装包时, 错误提示如:"the node may be temporaruily unreachable"
检查iptables、selinux是否关闭, 检查ricci服务是否关闭.
所需的包安装完后, 系统会重新启动. 系统启动成功后, 需要讲cman、rgmanager服务开启。
[root@rhel1 ~]# service cman start                           #开启cman服务;
[root@rhel2 ~]# service cman start
[root@rhel1 ~]# service rgmanager start                      #开启rgmanager服务;
[root@rhel2 ~]# service rgmanager start
[root@rhel1 ~]# chkconfig cman on                            #将cman服务设置为开机自启动;
[root@rhel1 ~]# chkconfig rgmanager on
3. 创建失败转移域;
Prioritized: 优先处理;
Resticted : 服务是否只能运行在指定节点;
Priority : 优先级。 数字越大优先级越低;
4. 创建资源组;
这里选择的是Scipt(脚本), 意思是当机器故障后通过Scipt开启服务.
IP Address这里指的是浮动IP地址, 子网掩码不能用255.255.0.0、255.255.255.0等表示, 只能用16、24等表示.
5. 创建服务组;
点击Add Resource -> 把刚才创建的http、IP Address两个资源组添加进去. (如果不添加不, HA不会成功)
六、验证
1. 检测rhel1所需服务状态,如果未启动, 请启动该服务;
[root@rhel1 ~]# service httpd status
[root@rhel1 ~]# service cman status
[root@rhel1 ~]# service luci status
[root@rhel1 ~]# service rgmanager status
2. 检测rhel2所需服务状态, 如果未启动, 请启动该服务(除httpd服务不启动);
3. clustat查看节点位置;
[root@rhel1 ~]# clustat
[root@rhel1 ~]# ip addr list #查看浮动IP地址;
 我们可以看到, 现在主节点是rhel1,浮动地址是192.168.15.30, 打开IE浏览器, 输入浮动地址会见到Apche默认页面, 如下:
4. 现在将rhel1的httpd服务停止后, HA会不会自启动rhel2的httpd服务;
[root@rhel1 ~]# service httpd stop
[root@rhel1 ~]# clustat
可以看到, 主节点已经成为rhel2了, 检查rhel2的httpd服务是否是否启动成功;
[root@rhel2 ~]# service httpd status
[root@rhel2 ~]# ip addr list
可以清楚的看到, 当rhel1的httpd服务停掉后, HA会自动在rhel2启动httpd服务, 并且浮动地址也会移动到rhel2. 为了进一步验证, 打开IE浏览器输入浮动地址
如有不对地方, 请及时提醒.


