插件化框架实现:基于kotlin的插件化框架
Java类加载
- 我们知道Java代码通过编译成class文件后,需要通过类加载机制加载到虚拟机后才能运行
类加载机制
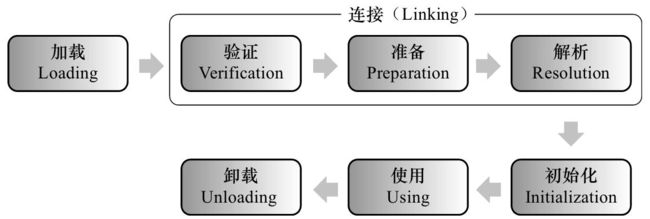
ClassLife.png
加载阶段
- 通过类的全限定名获取二进制字节流(可以来自磁盘,网络等),将字节流装换为方法区的数据结构,生成Class对象作为该类访问入口
连接阶段
- 验证Class的字节流符合虚拟机规范,为类变量分配内存初始化默认值,将常量池符号引用转化为直接引用
初始化阶段
- 执行类构造器:静态语句块和类变量赋值动作
- 初始化的触发时机是在遇到new、invokestatic、反射、父类还没初始化等操作时进行
Java 类加载器
-
启动类加载器(Bootstrap ClassLoader)
负责将
/lib -
扩展类加载器(Extension ClassLoader)
负责加载
\lib\ext -
应用程序类加载器(Application ClassLoader):一般程序的默认类加载器
负责加载用户类路径(
ClassPath)的类库
类加载器的双亲委托模型
- 如果一个类加载器收到了类的加载的请求,它首先不会自己去加载这个类,而是把这个请求委托给父类加载器去完成,每一层都是如此;因此所有的加载请求最终都应该传递到顶层的启动类加载器中,只有当父类加载器反馈无法完成这个加载请求(它的搜索范围内没有找到所需的类)时,子加载器才会尝试去加载
- 同时类加载方式也分为隐式加载(new等方式)和显示加载
Class.forname(xxx)
Android类加载
- Android不是基于jvm虚拟机,不能直接加载class字节码,需要将class字节码转换为dex字节码
Android 类加载器
Android类加载器主要是DexClassLoader和PathClassLoader,两者的区别是:
PathClassLoader是系统类加载器,同时也是默认类加载,只能加载系统中已经安装过的apk
DexClassLoader可以加载apk/dex,可以加载未安装的apk
DexClassLoader版本差异
- Android在API 9-13 和API 14以上DexClassLoader内部持有dex文件的数据结构不同,如果需要设配API 9-13则需要做不同处理,先来看一下数据结构不同的地方:
API 9 - 13
DexClassLoader
public class DexClassLoader extends ClassLoader {
    private static final boolean VERBOSE_DEBUG = false;
    /* constructor args, held for init */
    private final String mRawDexPath;
    private final String mRawLibPath;
    private final String mDexOutputPath;
    /*
     * Parallel arrays for jar/apk files.
     *
     * (could stuff these into an object and have a single array;
     * improves clarity but adds overhead)
     */
    private final File[] mFiles;         // source file Files, for rsrc URLs
    private final ZipFile[] mZips;       // source zip files, with resources
    private final DexFile[] mDexs;       // opened, prepped DEX files

    // ....
}
- 这里可以看到DexFile是直接以数组结构存放在DexClassLoader类中
API > 13
DexClassLoader相关类
public class DexClassLoader extends BaseDexClassLoader {
    public DexClassLoader(String dexPath, String optimizedDirectory,
            String librarySearchPath, ClassLoader parent) {
        super(dexPath, new File(optimizedDirectory), librarySearchPath, parent);
    }
}
public class BaseDexClassLoader extends ClassLoader {
    private final DexPathList pathList;

    public BaseDexClassLoader(String dexPath, File optimizedDirectory,
            String librarySearchPath, ClassLoader parent) {
        super(parent);
        this.pathList = new DexPathList(this, dexPath, librarySearchPath, optimizedDirectory);
    }

    // ...
}
final class DexPathList {
    /** class definition context */
    private final ClassLoader definingContext;
    /**
     * List of dex/resource (class path) elements.
     * Should be called pathElements, but the Facebook app uses reflection
     * to modify 'dexElements' (http://b/7726934).
     */
    private Element[] dexElements;

    // ...

    static class Element {
        private final File dir;
        private final boolean isDirectory;
        private final File zip;
        private final DexFile dexFile;

        // ...
    }
}
- 这里可以看到DexFile被层层封装存放在BaseDexClassLoader的DexPathList中
ODEX过程
- android 虚拟机并不是直接读取dex文件的,在安装apk的时候会做一次优化,在这一过程,由虚拟机控制的一个verify选项,如果开启会进行一次校验,如果某个类没有引用其他dex中的类,这个类会被打上CLASS_ISPREVERIFIED 的标志。一旦被打上这个标志,就无法再从其他 dex 中加载这个类了
- 这个问题的比较简单的解决办法是引用其他dex的类
App ClassLoader Hook点
- 我们知道App启动会初始化Application并且调用onCreate,这其实是在接受AMS启动信息后调用ActivityThread的handleBindApplication,函数过长,下面截取关键代码:
private void handleBindApplication(AppBindData data) {

  // ...
  data.info = getPackageInfoNoCheck(data.appInfo, data.compatInfo);
  // ...

  final ContextImpl appContext = ContextImpl.createAppContext(this, data.info);
  // 下面代码中也创建ContextImpl,这里应该需要先用到ContextImpl的信息,这里


  // 创建ApplicationInfo
  ApplicationInfo instrApp = new ApplicationInfo();
  instrApp.packageName = ii.packageName;
  instrApp.sourceDir = ii.sourceDir;
  instrApp.publicSourceDir = ii.publicSourceDir;
  instrApp.splitSourceDirs = ii.splitSourceDirs;
  instrApp.splitPublicSourceDirs = ii.splitPublicSourceDirs;
  instrApp.dataDir = ii.dataDir;
  instrApp.nativeLibraryDir = ii.nativeLibraryDir;
  // 获取或创建LoadedApk
  LoadedApk pi = getPackageInfo(instrApp, data.compatInfo,
          appContext.getClassLoader(), false, true, false);
  ContextImpl instrContext = ContextImpl.createAppContext(this, pi);

  try {
      java.lang.ClassLoader cl = instrContext.getClassLoader();
      mInstrumentation = (Instrumentation)
          cl.loadClass(data.instrumentationName.getClassName()).newInstance();
  } catch (Exception e) {
      throw new RuntimeException(
          "Unable to instantiate instrumentation "
          + data.instrumentationName + ": " + e.toString(), e);
  }

  mInstrumentation.init(this, instrContext, appContext,
         new ComponentName(ii.packageName, ii.name), data.instrumentationWatcher,
         data.instrumentationUiAutomationConnection);

  // ...

  // 创建Application
  Application app = data.info.makeApplication(data.restrictedBackupMode, null);
  mInitialApplication = app;

  // 调用Instrumentation的onCreate()方法
  mInstrumentation.onCreate(data.instrumentationArgs);

  // 调用Application的onCreate()方法
  mInstrumentation.callApplicationOnCreate(app);
}
- 上面代码有两个LoadedApk对象,分别是
data.info和pi,由下面获取LoadedApk代码可以知道都是同一个LoadedApk对象
public final LoadedApk getPackageInfoNoCheck(ApplicationInfo ai,                                                CompatibilityInfo compatInfo) {
  return getPackageInfo(ai, compatInfo, null, false, true, false);
}

private LoadedApk getPackageInfo(ApplicationInfo aInfo, CompatibilityInfo compatInfo,
        ClassLoader baseLoader, boolean securityViolation, boolean includeCode,
        boolean registerPackage) {
    // 根据包名加载缓存中的LoadedApk 或 创建LoadedApk
}
- 到这里我们知道ClassLoader来自
appContext.getClassLoader(),代码跟踪最终调用LoadedApk的getClassLoader()方法
public ClassLoader getClassLoader() {
  synchronized (this) {
      if (mClassLoader != null) {
          return mClassLoader;
      }

      if (mIncludeCode && !mPackageName.equals("android")) {
        // ...
        mClassLoader = ApplicationLoaders.getDefault().getClassLoader(zip, lib,
                    mBaseClassLoader);
      } else {
        if (mBaseClassLoader == null) {
           mClassLoader = ClassLoader.getSystemClassLoader();
        } else {
           mClassLoader = mBaseClassLoader;
        }
      }
      return mClassLoader;
    }
}
- 可以看到LoadedApk属性mClassLoader就是整个App的使用的ClassLoader
ZenusPlugin 类加载
- 通过替换系统LoadedApk的ClassLoader为ZeusClassLoader,利用ZeusClassLoader优先查找补丁中的类,若存在就返回,不存在则再查找宿主中的类
- 优先查找补丁中的类是先通过反射宿主ClassLoader的parent来完成
ZeusClassLoader
- 空ClassLoader,容器作用
- ZeusPluginClassLoader[],每个插件对应一个ZeusPluginClassLoader
ZeusHotfixClassLoader
- 补丁包类加载器,加载补丁包的时候会替换插件包的parent ClassLoader
加载插件代码
/**
 * 启动插件
 *
 */
public void startPlugin() {
    PluginManager.loadLastVersionPlugin(MyApplication.PLUGIN_TEST);
    try {
        Class cl = PluginManager.mNowClassLoader.loadClass(PluginManager.getPlugin(MyApplication.PLUGIN_TEST).getPluginMeta().mainClass);
        Intent intent = new Intent(this, cl);
        //这种方式为通过在宿主AndroidManifest.xml中预埋activity实现
//            startActivity(intent);
        //这种方式为通过欺骗android系统的activity存在性校验的方式实现
        PluginManager.startActivity(this,intent);
    } catch (ClassNotFoundException e) {
        e.printStackTrace();
    }
}
Small 类加载
- 通过单ClassLoader模式,通过反射Application的ClassLoader将插件包的dex文件添加到DexClassLoader中,通过添加到DexFile Array Head实现插件化
VirtualAPK
- 具备单ClassLoader和多ClassLoader模式,具体是可配置的,默认是单ClassLoader结合多ClassLoader
- apk直接作为插件,在VirtualAPK中被封装成LoadedPlugin,LoadedPlugin具有自己的DexClassLoader,同时根据配置判断是否将LoadedPlugin的DexClassLoader中DexPathList合并到宿主ClassLoader
单ClassLoader vs 多ClassLoader
- 当加载某个类的时候,如果不知道在哪个插件,通过单ClassLoader直接查找比较方便,但是查找过程比多ClassLoader小范围查找会比较慢
- 多ClassLoader需要管理多个ClassLoader,单新的补丁插件来时需要替换等操作,不像单ClassLoader模式,直接将新插件dex文件置于DexPathList头部即可
- VirtualAPK采用两个模式,其实是一种中和,当不知道要启动的类在哪个插件则可以直接通过Class.forName查找,当知道要启动的类在哪个插件则可以通过对应LoadedPlugin的API查找