一、前言
本次实验的目的:
(1) LNMP动静分离部署wordpress,动静都要能实现负载均衡,要注意会话的问题;
(2) 在haproxy和后端主机之间添加varnish进行缓存;
(3) haproxy的设定要求:
(a) stats page,要求仅能通过本地访问使用管理接口;
(b) 动静分离;
(c) 压缩合适的内容类型;
4)最后添加一tomcat服务器,实现动静分离处理jsp动态请求。(补充)
二、LNMP环境搭建
1、配置nginx-dynamic
#安装nginx和php-fpm服务
[root@dynamic ~]# yum install -y epel-release
[root@dynamic ~]# yum install -y nginx php-fpm php-mysql php-mbstring php-mcrypt

#创建nginx web根目录
[root@dynamic ~]# mkdir -pv /data/nginx/html

#下载wordpress到指定目录并解压
[root@dynamic html]# cd /data/nginx/html/
[root@dynamic html]# wget https://cn.wordpress.org/wordpress-4.9.4-zh_CN.tar.gz
[root@dynamic html]# tar xf wordpress-4.9.4-zh_CN.tar.gz

#创建php动态测试页面
[root@dynamic html]# vim test.php


  PHP 测试


 Hello World'; ?>


#创建web根目录的默认html和php页面
[root@dynamic html]# vim index.html
This is dynamic
[root@dynamic html]# vim index.php
Dynamic


#编辑配置/etc/php-fpm.d/www.conf文件
[root@dynamic html]# vim /etc/php-fpm.d/www.conf
listen = 0.0.0.0:9000
user = apache
group = apache
pm = dynamic
pm.max_children = 50
pm.start_servers = 5
pm.min_spare_servers = 5
pm.max_spare_servers = 35
ping.path = /ping
ping.response = pong
pm.status_path = /status
slowlog = /var/log/php-fpm/www-slow.log
php_admin_value[error_log] = /var/log/php-fpm/www-error.log
php_admin_flag[log_errors] = on
php_value[session.save_handler] = files
php_value[session.save_path] = /var/lib/php/session

#创建php-fpm的session目录
[root@dynamic html]# mkdir /var/lib/php/session
[root@dynamic html]# chown apache /var/lib/php/session/

#编辑创建nginx的配置文件
#注意在/etc/nginx/nginx.conf文件中注释下述两个默认配置
#        listen       80 default_server;
#        listen       [::]:80 default_server;
[root@dynamic html]# vim /etc/nginx/conf.d/dynamic.conf
server {
        listen 80;
        server_name www.ilinux.io;
        root /data/nginx/html;
        index index.html index.php;
        location ~* \.php$ {
                fastcgi_pass 192.168.0.83:9000;
                fastcgi_index index.php;
                include fastcgi_params;
                fastcgi_param SCRIPT_FILENAME /data/nginx/html/$fastcgi_script_name;
        }
        location ~* ^/(ping|status)$ {
                fastcgi_pass 192.168.0.83:9000;
                include fastcgi_params;
                fastcgi_param SCRIPT_FILENAME $fastcgi_script_name;

        }


#启动nginx和php-fpm服务并调整firewalld和selinux状态
[root@dynamic html]# systemctl start php-fpm
[root@dynamic html]# systemctl start nginx
[root@dynamic html]# systemctl stop firewalld
[root@dynamic html]# systemctl disable firewalld
[root@dynamic html]# setenforce 0
2、配置nginx-static
#安装nginx服务和mariadb-server
[root@static ~]# yum install -y epel-release mariadb-server

#配置创建wordpress数据库
[root@static ~]# systemctl start mariadb
[root@static ~]# mysql
Welcome to the MariaDB monitor.  Commands end with ; or \g.
Your MariaDB connection id is 2
Server version: 5.5.56-MariaDB MariaDB Server

Copyright (c) 2000, 2017, Oracle, MariaDB Corporation Ab and others.

Type 'help;' or '\h' for help. Type '\c' to clear the current input statement.

MariaDB [(none)]> create database wordpress;
Query OK, 1 row affected (0.00 sec)

MariaDB [(none)]> grant all on wordrpess.* to 'wpuser'@'192.168.0.%' identified by "magedu";
Query OK, 0 rows affected (0.00 sec)

#创建nginx web根目录
[root@static ~]# mkdir -pv /data/nginx/htm

#下载wordpress到指定目录并解压
[root@static html]# cd /data/nginx/html/
[root@static html]# wget https://cn.wordpress.org/wordpress-4.9.4-zh_CN.tar.gz
[root@static html]# tar xf wordpress-4.9.4-zh_CN.tar.gz

#创建txt文本和复制相关的图片内容到web根目录下作为静态内容
[root@dynamic html]# cp /usr/share/backgrounds/*.{png,jpg} .
[root@static html]# vim poem.txt
 Quiet Night
I saw the moonlight before my couch,
And wondered if it were not the frost on the ground.
I raised my head and looked out on the mountain moon,
I bowed my head and thought of my far-off home.
by S. Obata

#配置创建web根目录的默认html和php页面
[root@static html]# vim index.html
This is static
[root@static html]# vim index.php
Static


#编辑创建nginx的配置文件
[root@static html]# vim /etc/nginx/conf.d/static.conf
server {
        listen 80;
        server_name www.ilinux.io;
        root /data/nginx/html;
        index index.html index.php;
        location ~* \.php$ {
                fastcgi_pass 192.168.0.83:9000;
                fastcgi_index index.php;
                include fastcgi_params;
                fastcgi_param SCRIPT_FILENAME /data/nginx/html/$fastcgi_script_name;
        }
        location ~* ^/(ping|status)$ {
                fastcgi_pass 192.168.0.83:9000;
                include fastcgi_params;
                fastcgi_param SCRIPT_FILENAME $fastcgi_script_name;

        }
}

#启动nginx服务并检查firewalld和selinux的状态
[root@static html]# systemctl stop firewalld
[root@static html]# systemctl disable firewalld
Removed symlink /etc/systemd/system/multi-user.target.wants/firewalld.service.
Removed symlink /etc/systemd/system/dbus-org.fedoraproject.FirewallD1.service.
[root@static html]# setenforce 0
[root@static html]# systemctl start nginx
3、配置varnish
#安装varnish服务
[root@static ~]# yum install -y epel-release
[root@static ~]# yum install -y varnish

#配置varnish的监听信息和系统参数
[root@static ~]# vim /etc/varnish/varnish.params
RELOAD_VCL=1
VARNISH_VCL_CONF=/etc/varnish/default.vcl
VARNISH_LISTEN_PORT=6081
VARNISH_ADMIN_LISTEN_ADDRESS=192.168.0.87
VARNISH_ADMIN_LISTEN_PORT=6082
VARNISH_SECRET_FILE=/etc/varnish/secret
VARNISH_STORAGE="file,/data/cache/varnish_storage.bin,1G"
VARNISH_USER=varnish
VARNISH_GROUP=varnish

#创建缓存目录
[root@static ~]# mkdir -pv /data/cache
[root@static ~]# chown varnish /data/cache


#编辑配置varnish的vcl
[root@static ~]# vim /etc/varnish/default.vcl
import directors;
probe static_healthcheck {
    .url = "/index.html";
    .window = 5;
    .threshold = 4;
    .interval =2s;
    .timeout = 1s;
}

backend static {
    .host = "192.168.0.84";
    .port = "80";
    .probe = static_healthcheck;
}


sub vcl_init {
    new BE = directors.round_robin();
    BE.add_backend(static);
}

acl purgers {
    "127.0.0.1";
    "192.168.0.0/24";
}

sub vcl_recv {
    if (req.method == "GET" && req.http.cookie) {
        return(hash);
    }
    if (req.method == "PURGE") {
        if (client.ip ~ purgers) {
          return(purge);
        }
    }
    if (req.http.X-Forward-For) {
        set req.http.X-Forward-For = req.http.X-Forward-For + "," + client.ip;
    } else {
        set req.http.X-Forward-For = client.ip;
    }
        set req.backend_hint = BE.backend();
        return(hash);
}

sub vcl_backend_response {
    if (bereq.url ~ "\.(jpg|jpeg|gif|png)$") {
        set beresp.ttl = 1d;
    }
    if (bereq.url ~ "\.(html|css|js|txt)$") {
        set beresp.ttl = 12h;
    }
    if (beresp.http.Set-Cookie) {
    set beresp.grace = 30m;
        return(deliver);
    }
}

sub vcl_deliver {
    if (obj.hits > 0) {
        set resp.http.X-Cache = "HIT from " + server.ip;
    } else {
        set resp.http.X-Cache = "MISS";
    }
}


#启动varnish服务并调整firewalld和selinux状态
[root@static ~]# systemctl start varnish
[root@static ~]# systemctl stop firewalld
[root@static ~]# systemctl disable firewalld
[root@static ~]# setenforce 0
二、HAProxy的搭建和配置
配置完后端的LNMP环境后,接着我们来配置HAproxy。
#安装haproxy服务
[root@haproxy ~]# yum install -y haproxy

#配置HAProxy记录日志到本地
[root@haproxy ~]# vim /etc/rsyslog.conf
$ModLoad imudp
$UDPServerRun 514
local2.*                                                /var/log/haproxy.log
[root@haproxy ~]# vim /etc/sysconfig/rsyslog
SYSLOGD_OPTIONS="-r"
[root@haproxy ~]# systemctl restart rsyslog

#编辑配置haproxy的配置文件
[root@haproxy ~]# vim /etc/haproxy/haproxy.cfg
frontend  main *:80
    acl url_static       path_end       -i .jpg .gif .png .css .js .txt
    acl url_dynamic     path_end        -i .php
    compression algo gzip  #设置压缩算法为gzip
    compression type text/html text/plain image/x-png image/x-citrix-jpeg  #设置压缩的内容类型为相关静态内容
    use_backend static          if url_static
    use_backend dynamic     if url_dynamic
    default_backend             websrvs

backend websrvs
        balance roundrobin
        server web1 192.168.0.83:80 check
        server web2 192.168.0.87:6081 check

backend static  #添加varnish为静态服务,由varnish将代理处理静态请求
        balance roundrobin
        server srvs1 192.168.0.87:6081 check

backend dynamic
        balance roundrobin
        server dyn1 192.168.0.83:80 check

listen stats
        bind *:8080
        stats enable
        stats uri /admin?stats
        acl url_stats src 192.168.0.0/24  #配置ACL匹配本地网段
        stats admin if url_stats  #只允许匹配ACL的本地网段访问stats的管理页面


#启动haproxy服务
[root@haproxy ~]# systemctl start haproxy
[root@haproxy ~]# systemctl stop firewalld
[root@haproxy ~]# setenforce 0
[root@haproxy ~]# systemctl disable firewalld
Removed symlink /etc/systemd/system/dbus-org.fedoraproject.FirewallD1.service.
Removed symlink /etc/systemd/system/basic.target.wants/firewalld.service.
三、测试
-
1)LNMP动静分离部署wordpress,动静都要能实现负载均衡,要注意会话的问题。
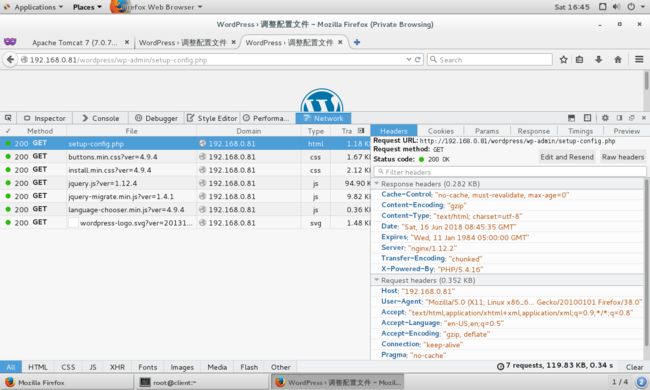
此时访问以.php的结尾的内容会被haproxy负载到dynamic服务器上处理,而访问.jpg,.png和.txt等静态内容则被负载到static服务器上进行处理。
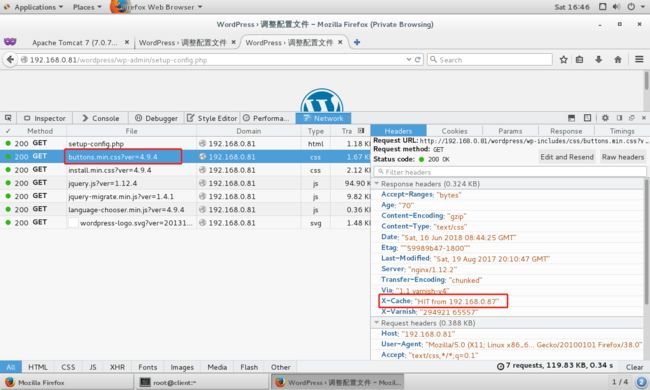
由上图所示访问wordpres页面的动态和静态内容已被分开处理,静态内容代理到varnish上进行处理,而动态内容则代理到dynamic服务器进行处理。
此时访问http://192.168.0.81 默认会轮询到后端两个服务器上,如下所示:
[root@client ~]# for i in {1..10} ; do curl http://192.168.0.81 ; done
This is dynamic
This is static
This is dynamic
This is static
This is dynamic
This is static
This is dynamic
This is static
This is dynamic
This is static
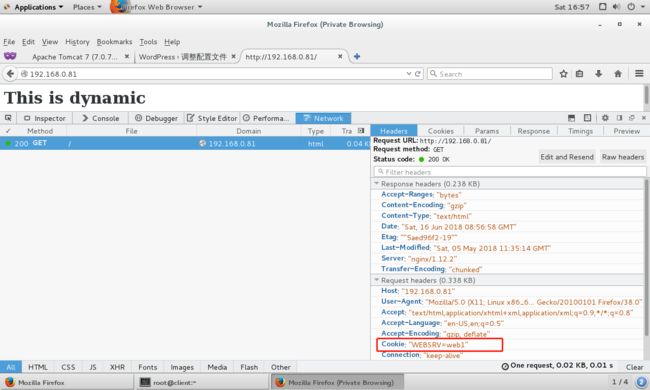
但有些时候需要确保我们用户每次访问的都是同一个服务器,此时我们就需要配置会话保持。haproxy自身提供了会话保持机制,我们可以在haproxy配置里添加基于cookie来做的会话保持,从而实现用户每次访问的都是同一个服务器,如下所示:
backend websrvs
        balance roundrobin
        cookie WEBSRV insert nocache indirect
        server web1 192.168.0.83:80 check cookie web1
        server web2 192.168.0.87:6081 check cookie web2
重启haproxy后,用户通过web访问都会被调度到同一个后端服务器。
其原理在于,haproxy会把客户端第一次的请求由哪个后端服务器处理,使用cookie告知给客户端。然后客户端之后的发送的请求都会带有此后端服务器的cookie,然后haproxy通过读取这个cookie的信息来判断连接请求该调度给哪个后端服务器。
-
2)在haproxy和后端主机之间添加varnish进行缓存
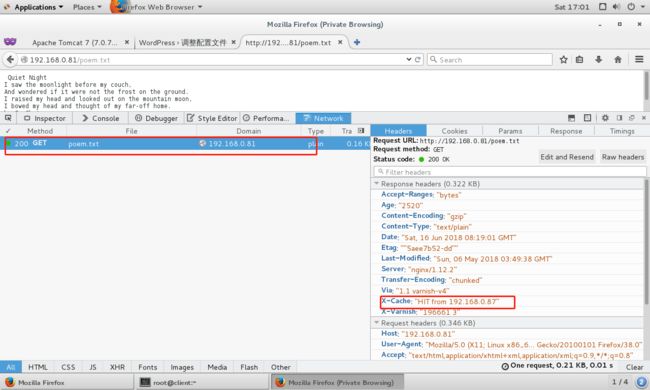
从此前的截图上,我们已经能看到,相关的静态内容已经被varnish缓存所“HIT”中了,这说明我们缓存已经生效了。
-
3)压缩合适的内容类型和设置stats page仅能通过本地访问使用管理接口。
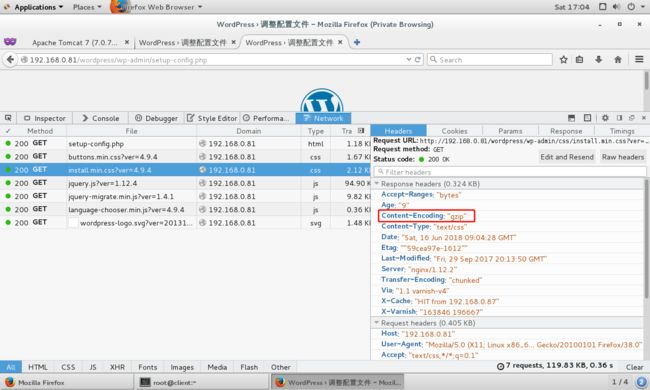
因为我们在haproxy的配置中设置了对相关静态内容进行压缩,所以访问相关静态内容时,如果响应报文带有相关的压缩字段,说明压缩已经成功,如:
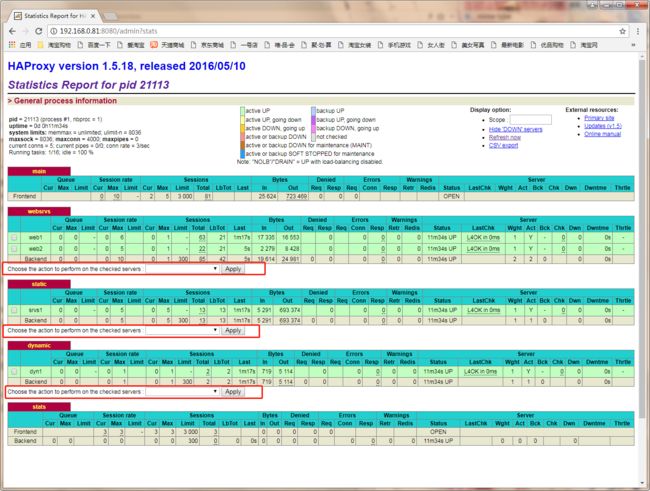
此时访问stats页面,因为访问主机是本地网络,所以能够下图红框中的管理操作。如果不是指定的本地网段,则只能查看相关的stats状态,而无法进行管理操作。
四、动静分离jsp动态内容(补充)
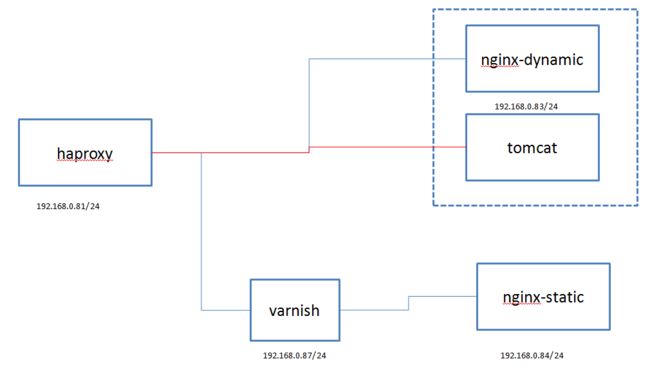
在dynamic服务上部署一个tomcat服务,haproxy上将jsp相关动态内容负载均衡到dynamic服务器的nginx服务监控的Ip和端口上,然后通过本机的nginx服务将jsp动态内容调度到tomcat上进行处理。
1、在dynamic服务器上安装tomcat
#事先下载相应的jdk源码包放置在/usr/local/src目录下,用于编译安装
#编译安装jdk服务
[root@dynamic ~]# cd /usr/local/src/
[root@dynamic src]# tar xf jdk-10.0.1_linux-x64_bin.tar.gz
[root@dynamic src]# ln -sv /usr/local/src/jdk-10.0.1 /usr/local/jdk
‘/usr/local/jdk’ -> ‘/usr/local/src/jdk-10.0.1’
[root@dynamic src]# vim /etc/profile.d/jdk.sh
export JAVA_HOME=/usr/local/jdk
export PATH=$JAVA_HOME/bin:$JAVA_HOME/jre/bin:$PATH
export CLASSPATH=.$CLASSPATH:$JAVA_HOME/lib:$JAVA_HOME/jre/lib:$JAVA_HOME/lib/tools.jar
[root@dynamic src]# source /etc/profile.d/jdk.sh
[root@dynamic src]# java -version
java version "10.0.1" 2018-04-17
Java(TM) SE Runtime Environment 18.3 (build 10.0.1+10)
Java HotSpot(TM) 64-Bit Server VM 18.3 (build 10.0.1+10, mixed mode)
#yum安装tomcat服务
[root@dynamic src]# yum install -y tomcat tomcat-webapps tomcat-admin-webapps tomcat-docs-webapp tomcat-lib
#配置开启tomcat的管理页面
[root@dynamic src]# vim /etc/tomcat/tomcat-users.xml
TomcatA
TomcatA.magedu.com
Session ID
<% session.setAttribute("magedu.com","magedu.com"); %>
<%= session.getId() %>
Created on
<%= session.getCreationTime() %>
#配置编辑tomcat的serve.xml文件
[root@dynamic src]# vim /etc/tomcat/server.xml
#启动tomcat服务
[root@dynamic src]# systemctl start tomcat
#配置nginx服务将jsp动态内容代理到tomcat监听的端口
[root@dynamic src]# vim /etc/nginx/conf.d/dynamic.conf
server {
listen 80;
server_name www.ilinux.io;
root /data/nginx/html;
index index.html index.php;
location ~* \.php$ {
fastcgi_pass 192.168.0.83:9000;
fastcgi_index index.php;
include fastcgi_params;
fastcgi_param SCRIPT_FILENAME /data/nginx/html/$fastcgi_script_name;
}
location ~* ^/(ping|status)$ {
fastcgi_pass 192.168.0.83:9000;
include fastcgi_params;
fastcgi_param SCRIPT_FILENAME $fastcgi_script_name;
}
location ~* /javatest\.* { #把java动态内容的URI路径代理至tomcat
proxy_pass http://192.168.0.83:8080;
}
location ~* \.(jsp|do)$ { #将以.jsp和.do的动态内容代理到tomcat进行处理
proxy_pass http://192.168.0.83:8080;
}
}
#重载nginx服务
[root@dynamic src]# nginx -t
nginx: the configuration file /etc/nginx/nginx.conf syntax is ok
nginx: configuration file /etc/nginx/nginx.conf test is successful
[root@dynamic src]# nginx -s reload
2、修改haproxy负载代理jsp动态内容
#修改haproxy配置文件中的fontend配置段的内容
[root@haproxy ~]# vim /etc/haproxy/haproxy.cfg
frontend  main *:80
    acl url_static       path_end       -i .jpg .gif .png .css .js .txt
    acl url_dynamic     path_end        -i .php .jsp .do  #在url_dynamic ACL中添加以.jsp,.do为后缀的动态内容
    acl url_java    path_beg        -i /javatest  #添加tomcat动态内容的路径
    compression algo gzip
    compression type text/css text/html text/plain image/x-png image/x-citrix-jpeg
    use_backend static          if url_static
    use_backend dynamic     if url_dynamic
    use_backend dynamic     if url_java
    default_backend             websrvs

#重启haproxy服务
[root@haproxy ~]# systemctl restart haproxy
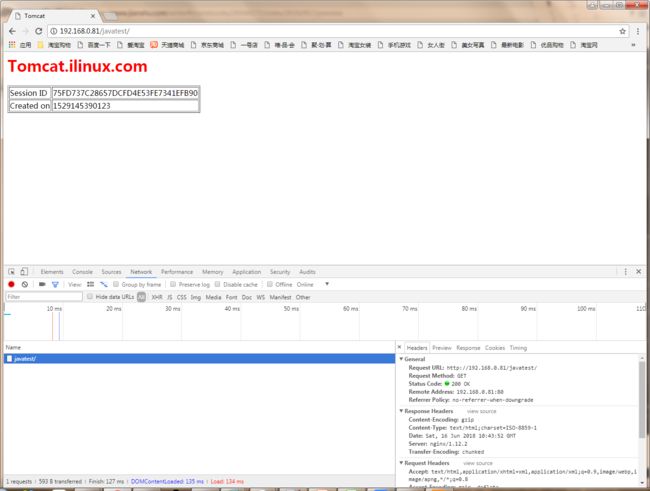
上述截图说明tomcat的jsp动态内容能够被haproxy正常负载调度到tomcat服务器上,而此时相应的静态内容依旧能正常访问。

