最近,再次看路遥 《平凡的世界》时,多多少少有自己的影子在里面,觉得没有什么爱与不爱的,在一起就是一种幸福吧。就像润叶和向前在一起,虽然向前失去了双腿,他最终得到一个好老婆和一个可爱的儿子。有时候觉得和谁在一起真的不重要,重要是她开心,你也觉得幸福。生活应该是柴米油盐,而非风花雪月啦。
一、 iOS 10 本地推送的效果图
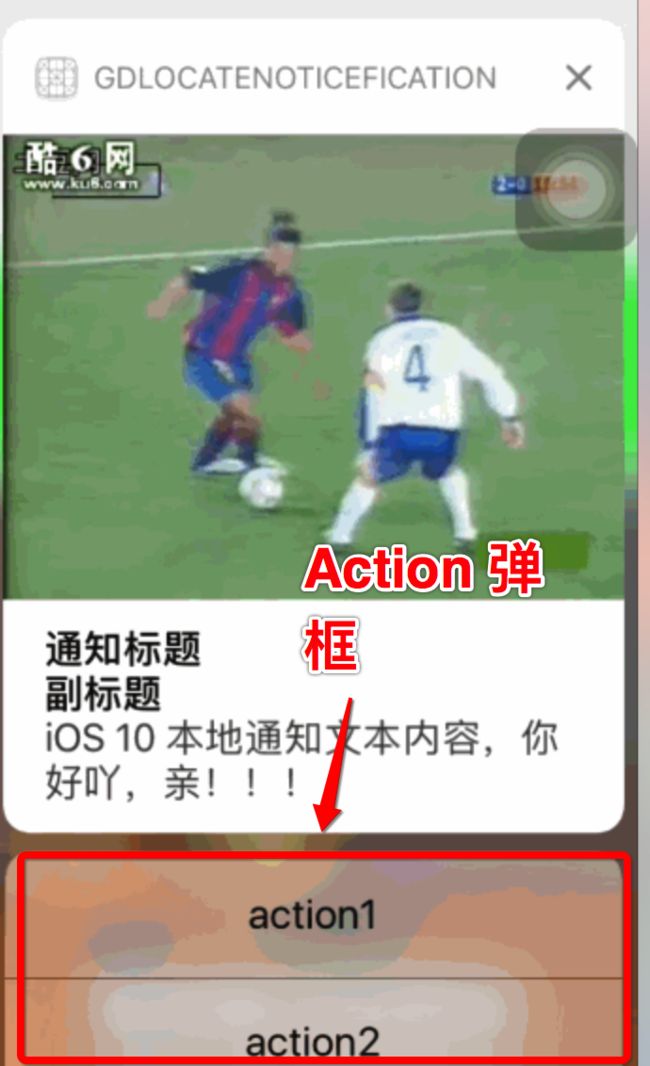
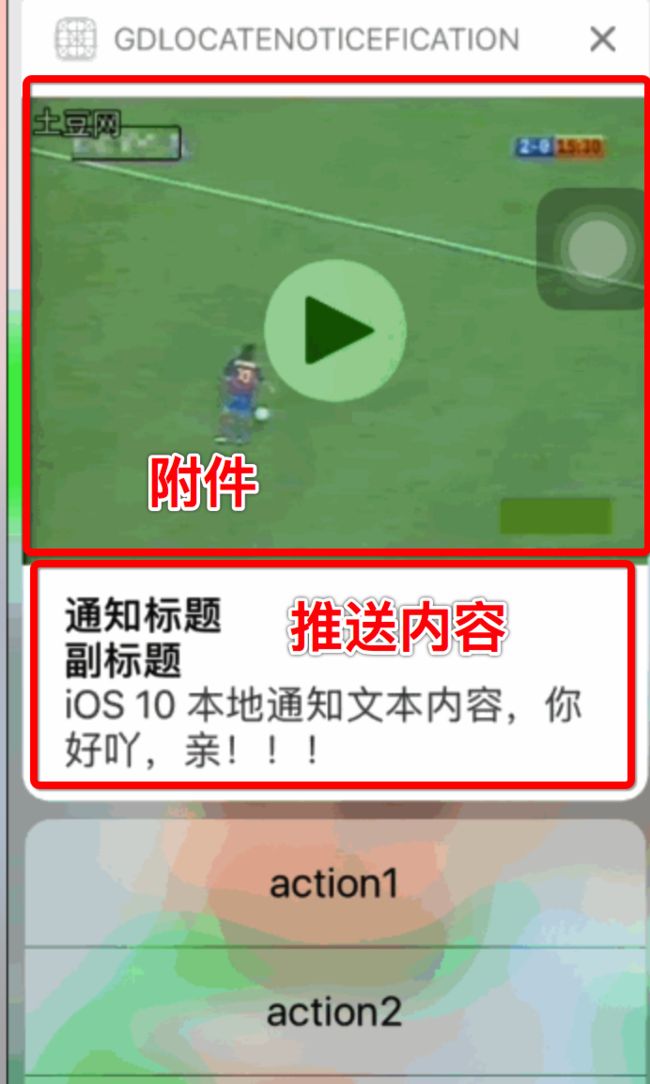
本文将重点讲述如何实现 iOS 10的本地推送通知的用法,如下是效果图。
上面的 gif 图片都已经本地推送的如下功能:
- 1、通知附件中有视频
- 2、 通知中有通知标题、副标题和通知内容
- 3、 通知 action
- 4、前台和后台都能接收到通知。
二、 iOS 10 本地推送实现思路
关于 iOS 10 本地推送实现思路分为如下三个步骤:
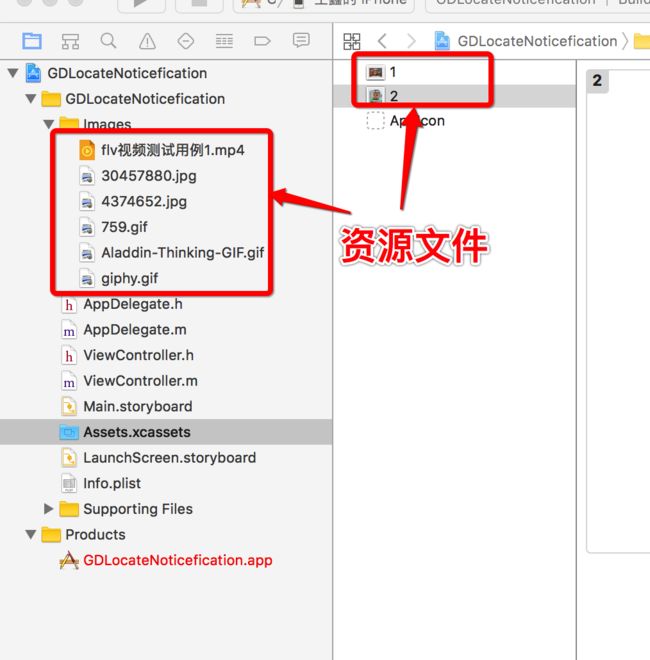
0>、手动导入资源文件,如下图。
1>、应用启动时,注册通知,并设置 Action 按键的样式和标题。
2>、设置通知的内容,附件、通知的触发条件。
3>、在代理中处理相对应的内容。一般是处理 用户点击那个按键,并处理相对应的事件。
三、 iOS 10 本地代码的实现
1、在 AppDelegate.m 中
- A、首先要导入头文件
#ifdef NSFoundationVersionNumber_iOS_9_x_Max
#import
#endif
- B、在 didFinishLaunchingWithOptions 方法中注册通知,主要思路是实现如下的内容:
1>、注册通知 requestAuthorizationWithOptions,在此方法中,注册通知需要有授权,设置推送的声音、Badge 等四种模式。
2>、设置推送的 Action,点击 Action 按键有三种状态,UNNotificationActionOptionForeground 直接开启应用,UNNotificationActionOptionDestructive 取消,
UNNotificationActionOptionAuthenticationRequired 需要解锁
3>、将本地推送包装在 UNNotificationCategory 对象中,记得设置 UNNotificationCategory 对象的标识符。
4>、将UNNotificationCategory 对象加入在通知中心去。
- (BOOL)application:(UIApplication *)application didFinishLaunchingWithOptions:(NSDictionary *)launchOptions {

    if ([[UIDevice currentDevice].systemVersion doubleValue] >= 10.0) {

        //ios 10 版本以上的通知
        UNUserNotificationCenter *center = [UNUserNotificationCenter currentNotificationCenter];
        //注册通知
        [center requestAuthorizationWithOptions:UNAuthorizationOptionBadge| UNAuthorizationOptionSound|UNAuthorizationOptionAlert|UNAuthorizationOptionCarPlay completionHandler:^(BOOL granted, NSError * _Nullable error) {
            NSLog(@"错误的要求通知,%@",error);

        }];

        // Action 内容 UNNotificationActionOptionForeground 点击 actionbutton 会跳转到应用中
        UNNotificationAction *actionOne = [UNNotificationAction actionWithIdentifier:@"action1" title:@"action1" options:UNNotificationActionOptionForeground];

        UNNotificationAction *actionTwo = [UNNotificationAction actionWithIdentifier:@"action2" title:@"action2" options:UNNotificationActionOptionForeground];

        UNNotificationAction *actionThree = [UNNotificationAction actionWithIdentifier:@"action3" title:@"action3" options:UNNotificationActionOptionForeground];

        //分类
        UNNotificationCategory *category = [UNNotificationCategory categoryWithIdentifier:@"category" actions:@[actionOne,actionTwo,actionThree] intentIdentifiers:@[] options:0];

        //添加分类
        [[UNUserNotificationCenter currentNotificationCenter] setNotificationCategories:[NSSet setWithObject:category]];


    }else if([[UIDevice currentDevice].systemVersion doubleValue] >= 8.0){
        //iOS 10 ~ iOS 8 之间的通知
        UIMutableUserNotificationAction *action1 = [UIMutableUserNotificationAction new];
        action1.identifier =  @"actionOne";
        action1.title = @"actionOne";
        action1.activationMode = UIUserNotificationActivationModeForeground;

        UIMutableUserNotificationCategory * category = [[UIMutableUserNotificationCategory alloc] init] ;

        UIUserNotificationSettings *setting = [UIUserNotificationSettings settingsForTypes:UIUserNotificationTypeAlert | UIUserNotificationTypeSound | UIUserNotificationTypeBadge  categories:[NSSet setWithObject:category]];
 [application registerUserNotificationSettings:setting];

    }else if([[UIDevice currentDevice].systemVersion doubleValue] < 8.0){

        // 低于 iOS 8 以下的系统
    }
    // Override point for customization after application launch.
    return YES;
}
2、在 ViewController.m 文件中
- A、导入头文件
#ifdef NSFoundationVersionNumber_iOS_9_x_Max
#import
#endif
- B、设置通知代码
- (void)viewDidLoad {
   [super viewDidLoad];
   [UNUserNotificationCenter currentNotificationCenter].delegate = self;
   // Do any additional setup after loading the view, typically from a nib.
}
-
C、推送代理方法的实现
1>、willPresentNotification 实现此代理方法可以接收来自前台的通知。当实现 completionHandler 时,如果加入 UNNotificationPresentationOptionBadge 时,前台不会接收到通知。2>、didReceiveNotificationResponse 此方法通过 Action 标识来识别用户点击那个 Action 按键。这样我们可以通过这个来处理相对应的事件。
  #pragma mark - UNNotification
  //此方法能在前台收到通知
   - (void)userNotificationCenter:(UNUserNotificationCenter *)center willPresentNotification:(UNNotification *)notification withCompletionHandler:(void (^)(UNNotificationPresentationOptions options))completionHandler{

    completionHandler(UNNotificationPresentationOptionAlert|UNNotificationPresentationOptionSound);
}

// The method will be called on the delegate when the user responded to the notification by opening the application, dismissing the notification or choosing a UNNotificationAction. The delegate must be set before the application returns from applicationDidFinishLaunching:.
- (void)userNotificationCenter:(UNUserNotificationCenter *)center didReceiveNotificationResponse:(UNNotificationResponse *)response withCompletionHandler:(void(^)())completionHandler{
    if ([response.actionIdentifier isEqualToString:@"action1"]) {
        self.noticeImage.image = [UIImage imageNamed:@"1"];
    }else if([response.actionIdentifier isEqualToString:@"action2"]){
        self.noticeImage.image = [UIImage imageNamed:@"2"];

    }else if([response.actionIdentifier isEqualToString:@"action3"]){
        UIAlertController *alert =  [UIAlertController alertControllerWithTitle:@"通知标题" message:@"hello world" preferredStyle:UIAlertControllerStyleAlert];
        UIAlertAction *action = [UIAlertAction actionWithTitle:@"1" style:UIAlertActionStyleDefault handler:^(UIAlertAction * _Nonnull action) {

        }];
        [alert addAction:action];
        [self presentViewController:alert animated:YES completion:nil];
    }
    completionHandler();
}
-
D、设置推送内容和附件
 Snip20170725_36.png
1>、设置推送内容,UNMutableNotificationContent 对象中是用来写推送的内容的,推送的声音,推送的角标。一定、一定、一定要注意,UNMutableNotificationContent 对象 categoryIdentifier 属性要与注册的标识一样,否则不能加载 Action 按键。
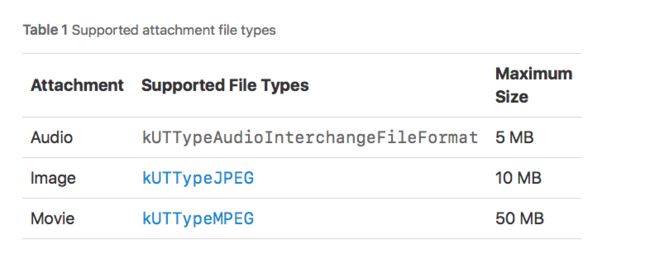
2>、设置推送附件,UNNotificationAttachment 对象是用于处理附件的,本地推送附件可以是 音频、视频、图片、gif 动图。一定一定要注意,使用本地的资源,不能用网上的资源,否则 UNNotificationAttachment 对象为空。其中资源文件的大小如下截图。
3>、触发推送,本地有三种推送方式:时间、日期、地区。本案例使用的是 时间 UNTimeIntervalNotificationTrigger。
4>、将推送的内容和触发条件包装在 UNNotificationRequest 对象中。
5>、将 UNNotificationRequest 对象 加入在 UNUserNotificationCenter 对象中。
#pragma  mark - 发送通知
- (IBAction)sendNotice:(id)sender {
    //1.设置通知内容
    UNMutableNotificationContent *content = [[UNMutableNotificationContent alloc] init];
    content.title = @"通知标题";
    content.subtitle = @"副标题";
    content.body = @"iOS 10 本地通知文本内容,你好吖,亲!!!";
    content.badge = [NSNumber numberWithInteger:1];
    content.categoryIdentifier = @"category";
    content.sound = [UNNotificationSound defaultSound];

    //2.设备通知的附件
    NSURL *url = [[NSBundle mainBundle] URLForResource:@"flv视频测试用例1.mp4" withExtension:@""];

    UNNotificationAttachment *attchment = [UNNotificationAttachment attachmentWithIdentifier:@"2" URL:url options:nil error:nil];
    if (attchment == nil) {
        NSLog(@"空的item");
        return;
    }
    content.attachments = @[attchment];

    //3.触发本地通知
    UNTimeIntervalNotificationTrigger * trigger = [UNTimeIntervalNotificationTrigger triggerWithTimeInterval:2 repeats:NO];

    //4.将通知的信息和触发条件放在 request中
    UNNotificationRequest *request = [UNNotificationRequest requestWithIdentifier:@"request" content:content trigger:trigger];
    //5. 添加通知
    [[UNUserNotificationCenter currentNotificationCenter] addNotificationRequest:request withCompletionHandler:^(NSError * _Nullable error) {

    }];

}
完整代码,多谢你完整的读完本文,感恩!