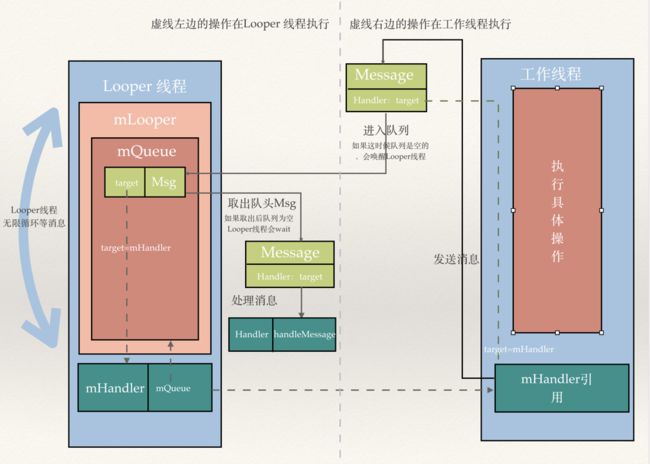
一、Handler、Looper、Message三者关系
如下图(图片引自:http://www.jianshu.com/p/697c1337dd20):
通过一行两张图片,先给自己一个大概的影响,下面我们具体说明。
欢迎搜索微信公众号SamuelAndroid关注我, 定期推送Android相关知识!
二、Handler分析
1. 如何创建一个Handler?
class LooperThread extends Thread {
        public Handler mHandler;

        public void run() {
            Looper.prepare();

            mHandler = new Handler() {
               public void handleMessage(Message msg) {
                    // process incoming messages here
                }
            };

            Looper.loop();
        }
    }
以上代码摘自Looper源码注释部分,通过以上代码,我们知道了什么又有什么疑问?
答案
- 创建Handler的步骤;
- 子线程里也可以创建Handler(平时开发中我们用的一般都是主线程的);
疑问:
我们开发过程中为什么可以直接new Handler,而没有以上步骤?
通过翻阅Activity源码,我们发现ActivityThread这个类,查看该类方法,main方法映入眼帘,多么熟悉的名字,代码如下:
public static void main(String[] args) {
        ......

        Looper.prepareMainLooper();

        ActivityThread thread = new ActivityThread();
        thread.attach(false);

        if (sMainThreadHandler == null) {
            sMainThreadHandler = thread.getHandler();
        }
       ......
        Looper.loop();
    }
main方法是打开应用的入口函数(如有不妥欢迎指正)。至此终于明白开发过程中为什么可以直接new Handler了。细心的童鞋会发现sMainThreadHandler 成员变量,我们来看看他的具体实现:
final Handler getHandler() {
        return mH;
    }
private class H extends Handler {
        public static final int LAUNCH_ACTIVITY         = 100;
        ......
        public static final int LOCAL_VOICE_INTERACTION_STARTED = 154;

        String codeToString(int code) {
            if (DEBUG_MESSAGES) {
                switch (code) {
                    case LAUNCH_ACTIVITY: return "LAUNCH_ACTIVITY";
                    ......
                    case LOCAL_VOICE_INTERACTION_STARTED: return "LOCAL_VOICE_INTERACTION_STARTED";
                }
            }
            return Integer.toString(code);
        }
        public void handleMessage(Message msg) {
            if (DEBUG_MESSAGES) Slog.v(TAG, ">>> handling: " + codeToString(msg.what));
            switch (msg.what) {
                case LAUNCH_ACTIVITY: {
                    Trace.traceBegin(Trace.TRACE_TAG_ACTIVITY_MANAGER, "activityStart");
                    final ActivityClientRecord r = (ActivityClientRecord) msg.obj;

                    r.packageInfo = getPackageInfoNoCheck(
                            r.activityInfo.applicationInfo, r.compatInfo);
                    handleLaunchActivity(r, null, "LAUNCH_ACTIVITY");
                    Trace.traceEnd(Trace.TRACE_TAG_ACTIVITY_MANAGER);
                } break;

                ......

                case LOCAL_VOICE_INTERACTION_STARTED:
                    handleLocalVoiceInteractionStarted((IBinder) ((SomeArgs) msg.obj).arg1,
                            (IVoiceInteractor) ((SomeArgs) msg.obj).arg2);
                    break;
            }
            Object obj = msg.obj;
            if (obj instanceof SomeArgs) {
                ((SomeArgs) obj).recycle();
            }

        }
    }
看到这里我们是不是突然明白了以前一直使用的回调,原来这里才是源头(突然有种豁然开朗的感觉!!!),接下来我们再详细的看一下Handler的代码。
一、Handler&MessageQueue源码解读
1. Handler里的两个主要成员变量
final Looper mLooper;
final MessageQueue mQueue;
2. Handler消息发送是如何实现的
private boolean enqueueMessage(MessageQueue queue, Message msg, long uptimeMillis) {
        msg.target = this;
        if (mAsynchronous) {
            msg.setAsynchronous(true);
        }
        return queue.enqueueMessage(msg, uptimeMillis);
    }
Handler发送消息和Runnable最终都是通过调用enqueueMessage实现,所以我们仔细看一下他的实现。由于enqueueMessage方法需要传入三个参数,所以我们看一下调用者怎样的(这里用sendMessageDelayed说明)。
public final boolean sendMessageDelayed(Message msg, long delayMillis)
    {
        if (delayMillis < 0) {
            delayMillis = 0;
        }
        return sendMessageAtTime(msg, SystemClock.uptimeMillis() + delayMillis);
    }
通过以上代码enqueueMessage参数uptimeMillis是当前开机时间加延时时间,MessageQueue表示整个消息队列,Message表示当前消息。enqueueMessage方法是通过调用MessageQueue的enqueueMessage方法,接下来我们看一下具体实现:
boolean enqueueMessage(Message msg, long when) {

            ......

            msg.markInUse();
            msg.when = when;
            Message p = mMessages;
            boolean needWake;
            if (p == null || when == 0 || when < p.when) {
                // New head, wake up the event queue if blocked.
                msg.next = p;
                mMessages = msg;
                needWake = mBlocked;
            } else {
                // Inserted within the middle of the queue.  Usually we don't have to wake
                // up the event queue unless there is a barrier at the head of the queue
                // and the message is the earliest asynchronous message in the queue.
                needWake = mBlocked && p.target == null && msg.isAsynchronous();
                Message prev;
                for (;;) {
                    prev = p;
                    p = p.next;
                    if (p == null || when < p.when) {
                        break;
                    }
                    if (needWake && p.isAsynchronous()) {
                        needWake = false;
                    }
                }
                msg.next = p; // invariant: p == prev.next
                prev.next = msg;
            }

            ......
        }
        return true;
    }
以上代码说明发送消息的是通过将消息按照时间插入到消息队列中,等待Looper取出消息。
二、Looper源码解读
文章开始就给出了创建Handler的流程,我们知道Looper的两个方法:prepare和loop,下面我们分别看一下。
1. prepare
    private static void prepare(boolean quitAllowed) {
        if (sThreadLocal.get() != null) {
            throw new RuntimeException("Only one Looper may be created per thread");
        }
        sThreadLocal.set(new Looper(quitAllowed));
    }
以上我们得到两个结果:1. 一个线程只能有一个Looper;2. 执行prepare就是实例化一个Looper然后放到ThreadLoacl,ThreadLocal的set方法具体实现如下:
public void set(T value) {
        Thread t = Thread.currentThread();
        ThreadLocalMap map = getMap(t);
        if (map != null)
            map.set(this, value);
        else
            createMap(t, value);
    }
createMap(t, value)
 void createMap(Thread t, T firstValue) {
        t.threadLocals = new ThreadLocalMap(this, firstValue);
    }
getMap(t)
ThreadLocalMap getMap(Thread t) {
        return t.threadLocals;
    }
饶了一圈就是把Looper实例存到Thread的threadLocals 变量里 。 O(∩_∩)O哈哈~
1. loop
public static void loop() {
        final Looper me = myLooper();
        if (me == null) {
            throw new RuntimeException("No Looper; Looper.prepare() wasn't called on this thread.");
        }
        final MessageQueue queue = me.mQueue;

        // Make sure the identity of this thread is that of the local process,
        // and keep track of what that identity token actually is.
        Binder.clearCallingIdentity();
        final long ident = Binder.clearCallingIdentity();

        for (;;) {
            Message msg = queue.next(); // might block
            if (msg == null) {
                // No message indicates that the message queue is quitting.
                return;
            }

            try {
                msg.target.dispatchMessage(msg);
            } finally {
                if (traceTag != 0) {
                    Trace.traceEnd(traceTag);
                }
            }

            msg.recycleUnchecked();
        }
    }
首先通过myLooper获取Looper对象,上面我们已经分析是如何把Looper存到Thread里的,这里就很好理解了,详细代码如下:
public T get() {
        Thread t = Thread.currentThread();
        ThreadLocalMap map = getMap(t);
        if (map != null) {
            ThreadLocalMap.Entry e = map.getEntry(this);
            if (e != null)
                return (T)e.value;
        }
        return setInitialValue();
    }
接下来通过Looper实例获取消息队列MessageQueue,详细代码如下:
final MessageQueue queue = me.mQueue;
在下面就是Looper里最重要的一步:不停从消息队列里取消息,然后通过消息队列MessageQueue的target(Handler)实例分发消息(Handler中handleMessage接收消息);如果消息队列无消息则阻塞等待(waite),直到有新消息。
msg.target.dispatchMessage(msg);
Handler的dispatchMessage方法如下:
 /**
     * Handle system messages here.
     */
    public void dispatchMessage(Message msg) {
        if (msg.callback != null) {
            handleCallback(msg);
        } else {
            if (mCallback != null) {
                if (mCallback.handleMessage(msg)) {
                    return;
                }
            }
            handleMessage(msg);
        }
    }
总结:
这类文章很多,自己有写一遍,主要是为了加深理解,这也是我第一次写有关源码解读的文章,如有错误,欢迎指正,谢谢!

