一、网络库选型
目前App开发网络库技术选型:
- HttpClient: 在android 5.0就被从源码中移除了
- HttpUrlConnection: 偏底层,不适合直接使用,封装起来也比较麻烦。
- Volley:适合数据量小但是频繁的网络操作,对大文件下载表现糟糕。
- Okhttp:目前主推的网络库,全面支持各种网络请求、文件上传下载;性能高效,底层线程池提高请求的复用性;优秀的代码设计。但是也需要进行二次封装。
- Retrofit:对Okhttp的二次封装。
大部分公司要么自己封装一套Okhttp,要么直接用Retrofit,怎么样都需要先了解Okhttp。那么就选择用Okhttp来研究下网络库。
Okhttp项目地址:https://github.com/square/okhttp
二、OkHttp网络请求流程
从一个简单的异步GET请求开始:
File cacheDir = new File(MainActivity.this.getCacheDir(), "okhttpcache");//缓存目录
Cache mCache = new Cache(cacheDir, 8 * 1024 * 1024); //8M缓存空间
mOkHttpClient = new OkHttpClient.Builder()
        .connectTimeout(10, TimeUnit.SECONDS) //连接超时阈值
       .writeTimeout(10, TimeUnit.SECONDS) //写超时阈值
       .readTimeout(10, TimeUnit.SECONDS)  //读超时阈值
       .retryOnConnectionFailure(true) //当失败后重试
       .cache(mCache)
        .build();

String url = "[https://www.baidu.com/img/bd_logo1.png](https://www.baidu.com/img/bd_logo1.png)";

CacheControl mCacheControl = new CacheControl.Builder()
        .noTransform()
        .maxAge(6, TimeUnit.SECONDS) //缓存有效期时长
       .build();

Request mRequest = new Request.Builder()
        .url(url)
        .method("GET",null)
        .cacheControl(mCacheControl)
        .build();

mOkHttpClient.newCall(mRequest).enqueue(new Callback() {
    @Override
   public void onFailure(@NotNull Call call, @NotNull IOException e) {
    }

    @Override
   public void onResponse(@NotNull Call call, @NotNull Response response) throws IOException {
        if (response.isSuccessful()) {
            byte[] bytes = response.body().bytes();
           final Bitmap bmp = BitmapFactory.decodeByteArray(bytes, 0, bytes.length);
           runOnUiThread(new Runnable() {
                @Override
               public void run() {
                    image.setImageBitmap(bmp);
               }
            });
       }
    }
});
上面代码效果是网络请求一张图片加载到ImageView,同时做了缓存。
下面来分析网络请求流程:
#OkHttpClient.java

public Builder() {
  dispatcher = new Dispatcher();//分发器
  ...
  connectionPool = new ConnectionPool();//连接池
  ...
}
先看构造方法,从命名看,一个分发器,一个连接池,mark下。继续看newCall方法
@Override public Call newCall(Request request) {
  return new RealCall(this, request);//实现类是RealCall
}
看下RealCall,execute是同步请求,enqueue是异步请求,那么重点看下enqueue:
#RealCall.java

void enqueue(Callback responseCallback, boolean forWebSocket) {
  synchronized (this) {
    if (executed) throw new IllegalStateException("Already Executed");
   executed = true;
  }
  client.dispatcher().enqueue(new AsyncCall(responseCallback, forWebSocket));
}
这里client.dispatcher()对应的正是OkHttpClient中的dispatcher,那么看看他的enqueue方法:
#Dispatcher.java

//ArrayDeque是数组实现的双端队列性能比LinkedList要好。
/** Ready async calls in the order they'll be run. */
private final Deque readyAsyncCalls = new ArrayDeque<>();

/** Running asynchronous calls. Includes canceled calls that haven't finished yet. */
private final Deque runningAsyncCalls = new ArrayDeque<>();

/** Running synchronous calls. Includes canceled calls that haven't finished yet. */
private final Deque runningSyncCalls = new ArrayDeque<>();

public synchronized ExecutorService executorService() {
  if (executorService == null) {
    executorService = new ThreadPoolExecutor(0, Integer.MAX_VALUE, 60, TimeUnit.SECONDS,
       new SynchronousQueue(), Util.threadFactory("OkHttp Dispatcher", false));
  }
  return executorService;
}
从线程池的配置看,就是一个CacheThreadPool。那么它支持高并发低耗时任务。
synchronized void enqueue(AsyncCall call) {
   //当正在运行的异步请求队列中的数量小于64并且正在运行的请求主机数小于5
  if (runningAsyncCalls.size() < maxRequests && runningCallsForHost(call) < maxRequestsPerHost) {
    runningAsyncCalls.add(call);
   executorService().execute(call);
  } else {
    readyAsyncCalls.add(call);
  }
}
当前AsyncCall满足条件后,异步执行队列添加,并交由线程池执行,否则添加到异步准备队列。执行就参考CacheThreadPool:当执行execute方法时,向SynchronousQueue提交任务,此时SynchronousQueue需要移除一个任务去被执行,如果此时有空闲线程则交给空闲线程处理,没有则新建线程处理。空闲线程超过60s没被使用则回收。
线程池中传进来的参数就是AsyncCall它是RealCall的内部类,内部也实现了execute方法:
#RealCall.java

@Override protected void execute() {
boolean signalledCallback = false;
  try {
    Response response = getResponseWithInterceptorChain(forWebSocket);
   if (canceled) {
      signalledCallback = true;
     responseCallback.onFailure(RealCall.this, new IOException("Canceled"));
   } else {
      signalledCallback = true;
     responseCallback.onResponse(RealCall.this, response);
   }
  } catch (IOException e) {
    if (signalledCallback) {
      // Do not signal the callback twice!
     Platform.get().log(INFO, "Callback failure for " + toLoggableString(), e);
   } else {
      responseCallback.onFailure(RealCall.this, e);
   }
  } finally {
    client.dispatcher().finished(this);
  }
}
这部分主要是获取response以及callback回调。重点关注getResponseWithInterceptorChain:
private Response getResponseWithInterceptorChain(boolean forWebSocket) throws IOException {
  Interceptor.Chain chain = new ApplicationInterceptorChain(0, originalRequest, forWebSocket);
  return chain.proceed(originalRequest);
}
创建了ApplicationInterceptorChain,它是一个拦截器链。拦截器的作用就是:可以在应用拿到response之前,先获得response,对其中某些数据进行监控,在有必要的情况下,对response的某些内容(比如response的header,body,response内的request的header,body)进行更改。
ApplicationInterceptorChain

public Response proceed(Request request) throws IOException {
    if (this.index < Call.this.client.interceptors().size()) {
        Chain chain = Call.this.new ApplicationInterceptorChain(this.index + 1, request, this.forWebSocket);
       Interceptor interceptor = (Interceptor)Call.this.client.interceptors().get(this.index);
       Response interceptedResponse = interceptor.intercept(chain);
       if (interceptedResponse == null) {
            throw new NullPointerException("application interceptor " + interceptor + " returned null");
       } else {
            return interceptedResponse;
       }
    } else {
        return Call.this.getResponse(request, this.forWebSocket);
   }
}
最终都会返回response,那么直接来看看getResponse方法:
#Call.java

Response getResponse(Request request, boolean forWebSocket) throws IOException {
...
   // Create the initial HTTP engine. Retries and redirects need new engine for each attempt.
   engine = new HttpEngine(client, request, false, false, forWebSocket, null, null, null);
   int followUpCount = 0;
   while (true) {
     if (canceled) {
       engine.releaseStreamAllocation();
       throw new IOException("Canceled");
     }
     boolean releaseConnection = true;
     try {
       engine.sendRequest();
       engine.readResponse();
       releaseConnection = false;
     } catch (RequestException e) {
       // The attempt to interpret the request failed. Give up.
       throw e.getCause();
     } catch (RouteException e) {
       // The attempt to connect via a route failed. The request will not have been sent.
        HttpEngine retryEngine = engine.recover(e.getLastConnectException(), null);
       if (retryEngine != null) {
          releaseConnection = false;
          engine = retryEngine;
          continue;
     }
 ...
   }
 }
这里网络请求和响应的核心逻辑封装在HttpEngine中。两个关键方法:sendRequest() 和 readResponse(),发送请求与接收响应。另外这里要注意:当发生IOException或者RouteException时会执行HttpEngine的recover方法,该方法实现失败重连。
Call 的execute同步逻辑就不分析了。
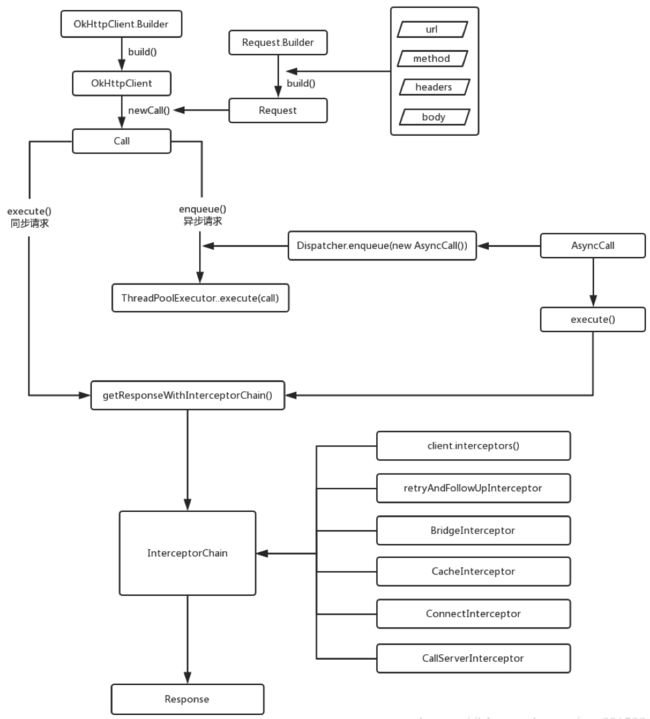
整体流程如下图所示:
三、Okhttp缓存策略
上节讲到HttpEngine,来看下sendRequest方法,作用是发送请求,逻辑中包含了缓存策略,所以先来简单了解下Http缓存相关知识点。
3.1Http缓存机制
http有强制和对比两种缓存方式:
-
强制缓存:在有效时间内直接获取本地缓存。对应有俩请求头参数
Cache-Control
在请求中使用Cache-Control 时,它可选的值有:
在响应中使用Cache-Control 时,它可选的值有:
Expires: 过期时间
超过过期时间需要重新请求服务器
-
对比缓存:先获取本地缓存数据标识,然后请求服务器确认缓存数据是否失效,如果没失效返回304,则直接使用标识对应的本地缓存,如果失效,服务器会返回新的数据再缓存起来。
ETag:缓存数据标识
If-None-Match:向服务器发请求时加的flag。 例如:If-None-Match:1ec5-502264e2ae4c0
Last-Modified: 由服务器返回,表示响应的数据最近修改的时间。
If-Modified-Since:由客户端请求,表示询问服务器这个时间是不是上次修改的时间。如果服务端该资源的修改时间小于等于If-Modified-Since指定的时间,说明资源没有改动,返回响应状态码304,可以使用缓存。如果服务端该资源的修改时间大于If-Modified-Since指定的时间,说明资源又有改动了,则返回响应状态码200和最新数据给客户端,客户端使用响应返回的最新数据。
3.2 Http缓存规则:
好,那么来看Okttp是怎么做缓存策略的,还是拿开头的GET请求小例子,我截取了缓存部分的内容:
File cacheDir = new File(MainActivity.this.getCacheDir(), "okhttpcache");//缓存目录
Cache mCache = new Cache(cacheDir, 8 * 1024 * 1024); //8M缓存空间
mOkHttpClient = new OkHttpClient.Builder()
       .cache(mCache)

CacheControl mCacheControl = new CacheControl.Builder()
        .noTransform()
        .maxAge(6, TimeUnit.SECONDS) //缓存有效期时长
       .build();

Request mRequest = new Request.Builder()
       .cacheControl(mCacheControl)
生成的缓存文件:
/data/data/com.stan.okhttpdemo/cache/okhttpcache # ls -al
total 56
drwx------ 2 u0_a138 u0_a138 4096 2019-11-23 10:50 .
drwxrwx--x 3 u0_a138 u0_a138 4096 2019-11-23 10:50 ..
-rw------- 1 u0_a138 u0_a138 6677 2019-11-23 10:50 5f8dcf06d74b796a51269303a0d2e07b.0
-rw------- 1 u0_a138 u0_a138 7877 2019-11-23 10:50 5f8dcf06d74b796a51269303a0d2e07b.1
-rw------- 1 u0_a138 u0_a138  124 2019-11-23 10:50 journal

cat 5f8dcf06d74b796a51269303a0d2e07b.0

GET
0
HTTP/1.1 200 OK
14
Accept-Ranges: bytes
Cache-Control: max-age=315360000
Connection: Keep-Alive
Content-Length: 7877
Content-Type: image/png
Date: Sat, 23 Nov 2019 02:50:48 GMT
Etag: "1ec5-502264e2ae4c0"
Expires: Tue, 20 Nov 2029 02:50:48 GMT
Last-Modified: Wed, 03 Sep 2014 10:00:27 GMT
好,了解这些之后,咱们再来看HttpEngine的两个方法。
public final class HttpEngine {
...
public void sendRequest(){//读缓存or网络请求
   先查找是否有可用的Cache,然后通过Cache找到请求对应的缓存,然后将请求和缓存交给缓存策略去判断使用请求还是缓存,
得出结果后,再判断使用缓存还是请求,如果使用缓存,用缓存构造响应直接返回,如果使用请求,那么开始网络请求流程。
}
...
public void readResponse(){//读取网络响 、存储缓存
   读取响应,然后存储缓存:
   如上面文件介绍
   通过maybeCache缓存头部信息到:/data/data/com.stan.okhttpdemo/cache/okhttpcache/ 5f8dcf06d74b796a51269303a0d2e07b.0
  通过cacheWritingResponse 缓存响应体信息到:/data/data/com.stan.okhttpdemo/cache/okhttpcache/ 5f8dcf06d74b796a51269303a0d2e07b.1
  缓存只支持GET请求方式。
  最后写文件保存通过DiskLruCache,按照LRU这种最近最少使用删除的原则,当总的大小超过限定大小后,删除最近最少使用的缓存文件。
   缓存空间指定Cache mCache = new Cache(cacheDir, 8 * 1024 * 1024); //8M缓存空间
}
缓存具体源码分析可以参考:https://www.jianshu.com/p/00d281c226f6
四、Okhttp复用连接池
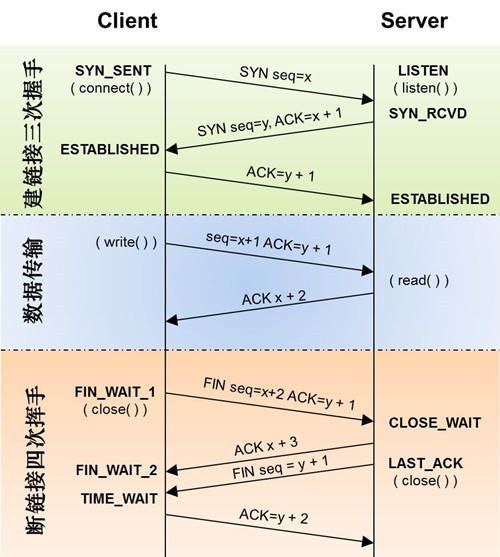
通常我们进行HTTP连接网络的时候我们会进行TCP的三次握手,然后传输数据,然后再四次挥手释放连接。但是大量连接每次连接关闭都要三次握手四次分手很显然性能低下。因此http有一种叫做keepalive connections的机制,它可以在传输数据后仍然保持连接,当客户端需要再次获取数据时,直接使用刚刚空闲下来的连接而不需要再次握手。在HTTP1.1中缺省就是支持keepalive的。
- 非keepalive connections:
- keepalive connections:
在前面OkhttpClient的Builder中我还提到过一个类:ConnectionPool。
public final class ConnectionPool {
   //类似CachedThreadPool的线程池,用于执行清理空闲连接
   private static final Executor executor = new ThreadPoolExecutor(0 /* corePoolSize */,
     Integer.MAX_VALUE /* maximumPoolSize */, 60L /* keepAliveTime */, TimeUnit.SECONDS,
     new SynchronousQueue(), Util.threadFactory("OkHttp ConnectionPool", true));
   //最大的空闲socket连接数
   private final int maxIdleConnections;
   //socket的keepAlive时间
   private final long keepAliveDurationNs;
   //Deque维护了一个队列,RealConnection是socket物理连接
   private final Deque connections = new ArrayDeque<>();
   final RouteDatabase routeDatabase = new RouteDatabase();
   boolean cleanupRunning;

  public ConnectionPool() {
...
  //默认空闲的socket最大连接数为5个,socket的keepAlive时间为5分钟
    this(5, 5, TimeUnit.MINUTES);
  }
}
...
}
连接池复用的核心就是用Deque
复用连接池具体源码分析可以参考:https://www.jianshu.com/p/ea1587646750
参考:
http://liuwangshu.cn/application/network/8-okhttp3-sourcecode2.html
http://liuwangshu.cn/application/network/7-okhttp3-sourcecode.html
https://blog.csdn.net/qq_29152241/article/details/82011539
https://www.jianshu.com/p/00d281c226f6
https://blog.csdn.net/u012375924/article/details/82806617
https://www.jianshu.com/p/ea1587646750


