第一章 LNMP架构概述
1.1 什么是LNMP
LNMP 是一套技术的组合, L=Linux、 N=Nginx、 M=MySQL、 P=PHP
1.2 LNMP架构是如何工作的
首先 Nginx 服务是不能处理动态请求,那么当用户发起动态请求时, Nginx 又是如何进行处理的。
当用户发起 http 请求,请求会被 Nginx 处理,如果是静态资源请求 Nginx 则直接返回,如果是动态请求 Nginx 则通过 fastcgi 协议转交给后端的 PHP 程序处理,具体如下图所示
1.3 Nginx与Fast-CGI工作流程
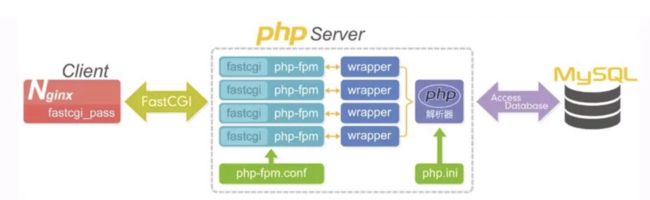
比喻:
Nginx: 拉货的货车
FastCGI: 高速公路
php-fpm: 每个路道的收费站
wrapper: 搬货的师傅
systemctl start php-fpm: 管理整个高速工作所有的收费站
1.用户通过 http 协议发起请求,请求会先抵达 LNMP 架构中的 Nginx
2.Nginx 会根据用户的请求进行判断,这个判断是有 Location 进行完成
3.判断用户请求的是静态页面, Nginx 直接进行处理
4.判断用户请求的是动态页面, Nginx 会将该请求交给 fastcgi 协议下发
5.fastgi 会将请求交给 php-fpm 管理进程, php-fpm 管理进程接收到后会调用具体的工作进程 warrap
6.warrap 进程会调用 php 程序进行解析,如果只是解析代码 php 直接返回
7.如果有查询数据库操作,则由 php 连接数据库(用户 密码 IP)发起查询的操作
8.最终数据由 mysql->php->php-fpm->fastcgi->nginx->http->user
第二章 LNMP安装部署
2.0 创建www统一用户
[root@web01 ~]# groupadd www -g 666
[root@web01 ~]# useradd www -s /sbin/nologin -M -u 666 -g 666
[root@web01 ~]# id www
uid=666(www) gid=666(www) 组=666(www)
2.1 使用官方仓库安装nginx
[root@web01 ~]# cat /etc/yum.repos.d/nginx.repo
[nginx-stable]
name=nginx stable repo
baseurl=http://nginx.org/packages/centos/$releasever/$basearch/
gpgcheck=1
enabled=1
gpgkey=https://nginx.org/keys/nginx_signing.key

[nginx-mainline]
name=nginx mainline repo
baseurl=http://nginx.org/packages/mainline/centos/$releasever/$basearch/
gpgcheck=1
enabled=0
gpgkey=https://nginx.org/keys/nginx_signing.key

[root@web01 ~]# yum install nginx -y
2.2 启动Nginx并加入开机自启动
[root@web01 ~]# systemctl start nginx
[root@web01 ~]# systemctl enable nginx
2.3 使用第三方拓展源安装php7.1
[root@web01 ~]# yum remove php-mysql-5.4 php php-fpm php-common
[root@web01 ~]# rpm -Uvh https://dl.fedoraproject.org/pub/epel/epel-release-latest-7.noarch.rpm
[root@web01 ~]# rpm -Uvh https://mirror.webtatic.com/yum/el7/webtatic-release.rpm
[root@web01 ~]# yum -y install php71w php71w-cli php71w-common php71w-devel php71w-embedded php71w-gd php71w-mcrypt php71w-mbstring php71w-pdo php71w-xml php71w-fpm php71w-mysqlnd php71w-opcache php71w-pecl-memcached php71w-pecl-redis php71w-pecl-mongodb
2.4 配置php-fpm用户与nginx用户保持一致
[root@web01 ~]# sed -i '/^user/c user = www' /etc/php-fpm.d/www.conf
[root@web01 ~]# sed -i '/^group/c group = www' /etc/php-fpm.d/www.conf
2.5 启动php-fpm并加入开机自启动
[root@web01 ~]# systemctl start php-fpm
[root@web01 ~]# systemctl enable php-fpm
2.6 安装Mariadb数据库
[root@web01 ~]# yum install mariadb-server mariadb -y
2.7 启动Mariadb数据库并加入开机自启动
[root@web01 ~]# systemctl start mariadb
[root@web01 ~]# systemctl enable mariadb
2.8 配置Mariadb账号密码
[root@web01 ~]# mysqladmin password 'oldboy123'
[root@web01 ~]# mysql -uroot -poldboy123
2.9 mysql基础命令
#查看当前mysql有哪些用户
MariaDB [(none)]> select user,host from mysql.user;
+------+-----------+
| user | host      |
+------+-----------+
| root | 127.0.0.1 |
| root | ::1       |
|      | localhost |
| root | localhost |
|      | web01     |
| root | web01     |
+------+-----------+
登录mysql
[root@web01 ~]# mysql -uroot -poldboy123
使用指定IP登录
[root@web01 ~]# mysql -uroot -poldboy123 -h127.0.0.1
查询当前数据库有哪些用户
select user,host from mysql.user;
查询   mysql库里的user表里的    user和host字段的内容
查看当前有哪些数据库
MariaDB [(none)]> show databases;
+--------------------+
| Database           |
+--------------------+
| information_schema |
| mysql              |
| performance_schema |
| test               |
+--------------------+
查看库里面有哪些表
MariaDB [(none)]> show tables from mysql;
+---------------------------+
| Tables_in_mysql           |
+---------------------------+
| columns_priv              |
| db                        |
| event                     |
| func                      |
| general_log               |
| help_category             |
| help_keyword              |
| help_relation             |
| help_topic                |
| host                      |
| ndb_binlog_index          |
| plugin                    |
| proc                      |
| procs_priv                |
| proxies_priv              |
| servers                   |
| slow_log                  |
| tables_priv               |
| time_zone                 |
| time_zone_leap_second     |
| time_zone_name            |
| time_zone_transition      |
| time_zone_transition_type |
| user                      |
+---------------------------+
24 rows in set (0.00 sec)
查看表里有哪些字段
MariaDB [mysql]> desc user;
+------------------------+-----------------------------------+------+-----+---------+-------+
| Field                  | Type                              | Null | Key | Default | Extra |
+------------------------+-----------------------------------+------+-----+---------+-------+
| Host                   | char(60)                          | NO   | PRI |         |       |
| User                   | char(16)                          | NO   | PRI |         |       |
| Password               | char(41)                          | NO   |     |         |       |
| Select_priv            | enum('N','Y')                     | NO   |     | N       |       |
| Insert_priv            | enum('N','Y')                     | NO   |     | N       |       |
| Update_priv            | enum('N','Y')                     | NO   |     | N       |       |
| Delete_priv            | enum('N','Y')                     | NO   |     | N       |       |
| Create_priv            | enum('N','Y')                     | NO   |     | N       |       |
| Drop_priv              | enum('N','Y')                     | NO   |     | N       |       |
| Reload_priv            | enum('N','Y')                     | NO   |     | N       |       |
| Shutdown_priv          | enum('N','Y')                     | NO   |     | N       |       |
| Process_priv           | enum('N','Y')                     | NO   |     | N       |       |
| File_priv              | enum('N','Y')                     | NO   |     | N       |       |
| Grant_priv             | enum('N','Y')                     | NO   |     | N       |       |
| References_priv        | enum('N','Y')                     | NO   |     | N       |       |
| Index_priv             | enum('N','Y')                     | NO   |     | N       |       |
| Alter_priv             | enum('N','Y')                     | NO   |     | N       |       |
| Show_db_priv           | enum('N','Y')                     | NO   |     | N       |       |
| Super_priv             | enum('N','Y')                     | NO   |     | N       |       |
| Create_tmp_table_priv  | enum('N','Y')                     | NO   |     | N       |       |
| Lock_tables_priv       | enum('N','Y')                     | NO   |     | N       |       |
| Execute_priv           | enum('N','Y')                     | NO   |     | N       |       |
| Repl_slave_priv        | enum('N','Y')                     | NO   |     | N       |       |
| Repl_client_priv       | enum('N','Y')                     | NO   |     | N       |       |
| Create_view_priv       | enum('N','Y')                     | NO   |     | N       |       |
| Show_view_priv         | enum('N','Y')                     | NO   |     | N       |       |
| Create_routine_priv    | enum('N','Y')                     | NO   |     | N       |       |
| Alter_routine_priv     | enum('N','Y')                     | NO   |     | N       |       |
| Create_user_priv       | enum('N','Y')                     | NO   |     | N       |       |
| Event_priv             | enum('N','Y')                     | NO   |     | N       |       |
| Trigger_priv           | enum('N','Y')                     | NO   |     | N       |       |
| Create_tablespace_priv | enum('N','Y')                     | NO   |     | N       |       |
| ssl_type               | enum('','ANY','X509','SPECIFIED') | NO   |     |         |       |
| ssl_cipher             | blob                              | NO   |     | NULL    |       |
| x509_issuer            | blob                              | NO   |     | NULL    |       |
| x509_subject           | blob                              | NO   |     | NULL    |       |
| max_questions          | int(11) unsigned                  | NO   |     | 0       |       |
| max_updates            | int(11) unsigned                  | NO   |     | 0       |       |
| max_connections        | int(11) unsigned                  | NO   |     | 0       |       |
| max_user_connections   | int(11)                           | NO   |     | 0       |       |
| plugin                 | char(64)                          | NO   |     |         |       |
| authentication_string  | text                              | NO   |     | NULL    |       |
+------------------------+-----------------------------------+------+-----+---------+-------+
42 rows in set (0.00 sec)
退出
exit
第三章 LNMP环境配置
3.1 Fastcgi语法
设置 fastcgi 服务器的地址,该地址可以指定为域名或 IP 地址,以及端口
Syntax: fastcgi_pass address;
Default: —
Context: location, if in location

#语法示例
fastcgi_pass localhost:9000;
fastcgi_pass unix:/tmp/fastcgi.socket;
设置 fastcgi 默认的首页文件,需要结合 fastcgi_param 一起设置
Syntax: fastcgi_index name;
Default: —
Context: http, server, location
通过 fastcgi_param 设置变量,并将设置的变量传递到后端的 fastcgi 服务器
Syntax: fastcgi_param parameter value [if_not_empty];
Default: —
Context: http, server, location

#语法示例
fastcgi_index index.php;
fastcgi_param SCRIPT_FILENAME /code$fastcgi_script_name;
3.2 最终Nginx连接FastCGI服务器配置如下
[root@web01 ~]# cat /etc/nginx/conf.d/php.conf
server {
    server_name www.oldboy.com;
    listen 80;
    root /code;
    index index.php index.html;

    location ~ \.php$ {
        root /code;
        fastcgi_pass 127.0.0.1:9000;
        fastcgi_index index.php;
        fastcgi_param SCRIPT_FILENAME $document_root$fastcgi_script_name;
        include fastcgi_params;
    }
}
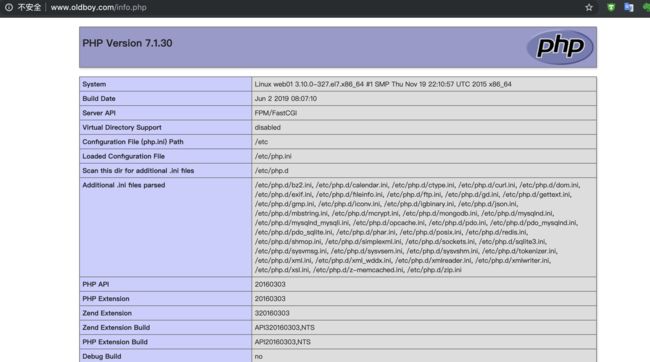
3.3 在/code目录下创建info.php文件并访问测试
[root@web01 ~]# mkdir /code
[root@web01 ~]# chown -R www:www /code/
[root@web01 ~]# cat /code/info.php
3.4 检查nginx语法并重启
[root@web01 ~]# nginx -t
nginx: the configuration file /etc/nginx/nginx.conf syntax is ok
nginx: configuration file /etc/nginx/nginx.conf test is successful
[root@web01 ~]# systemctl restart nginx
3.5 绑定hosts然后在浏览器访问
http://www.oldboy.com/info.php
3.6 测试php和数据库访问是否正常
[root@web01 ~]# cat /code/mysql.php
3.6 通过浏览器访问数据库页面

第四章 部署博客Wordpress
4.1 配置Nginx虚拟主机站点
[root@web01 ~]# cat /etc/nginx/conf.d/wordpress.conf
server {
    listen 80;
    server_name blog.oldboy.com;
    root /code/wordpress;
    index index.php index.html;

    location ~ \.php$ {
        root /code/wordpress;
        fastcgi_pass 127.0.0.1:9000;
        fastcgi_index index.php;
        fastcgi_param SCRIPT_FILENAME $document_root$fastcgi_script_name;
        include fastcgi_params;
    }
}
4.2 重启nginx
[root@web01 ~]# systemctl restart nginx
4.3 下载解压wordpress到代码目录
[root@web01 ~]# mkdir /code
[root@web01 ~]# cd /code/
[root@web01 /code]# wget https://cn.wordpress.org/wordpress-4.9.4-zh_CN.tar.gz
[root@web01 /code]# tar xf wordpress-4.9.4-zh_CN.tar.gz
[root@web01 /code]# chown -R www:www /code/wordpress
4.4 创建wordpress数据库
[root@web01 /code]# mysql -uroot -poldboy123
> create database wordpress;
> exit
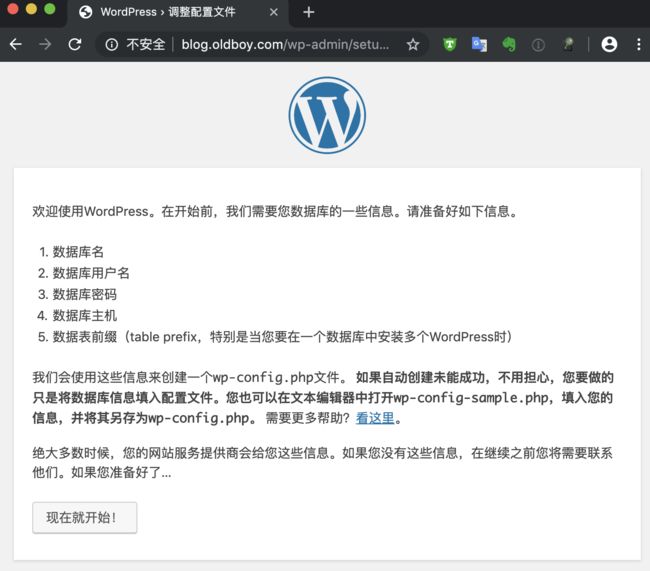
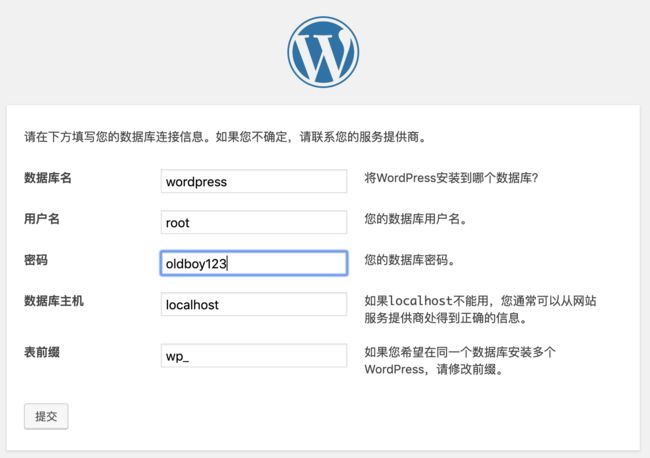
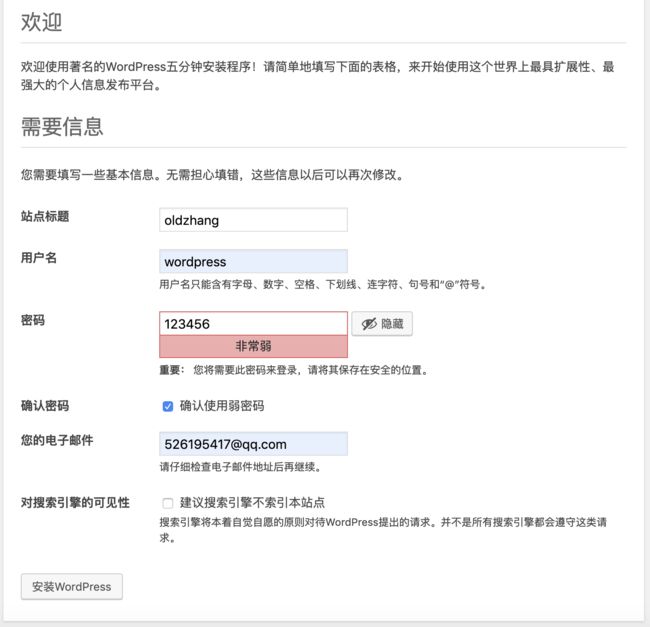
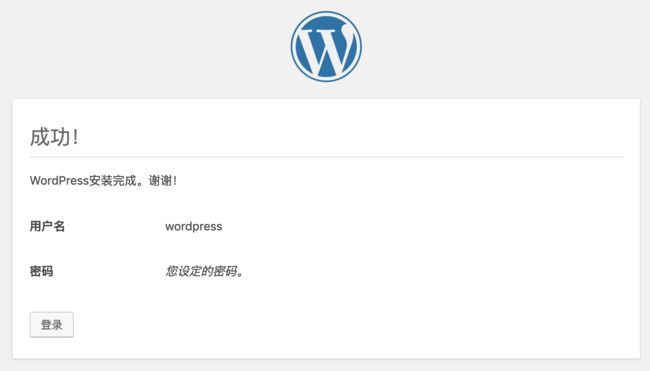
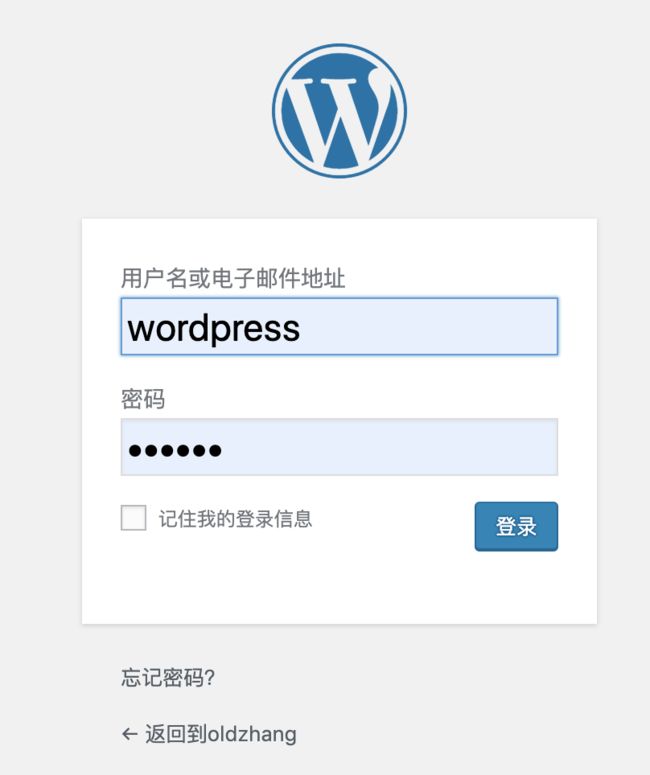
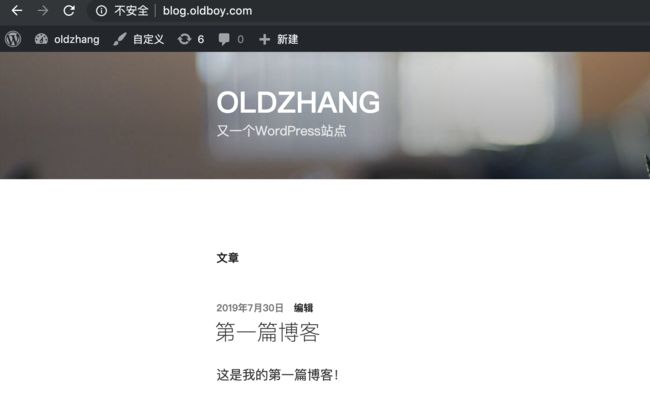
4.5 浏览器访问wordpress并部署


第五章 部署问答网站Wecenter
5.1 配置Nginx虚拟站点
[root@web01 ~]# cat /etc/nginx/conf.d/wecenter.conf
server {
    listen 80;
    server_name zh.oldboy.com;
    root /code/zh;
    index index.php index.html;

    location ~ \.php$ {
        root /code/zh;
        fastcgi_pass 127.0.0.1:9000;
        fastcgi_index index.php;
        fastcgi_param SCRIPT_FILENAME $document_root$fastcgi_script_name;
        include fastcgi_params;
    }
}
5.2 下载解压wecenter并授权
[root@web01 ~]# mkdir /code/zh -p
[root@web01 ~]# cd /opt/
[root@web01 /opt]# rz
[root@web01 /opt]# ls
WeCenter_3-3-2.zip
[root@web01 /opt]# unzip WeCenter_3-3-2.zip -d /code/zh/
[root@web01 /opt]# chown -R www:www /code/
5.3 创建wecenter数据库
[root@web01 ~]# mysql -uroot -poldboy123
> create database zh;
> exit;
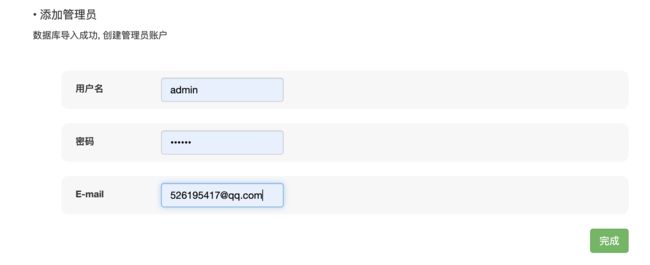
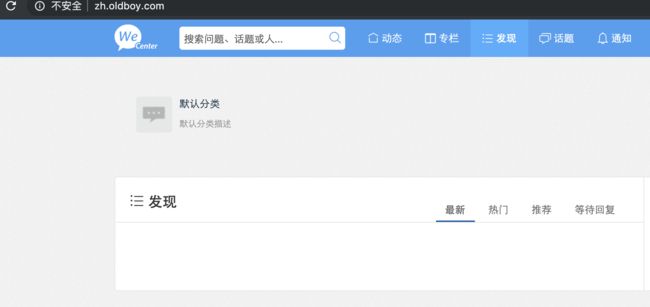
5.4 浏览器访问


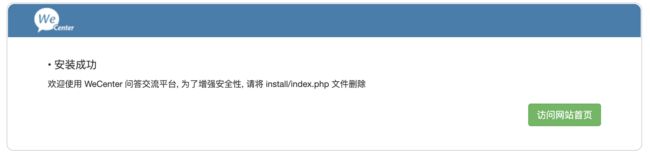
5.5 清除首页安装文件
[root@web01 ~]# rm -rf /code/zh/install
第六章 拆分数据库
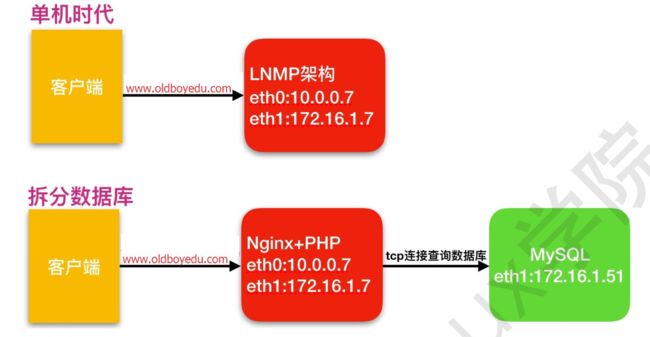
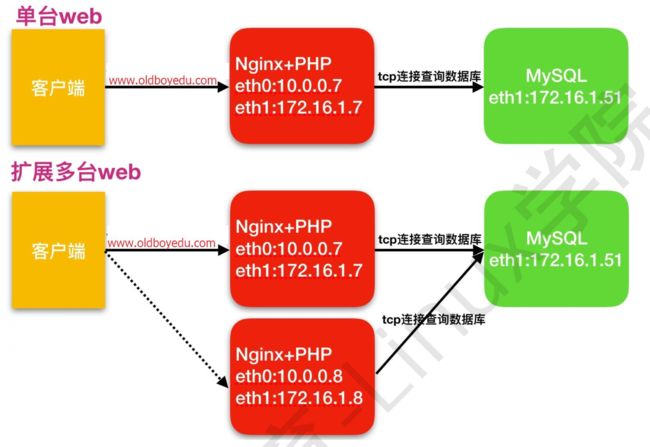
6.1 为什么要进行数据库的拆分
由于单台服务器运行 LNMP 架构会导致网站访问缓慢,当内存被吃满时,很容易导致系统出现 oom,从而 kill 掉MySQL 数据库,所以需要将 web 和数据库进行独立部署
6.2 数据库拆分后解决了什么问题
1.缓解 web 网站的压力
2.增强数据库读写性能
3.提高用户访问的速度
6.3 数据库拆分架构演变过程
6.4 数据库拆分环境搭建
web01 172.16.1.7    nginx+php
db01    172.16.1.51  mysql
6.5 数据库拆分详细步骤
6.5.1 web01上备份数据库并拷贝到db01上
备份 web01 上的数据库,oldboy123 是数据库密码
[root@web01 ~]# mysqldump -uroot -p'oldboy123' -A --single-transaction > mysql-all.sql
将 web01 上备份的数据库拷贝至 db01 服务器上
[root@web01 ~]# scp mysql-all.sql 10.0.1.51:/tmp
6.5.2 db01恢复数据库
将 web01 服务器上推送的数据库备份文件恢复至 db01 服务器新数据库中
[root@db01 ~]# yum install mariadb mariadb-server -y
[root@db01 ~]# systemctl start mariadb
[root@db01 ~]# systemctl enable mariadb
[root@db01 ~]# mysqladmin password 'oldboy123'
[root@db01 ~]# mysql -uroot -p'oldboy123' < /tmp/mysql-all.sql
[root@db01 ~]# mysql -uroot -p'oldboy123' -e "show databases;"
+--------------------+
| Database           |
+--------------------+
| information_schema |
| mysql              |
| performance_schema |
| test               |
| wordpress          |
| zh                 |
+--------------------+
6.6.3 db01数据库进行授权
在新数据库上授权, 允许所有网段, 通过 all 账户连接并操作该数据库
授权所有权限 grant all privileges
授权所有库所有表 .
将授权赋予给哪个用户,这个用户只能通过哪个网段过来(%所有) 'all'@'%'
授权该用户登录的密码 identified by
[root@db01 ~]# mysql -uroot -p'oldboy123'
> grant all privileges on *.* to 'all'@'%' identified by 'oldboy123';
> flush privileges;
>exit;
测试使用IP地址能不能登陆
[root@db01 ~]# mysql -uall -p'oldboy123' -h 10.0.1.51
> show databases;
+--------------------+
| Database           |
+--------------------+
| information_schema |
| mysql              |
| performance_schema |
| test               |
| wordpress          |
| zh                 |
+--------------------+
6.6.4 web01修改代码连接到新数据库
修改wordpress
[root@web01 ~]# vim /code/wordpress/wp-config.php
/** MySQL数据库用户名 */
define('DB_USER', 'all');

/** MySQL数据库密码 */
define('DB_PASSWORD', 'oldboy123');

/** MySQL主机 */
define('DB_HOST', '172.16.1.51');
修改wecenter
[root@web01 ~]# vim /code/zh/system/config/database.php
  'host' => '172.16.1.51',
  'username' => 'all',
  'password' => 'oldboy123',
  'dbname' => 'zh',
停止web01上的数据库
[root@web01 ~]# systemctl stop mariadb.service
6.6.5 测试访问
此时如果打开网页没有问题则表明数据库拆分完成
第七章 拓展WEB服务器
7.1 为什么要拓展多台web节点
单台 web 服务器能抗住的访问量是有限的,配置多台 web 服务器能提升更高的访问速度
7.2 拓展多台web解决了什么问题
1.单台 web 节点如果故障,会导致业务 down 机
2.多台 web 节点能保证业务的持续稳定,扩展性高
3.多台 web 节点能有效的提升用户访问网站的速度
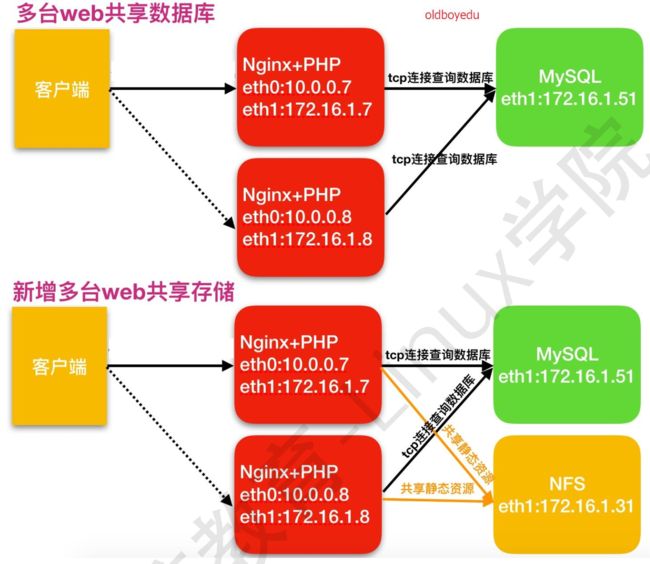
7.3 多台web服务器架构组成
7.4 多台web服务器思路
1.可以使用ansible批量部署多台web服务器
2.配置内网私有yum仓库
3 按照web01的步骤安装好nginx和php,然后远程拷贝代码到新机器
7.5 正常配置步骤
7.5.1 创建用户名密码
[root@web02 ~]# groupadd www -g 666
[root@web02 ~]# useradd www -s /sbin/nologin -M -u 666 -g 666
7.5.2 安装NP
可以直接从web01上拷贝yum源到本机yum目录
[root@web02 ~]# scp -rp [email protected]:/etc/yum.repos.d/* /etc/yum.repos.d/
[root@web02 ~]# scp -rp [email protected]:/etc/pki/rpm-gpg/* /etc/pki/rpm-gpg/
[root@web02 ~]# yum install nginx -y
[root@web02 ~]# yum -y install php71w php71w-cli php71w-common php71w-devel php71w-embedded php71w-gd php71w-mcrypt php71w-mbstring php71w-pdo php71w-xml php71w-fpm php71w-mysqlnd php71w-opcache php71w-pecl-memcached php71w-pecl-redis php71w-pecl-mongodb
7.5.3 拷贝web01的nginx配置文件到web02
[root@web02 ~]# scp -rp [email protected]:/etc/nginx /etc/
7.5.4 拷贝web01的php配置文件到web02
[root@web02 ~]# scp -rp [email protected]:/etc/php-fpm.d /etc/
7.5.5 拷贝代码目录到web02
[root@web01 ~]# tar czf code.tar.gz /code
[root@web01 ~]# scp code.tar.gz [email protected]:/tmp
7.5.6 web02上将代码解压到相应目录
[root@web02 ~]# tar zxf /tmp/code.tar.gz -C /
7.5.7 web02上启动nginx和php-fpm并加入开机自启动
[root@web02 ~]# systemctl start nginx php-fpm
[root@web02 ~]# systemctl enable nginx php-fpm
7.5.8 web访问测试
修改hosts为web02的地址,然后浏览器访问测试
第八章 将静态资源挂载到共享存储
8.1 为什么要拆分静态资源到独立服务器
当后端的 web 节点出现多台时,会导致用户上传的图片、视频附件等内容仅上传至一台 web 服务器,那么其他的web 服务器则无法访问到该图片
8.2 新增一台nfs存储解决了什么问题
1.保证了多台 web 节点静态资源一致。
2.有效节省多台 web 节点的存储空间。
3.统一管理静态资源,便于后期推送至 CDN 进行静态资源加速
8.3 多台web节点架构组成
8.4 多台web节点环境规划
web01      nginx+php
web02      nginx+php
db01        mysql
nfs           nfs
8.5 共享存储配置
8.5.1 安装配置NFS
[root@nfs01 ~]# yum install nfs-utils -y
[root@nfs01 ~]# cat /etc/exports
/data/blog 172.16.1.0/24(rw,sync,all_squash,anonuid=666,anongid=666)
/data/zh 172.16.1.0/24(rw,sync,all_squash,anonuid=666,anongid=666)
8.5.2 创建共享目录并进行授权
[root@nfs01 ~]# mkdir /data/{blog,zh} -p
[root@nfs01 ~]# chown -R www.www /data
8.5.3 启动nfs服务并加入开机自启
[root@nfs01 ~]# systemctl restart nfs-server
8.6 web01端操作步骤如下
8.6.1 web01节点挂在nfs
[root@web01 ~]# yum install nfs-utils -y
[root@web01 ~]# showmount -e 172.16.1.31
Export list for 172.16.1.31:
/data/zh   172.16.1.0/24
/data/blog 172.16.1.0/24
8.6.2 查找Wordpress 静态资源存放的位置
在wordpress的文章里添加一张图片,然后查看图片URL资源
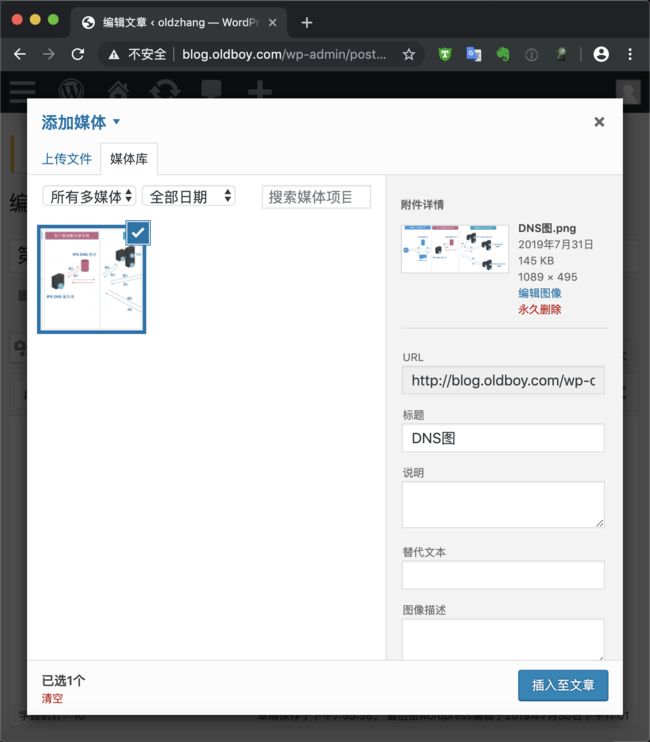
这里地址为:
http://blog.oldboy.com/wp-content/uploads/2019/07/DNS图.png
8.6.3 备份web01服务器上Wordpress 的静态资源
[root@web01 ~]# cd /code/wordpress/wp-content
[root@web01 /code/wordpress/wp-content]# cp -a uploads/ uploads_bak/
8.6.4 web01客户端执行挂载操作
[root@web01 /code/wordpress/wp-content]# mount -t nfs 172.16.1.31:/data/blog /code/wordpress/wp-content/uploads/
[root@web01 /code/wordpress/wp-content]# cp -rp uploads_bak/* uploads/
8.6.5 将挂载信息加入开机自启
[root@web01 ~]# tail -1 /etc/fstab
172.16.1.31:/data/blog /code/wordpress/wp-content/uploads nfs defaults 0 0
8.7 web02端操作
web02端操作和web01端一样
[root@web02 ~]# cd /code/wordpress/wp-content
[root@web02 /code/wordpress/wp-content]# cp -a uploads/ uploads_bak/
[root@web02 /code/wordpress/wp-content]# mount -t nfs 172.16.1.31:/data/blog /code/wordpress/wp-content/uploads/
[root@web02 /code/wordpress/wp-content]# cp -rp uploads_bak/* uploads/
[root@web02 ~]# tail -1 /etc/fstab
172.16.1.31:/data/blog /code/wordpress/wp-content/uploads nfs defaults 0 0
老男孩Linux教育-期中架构
作者:张亚_7868
链接:https://www.jianshu.com/p/a7989d8a5dec
来源:
著作权归作者所有。商业转载请联系作者获得授权,非商业转载请注明出处。