Python DataScience Handbook 学习笔记1
第一部分 numpy
相比较于python内置的数据类型,numpy提供了更为高效的数据操作.
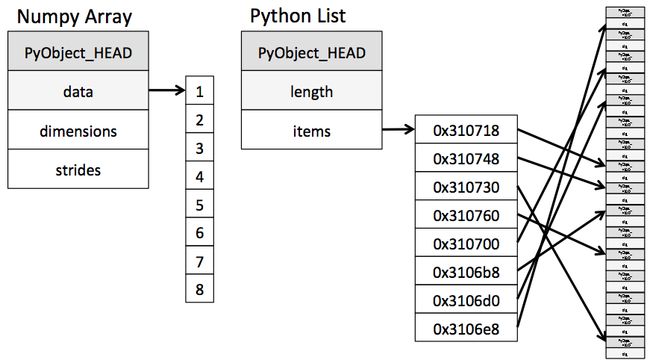
首先我们要了解一下python内置的数据类型.以Integer为例,C代码的实现如下
# This code illustrates why python allows dynamic typing
struct _longobject {
    long ob_refcnt;
    PyTypeObject *ob_type;
    size_t ob_size;
    long ob_digit[1];
};
int 类型在实现中是一个指向上述结构体的指针;
numpy中的核心:array
numpy array 与 list的对比可以通过下图来体会:
创建
接下来我们通过实例来看一下在numpy中如何简单优雅地创建数组
In [1]: import numpy as np

In [2]: np.__version__
Out[2]: '1.13.3'

In [3]: np?

In [4]: np.array([3.14, 3, 1, 2])
Out[4]: array([ 3.14,  3.  ,  1.  ,  2.  ])

In [5]: np.zeros((3, 5), dtype=int)
Out[5]:
array([[0, 0, 0, 0, 0],
       [0, 0, 0, 0, 0],
       [0, 0, 0, 0, 0]])

In [6]: np.arange(0,20,2)
Out[6]: array([ 0,  2,  4,  6,  8, 10, 12, 14, 16, 18])

In [7]: np.linspace(0,1,5)
Out[7]: array([ 0.  ,  0.25,  0.5 ,  0.75,  1.  ])

In [8]: np.random.random((3,3))
Out[8]:
array([[ 0.43170959,  0.10099413,  0.45859315],
       [ 0.62548971,  0.57233299,  0.6632921 ],
       [ 0.74947709,  0.31867245,  0.05988924]])

In [9]: np.random.normal(0, 1, (3,3))
Out[9]:
array([[-1.45242445, -1.27771487,  1.39220407],
       [-0.66294773, -1.56926783, -0.02177722],
       [ 1.0318081 , -0.87103441,  0.78930381]])

In [10]: np.random.randint(0, 10, (3, 3))
Out[10]:
array([[0, 5, 8],
       [2, 7, 7],
       [5, 0, 5]])

In [11]: np.zeros(10, dtype=np.complex128)
Out[11]:
array([ 0.+0.j,  0.+0.j,  0.+0.j,  0.+0.j,  0.+0.j,  0.+0.j,  0.+0.j,
        0.+0.j,  0.+0.j,  0.+0.j])
基本操作
对于一维的数组,与python原生的操作非常相似,在此不在赘述。我在这里列出了一些较为fancy的部分.
In [5]: x2 = np.random.randint(15, size = (3,5), dtype='int')

In [6]: x2
Out[6]:
array([[ 8,  8,  5, 11, 13],
       [ 2, 14,  2,  9,  6],
       [ 8, 14,  6,  4,  9]])

In [7]: x2[::-1, ::-1]
Out[7]:
array([[ 9,  4,  6, 14,  8],
       [ 6,  9,  2, 14,  2],
       [13, 11,  5,  8,  8]])
与matlab类似,numpy可以通过:符号来实现整行整列的访问
x2[:, 0] # first column of x2
x2[0, :] # first row of x2
接下来我们要强调非常重要的一点:在对numpy中的array作slice等操作时,与原生列表有很大的不同,主要表现为它会产生一个"view"而非一个"copy"。通俗的说就是它不重新分配内存,创建列表,而是直接在原始数据上操作。
In [8]: x = [1,2,3,4,5]

In [9]: y = np.array([1,2,3,4,5])

In [10]: copy = x[1:3]
In [12]: copy[1] = 1

In [13]: copy
Out[13]: [2, 1]

In [14]: not_copy = y[1:3]
In [16]: not_copy[1] = 1

In [17]: not_copy
Out[17]: array([2, 1])

In [18]: x
Out[18]: [1, 2, 3, 4, 5]

In [19]: y
Out[19]: array([1, 2, 1, 4, 5])
当然,只要显式地调用copy()就能创建一个copy而非view.
x2_sub_copy = x2[:2, :2].copy()
reshape
x = np.array([1, 2, 3])

# row vector via reshape
x.reshape((1, 3))
Out[39]:
array([[1, 2, 3]])
In [40]:
# row vector via newaxis
x[np.newaxis, :]
Out[40]:
array([[1, 2, 3]])
In [41]:
# column vector via reshape
x.reshape((3, 1))
Out[41]:
array([[1],
       [2],
       [3]])
In [42]:
# column vector via newaxis
x[:, np.newaxis]
Out[42]:
array([[1],
       [2],
       [3]])
Concatenation
grid = np.array([[1, 2, 3],
                 [4, 5, 6]])
In [46]:
# concatenate along the first axis
np.concatenate([grid, grid])
Out[46]:
array([[1, 2, 3],
       [4, 5, 6],
       [1, 2, 3],
       [4, 5, 6]])
In [47]:
# concatenate along the second axis (zero-indexed)
np.concatenate([grid, grid], axis=1)
Out[47]:
array([[1, 2, 3, 1, 2, 3],
       [4, 5, 6, 4, 5, 6]])
Splitting
x = [1, 2, 3, 99, 99, 3, 2, 1]
x1, x2, x3 = np.split(x, [3, 5])
print(x1, x2, x3)
[1 2 3] [99 99] [3 2 1]
In [23]: grid = np.arange(16).reshape((4,4))

In [24]: grid
Out[24]:
array([[ 0,  1,  2,  3],
       [ 4,  5,  6,  7],
       [ 8,  9, 10, 11],
       [12, 13, 14, 15]])

In [25]: a, b = np.vsplit(grid, [3])

In [26]: a
Out[26]:
array([[ 0,  1,  2,  3],
       [ 4,  5,  6,  7],
       [ 8,  9, 10, 11]])

In [27]: b
Out[27]: array([[12, 13, 14, 15]])
