将 Scrapy 爬虫变成 Scraoy-redis 分布式爬虫:
- 将爬虫的类对象从 scrapy.Spider 改成 scrapy_redis.spiders.RedisSpider,或 将 CrawlSpider 变成 scrapy_redis.spider.RedisCrawlSpider;
- 将爬虫的 start_urls 删掉,增加 redis_key='xxx',;
- settings.py 配置:
scrapy-redis 设置
-- SCHEDULER = "scrapy_redis.scheduler.Scheduler" # 使用scrapy-redis的调度器
-- DUPEFILTER_CLASS = "scrapy_redis.dupefilter.RFPDupeFilter" # 使用scrapy-redis的过滤器类
-- ITEM_PIPELINES = {
'scrapy_redis.pipelines.RedisPipeline': 400, # 尽量将scrapy-redis的管道类设置为最高
# 'XXXCrawl.pipelines.XXXPipeline': 300 自己的爬虫项目中的管道类
}
-- SCHEDULER_PERSIST = True # 配置调度器是否要持久化, 也就是当爬虫结束了, 要不要清空Redis中请求队列和去重指纹的set。如果是True, 就表示要持久化存储, 就不清空数据, 否则清空数据
redis 设置
-- REDIS_HOST = 'redis的IP地址'
-- REDIS_PORT = 6379
--REDIS_ENCODING = 'utf-8'
通用设置
-- LOG_LEVEL = 'INFO' # 日志级别
1. 分布式爬虫简介
1.1. 分布式系统介绍
- 分布式概念
-- 分布式系统是由一组多台计算机组成的系统;
-- 计算机之间通过网络进行通信;
-- 计算机之间为完成共同的任务而协调工作;
-- 分布式系统的目的是为了利用更多的机器,处理更多的数据,完成更多的任务; - 分布式系统的实现
-- 分布式系统的实现包括 MapReduce 和 Replication;
-- MapReduce:分布式系统实现的核心思想,是分片(partition),每个节点(node)处理一部分任务,最后将结果汇总,该思路即 MapReduce;
-- Replication:在实践中,分布式系统会遇到断网、高延迟、单节点故障等情况,需要系统具有高容错能力,常用的解决办法是冗余(replication),即多节点负责同一任务,常见于分布式存储,该思路即 Replication; - 分布式系统需要解决的问题
-- 机器 & 网络 异构;
-- 节点故障监控;
-- 网络丢包、延时、乱序等;
关于分布式系统,详情请参考链接:
《什么是分布式系统,如何学习分布式系统》
https://www.cnblogs.com/xybaby/p/7787034.html
1.2. 分布式爬虫介绍
1.2.1. 分布式爬虫分类
-
主从式爬虫
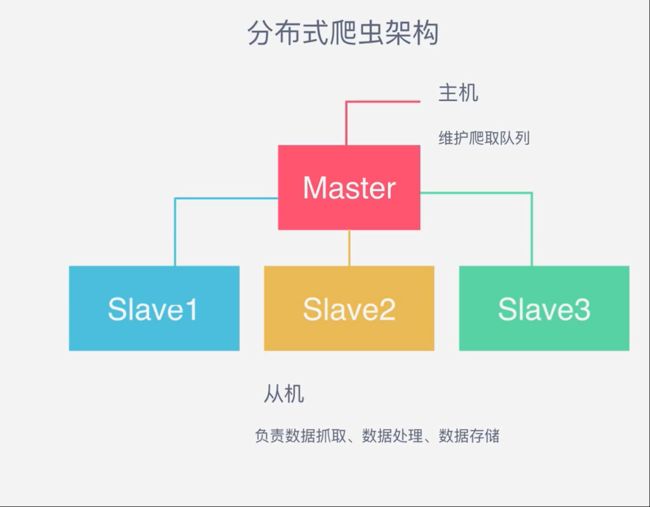
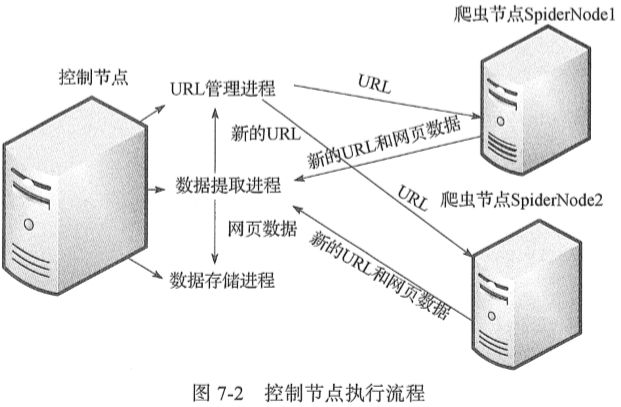
-- 整个分布式爬虫系统由两部分组成:master控制节点和slave爬虫节点;
-- master控制节点:负责管理所有slave,包括 slave 连接、任务调度、分发,维护爬取队列、 收取 salve 上传的数据,存储目标数据,新 URL 链接去重,新任务添加等、结果回收、汇总;
-- slave爬虫节点负责: 从 master 领取任务,并独自完成、本节点爬虫调度、数据抓取、HTML下载管理、数据处理、内容解析(解析包括目标数据和新的URL链接)、数据存储、上传结果;
注意:
- 主从模式下 slave 节点不需要与其他 slave 节点交流;
- 主从模式下,负载瓶颈在服务器端,主服务器不做爬取;
-- 主从式爬虫架构如下图:
- 对等式爬虫
-- 对等式爬虫模式下,所有节点工作任务相同;
-- 这是为了解决控制节点作为爬虫系统核心带来的瓶颈问题而设计的;
-- 这种模式一般用于超大规模爬虫如搜索引擎,此处不做赘述;
1.2.2. 分布式爬虫的优势【TODO】
- 解决目标地址对IP访问频率的限制的问题;
- 利用更高的带宽,提高下载速度;
- 大规模系统的分布式存储和备份;
- 系统可扩展性;
1.2.3 分布式爬虫需要解决的问题
- request 队列管理;
- 爬虫的集中去重;
- 爬取数据的统一存储;
关于分布式爬虫,详情请参考:
《简单分布式爬虫——第一弹:了解分布式爬虫结构》https://www.jianshu.com/p/d148ccc3e50a
《网络爬虫 | 你知道分布式爬虫是如何工作的吗?》https://www.jianshu.com/p/6e3eb50fe2b8
2. Scrapy-redis 介绍
2.1. scrapy-redis 简介
- scrapy 相关介绍此处不再赘述,详情参考:http://www.scrapyd.cn/;
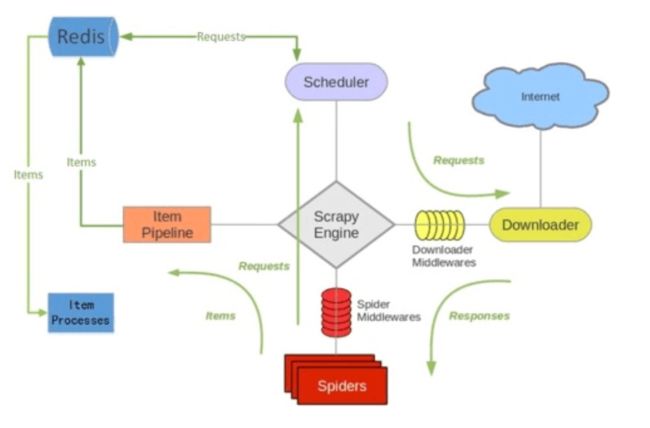
- scrapy-redis是一个基于 redis 的 scrapy 插件;
- 使用 Redis 数据库写入、存放和读取 URL 待爬取队列;
- 通过它可以快速实现简单分布式爬虫程序,
- 该组件本质上提供了三大功能:
-- scheduler 调度器;
-- dupefilter URL去重;
-- pipeline 数据持久化; -
scrapy-redis 架构图:
2.2. Redis 数据库在 scrapy_redis 中的作用
- 存请求队列
- 存指纹
-- 当请求到达 Redis 之后,先和之前的请求做指纹比对,如果指纹已存在则丢弃,否则存储请求; - 分布式爬虫中,所有的爬虫 spider 共享 Redis 队列和指纹。
2.3. scrapy_redis 与 scrapy 的区别
- 增加了 Redis 数据库;
- 队列:
-- scrapy 本身不支持爬虫 request 队列共享,即一个队列只能服务于一个爬虫,不支持分布式爬取;
-- scrapy-redis 则把 request 队列存放于 Redis 数据库,多个爬虫 spider 可以到同一个 Redis 数据库里读取; - 去重:
-- scrapy 使用 set 集合实现 request 去重,通过将 request 与 set 中的已有 request 进行比对,如果已存在则丢弃;
-- scrapy-redis 使用 Dupelication Filter 组件实现去重,scrapy-redis 调度器从引擎接受 request 并判断是否重复,并将不重复的 reuquest 写入 Redis 中的 队列,之后调度器从队列中根据优先级 pop 出一个 reuqest 发送给爬虫引擎 spider 进行处理;
2.4.scrapy-redis 优点
- 速度快
-- Redis 数据库是 key-value 型内存数据库,运行速度快,效率高; - 用法简单
-- scrapy-redis 是已经造好的轮子,拿来就可以用; - 去重简单
-- 使用 Redis 中的 set 类型就可以实现;
2.5. scrapy_redis 缺点
- Redis 比较吃内存;
- usage 需要处理;
参考链接:
《scrapy-redis 和 scrapy 有什么区别?》
https://www.zhihu.com/question/32302268/answer/55724369
3. scrapy-redis 的基本使用
3.1. 安装 scrapy-redis 模块
- 安装 scrapy
pip3 install scrapy
- 安装 scrapy-redis
pip3 install scrapy-redis
3.2. 安装 Redis 数据库并配置
- 安装 Redis
pip3 install redis
- 配置 Redis
vim /usr/local/etc/redis.conf
进入 vim 编辑器页面后,注释掉 bind 127.0.0.1。
# bind 127.0.0.1 # 如果不注释掉,则只能在本机上访问 Redis 数据库
3.3. 创建并编写爬虫
- 创建项目
scrapy startproject tutorial # 创建爬虫项目 tutorial
- 编写爬虫
备注:由于本文内容并非介绍 scrapy 用法,所以此处不再赘述,详情请参考:【TODO】
3.4. 修改爬虫项目文件
- 修改 spider.py
from scrapy_redis.spiders
import RedisSpider

class TutorialSpider(RedisSpider):    # 将爬虫的父类已经改成RedisSpider
    name = "tutorialspider"
    redis_key = 'tutorialspider:start_urls'  # 添加的redis_key实际上是一个变量名,
                                              # 之后爬虫爬到的所有URL都会保存到Redis中
                                              # 这个名为“tutorialspiderspider:start_urls”
                                              # 的列表下面,爬虫同时也会从这个列表中
                                              # 读取后续页面的URL。
- 修改 settings.py
-- 替换 SHCEDULER,使用 scrapy_redis 进行任务分发与调度
SCHEDULER = "scrapy_redis.scheduler.Scheduler"
-- 使用 scrapy_redis 去重队列
DUPEFILTER_CLASS = "scrapy_redis.dupefilter.RFPDupeFilter"
-- 不清理爬虫队列
SCHEDULER_PERSIST = True
注意:
如果这一项为 True,那么在 Redis 中的 URL 不会被 Scrapy_redis 清理掉。
-- 这样的好处是:爬虫停止了再重新启动,它会从上次暂停的地方开始继续爬取;
-- 但是它的弊端也很明显,如果有多个爬虫都要从这里读取 URL,需要另外写一段代码来防止重复爬取;如果设置成了 False,那么 Scrapy_redis 每一次读取了 URL 以后,就会把这个 URL 给删除。
-- 这样的好处是:多个服务器的爬虫不会拿到同一个 URL,也就不会重复爬取。
-- 但弊端是:爬虫暂停以后再重新启动,它会重新开始爬。
-- 爬虫请求调度算法
SCHEDULER_QUEUE_CLASS = 'scrapy_redis.queue.SpiderQueue' # 使用队列进行调度
注意:
-- 使用 ‘队列’ 进行爬虫调度
SCHEDULER_QUEUE_CLASS = 'scrapy_redis.queue.SpiderQueue'-- 使用 ‘栈’ 进行爬虫调度
SCHEDULER_QUEUE_CLASS = 'scrapy_redis.queue.SpiderStack'-- 使用 ‘优先级队列’ 进行爬虫调度
SCHEDULER_QUEUE_CLASS = 'scrapy_redis.queue.SpiderPriorityQueue'
-- 设置 Redis 地址和端口
REDIS_HOST = '127.0.0.1'   # 修改为Redis的实际IP地址
REDIS_PORT = 6379          # 修改为Redis的实际端口
注意:
如果不设置 Redis 的地址和端口,系统会默认 Redis 运行在本机。
这样,就初步实现了 scrapy-redis 基本的爬虫框架。
4. 基于 scrapy-redis 搭建主从分布式爬虫
前文铺垫了这么多,接下来我们将进入正题,本次我们将以爬取新浪微博数据为例来实现创建和部署。
4.1. 新浪微博网站分析
4.2. 创建 scrapy 爬虫
- 创建文件夹,并进入目录下
mkdir scrapy_redis_tutorial_diractory
cd scrapy_redis_tutorial_diractory
- 创建爬虫项目
scrapy startproject scrapy_redis_sinaweibo(工程文件夹名字)
cd scrapy_redis_sinaweibo
scrapy genspider -t  crawl  sinaweibo
- 修改 item.py 文件
# encoding=utf-8

from scrapy.item import Item, Field


class InformationItem(Item):
    #关注对象的相关个人信息
    _id = Field()                    # 用户ID
    Info = Field()                   # 用户基本信息
    Num_Tweets = Field()             # 微博数
    Num_Follows = Field()            # 关注数
    Num_Fans = Field()               # 粉丝数
    HomePage = Field()               #关注者的主页


class WeiboTweetsItem(Item):
    #微博内容的相关信息
    _id = Field()                    # 用户ID
    Content = Field()                # 微博内容
    Time_Location = Field()          # 时间地点
    Pic_Url = Field()                # 原图链接
    Like = Field()                   # 点赞数
    Transfer = Field()               # 转载数
    Comment = Field()                # 评论数
- 在 scrapy_redis_sinaweibo/spiders 目录下新建爬虫文件 sina_spider.py
# coding=utf-8
from scrapy.spider import Spider
from scrapy.http import Request
from scrapy.selector import Selector
from scrapy_redis_sinaweibo.items import InformationItem,TweetsItem
import re
import requests
from bs4 import BeautifulSoup

class Weibo(Spider):
    name = "weibospider"
    redis_key = 'weibospider:start_urls'
    #可以从多个用户的关注列表中获取这些用户的关注对象信息和关注对象的微博信息
    start_urls = ['http://weibo.cn/0123456789/follow','http://weibo.cn/0123456789/follow']
    #如果通过用户的分组获取关注列表进行抓取数据,需要调整parse中如id和nextlink的多个参数
    #strat_urls = ['http://weibo.cn/attgroup/show?cat=user¤tPage=2&rl=3&next_cursor=20&previous_cursor=10&type=opening&uid=1771329897&gid=201104290187632788&page=1']
    url = 'http://weibo.cn'
    #group_url = 'http://weibo.cn/attgroup/show'
    #把已经获取过的用户ID提前加入Follow_ID中避免重复抓取
    Follow_ID = ['0123456789']
    TweetsID = []

    def parse(self,response):
        #用户关注者信息
        informationItems = InformationItem()
        selector = Selector(response)

        print selector
        Followlist = selector.xpath('//tr/td[2]/a[2]/@href').extract()
        print "输出关注人ID信息"
        print len(Followlist)

        for each in Followlist:
            #选取href字符串中的id信息
            followId = each[(each.index("uid")+4):(each.index("rl")-1)]
            print followId
            follow_url = "http://weibo.cn/%s" % followId
            #通过筛选条件获取需要的微博信息,此处为筛选原创带图的微博
            needed_url = "http://weibo.cn/%s/profile?hasori=1&haspic=1&endtime=20160822&advancedfilter=1&page=1" % followId
            print follow_url
            print needed_url
            #抓取过数据的用户不再抓取:
            while followId not in self.Follow_ID:
                yield Request(url=follow_url, meta={"item": informationItems, "ID": followId, "URL": follow_url}, callback=self.parse1)
                yield Request(url=needed_url, callback=self.parse2)
                self.Follow_ID.append(followId)

        nextLink = selector.xpath('//div[@class="pa"]/form/div/a/@href').extract()
        #查找下一页,有则循环
        if nextLink:
            nextLink = nextLink[0]
            print nextLink
            yield Request(self.url + nextLink, callback=self.parse)
        else:
            #没有下一页即获取完关注人列表之后输出列表的全部ID
            print self.Follow_ID
            #yield informationItems

    def parse1(self, response):
        """ 通过ID访问关注者信息 """
        #通过meta把parse中的对象变量传递过来
        informationItems = response.meta["item"]
        informationItems['_id'] = response.meta["ID"]
        informationItems['HomePage'] = response.meta["URL"]
        selector = Selector(response)
        #info = ";".join(selector.xpath('//div[@class="ut"]/text()').extract())  # 获取标签里的所有text()
        info = selector.xpath('//div[@class="ut"]/span[@class="ctt"]/text()').extract()
        #用/分开把列表中的各个元素便于区别不同的信息
        allinfo = '  /  '.join(info)
        try:
            #exceptions.TypeError: expected string or buffer
            informationItems['Info'] = allinfo
        except:
            pass
        #text2 = selector.xpath('body/div[@class="u"]/div[@class="tip2"]').extract()
        num_tweets = selector.xpath('body/div[@class="u"]/div[@class="tip2"]/span/text()').extract()  # 微博数
        num_follows = selector.xpath('body/div[@class="u"]/div[@class="tip2"]/a[1]/text()').extract()  # 关注数
        num_fans = selector.xpath('body/div[@class="u"]/div[@class="tip2"]/a[2]/text()').extract()  # 粉丝数
        #选取'[' ']'之间的内容
        if num_tweets:
            informationItems["Num_Tweets"] = (num_tweets[0])[((num_tweets[0]).index("[")+1):((num_tweets[0]).index("]"))]
        if num_follows:
            informationItems["Num_Follows"] = (num_follows[0])[((num_follows[0]).index("[")+1):((num_follows[0]).index("]"))]
        if num_fans:
            informationItems["Num_Fans"] = (num_fans[0])[((num_fans[0]).index("[")+1):((num_fans[0]).index("]"))]

        yield informationItems

    #获取关注人的微博内容相关信息
    def parse2(self, response):

        selector = Selector(response)
        tweetitems = TweetsItem()
        #可以直接用request的meta传递ID过来更方便
        IDhref = selector.xpath('//div[@class="u"]/div[@class="tip2"]/a[1]/@href').extract()
        ID = (IDhref[0])[1:11]
        Tweets = selector.xpath('//div[@class="c"]')


        # 跟parse1稍有不同,通过for循环寻找需要的对象
        for eachtweet in Tweets:
            #获取每条微博唯一id标识
            mark_id = eachtweet.xpath('@id').extract()
            print mark_id
            #当id不为空的时候加入到微博获取列表
            if mark_id:
                #去重操作,对于已经获取过的微博不再获取
                while mark_id not in self.TweetsID:
                    content = eachtweet.xpath('div/span[@class="ctt"]/text()').extract()
                    timelocation = eachtweet.xpath('div[2]/span[@class="ct"]/text()').extract()
                    pic_url = eachtweet.xpath('div[2]/a[2]/@href').extract()
                    like = eachtweet.xpath('div[2]/a[3]/text()').extract()
                    transfer = eachtweet.xpath('div[2]/a[4]/text()').extract()
                    comment = eachtweet.xpath('div[2]/a[5]/text()').extract()

                    tweetitems['_id'] = ID
                    #把列表元素连接且转存成字符串
                    allcontents = ''.join(content)
                    #内容可能为空 需要先判定
                    if allcontents:
                        tweetitems['Content'] = allcontents
                    else:
                        pass
                    if timelocation:
                        tweetitems['Time_Location'] = timelocation[0]
                    if pic_url:
                        tweetitems['Pic_Url'] = pic_url[0]
                    # 返回字符串中'[' ']'里的内容
                    if like:
                        tweetitems['Like'] = (like[0])[((like[0]).index("[")+1):((like[0]).index("]"))]
                    if transfer:
                        tweetitems['Transfer'] = (transfer[0])[((transfer[0]).index("[")+1):((transfer[0]).index("]"))]
                    if comment:
                        tweetitems['Comment'] = (comment[0])[((comment[0]).index("[")+1):((comment[0]).index("]"))]
                    #把已经抓取过的微博id存入列表
                    self.TweetsID.append(mark_id)
                    yield tweetitems
            else:
                #如果selector语句找不到id 查看当前查询语句的状态
                print eachtweet

        tweet_nextLink = selector.xpath('//div[@class="pa"]/form/div/a/@href').extract()
        if tweet_nextLink:
            tweet_nextLink = tweet_nextLink[0]
            print tweet_nextLink
            yield Request(self.url + tweet_nextLink, callback=self.parse2)
- 在 scrapy_redis_sinaweibo 目录下新建微博ID列表 weibo_id.py 文件
- 编辑 pipelines.py 文件
# -*- coding: utf-8 -*-
import MySQLdb
from items import InformationItem,TweetsItem

DEBUG = True

if DEBUG:
    dbuser = 'root'
    dbpass = '123456'
    dbname = 'tweetinfo'
    dbhost = '127.0.0.1'
    dbport = '3306'
else:
    dbuser = 'XXXXXXXX'
    dbpass = 'XXXXXXX'
    dbname = 'tweetinfo'
    dbhost = '127.0.0.1'
    dbport = '3306'


class MySQLStorePipeline(object):
    def __init__(self):
        self.conn = MySQLdb.connect(user=dbuser, passwd=dbpass, db=dbname, host=dbhost, charset="utf8",
                                    use_unicode=True)
        self.cursor = self.conn.cursor()
        #建立需要存储数据的表

        # 清空表(测试阶段):
        self.cursor.execute("truncate table followinfo;")
        self.conn.commit()
        self.cursor.execute("truncate table tweets;")
        self.conn.commit()

    def process_item(self, item, spider):
        #curTime = datetime.datetime.now()
        if isinstance(item, InformationItem):
            print "开始写入关注者信息"
            try:
                self.cursor.execute("""INSERT INTO followinfo (id, Info, Num_Tweets, Num_Follows, Num_Fans, HomePage)
                                VALUES (%s, %s, %s, %s, %s, %s)""",
                                    (
                                        item['_id'].encode('utf-8'),
                                        item['Info'].encode('utf-8'),
                                        item['Num_Tweets'].encode('utf-8'),
                                        item['Num_Follows'].encode('utf-8'),
                                        item['Num_Fans'].encode('utf-8'),
                                        item['HomePage'].encode('utf-8'),
                                    )
                                    )

                self.conn.commit()
            except MySQLdb.Error, e:
                print "Error %d: %s" % (e.args[0], e.args[1])

        elif isinstance(item, TweetsItem):
            print "开始写入微博信息"
            try:
                self.cursor.execute("""INSERT INTO tweets (id, Contents, Time_Location, Pic_Url, Zan, Transfer, Comment)
                                VALUES (%s, %s, %s, %s, %s, %s, %s)""",
                                    (
                                        item['_id'].encode('utf-8'),
                                        item['Content'].encode('utf-8'),
                                        item['Time_Location'].encode('utf-8'),
                                        item['Pic_Url'].encode('utf-8'),
                                        item['Like'].encode('utf-8'),
                                        item['Transfer'].encode('utf-8'),
                                        item['Comment'].encode('utf-8')
                                    )
                                    )
                self.conn.commit()

            except MySQLdb.Error, e:
                print "出现错误"
                print "Error %d: %s" % (e.args[0], e.args[1])

        return item
4.2. 编写爬虫代码
参考文件:Scrapy-Redis的小知识:关于爬虫和settings一些point
http://www.liuyu.live/blog/content?aid=53


