android菜鸟学习笔记6----android布局(一)
Android应用的UI组件都是继承自View类,View类表示的就是一个空白的矩形区域。常用的组件如TextView、Button、EditText等都直接或间接继承自View。
此外,View还有一个重要的子类ViewGroup,该类可以用来包含多个View组件,本身也可以当做一个View组件被其他的ViewGroup所包含,由此,可以构建出非常复杂的UI界面。
常用的布局管理器如FrameLayout、LinearLayout、RelativeLayout等都直接继承自ViewGroup。
在Android应用中,Activity就相当于传统桌面开发中的Form,刚创建出来就是一个空白的屏幕,因此,要显示UI界面时,就需要调用setContentView()方法传入要显示的视图实例或者布局资源。
如:
传入一个布局资源:
setContentView(R.layout.main);
传入一个View实例:
TextView myTv = new TextView(this);
setContentView(myTv);
myTv.setText(“hello, world”);
因为setContentView()只能接受一个View实例,要显示复杂的UI界面,就需要用到ViewGroup来包含多个多个View实例,然后将ViewGroup实例传给setContentView。ViewGroup是个抽象类,一般直接使用的都是它的子类,被称之为布局管理器。
Android有两种方式编写UI界面,一种是在xml布局资源文件中,另一种是直接在代码中编写,如上面的传入一个View实例的做法就是直接在代码中编写,这是传统的Form编程的做法。现在比较推荐的是在xml布局资源文件中编写UI界面,这样一来就可以将应用表示层与逻辑层相分离,无需修改代码就可以修改表示层。
要编写复杂的UI界面,需要掌握android中常用的布局管理器。主要有:
AbsoluteLayout:绝对布局
FrameLayout:帧布局
LinearLayout:线性布局
RelativeLayout:相对布局
TableLayout:表格布局
GridLayou:网格布局(Android 4.0添加的新的布局管理器)
1.LinearLayout 线性布局
线性布局就是放在其中的View组件将进行线性对齐排列,可以设置是垂直排列还是水平排列。
新建一个布局资源文件的方法:
右击res/layout,然后在弹出的菜单中选择new,然后选择Android Xml File,要新建LinearLayout布局文件,就选择LinearLayout作为其根节点即可。
linear_layout.xml代码如下:
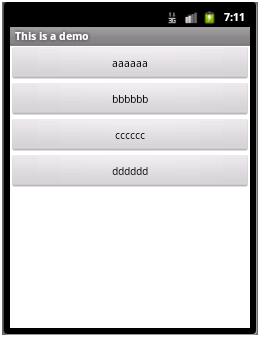
 1 <?xml version="1.0" encoding="utf-8"?>

 2

 3 <LinearLayout xmlns:android="http://schemas.android.com/apk/res/android"

 4

 5     android:layout_width="match_parent"

 6

 7     android:layout_height="match_parent"

 8

 9     android:orientation="vertical">

10

11     <Button

12

13         android:layout_width="match_parent"

14

15         android:layout_height="wrap_content"

16

17         android:text="aaaaaa"

18

19         />

20

21     <Button

22

23         android:layout_width="match_parent"

24

25         android:layout_height="wrap_content"

26

27         android:text="bbbbbb"

28

29         />

30

31     <Button

32

33         android:layout_width="match_parent"

34

35         android:layout_height="wrap_content"

36

37         android:text="cccccc"

38

39         />

40

41     <Button

42

43         android:layout_width="match_parent"

44

45         android:layout_height="wrap_content"

46

47         android:text="dddddd"

48

49         />

50

51 </LinearLayout>
activity中代码如下:
1 protected void onCreate(Bundle savedInstanceState) {

2

3            // TODO Auto-generated method stub

4

5            super.onCreate(savedInstanceState);

6

7            setContentView(R.layout.linear_layout);

8

9 }
显示效果:
常用的几个属性:
1)orientation属性:设置LinearLayout中组件的排列方式,可以取值vertical或者horizontal表示垂直排成一列或者水平排成一行。
上面代码中,如果把orientation设置为horizontal。显示则变为:

因为只显示一行,而第一个Button的宽度就是充满父元素,所以只显示出来了第一个Button。
2)layout_width属性:设置在父元素中该组件的宽度,可以取值wrap_content、match_parent或者fill_parent。其中wrap_content表示宽度能够包裹该组件中的内容即可,fill_parent和match_parent含义相同表示宽度充满父元素,现在,更常使用match_parent,而很少用fill_parent。
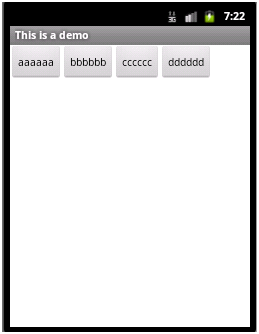
如上面代码中把所有的Button的layout_width都设置为wrap_content,则显示效果如下:
3)layout_height属性:设置在父元素中该组件的宽度,取值同layout_width。
4)grativity属性:设置该容器内组件的对齐方式。
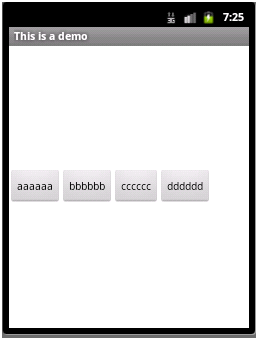
如在LinearLayout节点中添加属性:android:gravity="center_vertical"
则显示效果如下:
该属性的取值可以是:top、bottom、left、right、center、center_vertical、center_horizontal等值,或者这些值相或(即位或运算 | )
如:android:gravity="bottom|right" 显示效果

5)layout_gravity属性:当前控件在父元素的位置。
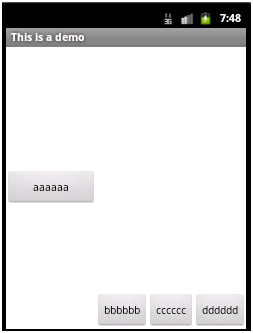
如将aaaaaa那个Button中layout_gravity设置为”center”,其效果将会与其所处容器即LinearLayout中的gravity属性效果进行叠加,显示如下:
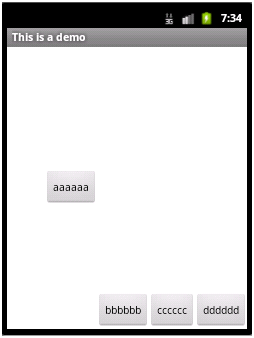
垂直上进行了居中,水平上还是排在bbbbbb的左边
6)layout_weight属性:在子控件中设置父元素中多出来的额外空间的分配权重。

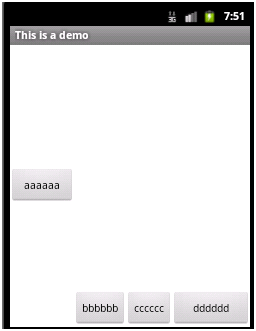
此时,如果只在aaaaaa这个button中设置layout_weight属性,可以设置为任意值,习惯设置为1。则aaaaaa这个button会拉伸占据剩下的空间,显示如下:
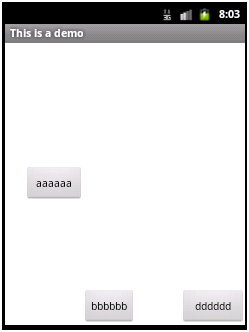
如果同时在aaaaaa和dddddd两个button中都设置layout_weight属性,且第一个设置为1,第二个设置为2,则之前多出来的剩余空间会分给aaaaaa 1/3,分给dddddd 2/3,即各自的权重值/总的权重值,即为各自所分得的剩余空间的比例,显示如下:
7)weightSum属性:设置容器中剩余空间的总的权重值,这个属性是LinearLayout中的属性,而layout_weight是各个子控件中的属性,若不设置,则默认为各个子控件layout_weight属性值的总和。
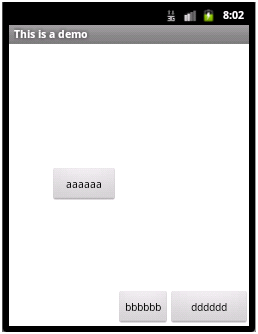
若如上面aaaaaa的layout_weight值为1,dddddd的layout_weight的值为2,同时在LinearLayout中设置weightSum值为6,则仍会有一半的剩余空间,aaaaaa只分得原来剩余空间的1/6,dddddd分得2/6,显示如下:

8)visibility属性:控制是否显示,取值可以是invisible、visible、gone。visible表示显示出来,invisible和gone不显示出来,其中invisible不显示,但控件仍然存在,占用着空间,而gone表示控件不存在了,也就不占用空间了。
如:cccccc设置visibility属性为gone,显示如下:
若改为invisible:
LinearLayout设置invisible:
2.RelativeLayout:相对布局
顾名思义,即根据各控件的相对位置进行布局,相对位置,可以是子控件A相对父控件的位置,也可以是子控件A相对于子控件B的位置。
右击res/layout,然后在弹出的菜单中选择new,然后选择Android Xml File,要新建RelativeLayout布局文件,就选择RelativeLayout作为其根节点即可。文件名为relative_layout.xml。
代码如下:
 1 <?xml version="1.0" encoding="utf-8"?>

 2

 3 <RelativeLayout xmlns:android="http://schemas.android.com/apk/res/android"

 4

 5     android:layout_width="match_parent"

 6

 7     android:layout_height="match_parent" >

 8

 9     <Button

10

11         android:id="@+id/aa"

12

13         android:layout_width="wrap_content"

14

15         android:layout_height="wrap_content"

16

17         android:layout_centerInParent="true"

18

19         android:text="aaaaaa"

20

21

22

23         />

24

25     <Button

26

27         android:id="@+id/bb"

28

29         android:layout_width="wrap_content"

30

31         android:layout_height="wrap_content"

32

33         android:layout_toRightOf="@id/aa"

34

35         android:layout_alignTop="@id/aa"

36

37         android:text="bbbbbb"

38

39         />

40

41     <Button

42

43         android:id="@+id/cc"

44

45         android:layout_width="wrap_content"

46

47         android:layout_height="wrap_content"

48

49         android:layout_toLeftOf="@id/aa"

50

51         android:layout_alignBottom="@id/aa"

52

53         android:text="cccccc"

54

55         />

56

57     <Button

58

59         android:id="@+id/dd"

60

61         android:layout_width="wrap_content"

62

63         android:layout_height="wrap_content"

64

65         android:layout_above="@id/aa"

66

67         android:layout_alignLeft="@id/aa"

68

69         android:text="dddddd"

70

71         />

72

73     <Button

74

75         android:id="@+id/ee"

76

77         android:layout_width="wrap_content"

78

79         android:layout_height="wrap_content"

80

81         android:layout_below="@id/aa"

82

83         android:layout_alignLeft="@id/aa"

84

85         android:text="eeeeee"

86

87         />

88

89 </RelativeLayout>
修改FirstActivity中setContentView(R.layout.relative_layout);
显示效果:

aaaaaa在父容器中居中显示
bbbbbb在aaaaaa的右边显示,并且与aaaaaa顶部对齐
ccccccc在aaaaaa的左边显示,并且与aaaaaa顶部对齐
dddddd在aaaaaa的上面显示,并且与aaaaaa左对齐
eeeeee在aaaaaa的下面显示,并且与aaaaaa左对齐
主要属性:均为设置父子相对位置,或者子控件与子控件的相对位置
android:layout_toRightOf 在指定控件的右边
android:layout_toLeftOf 在指定控件的左边
android:layout_above 在指定控件的上边
android:layout_below 在指定控件的下边
android:layout_alignBaseline 跟指定控件水平对齐
android:layout_alignLeft 跟指定控件左对齐
android:layout_alignRight 跟指定控件右对齐
android:layout_alignTop 跟指定控件顶部对齐
android:layout_alignBottom 跟指定控件底部对齐
android:layout_alignParentLeft 是否跟父布局左对齐
android:layout_alignParentTop 是否跟父布局顶部对齐
android:layout_alignParentRight 是否跟父布局右对齐
android:layout_alignParentBottom 是否跟父布局底部对齐
android:layout_centerVertical 在父布局中垂直居中
android:layout_centerHorizontal 在父布局中水平居中
android:layout_centerInParent 在父布局中居中