android自定义控件——以滑动开关为例
0.引言
(1)Android从4.0开始提供了switch的滑动开关效果组件,但是之前版本却没有
(2)很多时候我们写程序,都希望把有用的通用的通用的东西封装起来,以便以后重用。
本文根据组件开发思想,首先介绍android自定义控件,然后将自定义的控件封装为jar包。最为实现了一个滑动开关的例子。最后效果如图所示:

下面是开发步骤:
1.android自定义控件
自定义控件过程:建立一个应用程序,新建一个类,该类继承View类,并实现参数为(Context context,AttributeSet attrs)的构造函数,定义控件对应的xml布局文件,定义控件的属性文件attrs
2.封装为jar包
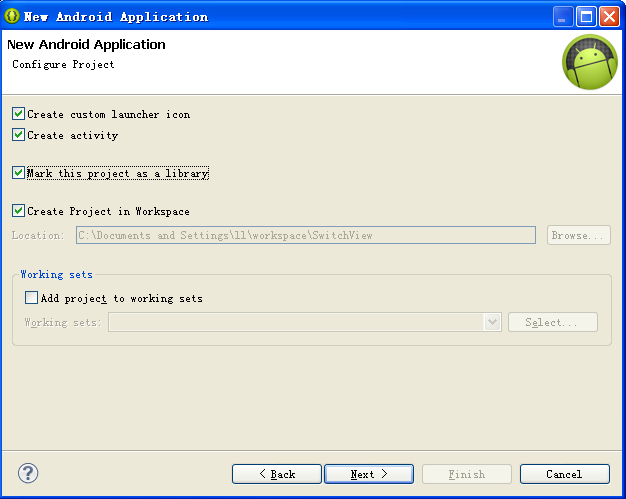
封装jar包有两种方法,一是在新建工程的时候就勾选Mark this project as a library

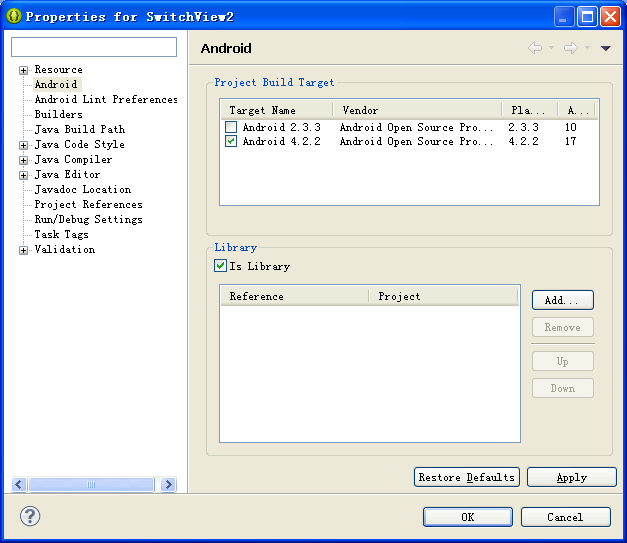
这样建立的就是库文件,但是这样的话建立项目的时候不利于调式,因此使用的二种方法;第二种方法是在建立调试好项目后将,选择项目右键——>属性——>在左边面板中选择Android,在面板中勾选Is Library

3.switchview实例
声明:本例子是在别人的基础上更改而来的部分代码版权属于他人
(1)建立工程switchview2
建立类SwitchView,SwitchView继承自LinearLayout
(2)新建布局文件switch_view.xml
<?xml version="1.0" encoding="utf-8"?>
<RelativeLayout xmlns:android="http://schemas.android.com/apk/res/android"
android:id="@+id/sv_container"
android:layout_width="230dip"
android:layout_height="38dip"
android:background="@drawable/usage_list_dark" >
<ImageButton
android:id="@+id/iv_switch_cursor"
android:layout_width="120dip"
android:layout_height="36dip"
android:layout_centerVertical="true"
android:layout_marginLeft="0.5dip"
android:layout_marginRight="0.5dip"
android:background="@drawable/usage_list_green" />
<LinearLayout
android:layout_width="fill_parent"
android:layout_height="fill_parent"
android:gravity="center" >
<TextView
android:id="@+id/switch_text_true"
android:layout_width="wrap_content"
android:layout_height="wrap_content"
android:layout_weight="1"
android:gravity="center"
android:text="开" />
<TextView
android:id="@+id/switch_text_false"
android:layout_width="wrap_content"
android:layout_height="wrap_content"
android:layout_weight="1"
android:gravity="center"
android:text="关" />
</LinearLayout>
</RelativeLayout>
布局文件包括外边框sv_container,滑动块iv_switch_cursor,以及显示文本的两个TextView
(3)在res->values文件夹下新建立控件的属性文件attrs.xml,里面建立了一个name为SwitchView的declare-styleable来自定义属性,属性包括当开关返回的是true时显示的文本,为false显示的文本,常见的是“是否”、“男女”等二选一的地方。container_Hight、container_Width、container_Background是表示的是背景高度、宽度、背景图或颜色,cursor_Hight、cursor_Width、cursor_Background表示的是滑动块的高度、宽度、背景图或颜色,这里背景一般都是用图片,因为颜色表示不出效果来,最终滑动开关的效果关键也要靠这些属性综合决定。
<?xml version="1.0" encoding="utf-8"?>
<resources>
<declare-styleable name="SwitchView">
<attr name="textTrue" format="string" />
<attr name="textFalse" format="string" />
<attr name="container_Hight" format="dimension" />
<attr name="container_Width" format="dimension" />
<attr name="cursor_Hight" format="dimension" />
<attr name="cursor_Width" format="dimension" />
<attr name="cursor_Background" format="reference|color" />
<attr name="container_Background" format="reference|color" />
</declare-styleable>
</resources>
(4)重构SwitchView方法。方法必须包含AttributeSet属性attrs,attrs通过context.obtainStyledAttributes(attrs, R.styleable.SwitchView);方法建立TypedArray与attrs.xml中的SwitchView对应,然后就可以为相应的控件赋值。
public SwitchView(Context context, AttributeSet attrs) {
super(context, attrs);
this.context = context;
initView();
//设置滑动开关的显示文本
TypedArray styledAttrs = context.obtainStyledAttributes(attrs, R.styleable.SwitchView);//TypedArray是一个数组容器
this.setTextTrue(styledAttrs.getString(R.styleable.SwitchView_textTrue));
this.setTextFalse(styledAttrs.getString(R.styleable.SwitchView_textFalse));
int c_h=(int) styledAttrs.getDimension(R.styleable.SwitchView_container_Hight, 38);
int c_w=(int)styledAttrs.getDimension(R.styleable.SwitchView_container_Width, 230);
int iv_h=(int) styledAttrs.getDimension(R.styleable.SwitchView_cursor_Hight,36);
int iv_w=(int)styledAttrs.getDimension(R.styleable.SwitchView_cursor_Width, 120);
//更改布局大小,用setLayoutParams报错
sv_container.getLayoutParams().height=c_h;
sv_container.getLayoutParams().width=c_w;
Drawable drawable1=styledAttrs.getDrawable(R.styleable.SwitchView_container_Background);
if(drawable1!=null)
sv_container.setBackground(drawable1);
sv_container.invalidate();
iv_switch_cursor.getLayoutParams().height=iv_h;
iv_switch_cursor.getLayoutParams().width=iv_w;
Drawable drawable2=styledAttrs.getDrawable(R.styleable.SwitchView_cursor_Background);
if(drawable1!=null)
iv_switch_cursor.setBackground(drawable2);
iv_switch_cursor.invalidate();
// iv_switch_cursor.setLayoutParams(new LayoutParams(iv_w,iv_h));
}
(5)按照第二步的方法封装为jar包
4.实例应用
新建一个工程项目SwitchViewExample,建立一个Activity类MainActivity.class
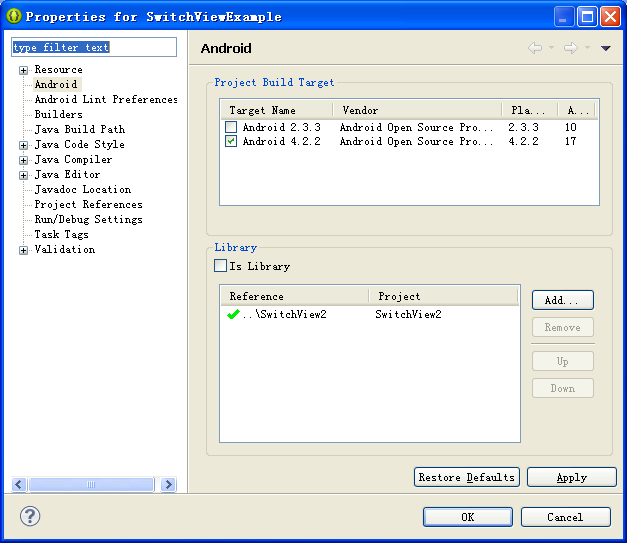
在项目的属性中选择Android,点击Add添加SwitcView的库

或着在项目SwitchView2项目的bin下面将switchview2.jar拷贝靠SwitchViewExample项目下的libs文件夹下面,通过添加外部jar包引用的方式加载进来。
在MainActivity对应的布局文件中添加前面自定义的控件,并设置对应的属性
<RelativeLayout xmlns:android="http://schemas.android.com/apk/res/android"
xmlns:tools="http://schemas.android.com/tools"
xmlns:sv="http://schemas.android.com/apk/res-auto/com.jiesai.ljp.switchview"
android:layout_width="match_parent"
android:layout_height="match_parent"
android:paddingBottom="@dimen/activity_vertical_margin"
android:paddingLeft="@dimen/activity_horizontal_margin"
android:paddingRight="@dimen/activity_horizontal_margin"
android:paddingTop="@dimen/activity_vertical_margin"
tools:context=".MainActivity" xmlns:app="http://schemas.android.com/apk/res/com.example.switchviewexample">
<com.jiesai.ljp.switchview.SwitchView
android:id="@+id/sv_test"
android:layout_width="wrap_content"
android:layout_height="wrap_content"
app:textTrue="男"
app:textFalse="女">
</com.jiesai.ljp.switchview.SwitchView>
</RelativeLayout>
在MainActivity类中可以实例化一个SwitchView,通过switchView.isChecked();可以判断滑动开关选择的是什么项,然后想做什么就可以随便了
public class MainActivity extends Activity {
@Override
protected void onCreate(Bundle savedInstanceState) {
super.onCreate(savedInstanceState);
setContentView(R.layout.activity_main);
SwitchView switchView=(SwitchView)findViewById(R.id.sv_test);
boolean check=switchView.isChecked();
if(check){
Toast.makeText(this, "你选择了:男", Toast.LENGTH_LONG).show();
}else{
Toast.makeText(this, "你选择了:女", Toast.LENGTH_LONG).show();
}
}
@Override
public boolean onCreateOptionsMenu(Menu menu) {
// Inflate the menu; this adds items to the action bar if it is present.
getMenuInflater().inflate(R.menu.main, menu);
return true;
}
}
附源码下载地址:http://download.csdn.net/detail/luojianpingljp/5842129