【Flex3】 advancedDataGrid的使用(一)
[转载:原创保留一切权力 http://hi.baidu.com/lz0830/blog/item/b17dcc3433170d325bb5f589.html ]
Flex3 已经开始公测,其带来了诸多变化,所以由今天开始,我们将陆续和大家一起来学习其中的新特性,进行我们的Flex 3发现之旅。
今天我们要说的是官方文档中用了整章介绍的AdvancedDataGrid,AdvancedDataGrid是DataGrid的高级版本
相对DataGrid组件,AdvancedDataGrid主要有以下几个高级之处:
- 多列排序:按住Control键在点击某一列的表头来实现多列排序。
- 自定义行和列样式:通过设置行和列的styleFunction指向一个函数来样式化行列
- 自定义行和列样式:通过设置行和列的styleFunction指向一个函数来样式化行列
- 显示分层数据:在组件的第一列显示一个可缩放的导航数来控制表格行的显示
- 创建多列分组:将多列汇聚到同一列表头下
- 使用单元渲染器(renderers):跨越多栏使用同一渲染器或者一列使用多个渲染器
1. 多列排序
缺省的情况下,AdvancedDataGrid是按数据添加到它的DataProvider的顺序显示数据,和DataGrid组件一样,AdvancedDataGrid也允许您在数据显示后对数据进行排序。不同的是DataGrid只能基于单列排序,而AdvancedDataGrid支持基于多列的排序。
以下是多列排序的示例:
<?xml version="1.0"?>

<mx:Application xmlns:mx="http://www.adobe.com/2006/mxml">

    <mx:Script>

      <![CDATA[

         import mx.collections.ArrayCollection;

         [Bindable]

         private var dpADG:ArrayCollection = new ArrayCollection([

           {Artist:'Pavement', Album:'Slanted and Enchanted', Price:12.99},

           {Artist:'Pavement', Album:'Brighten the Corners', Price:13.99},

           {Artist:'Saner', Album:'A Child Once', Price:14.99},

           {Artist:'Saner', Album:'Helium Wings', Price:12.99},

           {Artist:'The Doors', Album:'The Doors', Price:10.99},

           {Artist:'The Doors', Album:'Morrison Hotel', Price:12.99},

           {Artist:'Grateful Dead', Album:'American Beauty', Price:11.99},

           {Artist:'Grateful Dead', Album:'In the Dark', Price:17.99},

           {Artist:'Grateful Dead', Album:'Shakedown Street', Price:13.99},

           {Artist:'The Doors', Album:'Strange Days', Price:12.99},

           {Artist:'The Doors', Album:'The Best of the Doors', Price:10.99}

         ]);

      ]]>

    </mx:Script>

    <mx:AdvancedDataGrid width="100%" height="100%" dataProvider="{dpADG}">

        <mx:columns>

            <mx:AdvancedDataGridColumn dataField="Artist" />

            <mx:AdvancedDataGridColumn dataField="Album" />

            <mx:AdvancedDataGridColumn dataField="Price" />

       </mx:columns>

    </mx:AdvancedDataGrid>

</mx:Application>
运行以上示例,如下进行排序:
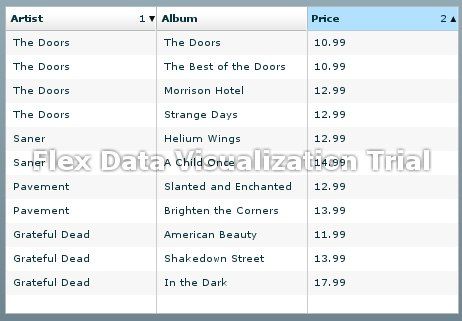
点击AdvancedDataGrid组件的任意列表头对任意列进行排序,例如点击Artist列的列表头Artist列将升序进行排序,再次点击的话将按降序排序。
按住Control键,点击其他任意的列头,例如点击Price列头,将在保持Artist列降序排列的情况下,将Price列按升序排列。现在你可以从中发现某一艺术家最便宜的专辑。
再次点击Price列头,Price列将按降序排列
按住Control键,点击任意其他列,将其加入排序条件中。
2. 自定义行列样式
通过使用AdvancedDataGrid组件的回调(callback)函数来自定义表格行列的样式,要控制某一行的样式,使用AdvancedDataGrid.styleFunction属性,要自定义某一列的样式,使用AdvancedDataGridColumn.styleFunction属性,AdvancedDataGrid.styleFunction指定的回调函数先执行,接着才执行AdvancedDataGridColumn.styleFunction属性指定的函数。
回调函数必须要有如下声明:
public function myStyleFunction(data:Object,column:SuperDataGridColumn):Object该函数返回一个包含用于表示样式设置的styleName:value对的完整对象,或者null。styleName为样式属性的名称,如Color,而value为样式属性的值,如0x00FF00。
AdvancedDataGrid会在更新显示时调用回调函数,如应用启动时该组件第一次会绘制的时候,或者在您调用invalidateList()来刷新组件所有行的显示时。
本节的示例将使用回调函数来定义AdvancedDataGrid的样式,本节中所有的示例都使用以下StyleData.as文件中的数据:
[Bindable]

private var dpADG:ArrayCollection = new ArrayCollection([

   {Artist:'Pavement', Album:'Slanted and Enchanted', Price:12.99},

   {Artist:'Pavement', Album:'Brighten the Corners', Price:13.99},

   {Artist:'Saner', Album:'A Child Once', Price:14.99},

   {Artist:'Saner', Album:'Helium Wings', Price:12.99},

   {Artist:'The Doors', Album:'The Doors', Price:10.99},

   {Artist:'The Doors', Album:'Morrison Hotel',Price:12.99},

   {Artist:'Grateful Dead', Album:'American Beauty', Price:11.99},

   {Artist:'Grateful Dead', Album:'In the Dark', Price:17.99},

   {Artist:'Grateful Dead', Album:'Shakedown Street', Price:13.99},

   {Artist:'The Doors', Album:'Strange Days', Price:12.99},

   {Artist:'The Doors', Album:'The Best of the Doors', Price:10.99} ]);
定义行样式
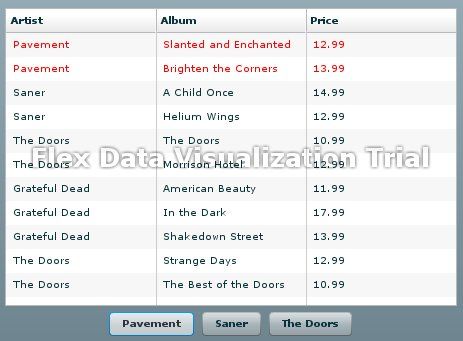
以下示例使用AdvancedDataGrid.styleFunction属性指定一个回调函数来定义表格行样式。在该示例中,您可以使用Button控件来选择AdvancedDataGrid.styleFunction中的artist,然后回调函数将会红色高亮显示所有被选择的行。
<?xml version="1.0"?>

<mx:Application xmlns:mx="http://www.adobe.com/2006/mxml">

    <mx:Script>

        <![CDATA[

            import mx.collections.ArrayCollection;

            import mx.controls.advancedDataGridClasses.AdvancedDataGridColumn;

            // Include the data for the AdvancedDataGrid control.

            include "StyleData.as"

            // Artist name to highlight.

            protected var artistName:String;

            // Event handler to set the selected artist's name

            // based on the selected Button control.

            public function setArtistName(event:Event):void

            {

                artistName=Button(event.currentTarget).label;

                // Refresh row display.

                myADG.invalidateList();

            }

            // Callback function that hightlights in red

            // all rows for the selected artist.

            public function myStyleFunc(data:Object,

                                        col:AdvancedDataGridColumn):Object

            {

                if (data["Artist"] == artistName)

                    return {color:0xFF0000};

                // Return null if the Artist name does not match.

                return null;

            }

        ]]>

    </mx:Script>

    <mx:AdvancedDataGrid id="myADG" width="100%" height="100%" dataProvider="{dpADG}" styleFunction="myStyleFunc">

        <mx:columns> <mx:AdvancedDataGridColumn dataField="Artist"/>

            <mx:AdvancedDataGridColumn dataField="Album"/>

            <mx:AdvancedDataGridColumn dataField="Price"/>

        </mx:columns> </mx:AdvancedDataGrid>

    <mx:HBox>

        <mx:Button label="Pavement" click="setArtistName(event);"/>

        <mx:Button label="Saner" click="setArtistName(event);"/>

        <mx:Button label="The Doors" click="setArtistName(event);"/>

    </mx:HBox>

</mx:Application>
定义列样式
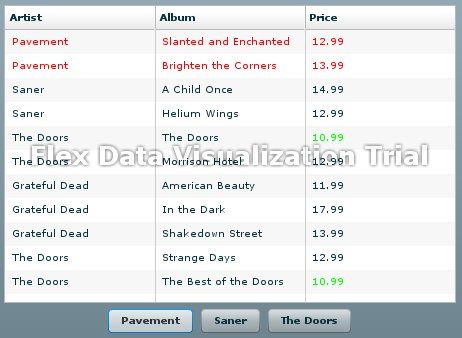
以下示例修改上节的示例来定义AdvancedDataGrid的行和列样式。在该示例中,所有价格小于$11.00的单元都将显示为绿色。
<?xml version="1.0"?>

<mx:Application xmlns:mx="http://www.adobe.com/2006/mxml">

    <mx:Script>

        <![CDATA[

            import mx.collections.ArrayCollection;

            import mx.controls.advancedDataGridClasses.AdvancedDataGridColumn;

            // Include the data for the AdvancedDataGrid control.

            include "StyleData.as"

            // Artist name to highlight.

            protected var artistName:String;

            // Event handler to set the selected artist's name

            // based on the selected Button control.

            public function setArtistName(event:Event):void

            {

                artistName=Button(event.currentTarget).label;

                // Refresh row display.

                myADG.invalidateList();

            }

            // Callback function that hightlights in red

            // all rows for the selected artist.

            public function myStyleFunc(data:Object,

                                        col:AdvancedDataGridColumn):Object

            {

                if (data["Artist"] == artistName)

                    return {color:0xFF0000};

                // Return null if the Artist name does not match.

                return null;

            }

            // Callback function that hightlights in green

            // all entries in the Price column // with a value less than $11.00. public function myColStyleFunc(data:Object, col:AdvancedDataGridColumn):Object { if(data["Price"] <= 11.00) return {color:0x00FF00}; return null; } ]]>

    </mx:Script> <mx:AdvancedDataGrid id="myADG" width="100%" height="100%" dataProvider="{dpADG}" styleFunction="myStyleFunc">

                     <mx:columns>

                         <mx:AdvancedDataGridColumn dataField="Artist"/>

                         <mx:AdvancedDataGridColumn dataField="Album"/>

                         <mx:AdvancedDataGridColumn dataField="Price" styleFunction="myColStyleFunc"/>

                     </mx:columns> </mx:AdvancedDataGrid>

    <mx:HBox>

        <mx:Button label="Pavement" click="setArtistName(event);"/>

        <mx:Button label="Saner" click="setArtistName(event);"/>

        <mx:Button label="The Doors" click="setArtistName(event);"/>

    </mx:HBox>

</mx:Application>
3. 在列中使用数据格式器(formatter)
AdvancedDataGridColumn有一个formatter属性,通过它,您可以向列传递一个Formatter类,或者Formatter子类的实例。格式器类可以将数据转换为自定义的字符串。例如您可以使用CurrencyFormatter类在Price列值的加上美元符($)前缀。
格式器类可以和labelFunction属性或styleFunction属性设定的回调函数一起使用,如果您指定了一个回调函数,Flex在回调函数值返回后调用格式器类。
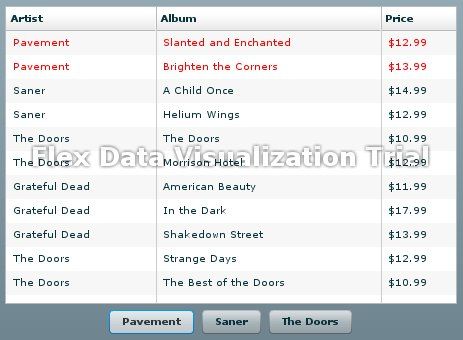
以下示例在修改自自定义行样式章节示例,在Price列增加了一个货币格式器以在价格前显示$前缀:
<?xml version="1.0"?>

<mx:Application xmlns:mx="http://www.adobe.com/2006/mxml">

    <mx:Script>

        <![CDATA[

            import mx.collections.ArrayCollection;

            import mx.controls.advancedDataGridClasses.AdvancedDataGridColumn;

            // Include the data for the AdvancedDataGrid control.

            include "StyleData.as"

            // Artist name to highlight.

            protected var artistName:String;

            // Event handler to set the selected artist's name

            // based on the selected Button control.

            public function setArtistName(event:Event):void { artistName=Button(event.currentTarget).label; // Refresh row display. myADG.invalidateList(); } // Callback function that hightlights in red // all rows for the selected artist. public function myStyleFunc(data:Object, col:AdvancedDataGridColumn):Object { if (data["Artist"] == artistName) return {color:0xFF0000}; // Return null if the Artist name does not match. return null; } ]]> </mx:Script>

    <mx:AdvancedDataGrid id="myADG" width="100%" height="100%" dataProvider="{dpADG}" styleFunction="myStyleFunc">

        <mx:columns>

            <mx:AdvancedDataGridColumn dataField="Artist"/>

            <mx:AdvancedDataGridColumn dataField="Album"/>

            <mx:AdvancedDataGridColumn width="75" dataField="Price">

                <mx:formatter>

                    <mx:CurrencyFormatter/>

                </mx:formatter>

            </mx:AdvancedDataGridColumn>

        </mx:columns>

    </mx:AdvancedDataGrid>

    <mx:HBox>

        <mx:Button label="Pavement" click="setArtistName(event);"/>

        <mx:Button label="Saner" click="setArtistName(event);"/>

        <mx:Button label="The Doors" click="setArtistName(event);"/>

    </mx:HBox>

</mx:Application>