Knative 组件包含两个大的领域,分别是Serving和Event。今天我们主要部署Serving部分。Serving,即服务,基于Kubernetes的crd提供缩容至零、请求驱动的计算功能。它本质上是无服务器平台的执行和扩展组件。主要有以下特性:
- 更高级层的抽象化,对象模型更易于理解
- 基于 HTTP 请求的无缝自动扩缩
- 逐步推出新版本
- 自动集成网络和服务网格
- 可插入:连接您自己的日志记录和监控平台
Serving 组件
在本文中,我们将重点关注 Serving 子项目,因为它是深入了解 Knative 自然起点。 Knative Serving 用户应该熟悉以下四个主要资源: Service(服务)、 Route(路由)、Configuration(配置)和 Revision(修订)。
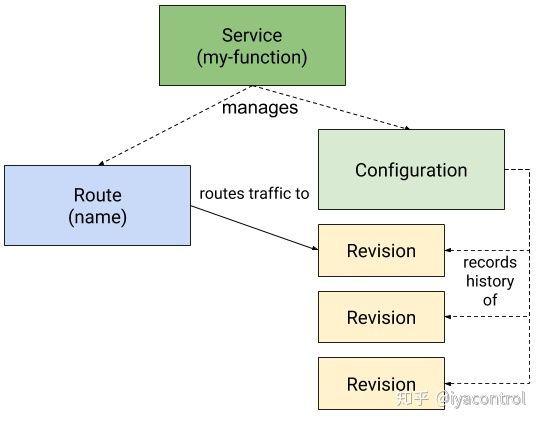
- Service:
service.serving.knative.dev资源会自动管理您的工作负载的整个生命周期。它控制其他对象的创建,以确保您的应用为服务的每次更新都具有路由,配置和新修订版。可以将服务定义为始终将流量路由到最新修订版或固定修订版。 - Route:
route.serving.knative.dev资源将网络端点映射到一个或多个修订版。您可以通过几种方式管理流量,包括部分流量和命名路由。 - Configuration:
configuration.serving.knative.dev资源维护部署的所需状态。它在代码和配置之间提供了清晰的分隔,并遵循了十二要素应用程序方法。修改配置会创建一个新修订。 - Revision:
reversion.serving.knative.dev资源是对工作负载进行的每次修改的代码和配置的时间点快照。修订是不可变的对象,可以保留很长时间。可以根据传入流量自动缩放实例数。有关更多信息,请参见配置自动缩放器。
部署
目前knative最新版本是v0.14,要求kubernetes版本v1.15+。以下命令将安装Knative Serving组件。
安装所需的CRD:
kubectl apply --filename https://github.com/knative/serving/releases/download/v0.14.0/serving-crds.yaml可以看到如下输出:
customresourcedefinition.apiextensions.k8s.io/certificates.networking.internal.knative.dev created
customresourcedefinition.apiextensions.k8s.io/configurations.serving.knative.dev created
customresourcedefinition.apiextensions.k8s.io/ingresses.networking.internal.knative.dev created
customresourcedefinition.apiextensions.k8s.io/metrics.autoscaling.internal.knative.dev created
customresourcedefinition.apiextensions.k8s.io/podautoscalers.autoscaling.internal.knative.dev created
customresourcedefinition.apiextensions.k8s.io/revisions.serving.knative.dev created
customresourcedefinition.apiextensions.k8s.io/routes.serving.knative.dev created
customresourcedefinition.apiextensions.k8s.io/serverlessservices.networking.internal.knative.dev created
customresourcedefinition.apiextensions.k8s.io/services.serving.knative.dev created
customresourcedefinition.apiextensions.k8s.io/images.caching.internal.knative.dev created
安装Serving 核心组件
kubectl apply --filename https://github.com/knative/serving/releases/download/v0.14.0/serving-core.yaml可以看到如下输出:
customresourcedefinition.apiextensions.k8s.io/images.caching.internal.knative.dev unchanged
namespace/knative-serving created
serviceaccount/controller created
clusterrole.rbac.authorization.k8s.io/knative-serving-admin created
clusterrolebinding.rbac.authorization.k8s.io/knative-serving-controller-admin created
image.caching.internal.knative.dev/queue-proxy created
configmap/config-autoscaler created
configmap/config-defaults created
configmap/config-deployment created
configmap/config-domain created
configmap/config-gc created
configmap/config-leader-election created
configmap/config-logging created
configmap/config-network created
configmap/config-observability created
configmap/config-tracing created
horizontalpodautoscaler.autoscaling/activator created
deployment.apps/activator created
service/activator-service created
deployment.apps/autoscaler created
service/autoscaler created
deployment.apps/controller created
service/controller created
deployment.apps/webhook created
service/webhook created
customresourcedefinition.apiextensions.k8s.io/certificates.networking.internal.knative.dev unchanged
customresourcedefinition.apiextensions.k8s.io/configurations.serving.knative.dev unchanged
customresourcedefinition.apiextensions.k8s.io/ingresses.networking.internal.knative.dev unchanged
customresourcedefinition.apiextensions.k8s.io/metrics.autoscaling.internal.knative.dev unchanged
customresourcedefinition.apiextensions.k8s.io/podautoscalers.autoscaling.internal.knative.dev unchanged
customresourcedefinition.apiextensions.k8s.io/revisions.serving.knative.dev unchanged
customresourcedefinition.apiextensions.k8s.io/routes.serving.knative.dev unchanged
customresourcedefinition.apiextensions.k8s.io/serverlessservices.networking.internal.knative.dev unchanged
customresourcedefinition.apiextensions.k8s.io/services.serving.knative.dev unchanged
clusterrole.rbac.authorization.k8s.io/knative-serving-addressable-resolver created
clusterrole.rbac.authorization.k8s.io/knative-serving-namespaced-admin created
clusterrole.rbac.authorization.k8s.io/knative-serving-namespaced-edit created
clusterrole.rbac.authorization.k8s.io/knative-serving-namespaced-view created
clusterrole.rbac.authorization.k8s.io/knative-serving-core created
clusterrole.rbac.authorization.k8s.io/knative-serving-podspecable-binding created
validatingwebhookconfiguration.admissionregistration.k8s.io/config.webhook.serving.knative.dev created
mutatingwebhookconfiguration.admissionregistration.k8s.io/webhook.serving.knative.dev created
validatingwebhookconfiguration.admissionregistration.k8s.io/validation.webhook.serving.knative.dev created
secret/webhook-certs created
我们可以此时执行下面的命令,来查看安装了那些资源对下:
kubectl get all -n knative-serving可以看到:
NAME                              READY   STATUS    RESTARTS   AGE
pod/activator-8cb6d456-fgm8b      1/1     Running   0          28s
pod/autoscaler-dd459ddbb-dk5bc    1/1     Running   0          28s
pod/controller-8564567c4c-jzlfg   1/1     Running   0          28s
pod/webhook-7fbf9c6d49-45lmq      1/1     Running   0          28s

NAME                        TYPE        CLUSTER-IP       EXTERNAL-IP   PORT(S)                              AGE
service/activator-service   ClusterIP   10.100.157.161           9090/TCP,8008/TCP,80/TCP,81/TCP      28s
service/autoscaler          ClusterIP   10.100.73.90             9090/TCP,8008/TCP,8080/TCP,443/TCP   28s
service/controller          ClusterIP   10.100.109.204           9090/TCP,8008/TCP                    28s
service/webhook             ClusterIP   10.100.101.64            9090/TCP,8008/TCP,443/TCP            28s

NAME                         READY   UP-TO-DATE   AVAILABLE   AGE
deployment.apps/activator    1/1     1            1           28s
deployment.apps/autoscaler   1/1     1            1           28s
deployment.apps/controller   1/1     1            1           28s
deployment.apps/webhook      1/1     1            1           28s

NAME                                    DESIRED   CURRENT   READY   AGE
replicaset.apps/activator-8cb6d456      1         1         1       28s
replicaset.apps/autoscaler-dd459ddbb    1         1         1       28s
replicaset.apps/controller-8564567c4c   1         1         1       28s
replicaset.apps/webhook-7fbf9c6d49      1         1         1       28s

NAME                                            REFERENCE              TARGETS          MINPODS   MAXPODS   REPLICAS   AGE
horizontalpodautoscaler.autoscaling/activator   Deployment/activator   /100%   1         20        1          28s
选择安装网络层
此处Knative已经不再强依赖istio,除istio之外,我们可以选择ambassador,contour,gloo,kourier。
此处因为Kourier相当于knative社区自己开发的网络层,有着更好的兼容性,所以选择Kourier。
安装Knative Kourier controller控制器:
kubectl apply --filename https://github.com/knative/net-kourier/releases/download/v0.14.0/kourier.yaml有如下输出:
namespace/kourier-system created
configmap/config-logging created
configmap/config-observability created
configmap/config-leader-election created
service/kourier created
deployment.apps/3scale-kourier-gateway created
deployment.apps/3scale-kourier-control created
clusterrole.rbac.authorization.k8s.io/3scale-kourier created
serviceaccount/3scale-kourier created
clusterrolebinding.rbac.authorization.k8s.io/3scale-kourier created
service/kourier-internal created
service/kourier-control created
configmap/kourier-bootstrap created
执行以下命令查看部署了那些资源:
kubectl get all -n kourier-system可以看到:
NAME                                          READY   STATUS    RESTARTS   AGE
pod/3scale-kourier-control-759cb78499-cph5g   1/1     Running   0          97s
pod/3scale-kourier-gateway-6f49d5768b-l7rsv   1/1     Running   0          97s

NAME                       TYPE           CLUSTER-IP       EXTERNAL-IP                                                                    PORT(S)                      AGE
service/kourier            LoadBalancer   10.100.81.199    ada062477a777476a8ed7fc989190fdf-1615177688.ap-southeast-1.elb.amazonaws.com   80:30588/TCP,443:30850/TCP   97s
service/kourier-control    ClusterIP      10.100.163.167                                                                            18000/TCP                    97s
service/kourier-internal   ClusterIP      10.100.113.134                                                                            80/TCP                       97s

NAME                                     READY   UP-TO-DATE   AVAILABLE   AGE
deployment.apps/3scale-kourier-control   1/1     1            1           97s
deployment.apps/3scale-kourier-gateway   1/1     1            1           97s

NAME                                                DESIRED   CURRENT   READY   AGE
replicaset.apps/3scale-kourier-control-759cb78499   1         1         1       97s
replicaset.apps/3scale-kourier-gateway-6f49d5768b   1         1         1       97s
配置Serving 默认使用Kourier:
Serving的配置位于config-network configmap中,修改之前的内容为:
    ################################
    #                              #
    #    EXAMPLE CONFIGURATION     #
    #                              #
    ################################

    # This block is not actually functional configuration,
    # but serves to illustrate the available configuration
    # options and document them in a way that is accessible
    # to users that `kubectl edit` this config map.
    #
    # These sample configuration options may be copied out of
    # this example block and unindented to be in the data block
    # to actually change the configuration.

    # DEPRECATED:
    # istio.sidecar.includeOutboundIPRanges is obsolete.
    # The current versions have outbound network access enabled by default.
    # If you need this option for some reason, please use global.proxy.includeIPRanges in Istio.
    #
    # istio.sidecar.includeOutboundIPRanges: "*"

    # ingress.class specifies the default ingress class
    # to use when not dictated by Route annotation.
    #
    # If not specified, will use the Istio ingress.
    #
    # Note that changing the Ingress class of an existing Route
    # will result in undefined behavior.  Therefore it is best to only
    # update this value during the setup of Knative, to avoid getting
    # undefined behavior.
    ingress.class: "istio.ingress.networking.knative.dev"

    # certificate.class specifies the default Certificate class
    # to use when not dictated by Route annotation.
    #
    # If not specified, will use the Cert-Manager Certificate.
    #
    # Note that changing the Certificate class of an existing Route
    # will result in undefined behavior.  Therefore it is best to only
    # update this value during the setup of Knative, to avoid getting
    # undefined behavior.
    certificate.class: "cert-manager.certificate.networking.knative.dev"

    # domainTemplate specifies the golang text template string to use
    # when constructing the Knative service's DNS name. The default
    # value is "{{.Name}}.{{.Namespace}}.{{.Domain}}". And those three
    # values (Name, Namespace, Domain) are the only variables defined.
    #
    # Changing this value might be necessary when the extra levels in
    # the domain name generated is problematic for wildcard certificates
    # that only support a single level of domain name added to the
    # certificate's domain. In those cases you might consider using a value
    # of "{{.Name}}-{{.Namespace}}.{{.Domain}}", or removing the Namespace
    # entirely from the template. When choosing a new value be thoughtful
    # of the potential for conflicts - for example, when users choose to use
    # characters such as `-` in their service, or namespace, names.
    # {{.Annotations}} can be used for any customization in the go template if needed.
    # We strongly recommend keeping namespace part of the template to avoid domain name clashes
    # Example '{{.Name}}-{{.Namespace}}.{{ index .Annotations "sub"}}.{{.Domain}}'
    # and you have an annotation {"sub":"foo"}, then the generated template would be {Name}-{Namespace}.foo.{Domain}
    domainTemplate: "{{.Name}}.{{.Namespace}}.{{.Domain}}"

    # tagTemplate specifies the golang text template string to use
    # when constructing the DNS name for "tags" within the traffic blocks
    # of Routes and Configuration.  This is used in conjunction with the
    # domainTemplate above to determine the full URL for the tag.
    tagTemplate: "{{.Tag}}-{{.Name}}"

    # Controls whether TLS certificates are automatically provisioned and
    # installed in the Knative ingress to terminate external TLS connection.
    # 1. Enabled: enabling auto-TLS feature.
    # 2. Disabled: disabling auto-TLS feature.
    autoTLS: "Disabled"

    # Controls the behavior of the HTTP endpoint for the Knative ingress.
    # It requires autoTLS to be enabled.
    # 1. Enabled: The Knative ingress will be able to serve HTTP connection.
    # 2. Disabled: The Knative ingress will reject HTTP traffic.
    # 3. Redirected: The Knative ingress will send a 302 redirect for all
    # http connections, asking the clients to use HTTPS
    httpProtocol: "Enabled"
执行以下命令,完成修改工作:
kubectl patch configmap/config-network \
  --namespace knative-serving \
  --type merge \
  --patch '{"data":{"ingress.class":"kourier.ingress.networking.knative.dev"}}'
获取外部IP或CNAME:
kubectl --namespace kourier-system get service kourier由于我们的集群是eks,所以可以看到如下输出:
NAME      TYPE           CLUSTER-IP      EXTERNAL-IP                                                                          PORT(S)                      AGE
kourier   LoadBalancer   10.100.47.159   a2f4c64ef34ea40b03d8933e1137ef-424fef949c9c7ad3.elb.ap-southeast-1.amazonaws.com   80:32327/TCP,443:31313/TCP   111s
配置dns
此处可以使用Magic DNS(http://xip.io), Real DNS以及Temporary DNS三种之一。
Magic DNS仅在集群LoadBalancer服务公开了IPv4地址的情况下才有效,因此不适用于IPv6集群,AWS或Minikube之类的本地设置。
生产环境的话,应该考虑使用Real DNS。
前面已经提到,我们使用的eks,决定了网络层(Service kourier的外部地址)返回的是一个CNAME。所以我们需要为domain配置CNAME记录。此处我们将http://knative.example.com 替换为http://serverless.xx.me 。
# Here knative.example.com is the domain suffix for your cluster
*.serverless.xx.me == CNAME a2f4c64ef34ea40b03d8933e1137ef-424fef949c9c7ad3.elb.ap-southeast-1.amazonaws.com
一旦你的dns提供商已经配置完成,你需要修改从configmap config-domain 告诉Knative去使用你自定义的domain:
修改之前我们看下默认的config-domain内容:
    ################################
    #                              #
    #    EXAMPLE CONFIGURATION     #
    #                              #
    ################################

    # This block is not actually functional configuration,
    # but serves to illustrate the available configuration
    # options and document them in a way that is accessible
    # to users that `kubectl edit` this config map.
    #
    # These sample configuration options may be copied out of
    # this example block and unindented to be in the data block
    # to actually change the configuration.

    # Default value for domain.
    # Although it will match all routes, it is the least-specific rule so it
    # will only be used if no other domain matches.
    example.com: |

    # These are example settings of domain.
    # example.org will be used for routes having app=nonprofit.
    example.org: |
      selector:
        app: nonprofit

    # Routes having domain suffix of 'svc.cluster.local' will not be exposed
    # through Ingress. You can define your own label selector to assign that
    # domain suffix to your Route here, or you can set the label
    #    "serving.knative.dev/visibility=cluster-local"
    # to achieve the same effect.  This shows how to make routes having
    # the label app=secret only exposed to the local cluster.
    svc.cluster.local: |
      selector:
        app: secret
那么执行下面的命令完成修改,
# Replace knative.example.com with your domain suffix
kubectl patch configmap/config-domain \
  --namespace knative-serving \
  --type merge \
  --patch '{"data":{"serverless.xx.me":""}}'
查看所有的Knative 组件运行状态,如果STATUS是Running或者 Completed 即部署成功。
kubectl get pods --namespace knative-serving
NAME                          READY   STATUS    RESTARTS   AGE
activator-8cb6d456-fgm8b      1/1     Running   0          3h19m
autoscaler-dd459ddbb-dk5bc    1/1     Running   0          3h19m
controller-8564567c4c-jzlfg   1/1     Running   0          3h19m
webhook-7fbf9c6d49-45lmq      1/1     Running   0          3h19m
部署可选组件
可选组件主要包括:
- HPA autoscaling
- TLS with cert-manager
- TLS via HTTP01
- TLS wildcard support
可以根据实际需求选择部署。
Hello World
接下来展示如何使用Knative部署应用程序,然后使用cURL请求与之交互。
示例程序
本指南演示了从Google Container Registry部署Hello World示例应用程序(Go)的基本工作流程。您可以使用这些步骤作为从其他注册表(例如Docker Hub)部署自己的容器镜像的指南。
要部署本地容器镜像,您需要通过运行以下命令来禁用镜像标签解析:
# Set to dev.local/local-image when deploying local container images
docker tag local-image dev.local/local-image
部署应用
要使用Knative部署应用,您需要一个配置.yaml的文件来定义服务。有关Service对象的更多信息,请参见资源类型文档。
此配置文件指定有关应用程序的元数据,指向要部署的应用程序的托管镜像,并允许配置部署。有关可用的配置选项的更多信息,请参阅服务规范文档。
创建一个名为service.yaml的新文件,然后将以下内容复制并粘贴到其中:
apiVersion: serving.knative.dev/v1 # Current version of Knative
kind: Service
metadata:
  name: helloworld-go # The name of the app
  namespace: default # The namespace the app will use
spec:
  template:
    spec:
      containers:
        - image: gcr.io/knative-samples/helloworld-go # The URL to the image of the app
          env:
            - name: TARGET # The environment variable printed out by the sample app
              value: "Go Sample v1"
执行以下命令完成创建:
kubectl apply --filename service.yaml现在,您的服务已创建,Knative将执行以下步骤:
- 为此版本的应用程序创建一个新的不变版本。
- 执行网络编程以为您的应用创建路由,入口,服务和负载平衡器。
- 根据流量自动上下缩放Pod,包括将活动Pod调整为零。
详情如下:
NAME                                  TYPE           CLUSTER-IP      EXTERNAL-IP                                         PORT(S)                             AGE
service/helloworld-go                 ExternalName             kourier-internal.kourier-system.svc.cluster.local                                 3m9s
service/helloworld-go-vx6cf           ClusterIP      10.100.14.241                                                 80/TCP                              3m40s
service/helloworld-go-vx6cf-private   ClusterIP      10.100.100.96                                                 80/TCP,9090/TCP,9091/TCP,8022/TCP   3m40s
service/kubernetes                    ClusterIP      10.100.0.1                                                    443/TCP                             10d

NAME                                             READY   UP-TO-DATE   AVAILABLE   AGE
deployment.apps/helloworld-go-vx6cf-deployment   0/0     0            0           3m40s

NAME                                                        DESIRED   CURRENT   READY   AGE
replicaset.apps/helloworld-go-vx6cf-deployment-6fcdd7b9cd   0         0         0       3m40s

NAME                                              LATESTCREATED         LATESTREADY           READY   REASON
configuration.serving.knative.dev/helloworld-go   helloworld-go-vx6cf   helloworld-go-vx6cf   True

NAME                                               CONFIG NAME     K8S SERVICE NAME      GENERATION   READY   REASON
revision.serving.knative.dev/helloworld-go-vx6cf   helloworld-go   helloworld-go-vx6cf   1            True

NAME                                      URL                                                   READY   REASON
route.serving.knative.dev/helloworld-go   http://helloworld-go.default.serverless.xx.me   True

NAME                                        URL                                                   LATESTCREATED         LATESTREADY           READY   REASON
service.serving.knative.dev/helloworld-go   http://helloworld-go.default.serverless.xx.me   helloworld-go-vx6cf   helloworld-go-vx6cf   True
发起请求,测试并观察结果:
curl http://helloworld-go.default.serverless.xx.me
Hello World: Go Sample v1!
至此,我们的使用knative 部署了hello-world应用,并且测试成功。
结论
本文简单介绍了Knative serving以及部署以及hello-world demo。接下来我们会通过解读hello-world,梳理一下整个Knative serving的实现。