Knative是一组构建模块,可在Kubernetes上运行无服务器工作负载。您还可以使用这些构建块来构建自己的无服务器平台。
Knative的一个问题是在本地运行它。 Kubernetes非常庞大,在它之上运行另一个平台是一个非常困难的事情。今天,我们将介绍一些不同的方法来测试Knative,而不会过多占用您的计算机。
一些注意事项:
- 我将重点介绍Knative的服务部分
- 我选择Kourier作为Knative网络层–它比Istio更简单,更轻便
- Ubuntu被用于一切,减去Mac上的Docker部分
- 您可以在此处找到安装Knative的完整说明
k3s
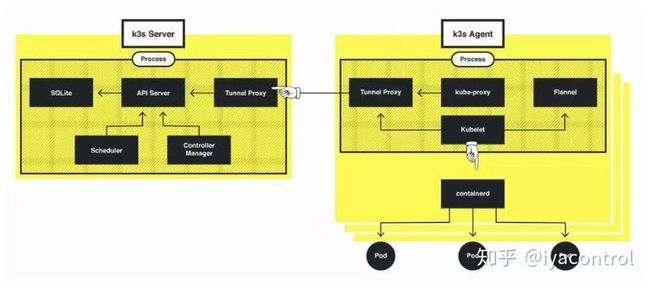
k3s是Kubernetes的精简版,专为IoT和Edge计算而设计-非常适合您的笔记本电脑。 k3s被打包为单个二进制文件(!!!),使其非常易于运行。它仅适用于Linux。
我们开始做吧!
export KNATIVE_VERSION="0.13.0"
export KUBECONFIG="/var/lib/rancher/k3s/server/cred/admin.kubeconfig"

# Since Knative has its own network layer, we need to disable k3s' Traefik during its installation
# to make sure Kourier proxy gets a LoadBalancer IP
curl -sfL https://get.k3s.io | sh -s - --disable traefik

# Install Knative Serving
kubectl apply --filename "https://github.com/knative/serving/releases/download/v$KNATIVE_VERSION/serving-crds.yaml"
kubectl apply --filename "https://github.com/knative/serving/releases/download/v$KNATIVE_VERSION/serving-core.yaml"

# Configure the magic xip.io DNS name
kubectl apply --filename "https://github.com/knative/serving/releases/download/v$KNATIVE_VERSION/serving-default-domain.yaml"

# Install and configure Kourier
kubectl apply --filename https://raw.githubusercontent.com/knative/serving/v$KNATIVE_VERSION/third_party/kourier-latest/kourier.yaml
kubectl patch configmap/config-network --namespace knative-serving --type merge --patch '{"data":{"ingress.class":"kourier.ingress.networking.knative.dev"}}'
好了,安装完成!确保所有Pod都在运行(如果没有运行,请稍等):
kubectl get pod -A那个k3给Kourier一个LoadBalancer IP地址:
kubectl get svc kourier -n kourier-system

                                       # yay!
NAME      TYPE           CLUSTER-IP    EXTERNAL-IP       PORT(S)                      AGE
kourier   LoadBalancer   10.43.94.13   172.17.255.1      80:31619/TCP,443:30649/TCP   80s
让我们部署Knative Service示例:
kubectl apply -f https://gist.githubusercontent.com/jonatasbaldin/bc04de2e376be23f75bb5815041fdd61/raw/d2345ac9aa01d0f3c771e9b3d4a1421dd766e0f9/service.yaml

service.serving.knative.dev/helloworld-go created
确保它正在运行并找到其“公共”地址:
kubectl get ksvc

NAME            URL                                                   LATESTCREATED         LATESTREADY           READY   REASON
helloworld-go   http://helloworld-go.default.172.17.255.1.xip.io      helloworld-go-2xvpx   helloworld-go-2xvpx   True
最终:
curl http://helloworld-go.default.172.17.255.1.xip.io

Hello Go Sample v1!
kind

一种在Docker容器中运行Kubernetes。看上去如此疯狂,它以很小的资源占用量就可以惊人地用于测试和本地开发。
确实可以在Mac上的Docker上工作,但要获得LoadBalancer并非易事:对于Linux,我们可以使用MetalLB获得LB –我参照了该教程,以了解它。
让我们从kind和Knative开始:
# Getting kind
curl -Lo kind https://github.com/kubernetes-sigs/kind/releases/download/v0.7.0/kind-$(uname)-amd64
chmod +x kind
mv kind /usr/local/bin

# Getting kubectl
curl -LO https://storage.googleapis.com/kubernetes-release/release/`curl -s https://storage.googleapis.com/kubernetes-release/release/stable.txt`/bin/linux/amd64/kubectl
chmod +x kubectl
mv kubectl /usr/local/bin

# Installing Docker (just copied from the Docker docs)
apt-get update
apt-get install apt-transport-https ca-certificates  curl gnupg-agent software-properties-common -y
curl -fsSL https://download.docker.com/linux/ubuntu/gpg | sudo apt-key add -
add-apt-repository "deb [arch=amd64] https://download.docker.com/linux/ubuntu $(lsb_release -cs) stable"
apt-get update
apt-get install docker-ce docker-ce-cli containerd.io -y

# Create a kind cluster
kind create cluster

# Install the Knative Serving
export KNATIVE_VERSION="0.13.0"
kubectl apply --filename "https://github.com/knative/serving/releases/download/v$KNATIVE_VERSION/serving-crds.yaml"
kubectl apply --filename "https://github.com/knative/serving/releases/download/v$KNATIVE_VERSION/serving-core.yaml"

# Configure the magic xip.io DNS name
kubectl apply --filename "https://github.com/knative/serving/releases/download/v$KNATIVE_VERSION/serving-default-domain.yaml"

# Install and configure Kourier
kubectl apply --filename https://raw.githubusercontent.com/knative/serving/v$KNATIVE_VERSION/third_party/kourier-latest/kourier.yaml
kubectl patch configmap/config-network --namespace knative-serving --type merge --patch '{"data":{"ingress.class":"kourier.ingress.networking.knative.dev"}}'
现在,MetalLB步骤:
# https://mauilion.dev/posts/kind-metallb/

# First, find the network CIDR used by the Docker bridge network
# MetalLB will use some IPs from there
docker inspect network bridge

[
    {
        "Name": "bridge",
        # ...
        "IPAM": {
            "Driver": "default",
            "Options": null,
            "Config": [
                {
                    # this is what we want
                    # we will give the 10 addresses to MetalLB
                    # let's say, 172.17.255.1-172.17.255.250
                    "Subnet": "172.17.0.0/16"
                }
            ]
        },
        # ...
    }
]
安装 MetalLB:
# god bless the yaml
kubectl apply -f https://raw.githubusercontent.com/google/metallb/v0.9.3/manifests/namespace.yaml
kubectl apply -f https://raw.githubusercontent.com/google/metallb/v0.9.3/manifests/metallb.yaml
kubectl create secret generic -n metallb-system memberlist --from-literal=secretkey="$(openssl rand -base64 128)"

# Creating a MetalLB configuration
# It states that we will use those IP addresses for the LoadBalancer
cat <
好了,安装完成!确保所有Pod都在运行(如果没有运行,请稍等):
kubectl get pod -A之后,看看Kourier:
kubectl get svc kourier -n kourier-system

                                       # yes!
NAME      TYPE           CLUSTER-IP    EXTERNAL-IP    PORT(S)                      AGE
kourier   LoadBalancer   10.96.7.120   172.17.255.1   80:30201/TCP,443:30909/TCP   110s
让我们部署Knative Service示例:
kubectl apply -f https://gist.githubusercontent.com/jonatasbaldin/bc04de2e376be23f75bb5815041fdd61/raw/d2345ac9aa01d0f3c771e9b3d4a1421dd766e0f9/service.yaml

service.serving.knative.dev/helloworld-go created
确保它正在运行并找到其“公共”地址:
kubectl get ksvc

NAME                   URL                                                       LATESTCREATED                LATESTREADY                  READY   REASON
helloworld-go          http://helloworld-go.default.172.17.255.1.xip.io          helloworld-go-7sttx          helloworld-go-7sttx          True
最终:
curl http://helloworld-go.default.172.17.255.1.xip.io

Hello Go Sample v1!
Docker for Mac
可能是我的最爱 Docker for Mac附带的Kubernetes是在本地使用该平台的一种非常简单的方法:单击Docker配置上的按钮,一切顺利。不幸的是,对于Knative而言,这并不容易,但是让我们对其进行修复。
首先,Knative仅支持K8S v1.15.0 +,而Mac的默认Docker随v1.14.6一起提供,没有升级路径。但是,您可以通过Edge版本获得v1.16.0 +。它具有实验性功能,因此可能不是100%稳定的。无论如何,Edge对于实验足够了。在进入下载页面之前,请阅读“在稳定版本和Edge版本之间切换”。
安装完成后,让我们开始Knative:
# Install the Knative Serving
export KNATIVE_VERSION="0.13.0"
kubectl apply --filename "https://github.com/knative/serving/releases/download/v$KNATIVE_VERSION/serving-crds.yaml"
kubectl apply --filename "https://github.com/knative/serving/releases/download/v$KNATIVE_VERSION/serving-core.yaml"

# Install and configure Kourier
kubectl apply --filename https://raw.githubusercontent.com/knative/serving/v$KNATIVE_VERSION/third_party/kourier-latest/kourier.yaml
kubectl patch configmap/config-network --namespace knative-serving --type merge --patch '{"data":{"ingress.class":"kourier.ingress.networking.knative.dev"}}'
如果我们检查Kourier LoadBalancer,它将获得一个本地主机地址
kubectl get svc kourier -n kourier-system

NAME      TYPE           CLUSTER-IP       EXTERNAL-IP   PORT(S)                      AGE
kourier   LoadBalancer   10.110.153.164   localhost     80:31650/TCP,443:30315/TCP   34m
LB在端口80和443上公开给我们的本地主机。这很重要,它将影响我们与Knative服务的通信方式。
让我们部署Knative Service示例:
kubectl apply -f https://gist.githubusercontent.com/jonatasbaldin/bc04de2e376be23f75bb5815041fdd61/raw/d2345ac9aa01d0f3c771e9b3d4a1421dd766e0f9/service.yaml

service.serving.knative.dev/helloworld-go created
确保它正在运行并找到其“公共”地址:
kubectl get ksvc

NAME            URL                                        LATESTCREATED         LATESTREADY           READY   REASON
helloworld-go   http://helloworld-go.default.example.com   helloworld-go-9qsq7   helloworld-go-9qsq7   True
与其他步骤不同,我们没有应用Magic http://xip.io DNS Knative文件,因为当LoadBalancer预配置了一个域(在本例中为localhost)时,该文件不起作用。
最后,要访问服务,请在localhost:80上单击LoadBalancer,并将服务域作为主机头传递:
curl localhost:80 -H "Host: helloworld-go.default.example.com"

Hello Go Sample v1!
太好了,对!!
PS:我对这个解决方案没有太多投入。本地主机LoadBalancer可能有我没有遇到过的问题。如果发现任何可疑内容,我将保持本文的更新。
minikube

Minikube部分是Jonathan Beri的贡献,Minikube在其GitHub存储库中得到了完美的描述:
minikube在macOS,Linux和Windows上实现了本地Kubernetes集群。 minikube的主要目标是成为本地Kubernetes应用程序开发的最佳工具,并支持所有合适的Kubernetes功能。
# Get a Minikube VM up and running, with enough resources
minikube start --cpus=4 --memory=4096 --addons=ingress

# Install the Knative Serving
export KNATIVE_VERSION="0.13.0"
kubectl apply --filename "https://github.com/knative/serving/releases/download/v$KNATIVE_VERSION/serving-crds.yaml"
kubectl apply --filename "https://github.com/knative/serving/releases/download/v$KNATIVE_VERSION/serving-core.yaml"

# Configure the magic xip.io DNS name
kubectl apply --filename "https://github.com/knative/serving/releases/download/v$KNATIVE_VERSION/serving-default-domain.yaml"

# Install and configure Kourier
kubectl apply --filename https://raw.githubusercontent.com/knative/serving/v$KNATIVE_VERSION/third_party/kourier-latest/kourier.yaml
kubectl patch configmap/config-network --namespace knative-serving --type merge --patch '{"data":{"ingress.class":"kourier.ingress.networking.knative.dev"}}'
好了,安装完成!确保所有Pod都在运行(如果没有运行,请稍等):
kubectl get pod -A打开一个新的终端控制台并启动Minikube LoadBalancer:
minikube tunnel

Status:
        machine: minikube
        pid: 13391
        route: 10.96.0.0/12 -> 192.168.64.6
        minikube: Running
        services: [kourier]
    errors:
                minikube: no errors
                router: no errors
                loadbalancer emulator: no errors
之后,从Kourier获得公共IP:
kubectl get svc kourier -n kourier-system

                                        # yes!
NAME      TYPE           CLUSTER-IP     EXTERNAL-IP    PORT(S)                      AGE
kourier   LoadBalancer   10.107.29.82   10.107.29.82   80:30354/TCP,443:30261/TCP   2m47s
让我们部署Knative Service示例:
kubectl apply -f https://gist.githubusercontent.com/jonatasbaldin/bc04de2e376be23f75bb5815041fdd61/raw/d2345ac9aa01d0f3c771e9b3d4a1421dd766e0f9/service.yaml

service.serving.knative.dev/helloworld-go created
确保它正在运行并找到其“公共”地址:
kubectl get ksvc

NAME                URL                                                    LATESTCREATED             LATESTREADY               READY   REASON
helloworld-go       http://helloworld-go.default.10.107.29.82.xip.io       helloworld-go-xqlxs       helloworld-go-xqlxs       True
最终:
curl http://helloworld-go.default.10.107.29.82.xip.io

Hello Go Sample v1!PS:本文属于翻译,原文