GD库使用小结---1
因为一开始,“大家”都说一般任务中,用php操作图片不常见,像我们这种基本业务型的,就更用不到了,所以先别看,偶就没有看。现在有机会了自然要来玩一把。
以前学过C#的GDI+,交了课程设计后忘得一干二净。又被迫学了点MFC的画图,觉得这是最蛋疼的画图过程。去年做了个小任务时用到了js图表控件,用的是封装好的js库直接调方法,然后发现这是用HTML5的canvas元素结合js打造而成,这些chart控件很多很漂亮:jsChart、HighChart、EChart、aChart、Chart.js等等,都是基于canvas,还有svg这货也很强大。
对比下有不少共同点,首先都要创建一个环境(context),就像真实的人画画一样,得给他一个完整的环境:一间画室,一张画板,若干画笔、颜料等,这样的硬性条件具备后才能开始作图,这个环境听起来很抽象,简单理解就是机子上必须具备某些“库”、“扩展”,类似于.net framework、jave runtime等,画js图表你得下载和加载对应的js文件,你的浏览器得支持canvas,这些硬性条件构成了这个(底层)环境,某些任务需要这些底层去完成,就像玩游戏,很多大点的游戏必须要directX,也是这个道理。
然后就是调用这个环境提供的各种库的方法,来画各种图形:点、线、圆(弧)、椭圆、矩形、多边形、字符、文本等,再强大的可能直接提供了一些经典的曲线如贝塞尔等,然后可以设置这些图形的样式,线条连续还是断续,颜色红还是绿,画图形时是画个空框架还是将内部填充,画在界面上哪里(图在屏幕上坐标多少),正着放还是歇着放(角度多少),图形长宽如何等等,都应有方法可调。
等一切设置完毕就是画到界面上了,然后可能会做释放某些资源的扫尾工作(垃圾回收)。大多数工作都在设置各种参数的阶段。
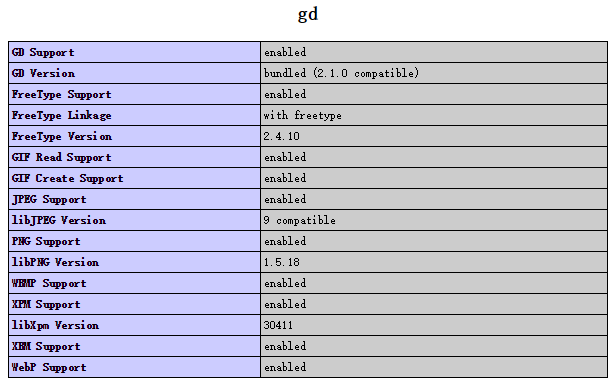
php使用GD库进行绘图,请确保开启了这个扩展。可以看到当前GD库的版本,支持的类型GIF、JPEG、PNG、WBMP等,FreeType大致查了下是一个字体引擎,提供访问各种字体接口,可供我们绘制文字,也算一个库扩展,只是包含在gd库中。
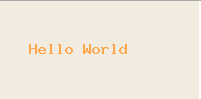
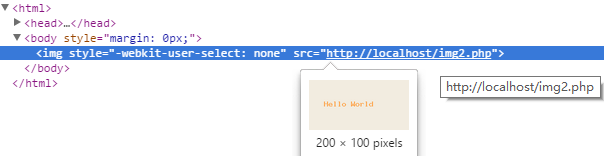
php画图也基本遵循这个过程:创建画布(相当于绘图环境)->设置参数,绘制图像 -> 输出(保存)图像 -> 资源释放。如果是将图片直接输出到浏览器,实际是放在一个img标签中,它的src属性是这个脚本的所在路径。一个最简单的示例
<?php

    // 创建画布

    $width = 200;   // 规定画布的宽高

    $height = 100;

    $image = imagecreatetruecolor($width, $height);  // 创建一幅真彩色图像

    // 添加一些即将用到的颜色

    $white = imagecolorallocate($image, 0xf2, 0xec, 0xe0);

    $orange = imagecolorallocate($image, 0xff, 0xa5, 0x4c);

    // 对画布背景填充颜色

    imagefill($image, 0, 0, $white);

    // 画一串字符串在画布上

    imagestring($image, 5, 30, 40, "Hello World", $orange);

    // 通知浏览器输出的是图像(png类型)

    header('Content-Type: image/png');

    // 输出到浏览器

    imagepng($image);

    // 释放图像资源

    imagedestroy($image);
运行结果与审查元素,src是脚本访问链接,图片实际是放在img标签中。
1. 创建画布
在php中有三种方式,一是imagecreate方法,一是imagecreatetruecolor,这两者不依赖已有文件,创建一幅画布,参数需要制定画布的宽高(如示例),返回一个resource资源型变量,有的称为句柄,以后的操作都在这个资源型变量上进行,它就代表这这幅图像,imagesx和imagesy方法可分别获取到它的宽高属性。稍不同的是,imagecreate方法会在添加颜色时,将第一种添加的颜色(调用imagecolorallocate方法)作为整个画布的背景色,而后者则需要调用方法对背景指定一个添加好的颜色进行填充。还有一类方法是基于现有的文件来创建画布,如imagecreatefromjpeg方法,从一个现有的jpeg(jpg)格式图片创建画布,参数需要你传入该格式文件所在的路径,所以它的代码可以简单到这样
<?php

    $filename = 'H:\wampserver\wamp\www\html\image\2015.png';  // 一个有效的文件路径

    $image = imagecreatefrompng($filename);  // 从现有文件创建图像

    header('Content-Type: image/png');

    imagepng($image);                        // 输出图像到浏览器

    imagedestroy($image);                    // 释放资源
2. 设置颜色各项参数
GD库绘图时颜色是被分配(allocate)到画布环境中的,不是你想画个啥,临时给个颜色变量就行,调用的是imagecolorallocate方法,原型是
int imagecolorallocate ( resource $image , int $red , int $green , int $blue ),第一个参数是前面创建的图像资源变量,后三个一次是红绿蓝色值,采用RGB三原色佳色法原理,绘制真彩色图像,每一个范围是0~255,当RGB=(255, 255, 255),就是白色,很多地方喜欢用十六进制表示,比如CSS中常见#ffffff(大小写均可),所以R、G、B可分别给值0xff、0xff、0xff,每allocate一次分配一种。看看imagecolorallocate函数原型,你会发现它返回的是int型,所以推测它只是对传入的rgb值合成一个颜色后返回一个编号,rgb真彩色是65535种颜色,这样可以每个颜色对应一个数值编号,最好当然还是用变量,凭空写个颜色数值恐怕很难。
使用imagecreate创建画布时,会将第一种分配的颜色作为画布的背景色(如前),如果是imagecreatetruecolor,则需调用imagefill来填充背景色,方法原型:bool imagefill ( resource $image , int $x , int $y , int $color ),它会将$x和$y附近的点填充为$color颜色,所以使用imagefill的话,基本上要么将背景全部填充为一种颜色,要么不填充(默认黑色)。但是一张画布上作画时,也许你需要背景色,但很可能不会将整张画板都涂上一种背景色,旁边总得留点白纸的地方,所以GD库提供了能将背景填充成各种具体形状的方法,如矩形(imagefilledrectangle)、椭圆(imagefilledecllipse)、圆形(椭圆)或扇形(imagefilledarc)、任意多边形(imagefilledpolygon)等,以椭圆形为例,方法原型:bool imagefilledellipse($image, $cx, $cy, $width, $height, $color),第一个参数资源变量,第二、三个椭圆圆心坐标,四、五设置椭圆宽高度,最后是颜色,简单如此,注意椭圆的宽高度指长轴长度、短轴长度,而非长半轴、短半轴长度
<?php

    $image = imagecreatetruecolor(200, 100);

    $background_color = imagecolorallocate($image, 0x13, 0x71, 0x32);

    // 填充背景为矩形

    imagefilledellipse($image, 100, 50, 200, 100, $background_color);

    header('Content-Type: image/png');

    imagepng($image);

    imagedestroy($image);

3.绘制图像
实际上第2步中的背景色填充就是在绘制图像,只是默认的黑色背景不好看,所以可以先给它填充个另外的颜色。绘图时也讲究个坐标、宽高的问题。老样子,屏幕坐标原点在左上角,水平往右X值学大,竖直向下Y值越大,以像素为单位。除了imagefill外还有:
像素点:imagesetpixel
直线:imageline
矩形:imagerectangle
多边形:imagepolygon
椭圆:imageellipse
圆弧:imagearc
以上的矩形、多边形、椭圆均有对应的填充类型函数,即它们只是画一个简单的形状边线。一段测试代码
<?php

    $width = 200;

    $height = 450;

    // 创建图像,得到一个资源变量

    $img = imagecreatetruecolor($width, $height);

    // 分配颜色

    $orange = imagecolorallocate($img, 0xff, 0x66, 0x33);

    $creamy_white = imagecolorallocate($img, 0xe8, 0xe9, 0xdb);

    $blue = imagecolorallocate($img, 0x1e, 0x90, 0xff);

    $green = imagecolorallocate($img, 0x64, 0xb1, 0x67);

    $red = imagecolorallocate($img, 0xf6, 0x65, 0x78);

    // 填充背景

    imagefill($img, 0, 0, $creamy_white);

    // 画线

    imageline($img, 10, 10, 100, 60, $orange);

    // 画一个填充的矩形

    imagefilledrectangle($img, 10, 70, 160, 150, $blue);

    // 画多边形

    $point_coords = array(10, 160, 50, 170, 120, 270, 5, 250);

    imagepolygon($img, $point_coords, count($point_coords)/2, $green);

    //imagefilledpolygon($img, $point_coords, count($point_coords)/2, $green); // 画一个填充多边形

    // 画一段圆弧

    imagearc($img, 80, 310, 80, 80, 0, 240, $orange);

    // 画一个填充的椭圆

    imagefilledellipse($img, 80, 400, 150, 70, $red);


    header('Content-Type:image/png');

    imagepng($img);  // 生成图像

    imagedestroy($img);  // 释放资源
效果

例如,画直线方法原型:bool imageline(resource $image, int $x1, int $y1, int $x2, int $y2, int $color),x1,y1和x2,y2是线的起点和终点坐标,画直线就是从这个点到哪个点。填充矩形方法中,x1,y1和x2,y2分别对应矩形的左上角和右下角坐标。多边形的方法:bool imagepolygon(resource $image, array $points, int $num_points, int $color),第二个参数$points是个一维数组,里边放着多边形各个顶点的坐标值,最好按照顺时针或逆时针围着多边形写,不会遗漏,第三个参数$num_points是顶点个数,所以是第二个坐标值数组的总数除2,这点要注意。画圆弧imagearc这里是画个弧线,也有对应的imagefilledarc可以画一个填充的饼状弧形。对于画椭圆imagefilledellipse(resource $image, int $cx, int $cy, int $width, int $height, int $color),$cx、$cy是椭圆中心坐标,$width、$height是指长轴长(宽)、短轴长(高)。
4. 绘制文字字符串
除了画这些图形,gd库允许我们画单个字符和字符串,比如水平画一个字符串方法:bool imagestring(resource $image, int $font, int $x, int $y, string $s, int $col),$image是图像句柄,$font是字体类型,gd内置五种字体(貌似除了大小外都差不多)。用int值标识它们(1至5,值越大字越大),传入其中一个即可,$x、$y是坐标值,指一串字符串的左上角的坐标(参考前面例子)。既然强调了水平画一个字符串,不出意外就有竖直方向的,确实有:imagestringup,对于画单个字符同理:imagechar和imagecharup。绘制字符能干什么,最经典的莫过于验证码了,试着写了个简单的验证码类
<?php

    class Validcode

    {

        private $codeNum = 4;   // 验证码个数

        private $width = 80;    // 图像宽度

        private $height = 20;    // 图像高度

        private $image = false;        // 图像句柄

        private static $colors = array();    // 颜色色值

        private $vcodes = '';        // 验证码字符串

        private static $instance = null;    // 当前实例

        private function __construct($num = 4, $width = 80, $height = 20)

        {

            if(!extension_loaded('gd'))

            {

                exit('fatal error: no gd extension!');

            }

            // 规定字符数为3到5个

            if((int)$num < 2 || (int)$num > 5)

            {

                $num = 4;

            }

            $this->codeNum = (int)$num;

            // 限制宽高

            $min_width = (imagefontwidth(5) * $this->codeNum) + 10;

            $min_height = imagefontheight(5) + 10;

            $width < $min_width && $width = $min_width;

            $height < $min_height && $height = $min_height;

            $this->width = $width;

            $this->height = $height;

        }

        // 获取单例

        public static  function getInstance($num = 4, $width = 80, $height = 20)

        {

            if(self::$instance === null)

            {

                self::$instance = new self($num, $width, $height);

            }

            return self::$instance;

        }

        /**

         * 获取图像句柄

         */

        private function getImage()

        {

            if($this->image === false)

                $this->image = imagecreatetruecolor($this->width, $this->height);

            if(!$this->image)

                exit('can not initialize image resource!');

            // 添加一个默认背景色到数组

            self::$colors['yello_back'] = imagecolorallocate($this->image, 0xf5, 0xf5, 0xdc);

        }

        /**

         * 添加颜色

         * @param color array('colorKey'=>array(r,g,b),)

         * 注意格式参数,array(键名=>array(r值, g值, b值),),可一次添加多个

         */

        public function addColors($colors = array())

        {

            if(!is_array($colors))

            {

                echo 'ERROR: pass array of colors data. LINE:'.__LINE__.'<br/>';

                return false;

            }

            if(!$this->image)

            {

                echo 'ERROR: uninilitialized image resource. LINE:'.__LINE__.'<br/>';

                return false;

            }

            // 批量添加颜色

            foreach($colors as $colKey=>$colVal)

            {

                if(!is_array($colVal) || count($colVal) < 3)

                    continue;

                $rgb = array();

                foreach($colVal as $val)

                {

                    $rgb[] = (int)$val;

                }

                self::$colors[$colKey] = imagecolorallocate($this->image, $rgb[0], $rgb[1], $rgb[2]);

            }

            return true;

        }

        /**

         * 设置背景色,请保证$x,$y坐标位于画布内

         * @param colorName string 添加过的颜色对应的名称

         */

        public function fillBackgroundColor($x = 0, $y = 0, $colorName = 'yello_back')

        {

            if($this->image && isset(self::$colors[$colorName]))

            {

                return imagefill($this->image, $x, $y, self::$colors[$colorName]);

            }

            else

            {

                echo 'ERROR: fill background color failed. LINE:'.__LINE__.'<br/>';

                return false;

            }

        }

        /**

         * 创建随机验证码

         */

        private function createVCode()

        {

            $chars = '23456789'.'abcdefghjkmn'.

                     'pqrstuvwxyz'.'ABCDEFG'.

                     'HJKLMNPQRSTUVWXYZ';

            $this->vcodes = '';


            for($i = 0; $i < $this->codeNum; $i++)

            {

                $this->vcodes .= $chars[mt_rand(0, strlen($chars)-1)];

            }

            return true;

        }

        /**

         * 在画布上画出验证码

         * 字体的大小、颜色、位置随机变化

         */

        private function drawVCode()

        {

            if($this->image === false)

                return false;

            if($this->vcodes)

            {

                for($i = 0; $i < $this->codeNum; $i++)

                {

                    $font_size = mt_rand(3, 5);

                    $x = $i * floor($this->width / $this->codeNum) + 2;

                    $y = mt_rand(0, $this->height-imagefontheight($font_size));

                    $color = imagecolorallocate($this->image, mt_rand(0, 128), mt_rand(0, 128), mt_rand(0, 128));

                    imagechar($this->image, $font_size, $x, $y, $this->vcodes[$i], $color);

                }

                return true;

            }

            return false;

        }

        /**

         * 绘制图像

         */

        private function generateImage()

        {

            if(!$this->image)

            {

                echo 'ERROR: invalid image resource. LINE: '.__LINE__.'<br/>';

                return false;

            }

            // 获取当前GD库支持的图片类型,绘制图像

            if(imagetypes() & IMG_PNG)

            {

                header('Content-Type: image/png');

                imagepng($this->image);

            }

            else if(imagetypes() & IMG_JPG)

            {

                header('Content-Type: image/jpg');

                imagejpeg($this->image);

            }

            else if(imagetypes() & IMG_GIF)

            {

                header('Content-Type: image/gif');

                imagegif($this->image);

            }

            else if(imagetypes() & IMG_WBMP)

            {

                header('Content-Type: image/vnd.wap.wbmp');

                imagejpeg($this->image);

            }

            else

            {

                exit('this version do not support creating image!');

            }


        }

        /**

         * 输出图像

         * @param colorName type string|array('key'=>array(int, int, int),)

         */

        public function outputImage($color = 'yello_back', $x = 0, $y = 0)

        {

            // 初始化图像资源变量

            $this->getImage();

            // 创建验证码字符串

            $this->createVCode();

            // 填充背景色

            if(is_string($color) && isset(self::$colors[$color])) //传入字符串时判断已有颜色数组中是否有

            {

                $this->fillBackgroundColor($x, $y, $color);

            }

            else if(is_array($color) && count($color) == 1 && $this->addColors($color)) // 传入数组进行添加和填充,只能传入一种颜色

            {

                $colorName = array_keys($color);

                $this->fillBackgroundColor($x, $y, $colorName[0]);

            }

            else      // 否则使用默认背景色填充

            {

                $this->fillBackgroundColor($x, $y, 'yello_back');

            }

            // 画验证码字符

            $this->drawVCode();

            // 生成图像

            $this->generateImage();

            return '';

        }

        /**

         * 释放资源

         */

        public function __destruct()

        {

            if($this->image)

                imagedestroy($this->image);

        }

    }

    // test1: 默认4个字符

    $vcodeObj = Validcode::getInstance();

    $vcodeObj->outputImage();*/

    /*

    // test2: 3个字符

    $vcodeObj = Validcode::getInstance(3);

    $vcodeObj->outputImage(); // 3个字符*/

    /*

    // test3: 设置成5个字符,且图片长宽不合理,使用对象内部调节

    $vcodeObj = Validcode::getInstance(5, 1, 1);

    // 输出时传入颜色值,替换背景色

    $vcodeObj->outputImage(array('col'=>array(255, 255, 0)));

    */
三个测试输出的结果:


效果还行,首先是构造函数,来设置长宽和生成验证码个数,个数定为3到5个,长宽设置最小的话要容得下几个字符的宽度(测试3),否则就有显示不完全了,$codeNum为验证码个数,$weight、$height为图像宽高,$image为图像句柄变量,$colors是一个数组存放可能用到的背景色,$vcodes是验证码字符串。getImage方法获取图像句柄,并添加一个默认的颜色值,作为备用。addColors方法可批量添加颜色,fillBackgroundColor执行填充图像背景色,createVCode创建随机验证码,大小写、数字随机组合,drawVCode在画布上画出验证码,这里要保证验证均匀分布在画布上,上下高度随机,颜色随机。generateImage根据当前支持的图片类型,设置头信息,参考官网手册的示例代码。
最后一个outputImage接口是将以上方法组合,第一个参数允许在输出验证码时用传递的色值代替当前备用的背景色,也可传入字符串名,在背景色中寻找对应色值数组并填充,当然addColors是公有的接口,也可先调用它添加你的背景色值,再调fillBackgroundColor填充,再调用outputImage传入对应颜色键名即可。需要注意的是,fillBackgroundColor方法填充背景色时,坐标值$x、$y一定要调整在画布内,否则填充无效,这里只是简单演示,图片位于浏览器左上角,所以直接是(0,0),放到页面其他位置的话注意计算坐标,这里是尽量图简单了。
不仅是验证码了,图片加水印也可以这么干,一个道理~
前面输出英文字符串后,自然而然,我们就可以想到能否绘制中文,确实可以。前面说了GD库中有个FreeType的字体引擎,而php提供了imagefttext和imagettf两个方法前者是
将FreeType 2 字体写入图像,后者是将TrueType字体写入图像,查了下,这个TrueType算是FreeType的子成员,所以前者所支持的字体库更多,用它更有保证。实际上Win上面自带有字体,在C:\Windows\Fonts(C盘为安装盘时)下面,好像不是每种都能拿来用,选了一个黑体玩一下
<?php


    $width = 300; $heiht = 300;

    $image = imagecreatetruecolor($width, $heiht);


    $yellow = imagecolorallocate($image, 0xff, 0xe6, 0xa4);

    $blue = imagecolorallocate($image, 0x40, 0x99, 0xff);

    // 填充背景

    imagefilledrectangle($image, 0, 0, $width, $heiht, $yellow);

    // 字体文件

    //$fontfile = str_replace('\\', '/', 'C:\Windows\Fonts\simsun.ttc');

    $fontfile = str_replace('\\', '/', 'C:\Windows\Fonts\simhei.ttf');


    $text = '世界如此美妙,我却如此暴躁';

    // 需要转换编码吗?

    //$text = iconv('ANSI', 'UTF-8', $text);

    // 画文字,text需要时UTF-8编码

    imagettftext($image, 12, 0, 20, 50, $blue, $fontfile, $text);

    // 输出图像

    header('Content-Type:image/png');

    imagepng($image);

    imagedestroy($image);
效果: 
在使用字体时,偶发现simsun.ttc这个是简体中文,扩展是.ttc,但是用imagettftext也能用。另,如果你的编辑器编辑的代码不是UTF-8编码,需要使用iconv将文本编码转换过来,特别是文本变量是从数据库中读取时,但是你懂的,什么ANSI、GBK、GB2312等转换为UTF-8时,不出意外会是乱码-_-#。既然能用字体了,就到网上扒了几个免费字体玩了下(比如这个http://www.freefontscenter.com/),这个测试程序前提是需要下载对应字体文件,放到指定目录,注意有的字体扩展是.otf,这个OpenType字体,用imagettftext就不行啦,要用imagefttext ~
<?php


    $width = 600; $heiht = 150;

    $image = imagecreatetruecolor($width, $heiht);

    // 添加颜色

    $blue = imagecolorallocate($image, 0x40, 0x99, 0xff); #229cdc

    $green = imagecolorallocate($image, 0x59, 0x98, 0x3b);

    $yellow = imagecolorallocate($image, 0xff, 0xe6, 0xa4);

    // 填充背景

    imagefilledrectangle($image, 0, 0, $width, $heiht, $yellow);


    $text = 'lazycat';

    // 1

    $fontfile = str_replace('\\', '/', 'G:\wamp\fonts\Maiandra_GD.ttf');

    imagefttext($image, 17, 0, 5, 50, $green, $fontfile, $text);

    // 2

    $fontfile = str_replace('\\', '/', 'G:\wamp\fonts\black_jack.ttf');

    imagefttext($image, 17, 0, 85, 50, $green, $fontfile, $text);

    // 3

    $fontfile = str_replace('\\', '/', 'G:\wamp\fonts\OpenSans-Italic.ttf'); //

    imagefttext($image, 17, 0, 155, 50, $green, $fontfile, $text);

    // 4

    $fontfile = str_replace('\\', '/', 'G:\wamp\fonts\Amatic-Bold.ttf');

    imagefttext($image, 17, 0, 235, 50, $green, $fontfile, $text);

    // 5

    $fontfile = str_replace('\\', '/', 'G:\wamp\fonts\free\Santana-RegularCondensed.ttf');

    imagefttext($image, 17, 0, 290, 50, $green, $fontfile, $text);

    // 6

    $fontfile = str_replace('\\', '/', 'G:\wamp\fonts\free\veteran_typewriter.ttf');

    imagefttext($image, 17, 0, 345, 50, $green, $fontfile, $text);

    // 7

    $fontfile = str_replace('\\', '/', 'G:\wamp\fonts\free\LondrinaOutline-Regular.ttf');

    imagefttext($image, 20, 0, 440, 50, $green, $fontfile, $text);

    // 8

    $fontfile = str_replace('\\', '/', 'G:\wamp\fonts\free\SCRATCHM.ttf');

    imagefttext($image, 17, 0, 5, 100, $green, $fontfile, $text);

    // 9

    $fontfile = str_replace('\\', '/', 'G:\wamp\fonts\free\tiza.ttf');

    imagefttext($image, 17, 0, 150, 100, $green, $fontfile, $text);

    // 10

    $fontfile = str_replace('\\', '/', 'G:\wamp\fonts\free\texgyrecursor-regular.otf');

    imagefttext($image, 17, 0, 325, 100, $green, $fontfile, $text);

    // 11

    $fontfile = str_replace('\\', '/', 'G:\wamp\fonts\free\yukarimobil.ttf');

    imagefttext($image, 17, 0, 430, 100, $green, $fontfile, $text);

    // 输出图像

    header('Content-Type:image/png');

    imagepng($image);

    imagedestroy($image);
效果:

非常炫酷有木有!>3<