SpringBoot
一、SpringBoot 入门
**时代在变化(Spring全家桶时代):**J2EE ->SSH ->SSM ->Spring全家桶
Spring Boot的简介:Spring Boot来简化Spring应用开发,去除J2EE笨重的开发、繁多的配置、低下的开发效率、复杂的部署流程、减轻第三方技术的集成难度。(Spring的升级版)
一句话:自动装配,约定大于配置
Spring Boot学习文档:https://docs.spring.io/spring-boot/docs/2.2.6.RELEASE/reference/html/using-spring-boot.html#using-boot
1.1 spring boot探究
- pom文件
- 父项目
- 启动器
- 主程序类,主入口类
1.2 父项目
	<groupId>com.jsongroupId>
    <artifactId>hello_worldartifactId>
    <version>0.0.1-SNAPSHOTversion>


<parent>
    <groupId>org.springframework.bootgroupId>
    <artifactId>spring-boot-starter-parentartifactId>
    <version>1.5.9.RELEASEversion>
parent>


<parent>
  <groupId>org.springframework.bootgroupId>
  <artifactId>spring-boot-dependenciesartifactId>
  <version>1.5.9.RELEASEversion>
  <relativePath>../../spring-boot-dependenciesrelativePath>
parent>
spring-boot-dependencies管理Spring Boot应用中所有的依赖的版本,导入依赖默认是不需要版本,因为spring-boot-dependencies中存放jar的版本号
注意:没有在dependencies中管理的依赖自然需要声明版本号
1.3 启动器
<dependency>
    <groupId>org.springframework.bootgroupId>
    <artifactId>spring-boot-starter-webartifactId>
dependency>
<dependency>
    <groupId>org.springframework.bootgroupId>
    <artifactId>spring-boot-starterartifactId>
dependency>
spring-boot-starter:spring boot场景启动器,spring boot 将J2EE中应用的模块整合到一个个starter中。例如用到web模块,导入spring-boot-starter-web即可导入所需的jar依赖组件
要用什么功能就导入什么场景的启动器
…省略
https://docs.spring.io/spring-boot/docs/2.2.5.RELEASE/reference/html/using-spring-boot.html#using-boot-starter
1.4 主入口类
/**
 *  @SpringBootApplication 来标注一个主程序类,说明这是一个Spring Boot应用
 */
package com.json;

import org.springframework.boot.SpringApplication;
import org.springframework.boot.autoconfigure.SpringBootApplication;

@SpringBootApplication
public class HelloWorldApplication {

    public static void main(String[] args) {

        //Spring Boot应用启动
        SpringApplication.run(HelloWorldApplication.class, args);
    }
}
1、@SpringBootApplication
@SpringBootApplication: Spring Boot应用标注在某个类上说明这个类是SpringBoot的主配置类,SpringBoot就应该运行这个类的main方法来启动SpringBoot应用
// @interface SpringBootApplication
@Target(ElementType.TYPE)
@Retention(RetentionPolicy.RUNTIME)
@Documented
@Inherited
@SpringBootConfiguration
@EnableAutoConfiguration
@ComponentScan(excludeFilters = { @Filter(type = FilterType.CUSTOM, classes = TypeExcludeFilter.class),
		@Filter(type = FilterType.CUSTOM, classes = AutoConfigurationExcludeFilter.class) })
public @interface SpringBootApplication {
2、@SpringBootConfiguration
@SpringBootConfiguration:标注在类上表示为 Spring Boot 的配置类,配置类也是容器中的一个组件@Component
//@interface SpringBootConfiguration
@Target(ElementType.TYPE)
@Retention(RetentionPolicy.RUNTIME)
@Documented
@Configuration
public @interface SpringBootConfiguration {

//@interface Configuration
@Target(ElementType.TYPE)
@Retention(RetentionPolicy.RUNTIME)
@Documented
@Component
public @interface Configuration {
3、@EnableAutoConfiguration
@EnableAutoConfiguration:开启自动配置功能(核心注解)
@Target(ElementType.TYPE)
@Retention(RetentionPolicy.RUNTIME)
@Documented
@Inherited
@AutoConfigurationPackage
@Import(AutoConfigurationImportSelector.class)
public @interface EnableAutoConfiguration {
@AutoConfigurationPackage中的@Import注解导入静态内部类Registrar.class,其register()方法将主配置类(@SpringBootApplication标注的类)的所在包及下面所有子包里面的所有组件扫描到Spring容器
@Target(ElementType.TYPE)
@Retention(RetentionPolicy.RUNTIME)
@Documented
@Inherited
@Import(AutoConfigurationPackages.Registrar.class)
public @interface AutoConfigurationPackage {

    static class Registrar implements ImportBeanDefinitionRegistrar, DeterminableImports {

		@Override
		public void registerBeanDefinitions(AnnotationMetadata metadata, BeanDefinitionRegistry registry) {
			//getPackageName获取主类包的名称,扫描该包及该包下的所有组件到SpringIOC容器中
            register(registry, new PackageImport(metadata).getPackageName());
		}
@Import(AutoConfigurationImportSelector.class)给容器中导入一个组件AutoConfigurationImportSelector类,该类会加载SpringBoot所需的自动配置类,将所有需要导入自动配置类以全类名的方式返回,这些组件就会被添加到容器中
public class AutoConfigurationImportSelector {
	protected AutoConfigurationEntry getAutoConfigurationEntry(AutoConfigurationMetadata autoConfigurationMetadata,
			AnnotationMetadata annotationMetadata) {
		if (!isEnabled(annotationMetadata)) {
			return EMPTY_ENTRY;
		}
		AnnotationAttributes attributes = getAttributes(annotationMetadata);
		//获取所有候选的自动配置类的全类名,并存在List集合中
        List<String> configurations = getCandidateConfigurations(annotationMetadata, attributes);
		configurations = removeDuplicates(configurations);
		Set<String> exclusions = getExclusions(annotationMetadata, attributes);
		checkExcludedClasses(configurations, exclusions);
		configurations.removeAll(exclusions);
		configurations = filter(configurations, autoConfigurationMetadata);
		fireAutoConfigurationImportEvents(configurations, exclusions);
		//返回AutoConfigurationEntry(封装了存放自动配置类的List和Set集合)
        return new AutoConfigurationEntry(configurations, exclusions);
	}

    protected List<String> getCandidateConfigurations(AnnotationMetadata metadata, AnnotationAttributes attributes) {
        List<String> configurations = SpringFactoriesLoader.loadFactoryNames(getSpringFactoriesLoaderFactoryClass(),
				getBeanClassLoader());
		Assert.notEmpty(configurations, "No auto configuration classes found in META-INF/spring.factories. If you "
				+ "are using a custom packaging, make sure that file is correct.");
		return configurations;
	}

    public static List<String> loadFactoryNames(Class<?> factoryType, @Nullable ClassLoader classLoader) {
		String factoryTypeName = factoryType.getName();
		return loadSpringFactories(classLoader).getOrDefault(factoryTypeName, Collections.emptyList());
	}


    //定义自动配置类的全类名的路径
    public static final String FACTORIES_RESOURCE_LOCATION = "META-INF/spring.factories";

    //加载工厂的名称
    private static Map<String, List<String>> loadSpringFactories(@Nullable ClassLoader classLoader) {
		MultiValueMap<String, String> result = cache.get(classLoader);
		if (result != null) {
			return result;
		}

		try {
			Enumeration<URL> urls = (classLoader != null ?
                    //在FACTORIES_RESOURCE_LOCATION路径下加载配置文件
					classLoader.getResources(FACTORIES_RESOURCE_LOCATION) :
					ClassLoader.getSystemResources(FACTORIES_RESOURCE_LOCATION));
			result = new LinkedMultiValueMap<>();
			while (urls.hasMoreElements()) {
				URL url = urls.nextElement();
				UrlResource resource = new UrlResource(url);
                //将FACTORIES_RESOURCE_LOCATION路径下的配置文件封装到properties类中
				Properties properties = PropertiesLoaderUtils.loadProperties(resource);
				for (Map.Entry<?, ?> entry : properties.entrySet()) {
					String factoryTypeName = ((String) entry.getKey()).trim();
					for (String factoryImplementationName : StringUtils.commaDelimitedListToStringArray((String) entry.getValue())) {
						//将所有配置类的全类名存放到Map集合中
                        result.add(factoryTypeName, factoryImplementationName.trim());
					}
				}
			}
			cache.put(classLoader, result);
            //返回Map
			return result;
		}
		catch (IOException ex) {
			throw new IllegalArgumentException("Unable to load factories from location [" +
					FACTORIES_RESOURCE_LOCATION + "]", ex);
		}
	}
总结:AutoConfigurationImportSelector类会给容器中导入非常多的自动配置类(xxxAutoConfifiguration),就是给容器中导入这个场景需要的所有组件, 并配置好这些组件,这些自动配置类容纳了J2EE所有的场景
这些自动配置类存放在spring-boot-autoconfigure\2.2.5.RELEASE\spring-boot-autoconfigure.jar中
1.5resources目录结构
- statics:保存所有的静态资源; js css images
- templates:保存所有的模板页面(SpringBoot内置了嵌入式Tomcat,打包方式为jar,所以不支持jsp),可以使用模板引擎(thymeleaf,freemarker)
- application.properties:SpringBoot的配置文件
二、Spring Boot配置
Spring Boot使用一个全局的配置文件,配置文件名是固定的
- application.properties
- application.yml
配置文件的作用:修改SpringBoot自动配置的默认值
2.1 yml配置文件
.yml是YAML (YAML Ain’t Markup Language)语言的文件,以数据为中心,比json、xml等更适合做配置文件
参考语法规范 http://www.yaml.org/
2.1.1 YAML语法
- 使用缩进表示层级关系
- 缩进时不允许使用Tab键,只允许使用空格
- 缩进的空格数目不重要,只要相同的元素级别左侧对齐
- 大小写敏感
对比:
properties
#设置端口号
server.port=8888
yml
#设置端口号
server:
  port: 8888
xml
<server>
	<port>8888port>
server>
注意:
- key:(空格)value:表示一对键值对(空格必须有)
- 以空格的缩进来控制层级关系
- 只要是左对齐的一列数据,都是同一个层级的
2.1.2 YAML支持的三种数据结构
- 字面量:单个的,不可再分的值
- 对象:键值对的集合
- 数组:一组按次序排列的值
字面量: 普通的值(数字、字符串、布尔值)
- key: value (直接写字面值)
- 字符串默认不用加**“ ”或‘ ’**
- “ ”:双引号,不会转义特殊字符,特殊字符会作为本身想表示的意思
- name: “json \n list” 输出:json 换行 list
- ‘ ’:会转义特殊字符,特殊字符最终只是一个普通的字符串数据
- name: “json \n list” 输出:json \n list
对象、Map
方式一:使用缩进写法
student:
  name: json
  age: 22
方式二:行内写法(使用大括号,属性用逗号隔开)
student: {name: jack , age: 22}
数组集合(List、Set)
方式一:使用缩进写法,用**“ - ”**表示数组中的一个元素
pets:
  - cat
  - dog
  - pig
方式二:行内写法(使用中括号,元素用逗号隔开)
pets: [cat,dog,pig]
2.2 配置文件注入对象
yml
person:
  name: json
  age: 23
  boss: false
  birthday: 1995/7/12
  maps: {k1: v1,k2: v2}
  list:
    - element1
    - element2
    - element3
  pet:
    name: dog
    age: 3
properties
person.last-name=叶俊杰
person.list=list1,list2,list3
person.maps.key1=value1
person.maps.key2=value2
person.maps.key3=value3
person.pet.name=pig
person.pet.age=4
JavaBean
/*
将配置文件中配置的每一个属性的值,映射到这个组件中
@ConfigurationProperties:
告诉SpringBoot将本类中的所有属性和配置文件中相关的配置进行绑定;
prefix = "person":配置文件中哪个下面的所有属性进行一一映射
只有这个组件是容器中的组件,才能容器提供的@ConfigurationProperties功能
*/
@Component
@ConfigurationProperties(prefix = "person")
public class Person {

    private String name ;
    private Integer age ;
    private Boolean boss ;
    private Date birthday ;
    private Map<String,Object> maps ;
    private List<Object> list ;
    private Pet pet ;

    @Override
    public String toString() {
        return "Person{" +
                "name='" + name + '\'' +
                ", age=" + age +
                ", boss=" + boss +
                ", birthday=" + birthday +
                ", maps=" + maps +
                ", list=" + list +
                ", pet=" + pet +
                '}';
    }
}

public class Pet {

    private String name ;
    private Integer age ;

    @Override
    public String toString() {
        return "Pet{" +
                "name='" + name + '\'' +
                ", age=" + age +
                '}';
    }
}
输出结果:
@ConfigurationProperties:将配置文件中配置的每一个属性的值映射到指定的JavaBean,prefix属性指定JavaBean与配置文件中的哪个属性进行绑定(prefix=“xxx”)
注意:只要是Spring容器中的JavaBean才能使用@ConfigurationProperties进行绑定
		<dependency>
            <groupId>org.springframework.bootgroupId>
            <artifactId>spring-boot-configuration-processorartifactId>
            <optional>trueoptional>
        dependency>
导入该依赖在绑定时有相应的提示(鸡肋,可以忽略)
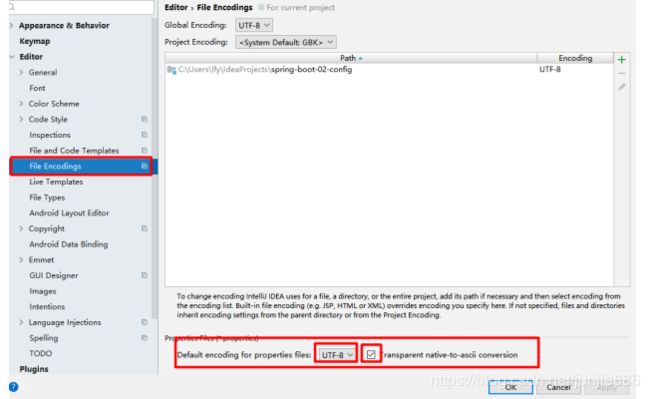
解决properties配置文件中文乱码问题
2.3 属性名匹配规则
- person.firstName:使用标准方式
- person…first-name:大写用-
- person.first_name:大写用_
- PERSON_FIRST_NAME:
properties
person.last-name=json
yml
person:
  LAST_NAME: json
JavaBean
@Component
@ConfigurationProperties(prefix = "person")
public class Person {

    private String lastName ;
2.4 @Value赋值
使用注解@Value也可以给指定一个属性赋值(可以从配置文件中动态获取)
yml
person:
  LAST_NAME: json
JavaBean
@Component
public class Person {

    @Value("${person.last-name}")
    private String lastName ;
    @Value("#{1*10}")
若properties、yaml、@Value都给属性注入了值,优先级为:
properties > yaml > @Value
使用场景:
- 是在某个业务逻辑中需要获取一下配置文件中的某项值,使用@Value
- 编写了一个JavaBean来和配置文件进行映射,我们就直接使用@ConfifigurationProperties
@Value获取值和@ConfigurationProperties获取值比较
| @ConfigurationProperties | @Value | |
|---|---|---|
| 功能 | 批量注入配置文件中的属性 | 一个个指定注入 |
| 松散语法 | 支持 | 不支持 |
| EL表达式 | 不支持 | 支持 |
| JSR303数据校验 | 支持 | 不支持 |
| 复杂类型封装 | 支持 | 不支持 |
JSR303数据检验
使用**@Validated**进行检验,非法数据则会抛出异常
@Component
@ConfigurationProperties(prefix = "person")
@Validated
public class Person {

    //判断是否为邮箱类型
    @Email
    private String lastName ;
    private Integer age ;
    private Boolean boss ;
    //判断日期的格式化
    @DateTimeFormat(pattern = "yyyy-MM-dd")
    private Date birthday ;
校验结果:
2.5 @PropertySource联合赋值
@ConfigurationProperties为全局配置,自定义properties配置文件绑定JavaBean赋值使用**@PropertiesSource**注解
@Component
@PropertySource("classpath:person.properties")
@ConfigurationProperties(prefix = "person")
public class Person {

    private String lastName ;
    private Integer age ;
    private Boolean boss ;
    private Date birthday ;
    private Map<String,Object> maps ;
    private List<Object> list ;
    private Pet pet ;
person.properties配置文件
person.last-name=json
person.list=list1,list2,list3
person.maps.key1=value1
person.maps.key2=value2
person.maps.key3=value3
person.pet.name=pig
person.pet.age=4
注意:
- 绑定必须加上注解**@ConfigurationProperties**(prefix = “person”)
- 必须为.properties文件,不能为.yml文件
@Value也可以与@PropertiesSource联合使用,若在application.properties或.yml中有定义,优先级为**.properties>.yml>@PropertiesSource加载的Properties配置文件**
@Component
@PropertySource("classpath:person.properties")
public class Person {

    @Value("person.last-name")
    private String lastName ;
    private Integer age ;
    private Boolean boss ;
    private Date birthday ;
    private Map<String,Object> maps ;
    private List<Object> list ;
    private Pet pet ;
person.properties
person.last-name=json
person.list=list1,list2,list3
person.maps.key1=value1
person.maps.key2=value2
person.maps.key3=value3
person.pet.name=pig
person.pet.age=4
yml
person:
	last-name: marry
此时会注入marry
@PropertiesSource只是加载局部的配置文件到项目中,无法直接赋值,需要通过@Value或
@ConfigurationProperties赋值或绑定
2.6 @ImportResource加载Spring配置文件
Spring Boot中没有Spring的配置文件(.xml),自定义的配置文件需要使用注解**@ImportResource**加载(在主启动类上标注)
自定义配置文件conf.xml
<beans xmlns="http://www.springframework.org/schema/beans"
       xmlns:xsi="http://www.w3.org/2001/XMLSchema-instance"
       xsi:schemaLocation="http://www.springframework.org/schema/beans http://www.springframework.org/schema/beans/spring-beans.xsd">

    <bean id="pet" class="com.json.pojo.Pet" scope="prototype">
        <property name="name" value="cat" />
        <property name="age" value="23" />
    bean>
beans>
@ImportResource加载配置文件
@SpringBootApplication
@ImportResource(locations = "classpath:conf.xml")
public class HelloWorldApplication {

    public static void main(String[] args) {
        SpringApplication.run(HelloWorldApplication.class, args);
    }

}
2.7 配置类注入Bean(@Configuration)
SpringBoot推荐给容器中添加组件的方式为使用全注解的方式
- 编写一个类标注**@Configuration**作为配置类(该类也为Spring容器中的组件)
- 使用注解**@Bean**给容器中添加组件
/*
	@Configuration:指明当前类是一个配置类
	就是来替代之前的xml配置文件
*/
@Configuration
public class MyConfiguration {

    //将方法的返回值添加到容器中,容器中这个组件默认的id就是方法名
    @Bean
    public Pet getPet(){
        Pet pet = new Pet();
        pet.setName("pig");
        pet.setAge(4);
        return pet ;
    }
}
2.8 配置文件占位符
- 随机数
- ${random.int} 随机一个int
- ${random.long} 随机一个long
- ${random.uuid} 随机字符串
- ${random.value} 随机字符串
- 取配置的值,没有可以指定默认值
- ${person.hello:默认值} (:后面不能跟空格)
person:
  last-name: json${random.uuid}
  age: ${random.int}
  list:
    - ${person.last-name}
    - ${person.hello:hello}
2.9 Profile多环境切换
2.10 配置文件的加载位置
2.11 外部配置文件加载顺序
三、自动配置原理(重点)
官方定义配置文件中可以配置的所有属性:https://docs.spring.io/spring-boot/docs/2.2.5.RELEASE/reference/htmlsingle/#common-application-properties
3.1 自动配置类的加载过程
SpringBoot中存在大量的xxxAutoConfiguration的自动配置类,SpringBoot在启动时会加载这些自动配置类,SpringBoot的自动配置是依赖这些自动配置类实现的。
自动配置类的加载过程:
-
SpringBoot启动时加载主配置类,开启自动配置功能**@EnableAutoConfiguration**
-
@EnableAutoConfiguration的作用:
-
@Import(AutoConfigurationImportSelector.class)导入了一个自动配置导入选择器的类
@AutoConfigurationPackage @Import(AutoConfigurationImportSelector.class) public @interface EnableAutoConfiguration { -
AutoConfigurationImportSelector给容器中导入一些自动配置类
-
调用getAutoConfigurationEntry()方法中getCandidateConfigurations方法获取所有的候选的自动配置类
protected AutoConfigurationEntry getAutoConfigurationEntry(AutoConfigurationMetadata autoConfigurationMetadata, AnnotationMetadata annotationMetadata) { if (!isEnabled(annotationMetadata)) { return EMPTY_ENTRY; } AnnotationAttributes attributes = getAttributes(annotationMetadata); //获取所有的候选的自动配置类 List<String> configurations = getCandidateConfigurations(annotationMetadata, attributes); configurations = removeDuplicates(configurations); Set<String> exclusions = getExclusions(annotationMetadata, attributes); checkExcludedClasses(configurations, exclusions); configurations.removeAll(exclusions); configurations = filter(configurations, autoConfigurationMetadata); fireAutoConfigurationImportEvents(configurations, exclusions); return new AutoConfigurationEntry(configurations, exclusions); } -
getCandidateConfigurations()方法中使用SpringFactoriesLoader类加载器加载配置文件中的自动配置类
protected List<String> getCandidateConfigurations(AnnotationMetadata metadata, AnnotationAttributes attributes) { //SpringFactoriesLoader类加载类加载配置文件的自动配置类 List<String> configurations = SpringFactoriesLoader.loadFactoryNames(getSpringFactoriesLoaderFactoryClass(), getBeanClassLoader()); Assert.notEmpty(configurations, "No auto configuration classes found in META-INF/spring.factories. If you " + "are using a custom packaging, make sure that file is correct."); return configurations; } -
loadFactoryNames方法加载具体的自动配置类的全类名,将这些类名包装成Properties对象,然后添加到Spring容器中
public final class SpringFactoriesLoader { //自动配置类的配置文件路径 public static final String FACTORIES_RESOURCE_LOCATION = "META-INF/spring.factories"; public static List<String> loadFactoryNames(Class<?> factoryType, @Nullable ClassLoader classLoader) { //得到EnableAutoConfiguration.class的名称 String factoryTypeName = factoryType.getName(); //返回加载完的自动配置类的List集合 return loadSpringFactories(classLoader).getOrDefault(factoryTypeName, Collections.emptyList()); } private static Map<String, List<String>> loadSpringFactories(@Nullable ClassLoader classLoader) { MultiValueMap<String, String> result = cache.get(classLoader); if (result != null) { return result; } try { //将加载的自动配置类的信息保存在 urls 中 Enumeration<URL> urls = (classLoader != null ? //类加载器加载FACTORIES_RESOURCE_LOCATION路径的配置文件(MATA-INF/spring.factories) classLoader.getResources(FACTORIES_RESOURCE_LOCATION) : ClassLoader.getSystemResources(FACTORIES_RESOURCE_LOCATION)); result = new LinkedMultiValueMap<>(); //判断urls是否还有元素(迭代器模式) while (urls.hasMoreElements()) { URL url = urls.nextElement(); UrlResource resource = new UrlResource(url); //将自动配置类封装到Properties类中 Properties properties = PropertiesLoaderUtils.loadProperties(resource); for (Map.Entry<?, ?> entry : properties.entrySet()) { String factoryTypeName = ((String) entry.getKey()).trim(); for (String factoryImplementationName : StringUtils.commaDelimitedListToStringArray((String) entry.getValue())) { //添加在Map集合中 result.add(factoryTypeName, factoryImplementationName.trim()); } } } cache.put(classLoader, result); //返回Map集合 return result; } catch (IOException ex) { throw new IllegalArgumentException("Unable to load factories from location [" + FACTORIES_RESOURCE_LOCATION + "]", ex); } } -
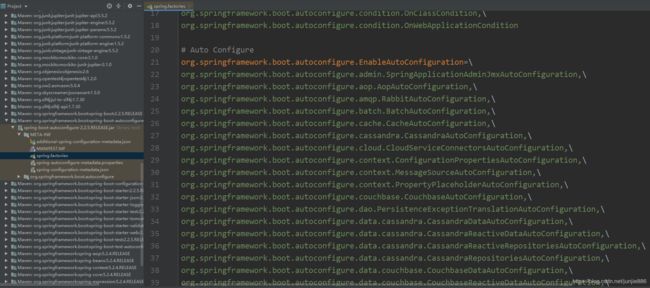
SpringBoot中所有的自动配置类都存放在spring-boot-autoconfigure-.jar\ META-INF\spring.factories路径下的配置文件
-
有了这些自动配置类,就可以自动配置了
-
3.2 自动配置原理
每一个这样的 xxxAutoConfifiguration类都是容器中的一个组件,都加入到容器中,用他们来做自动配置,自动配置类也会给容器中添加组件
以HttpEncodingAutoConfiguration自动配置类为例,剖析自动配置原理:
//表示为一个配置类
@Configuration(proxyBeanMethods = false)
/*
	开启ConfigurationProperties的功能
	将配置文件中对应的值和HttpEncodingProperties绑定起来
	并把 HttpProperties加入到ioc容器中
*/
@EnableConfigurationProperties(HttpProperties.class)
//判断是否为Web应用,如果是Web应用,该配置类才能生效
@ConditionalOnWebApplication(type = ConditionalOnWebApplication.Type.SERVLET)
//判断是有指定的类
@ConditionalOnClass(CharacterEncodingFilter.class)
@ConditionalOnProperty(prefix = "spring.http.encoding", value = "enabled", matchIfMissing = true)
public class HttpEncodingAutoConfiguration {
@EnableConfigurationProperties(HttpProperties.class)表示开启@ConfigurationProperties的功能,@ConfigurationProperties注解将配置文件中属性的值和HttpProperties.class该类绑定起来,并把HttpProperties类加入到Spring容器中
@ConfigurationProperties(prefix = "spring.http")
public class HttpProperties {

	private boolean logRequestDetails;

	private final Encoding encoding = new Encoding();

	public static class Encoding {

		public static final Charset DEFAULT_CHARSET = StandardCharsets.UTF_8;

		private Charset charset = DEFAULT_CHARSET;

		private Boolean force;

		private Boolean forceRequest;

		private Boolean forceResponse;
所以在配置文件可以配的属性以prefix=spring.http为前缀,HttpProperties类中的属性都可以在配置文件中指定,这些属性可以设置默认值,如果想自定义就可以在配置文件重新赋值
spring.http.encoding.charset=utf-8
spring.http.log-request-details=true
spring.http.encoding.enabled=true
spring.http.encoding.force=true
根据当前不同的条件判断,决定这个HttpEncodingAutoConfiguration配置类是否生效,一旦生效
HttpEncodingAutoConfiguration自动配置类给Spring容器添加组件CharacterEncodingFilter类和LocaleCharsetMappingsCustomizer类,CharacterEncodingFilter类中所需要的属性从HttpProperties类中获取
public class HttpEncodingAutoConfiguration {

    private final HttpProperties.Encoding properties;

    /*
    	HttpProperties类作为形参构造HttpEncodingAutoConfiguration自动配置类
   		@EnableConfigurationProperties又将HttpProperties加入到Spring容器
   		因此创建HttpEncodingAutoConfiguration配置类时,会从Spring容器中获取
   		HttpProperties实例作为形参
    */
	public HttpEncodingAutoConfiguration(HttpProperties properties) {
		this.properties = properties.getEncoding();
	}

    /*
    	给Spring容器中添加CharacterEncodingFilter类
    */
	@Bean
    //判断容器中是否存在该Bean,如果不存在,才加入Spring容器
	@ConditionalOnMissingBean
	public CharacterEncodingFilter characterEncodingFilter() {
		CharacterEncodingFilter filter = new OrderedCharacterEncodingFilter();
        //设置filter的属性都是从HttpProperties.Encoding中获取
		filter.setEncoding(this.properties.getCharset().name());
		filter.setForceRequestEncoding(this.properties.shouldForce(Type.REQUEST));
		filter.setForceResponseEncoding(this.properties.shouldForce(Type.RESPONSE));
		return filter;
	}

    @Bean
	public LocaleCharsetMappingsCustomizer localeCharsetMappingsCustomizer() {
		return new LocaleCharsetMappingsCustomizer(this.properties);
	}
3.3 xxxProperties类
每一个xxxAutoConfiguration自动配置类都有对应的xxxProperties类,xxxAutoConfiguration若能生效,会通过**@Bean注解给Spring容器中导入一些组件,这些组件需要的属性的值都在xxxProperties获取,而xxxProperties类标注@ConfigurationProperties**注解,与配置文件绑定起来,xxxProperties类中的属性可以在配置文件(.properties,.yml)中配置
WebMvcAutoConfiguration自动配置类与WebMvcProperties、ResourceProperties类
@Configuration(proxyBeanMethods = false)
@ConditionalOnWebApplication(type = Type.SERVLET)
@ConditionalOnClass({ Servlet.class, DispatcherServlet.class, WebMvcConfigurer.class })
@ConditionalOnMissingBean(WebMvcConfigurationSupport.class)
@AutoConfigureOrder(Ordered.HIGHEST_PRECEDENCE + 10)
@AutoConfigureAfter({ DispatcherServletAutoConfiguration.class, TaskExecutionAutoConfiguration.class,
		ValidationAutoConfiguration.class })
//Web自动配置类
public class WebMvcAutoConfiguration {

    @Configuration(proxyBeanMethods = false)
	@Import(EnableWebMvcConfiguration.class)
	//开启ConfigurationProperties绑定功能,给容器导入WebMvcProperties和ResourceProperties类
    @EnableConfigurationProperties({ WebMvcProperties.class, ResourceProperties.class })
	@Order(0)
	//Web静态内部类
    public static class WebMvcAutoConfigurationAdapter implements WebMvcConfigurer {

        @Bean
		@ConditionalOnMissingBean({ RequestContextListener.class, RequestContextFilter.class })
		@ConditionalOnMissingFilterBean(RequestContextFilter.class)
		public static RequestContextFilter requestContextFilter() {
			return new OrderedRequestContextFilter();
		}
}


//与配置文件绑定,prefix = "spring.mvc",该类的属性均可以在配置文件中配置
@ConfigurationProperties(prefix = "spring.mvc")
public class WebMvcProperties {

	private DefaultMessageCodesResolver.Format messageCodesResolverFormat;

	private Locale locale;

	private LocaleResolver localeResolver = LocaleResolver.ACCEPT_HEADER;

	private String dateFormat;

//与配置文件绑定,prefix = "spring.resources",该类的属性均可以在配置文件中配置
@ConfigurationProperties(prefix = "spring.resources", ignoreUnknownFields = false)
public class ResourceProperties {

	private static final String[] CLASSPATH_RESOURCE_LOCATIONS = { "classpath:/META-INF/resources/",
			"classpath:/resources/", "classpath:/static/", "classpath:/public/" };

	private String[] staticLocations = CLASSPATH_RESOURCE_LOCATIONS;
HttpEncodingAutoConfiguration自动配置类与HttpProperties类
@Configuration(proxyBeanMethods = false)
//开启ConfigurationProperties绑定功能,给容器导入HttpProperties类
@EnableConfigurationProperties(HttpProperties.class)
@ConditionalOnWebApplication(type = ConditionalOnWebApplication.Type.SERVLET)
@ConditionalOnClass(CharacterEncodingFilter.class)
@ConditionalOnProperty(prefix = "spring.http.encoding", value = "enabled", matchIfMissing = true)
//HttpEncoding自动配置类
public class HttpEncodingAutoConfiguration {

	@Bean
	@ConditionalOnMissingBean
	public CharacterEncodingFilter characterEncodingFilter() {
		CharacterEncodingFilter filter = new OrderedCharacterEncodingFilter();
		filter.setEncoding(this.properties.getCharset().name());
		filter.setForceRequestEncoding(this.properties.shouldForce(Type.REQUEST));
		filter.setForceResponseEncoding(this.properties.shouldForce(Type.RESPONSE));
		return filter;
	}
}


//与配置文件绑定,prefix = "spring.http",该类的属性均可以在配置文件中配置
@ConfigurationProperties(prefix = "spring.http")
public class HttpProperties {

	private boolean logRequestDetails;

	private final Encoding encoding = new Encoding();

	public static class Encoding {

		public static final Charset DEFAULT_CHARSET = StandardCharsets.UTF_8;

		private Charset charset = DEFAULT_CHARSET;

		private Boolean force;

		private Boolean forceRequest;

		private Boolean forceResponse;
3.4 @Conditional派生注解
作用:必须是@Conditional指定的条件成立,才给容器中添加组件,自动配置类里面的所有内容才生效;
| @Conditional扩展注解 | 作用(判断是否满足当前指定条件) |
|---|---|
| @ConditionalOnJava | 系统的Java版本是否符合要求 |
| @ConditionalOnBean | 容器中存在指定Bean |
| @ConditionalOnMissingBean | 容器中不存在指定Bean |
| @ConditionalOnExpression | 满足SpEL表达式指定 |
| @ConditionalOnClass | 系统中有指定的类 |
| @ConditionalOnMissingClass | 系统中没有指定的类 |
| @ConditionalOnSingleCandidate | 容器中只有一个指定的Bean,或者这个Bean是首选Bean |
| @ConditionalOnProperty | 系统中指定的属性是否有指定的值 |
| @ConditionalOnResource | 类路径下是否存在指定资源文件 |
| @ConditionalOnWebApplication | 当前是web环境 |
| @ConditionalOnNotWebApplication | 当前不是web环境 |
| @ConditionalOnJndi | JNDI存在指定项 |
自动配置类必须在一定的条件下才能生效
可以在配置文件中配置debug=true,让控制台打印自动配置报告
生效的自动配置类
没生效的自动配置类
3.5 总结
精髓:
- SpringBoot启动会加载大量的自动配置类
- 需要的功能有没有SpringBoot默认写好的自动配置类
- 自动配置类中到底配置了哪些组件(只要有默认的配置,就不需要配置了)
- 自动配置类给容器中添加组件,会从xxxProperties类中获取属性的值,可以在配置文件中指定这些属性的值
通用模式
– xxxAutoConfiguration:自动配置类
– xxxProperties:属性配置类
– yml/properties文件中能配置的值就来源于[属性配置类]
四、Spring Boot与日志
五、Spring Boot与Web开发
Web自动配置规则
- WebMvcAutoConfiguration
- WebMvcProperties
- ViewResolver自动配置
- Formatter与Converter自动配置
- HttpMessageConverter自动配置
- 静态首页
- favicon.ico
- 错误处理
使用SpringBoot开发Web
-
创建SpringBoot应用,选中需要的模块
-
SpringBoot默认将场景配置好了,只需要在配置文件中指定少量的配置就可以运行起来
-
xxxxAutoConfiguration:给容器中自动配置组件
-
xxxxProperties:Properties配置类来封装配置文件的内容
5.1 SpringBoot对静态资源的映射规则
静态资源的映射规则:
方式一:
WebMvcAutoConfiguration中的静态内部类WebMvcAutoConfigurationAdapter
	public void addResourceHandlers(ResourceHandlerRegistry registry) {
			if (!this.resourceProperties.isAddMappings()) {
				logger.debug("Default resource handling disabled");
				return;
			}
			Duration cachePeriod = this.resourceProperties.getCache().getPeriod();
			CacheControl cacheControl = this.resourceProperties.getCache().getCachecontrol().toHttpCacheControl();
			//处理请求路径为/web/jars/下所有请求
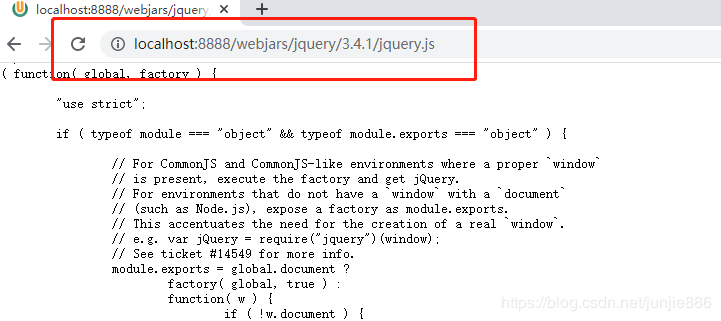
        	if (!registry.hasMappingForPattern("/webjars/**")) {
				customizeResourceHandlerRegistration(registry.addResourceHandler("/webjars/**")
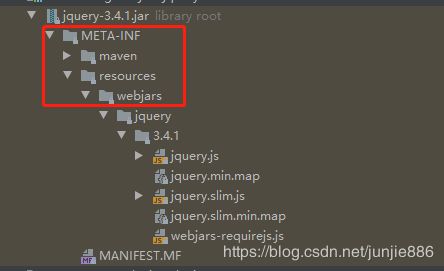
                         // 如果发送的请求路径为/web/jars/下所有请求都会自动映射到classpath:/META-INF/resources/webjars/
						.addResourceLocations("classpath:/META-INF/resources/webjars/")
						.setCachePeriod(getSeconds(cachePeriod)).setCacheControl(cacheControl));
			}
			String staticPathPattern = this.mvcProperties.getStaticPathPattern();
			if (!registry.hasMappingForPattern(staticPathPattern)) {
				customizeResourceHandlerRegistration(registry.addResourceHandler(staticPathPattern)
						.addResourceLocations(getResourceLocations(this.resourceProperties.getStaticLocations()))
						.setCachePeriod(getSeconds(cachePeriod)).setCacheControl(cacheControl));
			}
		}
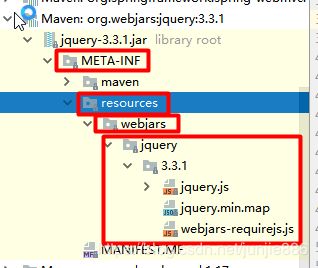
发送的请求路径为/web/jars/下所有请求都会自动映射到classpath:/META-INF/resources/webjars/
- 比如:发送请求/web/jars/jquery.js会映射到classpath:/META-INF/resources/webjars/jquery.js
- webjars是静态资源以jar(依赖)的方式导入项目
webjars官方:https://www.webjars.org/
方式二:
请求路径为:/** 访问当前项目的任何资源,都去(静态资源的文件夹)找映射
WebMvcAutoConfiguration中的静态内部类WebMvcAutoConfigurationAdapter
	@Configuration(proxyBeanMethods = false)
	@Import(EnableWebMvcConfiguration.class)
	@EnableConfigurationProperties({ WebMvcProperties.class, ResourceProperties.class })
	@Order(0)
	public static class WebMvcAutoConfigurationAdapter implements WebMvcConfigurer {

	//静态资源的访问路径为/**
	private String staticPathPattern = "/**";

	public void addResourceHandlers(ResourceHandlerRegistry registry) {
			if (!this.resourceProperties.isAddMappings()) {
				logger.debug("Default resource handling disabled");
				return;
			}
			Duration cachePeriod = this.resourceProperties.getCache().getPeriod();
			CacheControl cacheControl = this.resourceProperties.getCache().getCachecontrol().toHttpCacheControl();
			if (!registry.hasMappingForPattern("/webjars/**")) {
				customizeResourceHandlerRegistration(registry.addResourceHandler("/webjars/**")
						.addResourceLocations("classpath:/META-INF/resources/webjars/")
						.setCachePeriod(getSeconds(cachePeriod)).setCacheControl(cacheControl));
			}
        	//获取静态资源的访问路径(/**)
			String staticPathPattern = this.mvcProperties.getStaticPathPattern();
			if (!registry.hasMappingForPattern(staticPathPattern)) {
				customizeResourceHandlerRegistration(registry.addResourceHandler(staticPathPattern)
						//将/**的访问路径映射到getStaticLocations的路径下
                        .addResourceLocations(getResourceLocations(this.resourceProperties.getStaticLocations()))
						.setCachePeriod(getSeconds(cachePeriod)).setCacheControl(cacheControl));
			}
		}

@ConfigurationProperties(prefix = "spring.resources", ignoreUnknownFields = false)
public class ResourceProperties {

    //静态资源的路径默认的路径
	private static final String[] CLASSPATH_RESOURCE_LOCATIONS = { "classpath:/META-INF/resources/",
			"classpath:/resources/", "classpath:/static/", "classpath:/public/" };

    //静态资源的路径
	private String[] staticLocations = CLASSPATH_RESOURCE_LOCATIONS;

	private boolean addMappings = true;

	private final Chain chain = new Chain();

	private final Cache cache = new Cache();

    //获取静态资源的路径
	public String[] getStaticLocations() {
		return this.staticLocations;
	}
请求路径为:**/ **** 访问当前项目的任何资源,都去(静态资源的文件夹)找映射
-
比如:发送请求**/hello.html会映射到默认的静态资源路径下即(classpath:/static/hello.html)**
- classpath:/META-INF/resources/
- classpath:/resources/
- classpath:/static/
- classpath:/public/
-
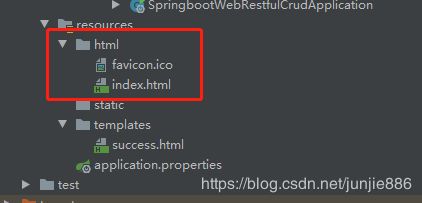
可以在配置文件中修改默认的静态资源文件路径
- 设置静态资源文件路径为
- spring.resources.static-locations=classpath:/html
- 即类路径下的html文件夹下
ResourceProperties属性配置类
@ConfigurationProperties(prefix = "spring.resources", ignoreUnknownFields = false)
public class ResourceProperties {

	private static final String[] CLASSPATH_RESOURCE_LOCATIONS = { "classpath:/META-INF/resources/",
			"classpath:/resources/", "classpath:/static/", "classpath:/public/" };

	/**
	 * Locations of static resources. Defaults to classpath:[/META-INF/resources/,
	 * /resources/, /static/, /public/].
	 */
	private String[] staticLocations = CLASSPATH_RESOURCE_LOCATIONS;
properties配置文件
#自定义静态资源的路径映射
spring.resources.static-locations=classpath:/html
5.2 SpringBoot设置欢迎页
		private Optional<Resource> getWelcomePage() {
            //getStaticLocations获取静态资源的路径
			String[] locations = getResourceLocations(this.resourceProperties.getStaticLocations());
			return Arrays.stream(locations).map(this::getIndexHtml).filter(this::isReadable).findFirst();
		}

		private Resource getIndexHtml(String location) {
            //加载首页的路径,即静态资源的路径下的index.html
			return this.resourceLoader.getResource(location + "index.html");
		}
例如:访问localhost:8888/映射到静态资源路径下的index.html,即(classpath:/static/index.html)
- classpath:/META-INF/resources/
- classpath:/resources/
- classpath:/static/
- classpath:/public/
只要index.html欢迎页放在任意的静态资源路径下都能被识别
5.3 SpringBoot设置logo图标
只需将图标定义为favicon.ioc,放在任意静态资源路径下就可被SpringBoot识别
- classpath:/META-INF/resources/
- classpath:/resources/
- classpath:/static/
- classpath:/public/
5.4 模板引擎Thymeleaf
5.5 SpringMVC自动装配原理
Spring官网说明文档:https://docs.spring.io/spring-boot/docs/2.2.5.RELEASE/reference/html/spring-boot-features.html#boot-features-developing-web-applications
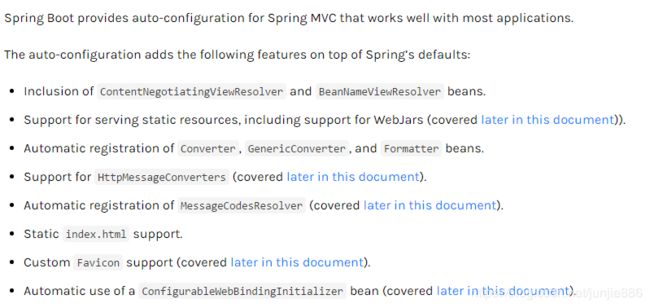
官网上说明:SpringMVC自动配置默认以下功能:
Spring Boot provides auto-configuration for Spring MVC that works well with most applications.
Spring Boot 默认给Spring MVC 自动配置有以下功能:
5.5.1 自动配置了ViewREsolver视图解析器(根据方法返回值跳转视图)
Inclusion of ContentNegotiatingViewResolver and BeanNameViewResolver beans.
-
ContentNegotiatingViewResolver解析所有的视图解析器,返回视图时使用
WebMvcAutoConfiguration向容器中注入ContentNegotiatingViewResolver
@Bean
//当ViewResolver视图解析器存在时向容器注入ContentNegotiatingViewResolver
@ConditionalOnBean(ViewResolver.class)
@ConditionalOnMissingBean(name = "viewResolver", value = ContentNegotiatingViewResolver.class)
public ContentNegotiatingViewResolver viewResolver(BeanFactory beanFactory) {
    ContentNegotiatingViewResolver resolver = new ContentNegotiatingViewResolver();
    resolver.setContentNegotiationManager(beanFactory.getBean(ContentNegotiationManager.class));
    resolver.setOrder(Ordered.HIGHEST_PRECEDENCE);
    return resolver;
}
ContentNegotiatingViewResolver解析所有视图,返回一个视图
dispatcherServlet则跳转到得到的视图
//ContentNegotiatingViewResolver解析所有视图,然后返回视图
public class ContentNegotiatingViewResolver extends WebApplicationObjectSupport
		implements ViewResolver, Ordered, InitializingBean {

    //调用方法解析视图名字,返回一个视图,dispatcherServlet则跳转到得到的视图
    public View resolveViewName(String viewName, Locale locale) throws Exception {
        RequestAttributes attrs = RequestContextHolder.getRequestAttributes();
        Assert.state(attrs instanceof ServletRequestAttributes, "No current ServletRequestAttributes");
        List<MediaType> requestedMediaTypes = getMediaTypes(((ServletRequestAttributes) attrs).getRequest());
        if (requestedMediaTypes != null) {

            //主要使用两个方法实现

            //1、获取候选的所有视图
            List<View> candidateViews = getCandidateViews(viewName, locale, requestedMediaTypes);
            //2、得到最好的视图,返回
            View bestView = getBestView(candidateViews, requestedMediaTypes, attrs);
            if (bestView != null) {
                return bestView;
            }
        }
		...
    }

    //1、获取候选的所有视图
  	 private List<View> getCandidateViews(String viewName, Locale locale, List<MediaType> requestedMediaTypes)
			throws Exception {

		List<View> candidateViews = new ArrayList<>();
		//如果视图解析器不为空
         if (this.viewResolvers != null) {
			Assert.state(this.contentNegotiationManager != null, "No ContentNegotiationManager set");

             //遍历所有的视图解析器
             for (ViewResolver viewResolver : this.viewResolvers) {
				//解析resolveViewName得到view视图
                 View view = viewResolver.resolveViewName(viewName, locale);
				if (view != null) {
					candidateViews.add(view);
				}
				for (MediaType requestedMediaType : requestedMediaTypes) {
					List<String> extensions = this.contentNegotiationManager.resolveFileExtensions(requestedMediaType);
					for (String extension : extensions) {
						String viewNameWithExtension = viewName + '.' + extension;
						view = viewResolver.resolveViewName(viewNameWithExtension, locale);
						if (view != null) {
                            //将每一个视图加入到候选的视图集合中
							candidateViews.add(view);
						}
					}
				}
			}
		}
		...
        //返回该候选的视图集合
		return candidateViews;
	}

    //2、从候选的视图集合获取最好的视图
    @Nullable
	private View getBestView(List<View> candidateViews, List<MediaType> requestedMediaTypes, RequestAttributes attrs) {
		//遍历候选的视图集合
        for (View candidateView : candidateViews) {
			if (candidateView instanceof SmartView) {
				SmartView smartView = (SmartView) candidateView;
				if (smartView.isRedirectView()) {
					return candidateView;
				}
			}
		}

}
viewResolvers视图集合的来源
@Override protected void initServletContext(ServletContext servletContext) { //从容器中获取类型ViewResolver.class的所有bean并放到集合matchingBeans中 Collection<ViewResolver> matchingBeans = BeanFactoryUtils.beansOfTypeIncludingAncestors(obtainApplicationContext(), ViewResolver.class).values(); if (this.viewResolvers == null) { //根据matchingBeans集合的长度创建viewResolvers this.viewResolvers = new ArrayList<>(matchingBeans.size()); //遍历matchingBeans每一个视图解析器,并加入到ViewResolver中 for (ViewResolver viewResolver : matchingBeans) { if (this != viewResolver) { this.viewResolvers.add(viewResolver); } } } ... }由源码可知,springboo会从容器中获取所有的视图解析器ViewResolver,若需要扩展视图解析器:
只需自定义一个类实现ViewResolver接口,并加入容器中即可
@SpringBootApplication public class SpringbootWebRestfulCrudApplication { public static void main(String[] args) { SpringApplication.run(SpringbootWebRestfulCrudApplication.class, args); } //注入容器 @Bean public ViewResolver getViewResolver(){ return new MyViewResolver(); } //定义一个视图解析器类 static class MyViewResolver implements ViewResolver{ public View resolveViewName(String viewName, Locale locale) throws Exception { return null; } } } -
BeanNameViewResolver解析beanName,返回json格式时使用
5.5.2 对提供静态资源的支持,包括支持WebJars
Support for serving static resources, including support for WebJars
-
默认情况下,Spring Boot对静态资源访问映射到目录**/static(或/public或/resources或/META-INF/resources)**
-
可以通过使用自定义静态资源位置spring.resources.static-locations属性替换默认值的列表目录位置
spring.resources.static-locations=classpath:/html
5.5.3 自动注册了转换器,格式化器
Automatic registration of Converter, GenericConverter, and Formatter beans.
- Converter 转换器: 前端字符串参数转换为对象
- Formatter 格式化器:日期格式化
自定义格式化器:
添加的格式化器转换器,只需要放在容器中即可
	@Bean
    public Formatter formatter(){
        return new MyFormatter();
    }

    class MyFormatter implements Formatter<Date>{

        @Override
        public Date parse(String text, Locale locale) throws ParseException {
            return null;
        }

        @Override
        public String print(Date object, Locale locale) {
            return null;
        }
    }
5.5.4 自动配置Http请求和响应转换器
Support for HttpMessageConverters .
HttpMessageConverter:SpringMVC用来转换Http请求和响应的;
-
Object–Json
-
String(ModelAndView)–视图
-
默认情况下,字符串进行编码UTF-8
HttpMessageConverters:获取容器中所有的HttpMessageConverter
		@Override
		public void configureMessageConverters(List<HttpMessageConverter<?>> converters) {
			//从容器中获取所有的Converter,调用addAll方法添加所有Converter到List集合中
            this.messageConvertersProvider
					.ifAvailable((customConverters) -> converters.addAll(customConverters.getConverters()));
		}
若需要自定义:
只需实现HttpMessageConverter接口并@Bean或@Component放入容器中即可
5.5.5 定义错误代码生成规则
Automatic registration of MessageCodesResolver .
- MessageCodesResolver:代码解析器,定义错误代码的生成(了解即可)
5.5.6 静态首页访问
Static index.html support.
- index.html欢迎页放在任意的静态资源路径下都能被识别
5.5.7 自定义图标
Custom Favicon support.
- favicon.ico 任意的静态资源路径,是自动用作应用程序的标识
5.5.8 自动配置绑定JavaBean初始化
Automatic use of a ConfigurableWebBindingInitializer bean.
- ConfigurableWebBindingInitializer:请求数据==JavaBean
5.5.10 @EnableWebMvc(重点)
Spring Boot自动配置基本的Spring MVC所需的功能,但若还需扩展
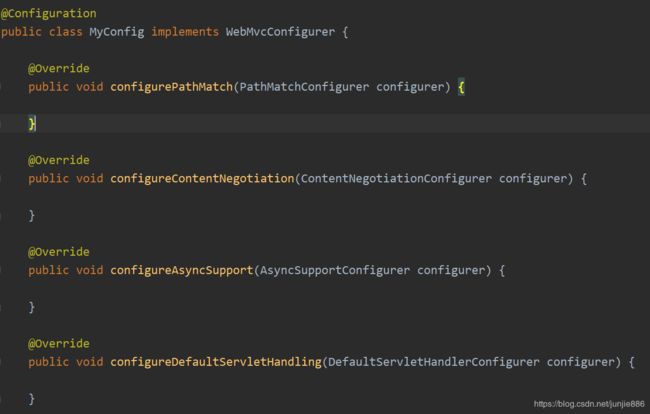
- 只需标注继承 WebMvcConfigurer并标注@Configuration
- 不能标注@EnableWebMvc
实现拦截器功能
@Configuration
public class MyConfig implements WebMvcConfigurer {

    //拦截器
    @Override
    public void addInterceptors(InterceptorRegistry registry) {

    }
 	...
}
WebMvcConfigurer里面具有所有SpringMVC的功能的空方法,想要扩展哪个功能就重写哪个方法
既保留了所有的自动配置,也能自定义扩展的配置
为什么可以同时使用Spring Boot和自定义的Web配置
Spring Boot自动配置SpringMVC和自定义SpringMVC的原理
-
WebMvcConfiguration类时SpringBoot自动配置类
-
使用注解@Import导入了EnableWebMvcConfiguration类
@Configuration(proxyBeanMethods = false) @ConditionalOnWebApplication(type = Type.SERVLET) @ConditionalOnClass({ Servlet.class, DispatcherServlet.class, WebMvcConfigurer.class }) @ConditionalOnMissingBean(WebMvcConfigurationSupport.class) @AutoConfigureOrder(Ordered.HIGHEST_PRECEDENCE + 10) @AutoConfigureAfter({ DispatcherServletAutoConfiguration.class, TaskExecutionAutoConfiguration.class, ValidationAutoConfiguration.class }) public class WebMvcAutoConfiguration { @Configuration(proxyBeanMethods = false) //导入EnableWebMvcConfiguration类 @Import(EnableWebMvcConfiguration.class) @EnableConfigurationProperties({ WebMvcProperties.class, ResourceProperties.class }) @Order(0) public static class WebMvcAutoConfigurationAdapter implements WebMvcConfigurer { ... } //继承DelegatingWebMvcConfiguration @Configuration(proxyBeanMethods = false) public static class EnableWebMvcConfiguration extends DelegatingWebMvcConfiguration implements ResourceLoaderAware { private final ResourceProperties resourceProperties; private final WebMvcProperties mvcProperties; private final ListableBeanFactory beanFactory; private final WebMvcRegistrations mvcRegistrations; private ResourceLoader resourceLoader; //加载xxxProperties类里的默认属性(resourceProperties、mvcProperties) public EnableWebMvcConfiguration(ResourceProperties resourceProperties, ObjectProvider<WebMvcProperties> mvcPropertiesProvider, ObjectProvider<WebMvcRegistrations> mvcRegistrationsProvider, ListableBeanFactory beanFactory) { this.resourceProperties = resourceProperties; this.mvcProperties = mvcPropertiesProvider.getIfAvailable(); this.mvcRegistrations = mvcRegistrationsProvider.getIfUnique(); this.beanFactory = beanFactory; } ... } -
EnableWebMvcConfiguration又继承了DelegatingWebMvcConfiguration
@Configuration(proxyBeanMethods = false) public class DelegatingWebMvcConfiguration extends WebMvcConfigurationSupport { private final WebMvcConfigurerComposite configurers = new WebMvcConfigurerComposite(); //参数为WebMvcConfigurer的List集合 @Autowired(required = false) public void setConfigurers(List<WebMvcConfigurer> configurers) { if (!CollectionUtils.isEmpty(configurers)) { //WebMvcConfigurer的List集合添加到Web配置中 this.configurers.addWebMvcConfigurers(configurers); } } ... } -
从上述可看出,SpringBoot加载Web自动配置类时,使用了所有的WebMvcConfigurer类,包括SpringBoot默认的配置类与自定义的配置类
全面接管SpringMVC
为何不能标注@EnableWebMvc
@Retention(RetentionPolicy.RUNTIME)
@Target(ElementType.TYPE)
@Documented
@Import(DelegatingWebMvcConfiguration.class)
public @interface EnableWebMvc {
}
可以发现@EnableWebMvc导入了一个类@Import**(DelegatingWebMvcConfiguration.class**),该类为EnableWebMvcConfiguration类的父类
@Configuration(proxyBeanMethods = false)
public class DelegatingWebMvcConfiguration extends WebMvcConfigurationSupport {

    ...
}
该类继承了WebMvcConfigurationSupport类
WebMvcAutoConfiguration自动配置类上标有注解**@ConditionalOnMissingBean(WebMvcConfigurationSupport.class)**,若容器中有WebMvcConfigurationSupport类则该配置类不会生效
@Configuration(proxyBeanMethods = false)
@ConditionalOnWebApplication(type = Type.SERVLET)
@ConditionalOnClass({ Servlet.class, DispatcherServlet.class, WebMvcConfigurer.class })
//若容器中没有WebMvcConfigurationSupport类,则该类生效
@ConditionalOnMissingBean(WebMvcConfigurationSupport.class)
@AutoConfigureOrder(Ordered.HIGHEST_PRECEDENCE + 10)
@AutoConfigureAfter({ DispatcherServletAutoConfiguration.class, TaskExecutionAutoConfiguration.class,
		ValidationAutoConfiguration.class })
public class WebMvcAutoConfiguration {
总结:
- 使用@EnableWebMvc注解会给容器导入一个WebMvcConfigurationSupport类,只要容器存在该类,WebMvcAutoConfiguration自动配置类则不会生效
- 使用@EnableWebMvc会全面接管SpringMVC,自动配置类不会生效,若使用SpringMVC只需向ssm中常规配置
六、Spring Boot与Docker
七、Spring Boot与数据访问
7.1 JDBC
- 引入jar
- 配置数据源
spring-boot-starter-jdbc和mysql驱动
<dependency>
    <groupId>org.springframework.bootgroupId>
    <artifactId>spring-boot-starter-jdbcartifactId>
dependency>
<dependency>
    <groupId>mysqlgroupId>
    <artifactId>mysql-connector-javaartifactId>
    <scope>runtimescope>
dependency>
配置数据源信息
spring:
  datasource:
    driver-class-name: com.mysql.cj.jdbc.Driver
    url: jdbc:mysql://127.0.0.1:3306/client?serverTimezone=UTC&userUnicode=true&characterEncoding=utf-8&useSSL=true
    username: root
    password: root123
即可使用
测试
@SpringBootTest
class SpringbootWebRestfulCrudApplicationTests {

    @Autowired
    private DataSource dataSource ;
    @Autowired
    private JdbcTemplate jt ;

    @Test
    void contextLoads() throws Exception {
        System.out.println(dataSource.getClass());
        Connection connection = dataSource.getConnection();
        System.out.println(connection);
    }

    @Test
    public void testQueryList(){
        List<Map<String, Object>> maps = jt.queryForList("select * from `person`");
        System.out.println(maps);
    }

}
执行结果:
Spring Boot默认使用HikariDataSource数据源
也可以手动设置使用的数据源
只需在yml中配置spring.datasource.type指定数据即可
有关配置DataSource疯转在DataSourceProperties类中
7.2 Druid数据源
官网介绍:https://www.alibabacloud.com/help/zh/doc-detail/72987.html
7.2.1 Druid简介
Druid应用场景
- 实时指标监控
- 推荐模型
- 广告平台
- 搜索模型
7.2.2 Druid使用
- 引入jar(druid-spring-boot-starter.jar)
- 配置yml
导入jar
<dependency>
    <groupId>com.alibabagroupId>
    <artifactId>druid-spring-boot-starterartifactId>
    <version>1.1.10version>
dependency>
配置druid相关配置
spring:
  datasource:
    driver-class-name: com.mysql.cj.jdbc.Driver
    url: jdbc:mysql://127.0.0.1:3306/client?serverTimezone=UTC&userUnicode=true&characterEncoding=utf-8&useSSL=true
    username: root
    password: root123

    #选择Druid数据源
    type: com.alibaba.druid.pool.DruidDataSource

    #配置Druid相关配置
    druid:
      # 连接池的配置信息
      # 初始化大小,最小,最大
      initial-size: 5
      min-idle: 5
      maxActive: 20
      # 配置获取连接等待超时的时间
      maxWait: 60000
      # 配置间隔多久才进行一次检测,检测需要关闭的空闲连接,单位是毫秒
      timeBetweenEvictionRunsMillis: 60000
      # 配置一个连接在池中最小生存的时间,单位是毫秒
      minEvictableIdleTimeMillis: 300000
      validationQuery: SELECT 1 FROM DUAL
      testWhileIdle: true
      testOnBorrow: false
      testOnReturn: false
      # 打开PSCache,并且指定每个连接上PSCache的大小
      poolPreparedStatements: true
      maxPoolPreparedStatementPerConnectionSize: 20
      # 配置监控统计拦截的filters,去掉后监控界面sql无法统计,'wall'用于防火墙
      # DruidFilterConfiguration
      filter:
        slf4j:
          enabled: true
        wall:
          enabled: true
        stat:
          enabled: true
      # 通过connectProperties属性来打开mergeSql功能;慢SQL记录
      connectionProperties: druid.stat.mergeSql\=true;druid.stat.slowSqlMillis\=5000
      # 配置DruidStatFilter
      web-stat-filter:
        enabled: true
        url-pattern: "/*"
        exclusions: "*.js,*.gif,*.jpg,*.bmp,*.png,*.css,*.ico,/druid/*"
      # 配置DruidStatViewServlet
      stat-view-servlet:
        url-pattern: "/druid/*"
        # IP白名单(没有配置或者为空,则允许所有访问)
        # allow: 127.0.0.1,192.168.46.120
        # IP黑名单 (存在共同时,deny优先于allow)
        # deny: 192.168.46.121
        #  禁用HTML页面上的“Reset All”功能
        reset-enable: false
        # 登录名
        login-username: admin
        # 登录密码
        login-password: 123456
然后访问URL为/druid,默认进入druid监控页面,登录可以查看监控
注意:若访问/druid为404,有可能为jar版本过高
7.3 Spring Boot整合Mybatis
7.3.1 配置文件版
- 导入mybaits-spring-boot-starter.jar
- 配置mybaits
- 在主类接口上标注@MapperScan(扫描Mapper接口,并加入容器)
- 编写mapper.xml
导入mybaits-spring-boot-starter.jar
<dependency>
    <groupId>org.mybatis.spring.bootgroupId>
    <artifactId>mybatis-spring-boot-starterartifactId>
    <version>2.1.0version>
dependency>
配置mybatis
mybatis:
  config-location: classpath:mybatis/mybatis-config.xml #指定全局配置文件的位置
  mapper-locations: classpath:mappers/*.xml  #指定sql映射文件的位置
  type-aliases-package: com.json.springboot.pojo #定义实体类的别名
标注@MapperScan
@MapperScan(basePackages="com.json.springboot.dao")
@SpringBootApplication
public class SpringbootWebRestfulCrudApplication {

    public static void main(String[] args) {
        SpringApplication.run(SpringbootWebRestfulCrudApplication.class, args);
    }
}
mapper.xml
<mapper namespace="com.json.springboot.dao.PersonMapper">

    <select id="queryAll" resultType="Person">
        select * from person
    select>

mapper>
测试:
7.3.2 注解版
public interface PersonMapper {

    @Select("select * from person")
    List<Person> queryAll();
}
即可
7.3.3 Spring Boot集成PageHelper插件
- 导入jar
- 配置yml
- 使用
导入jar
<dependency>
    <groupId>com.github.pagehelpergroupId>
    <artifactId>pagehelper-spring-boot-starterartifactId>
    <version>1.2.5version>
dependency>
配置PageHelper
pagehelper:
  helperDialect: mysql
  reasonable: true
  supportMethodsArguments: true
  params: count=countSql
  returnPageInfo: check
使用
@RestController
public class ContentController {

    @Autowired
    private ContentMapper contentMapper;

    @GetMapping("/queryAll")
    public PageInfo queryAll(){
        //分页
        PageHelper.startPage(1,10);
        List<Content> contents = contentMapper.queryAll();

        //使用PageInfo对象封装数据
        PageInfo pageInfo = new PageInfo(contents);
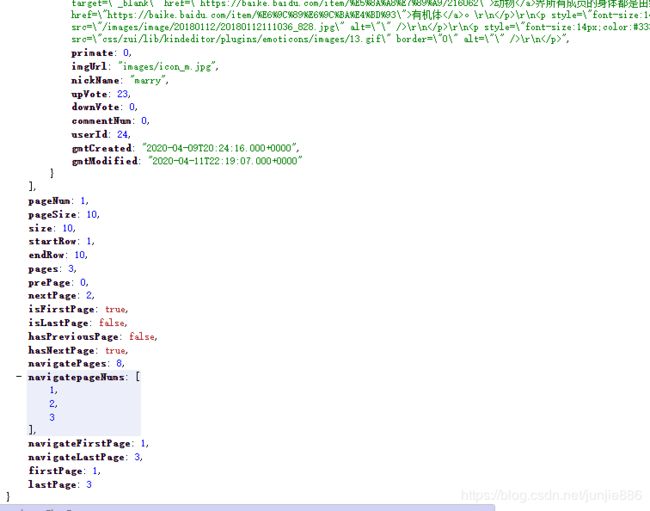
        return pageInfo;
    }
}
7.5 Spring Boot整合Redis
- 导入jar(spring-boot-starter-data-redis.jar)
- 配置redis
导入jar
<dependency>
    <groupId>org.springframework.bootgroupId>
    <artifactId>spring-boot-starter-data-redisartifactId>
dependency>
配置redis
spring:
  redis:
	database: 0
	host: localhost
	post: 6379
测试
@SpringBootTest
class SpringbootWebRestfulCrudApplicationTests {

    @Qualifier("redisTemplate")
    @Autowired
    RedisTemplate rt ;

    @Test
    public void test(){
        rt.opsForValue().set("name","json");
    }
}
八、Spring Boot与Swagger
8.1 前后端分离时代
-
后端:控制层,业务层,持久层
-
前端:前端控制层,视图层
使用Vue+SpringBoot
前后端交互:
API
前端 <———> 后端
需要提供API文档供前后端团队交互
Swagger
- 流行的API框架
- RestFul API文档在线自动生成工具
- API文档与API接口同步更新
- 支持多种语言
8.2 SpringBoot集成Swagger
- 导入jar(springfox-swagger2.jar、springfox-swagger-ui.jar)
- 配置swagger
- 编写SwaggerConfig类
- 标注@Configuration
- 开启Swagger功能(@EnableSwagger2)
Swagger配置主要向容器导入Docket类,配置该类,Docket类封装了Swagger的生成规则
导入依赖
<dependency>
    <groupId>io.springfoxgroupId>
    <artifactId>springfox-swagger2artifactId>
    <version>2.9.2version>
dependency>

<dependency>
    <groupId>io.springfoxgroupId>
    <artifactId>springfox-swagger-uiartifactId>
    <version>2.9.2version>
dependency>
配置swagger
@Configuration
@EnableSwagger2//开发Swagger功能
public class SwaggerConfig {

    @Bean
    public Docket docket(){
       return new Docket(DocumentationType.SWAGGER_2);
    }

}
使用默认的Swagger配置信息
编写接口
@RestController
public class HelloController {

    @GetMapping("/get")
    public Map getMap(){
        return new HashMap();
    }

    @PutMapping("/put")
    public String putMap(Map map){
        return "hello";
    }

    @PostMapping("/post")
    public String postMap(String name){
        return name;
    }

    @DeleteMapping("/delete")
    public List deleteMap(){
        return new ArrayList();
    }
}
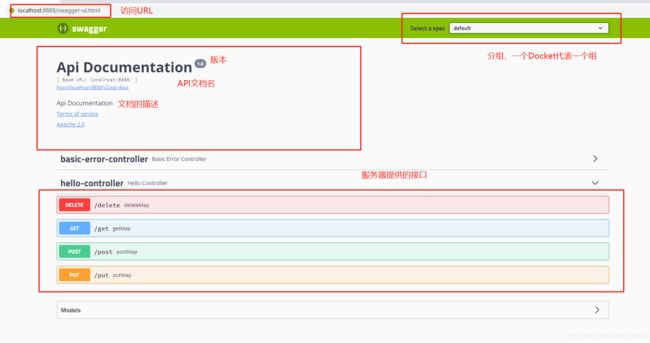
访问/swagger-ui.html,进入在线文档
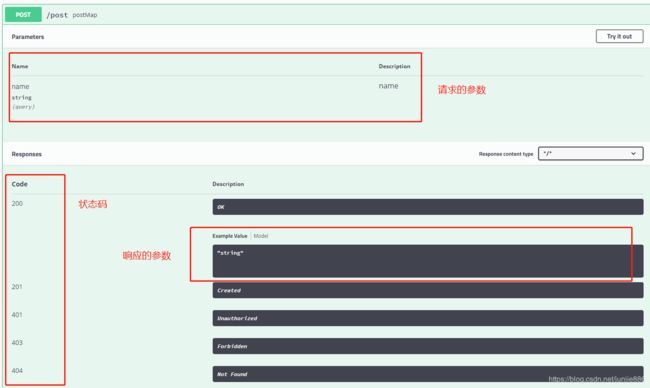
可以发现:API文档可以详细的说明,当然也可以测试
8.3 自定义信息
API信息被封装为Docket中的ApiInfo类中
源码:
public class ApiInfo {

  public static final Contact DEFAULT_CONTACT = new Contact("", "", "");

  //默认的信息配置
  public static final ApiInfo DEFAULT = new ApiInfo("Api Documentation", "Api Documentation", "1.0", "urn:tos",
          DEFAULT_CONTACT, "Apache 2.0", "http://www.apache.org/licenses/LICENSE-2.0", new ArrayList<VendorExtension>());

  private final String version;
  private final String title;
  private final String description;
  private final String termsOfServiceUrl;
  private final String license;
  private final String licenseUrl;
  private final Contact contact;
  private final List<VendorExtension> vendorExtensions;

  /**
   * Deprecated in favor of richer contact object
   * @deprecated @since 2.4.0
   *
   * @param title 标题
   * @param description 描述
   * @param version 版本
   * @param termsOfServiceUrl 团体的地址URL
   * @param contactName contact name
   * @param license licence text
   * @param licenseUrl license url
   */
  /**
   * Default contstructor
   * @param title 标题
   * @param description 描述
   * @param version 版本
   * @param termsOfServiceUrl 团体的地址URL
   * @param contact contact
   * @param license license
   * @param licenseUrl license url
   * @param vendorExtensions vendor extensions
   */
  public ApiInfo(
      String title,
      String description,
      String version,
      String termsOfServiceUrl,
      Contact contact,
      String license,
      String licenseUrl,
      Collection<VendorExtension> vendorExtensions) {
    this.title = title;
    this.description = description;
    this.version = version;
    this.termsOfServiceUrl = termsOfServiceUrl;
    this.contact = contact;
    this.license = license;
    this.licenseUrl = licenseUrl;
    this.vendorExtensions = newArrayList(vendorExtensions);
  }
自定义ApiInfo类和Docket类
@Configuration
@EnableSwagger2
public class SwaggerConfig {

    @Bean
    public Docket docket(){
       return new Docket(DocumentationType.SWAGGER_2)
               .groupName("json组")
               //是否开启
               .enable(true)
               //指定扫描的包
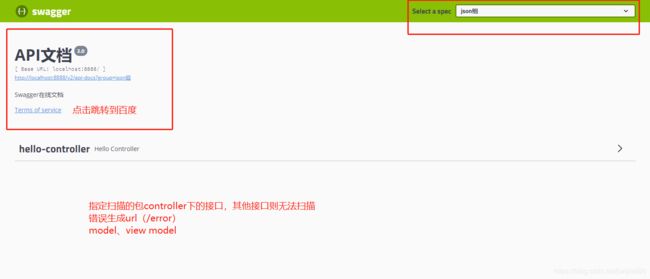
               .select().apis(RequestHandlerSelectors.basePackage("com.json.springboot.controller"))
               .build()
               //信息
               .apiInfo(getApiInfo());
    }

    private ApiInfo getApiInfo(){
        return new ApiInfo("API文档",
                "Swagger在线文档",
                "2.0",
                "https:www.baidu.com",
                new Contact("json", "", ""),
                "",
                "",
                new ArrayList<VendorExtension>());
    }
}
8.4 Swagger注解定义注释
- @ApiModel(“用户实体类”):标注在实体类上
- @ApiModelProperty(“用户id”):标注在类的属性上
- @ApiOperation(“get请求”):标注在控制器的方法(暴露的接口)上
- @ApiParam(“map集合”):标注在请求参数上
@ApiModel("用户实体类")
public class User {

    @ApiModelProperty("用户id")
    private Integer id ;
    @ApiModelProperty("用户姓名")
    private String name ;
    @ApiModelProperty("用户年龄")
    private Integer age ;


@RestController
public class HelloController {

    @ApiOperation("get请求")
    @GetMapping("/get")
    public Map getMap(User user){
        return new HashMap();
    }

    @ApiOperation("put请求")
    @PutMapping("/put")
    public String putMap(@ApiParam("map集合") Map map){
        return "hello";
    }

    @ApiOperation("post请求")
    @PostMapping("/post")
    public String postMap(@ApiParam("姓名")String name){
        return name;
    }

    @ApiOperation("delete请求")
    @DeleteMapping("/delete")
    public List deleteMap(){
        return new ArrayList();
    }
}
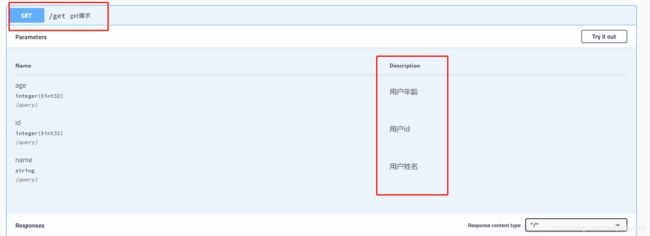
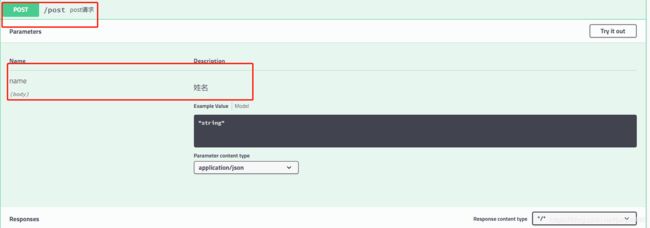
可以发现:swagger API文档已经生成相应的注释
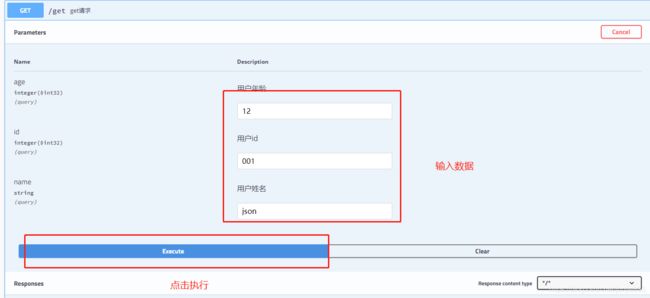
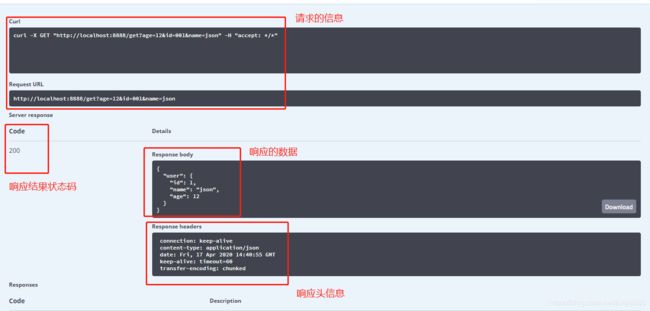
8.5 测试接口(重要)
可以在线测试接口的准确性
- 点击try it out
- 查看响应结果
九、Spring Boot与任务
9.1 异步任务
异步任务:开启多线程
无需导入jar,Spring Boot默认集成
步骤:
- 主类标注**@EnableAsync**注解
- 异步任务的方法标注**@Async**注解
异步任务
@EnableAsync
@SpringBootApplication
public class SpringbootJobApplication {

    public static void main(String[] args) {
        SpringApplication.run(SpringbootJobApplication.class, args);
    }

}
service
@Service
public class AsyncJobService {

    @Async
    public void sleep(){
        try {
            Thread.sleep(2000);
        } catch (InterruptedException e) {
            e.printStackTrace();
        }
    }

}
contrller
@RestController
public class HelloController {

    @Autowired
    private AsyncJobService asyncJobService ;

    @RequestMapping("hello")
    public String hello(){
        asyncJobService.sleep();
        return "success" ;
    }
}
若没有开启异步,访问/hello会执行完sleep方法才响应成功,影响体验
开启了异步,访问/hello会立刻响应成功,开启另一个线程执行sleep方法
9.2 邮件任务
- 导入starter(spring-boot-starter-mail.jar)
- 配置邮箱信息
- 使用JavaMailSenderImpl类操作邮箱发送
导入jar
<dependency>
    <groupId>org.springframework.bootgroupId>
    <artifactId>spring-boot-starter-mailartifactId>
dependency>
配置application.properties
#服务器类型
spring.mail.host=smtp.qq.com
#发送人
[email protected]
#激活码
spring.mail.password=xxxxxxxxxxx
#QQ固有ssl加密
spring.mail.properties.mail.smtp.ssl.enable=true
发送邮件
	@Autowired
    private JavaMailSender javaMailSender ;

    @Test
    void contextLoads() {
        //简单邮件
        SimpleMailMessage message = new SimpleMailMessage();
        //收件人
        message.setTo("[email protected]");
        //发件人
        message.setFrom("[email protected]");
        //邮件标题
        message.setSubject("交个朋友呗");
        //邮件内容
        message.setText("你好!");
        //发送消息
        javaMailSender.send(message);
    }

    @Test
    public void send() throws MessagingException {
        //创建复杂邮件
        MimeMessage message = javaMailSender.createMimeMessage();
        //使用复杂邮件助手MimeMessageHelper
        MimeMessageHelper helper = new MimeMessageHelper(message,true);
        //收件人
        helper.setTo("[email protected]");
        //发件人
        helper.setFrom("[email protected]");
        //邮件标题
        helper.setSubject("交个朋友呗");
        //邮件内容,html超文本
        helper.setText("百度一下",true);
        //附件
        helper.addAttachment("图片", new File("D:\\Users\\333\\Desktop\\微信图片_20200414140517.jpg"));
        //发送消息
        javaMailSender.send(message);
    }
注意:
创建MailMessageHelper对象需要带上multipart参数为true
源码:
//空参multipart默认为null
public MimeMessageHelper(MimeMessage mimeMessage) {
    this(mimeMessage, (String)null);
}


public MimeMessageHelper(MimeMessage mimeMessage, boolean multipart) throws MessagingException {
    this(mimeMessage, multipart, (String)null);
}

//若multipart为null,抛异常
public final MimeMultipart getRootMimeMultipart() throws IllegalStateException {
		if (this.rootMimeMultipart == null) {
			throw new IllegalStateException("Not in multipart mode - " +
					"create an appropriate MimeMessageHelper via a constructor that takes a 'multipart' flag " +
					"if you need to set alternative texts or add inline elements or attachments.");
		}
		return this.rootMimeMultipart;
	}
9.3 定时任务
- 在主类标注@EnableScheduling(开启任务调度功能)
- 在调度的方法上标注@Scheduled
- 使用cron表达式给定执行的规则
主类
@EnableScheduling
@SpringBootApplication
public class SpringbootJobApplication {

    public static void main(String[] args) {
        SpringApplication.run(SpringbootJobApplication.class, args);
    }

}
调度方法
@Service
public class ScheduleService {

    /**
     * Seconds Minutes Hours Day Month DayOfWeek (Year)
     *   秒      分      时   日    月   星期      年
     *   通配符 *
     *	 匹配符 ?
     */
    @Scheduled(cron = "")
    public void sendTime(){
        System.out.println("每隔两秒执行一次");
    }
}
cron表达式:
| 字段 | 允许值 |
|---|---|
| 秒(Seconds) | 0~59的整数 |
| 分(Minutes) | 0~59的整数 |
| 小时(Hours) | 0~23的整数 |
| 日期(Day) | 1~31的整数(但是你需要考虑你月的天数) |
| 月份(Month) | 1~12的整数或者 JAN-DEC |
| 星期(DayOfWeek) | 0~7的整数或者 SUN-SAT (0和7都代表星期日) |
| 年(可选,留空)(Year) | 1970~2099 |
注意:
-
***** :代表任意
-
?:只能用在Day和DayOfWeek两个域,代表匹配,因为会相互影响。所以“?”根据另一个字段匹配
例如:
1、在每月的20日触发调度,那星期DayOfWeek就不能为 * ,只能根据月份的20日匹配
2、在每个星期日触发调度,那日期Day就不能为 * ,只能根据 星期 去匹配
十、Dubbo与Zookeeper
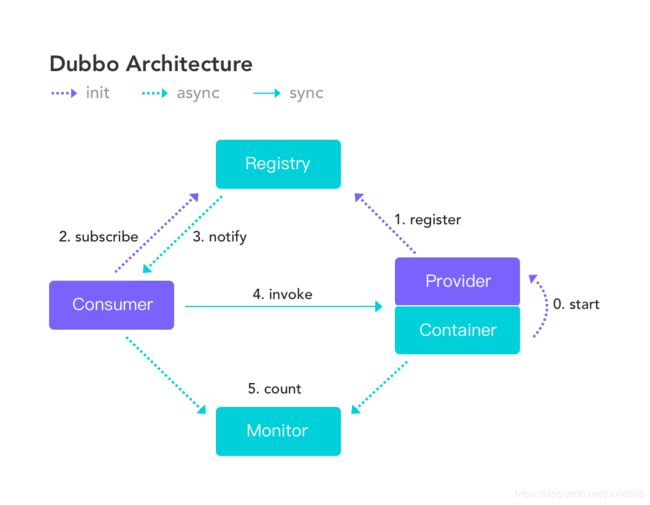
10.1 远程调用
Dubbo 是一款高性能、轻量级的开源Java RPC框架,它提供了三大核心能力:
- 面向接口的远程方法调用
- 智能容错和负载均衡
- 服务自动注册和发现
角色:
- 服务提供者(Provider):提供服务的服务提供方,向注册中心注册自己提供的服务
- 服务消费者(Consumer): 调用远程服务的服务消费方,向注册中心订阅自己所需的服务,服务消费者,从提供者地址列表中,基于软负载均衡算法,选一台提供者进行调用,如果调用失败,再选另一台调用
- 注册中心(Registry):注册中心返回服务提供者地址列表给消费者,如果有变更,注册中心将基于长连接推送变更数据给消费者
- 监控中心(Monitor):服务消费者和提供者,在内存中累计调用次数和调用时间,定时每分钟发送一次统计数据到监控中心
Dubbo推荐注册中心使用Zookeeper(Dubbo+Zookeeper标配)
10.2 实现服务注册与发现
102.1 服务注册中心Zookeeper
下载Zookeeper,解压
Zookeeper运行在Linux上,压缩包为gz,但Windows也可运行
修改配置文件
- 将conf文件夹下面的zoo_sample.cfg复制一份改名为zoo.cfg即可。
注意几个重要位置:
dataDir=/tmp/zookeeper 临时数据存储的目录(可写相对路径)
clientPort=2181 zookeeper的端口号
修改完成后再次启动zookeeper
启动Zookeeper
启动bin目录下的zkServer.cmd
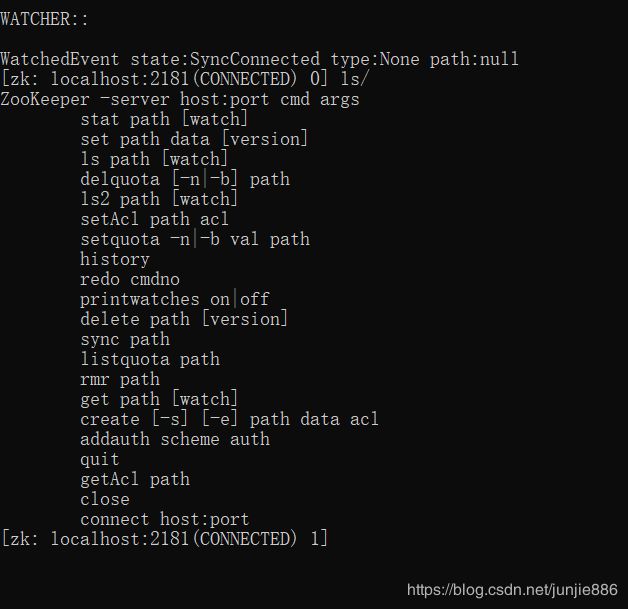
启动zkCli.cmd客户端测试
连接成功
10.2.2 监控中心dubbo-admin
下载dubbo-admin,监控服务的注册与发现
github:https://github.com/apache/dubbo-admin/tree/master
可以发现:dubbo-admin是一个Spring Boot应用
配置信息如下
server.port=7001
spring.velocity.cache=false
spring.velocity.charset=UTF-8
spring.velocity.layout-url=/templates/default.vm
spring.messages.fallback-to-system-locale=false
spring.messages.basename=i18n/message
spring.root.password=root
spring.guest.password=guest

dubbo.registry.address=zookeeper://127.0.0.1:2181
- dubbo端口为7001
- zookeeper端口为2181
使用maven打包为jar
mvn clean package -Dmaven.test.skip=true
#打包,跳过测试
得到dubbo-admin-0.0.1-SNAPSHOT.jar,可以在命令行运行
运行dubbo-admin
java -jar dubbo-admin-0.0.1-SNAPSHOT.jar
先启动zookeeper服务端,再运行dubbo-admin.jar
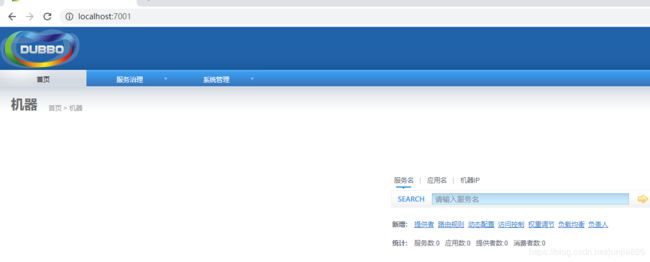
访问监控页面
默认用户和密码为root、root
可以发现监控中心可以运行了,注册的服务在此发现
10.2.3 提供者端注册服务
使用 Spring Boot + Dubbo + zookeeper注册服务
注意:注册服务一定要启动zooke服务端,dubbo-admin监控可以不启动
-
导入jar
-
配置dubbo
-
编写注册的服务(标注@Service和@Component)
注意:@Service为dubbo包下的注解
导入jar
<dependency>
   <groupId>org.apache.dubbogroupId>
   <artifactId>dubbo-spring-boot-starterartifactId>
   <version>2.7.1version>
dependency>

<dependency>
    <groupId>com.101tecgroupId>
    <artifactId>zkclientartifactId>
    <version>0.10version>
dependency>

<dependency>
   <groupId>org.apache.curatorgroupId>
   <artifactId>curator-frameworkartifactId>
   <version>2.12.0version>
dependency>

<dependency>
   <groupId>org.apache.curatorgroupId>
   <artifactId>curator-recipesartifactId>
   <version>2.12.0version>
dependency>

<dependency>
   <groupId>org.apache.zookeepergroupId>
   <artifactId>zookeeperartifactId>
   <version>3.4.14version>

   <exclusions>
       <exclusion>
           <groupId>org.slf4jgroupId>
           <artifactId>slf4j-log4j12artifactId>
       exclusion>
   exclusions>
dependency>
配置dubbo
#注册项目名称
#项目名不能使用中文
dubbo.application.name=provider-server
#指定扫描的包
dubbo.scan.base-packages=com.json.springboot.provider
#指定注册中心zookeeper的ip+post
dubbo.registry.address=zookeeper://127.0.0.1:2181
#指定项目的端口号
server.port=8889
编写注册的服务
//服务接口
public interface Provider {

    String sellTicket(int count);
}


//服务具体实现
@Service//最好使用@Component区别
@org.apache.dubbo.config.annotation.Service
public class DubboProvider implements Provider{

    /**
     * 卖票服务
     */
    public String sellTicket(int count){
        return "出售了"+count+"张票";
    }

}
启动zookeeper服务端与springboot应用,即可注册
注意:注册的服务必须实现接口
启动顺序:zookeeper服务端 -> springboot提供方 -> dubbo-admin
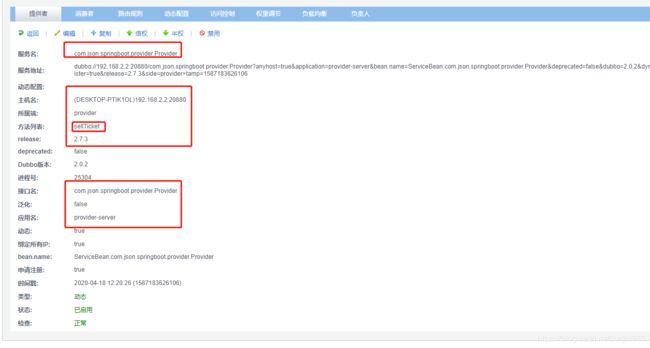
访问7001:
可以发现:服务已注册成功,还可以查看服务的具体信息
10.2.4 消费者端调用服务
- 导入jar(与提供端一样)
- 配置dubbo
- 编写消费者(标注@Reference远程调用)
导入jar
<dependency>
   <groupId>org.apache.dubbogroupId>
   <artifactId>dubbo-spring-boot-starterartifactId>
   <version>2.7.1version>
dependency>

<dependency>
    <groupId>com.101tecgroupId>
    <artifactId>zkclientartifactId>
    <version>0.10version>
dependency>

<dependency>
   <groupId>org.apache.curatorgroupId>
   <artifactId>curator-frameworkartifactId>
   <version>2.12.0version>
dependency>

<dependency>
   <groupId>org.apache.curatorgroupId>
   <artifactId>curator-recipesartifactId>
   <version>2.12.0version>
dependency>

<dependency>
   <groupId>org.apache.zookeepergroupId>
   <artifactId>zookeeperartifactId>
   <version>3.4.14version>

   <exclusions>
       <exclusion>
           <groupId>org.slf4jgroupId>
           <artifactId>slf4j-log4j12artifactId>
       exclusion>
   exclusions>
dependency>
配置dubbo
#指定项目的端口号
server.port=8888
#消费者的名称
dubbo.application.name=consumer-server
#注册中心地址
dubbo.registry.address=zookeeper://127.0.0.1:2181
调用注册中心的方法
@SpringBootTest
class DubboZookeeperConsumerApplicationTests {

    @Reference//注意为dubbo的注解
    Provider provider ;

    @Test
    void contextLoads() {
        String string = provider.sellTicket(3);
        System.out.println(string);
    }

}
若为容器中的对象,使用Autowired,若远程调用使用@Reference
调用结果:
注意:消费者端调用远程方法,从语法上也需要写提供方的接口,包的目录要一致
例如:Provider provider,但无需具体实现,因为调用远程的实现方法
public interface Provider {

    String sellTicket(int count);
}
只要注册中心Zookeeper关闭,提供者端与消费者端立即报错
十一、前后端分离
前后端分离大势所趋
CORS就是为了解决SOP问题而生的,当然CORS不是唯一的解决方案
CORS简介: CORS是一个W3C标准,全称是"跨域资源共享"(Cross-origin resource sharing)。它允许浏览器向跨源(协议 + 域名 + 端口)服务器,发出XMLHttpRequest请求,从而克服了AJAX只能同源使用的限制。
CORS需要浏览器和服务器同时支持。它的通信过程,都是浏览器自动完成,不需要用户参与。对于开发者来说,CORS通信与同源的AJAX/Fetch通信没有差别,代码完全一样。浏览器一旦发现请求跨源,就会自动添加一些附加的头信息,有时还会多出一次附加的请求,但用户不会有感觉。
因此,实现CORS通信的关键是服务器。只要服务器实现了CORS接口,就可以跨源通信
在springboot的controller中添加@CrossOrigin
@CrossOrigin(origins = "http://localhost:8080")
@RestController
public class ContentController {

    @Autowired
    private ContentMapper contentMapper;

    @GetMapping("/queryAll")
    public List<Content> queryAll(){
        return contentMapper.queryAll();
    }
}
当然,也可以在controller方法中添加@CrossOrigin
lements Provider{
/**
 * 卖票服务
 */
public String sellTicket(int count){
    return "出售了"+count+"张票";
}
}
启动zookeeper服务端与springboot应用,即可注册

注意:注册的服务必须实现接口

启动顺序:zookeeper服务端 -> springboot提供方 -> dubbo-admin

访问7001:

[外链图片转存中...(img-rOoiw2aL-1589729019299)]

可以发现:服务已注册成功,还可以查看服务的具体信息

[外链图片转存中...(img-yyH6Pn9a-1589729019300)]


### 10.2.4 消费者端调用服务

* 导入jar(与提供端一样)
* 配置dubbo
* 编写消费者(标注@Reference远程调用)

> 导入jar

```xml

   org.apache.dubbo
   dubbo-spring-boot-starter
   2.7.1


    com.101tec
    zkclient
    0.10


   org.apache.curator
   curator-framework
   2.12.0


   org.apache.curator
   curator-recipes
   2.12.0


   org.apache.zookeeper
   zookeeper
   3.4.14


           org.slf4j
           slf4j-log4j12
配置dubbo
#指定项目的端口号
server.port=8888
#消费者的名称
dubbo.application.name=consumer-server
#注册中心地址
dubbo.registry.address=zookeeper://127.0.0.1:2181
调用注册中心的方法
@SpringBootTest
class DubboZookeeperConsumerApplicationTests {

    @Reference//注意为dubbo的注解
    Provider provider ;

    @Test
    void contextLoads() {
        String string = provider.sellTicket(3);
        System.out.println(string);
    }

}
若为容器中的对象,使用Autowired,若远程调用使用@Reference
调用结果:
[外链图片转存中…(img-QZVfzXkx-1589729019301)]
注意:消费者端调用远程方法,从语法上也需要写提供方的接口,包的目录要一致
例如:Provider provider,但无需具体实现,因为调用远程的实现方法
public interface Provider {

    String sellTicket(int count);
}
只要注册中心Zookeeper关闭,提供者端与消费者端立即报错
Spring Boot应用场景与整合:
内容概要:
- Spring Boot入门
- Spring Boot配置
- Spring Boot与日志
- Spring Boot与Web开发
- Spring Boot与Docker
- Spring Boot与数据访问
- Spring Boot启动配置原理
- Spring Boot自定义starters
- Spring Boot与缓存
- Spring Boot与消息
- Spring Boot与检索
- Spring Boot与任务
- Spring Boot与安全
- Spring Boot与分布式
- Spring Boot与开发热部署
- Spring Boot与监控管理
SpringBoot开发文档:
十一、前后端分离
前后端分离大势所趋
CORS就是为了解决SOP问题而生的,当然CORS不是唯一的解决方案
CORS简介: CORS是一个W3C标准,全称是"跨域资源共享"(Cross-origin resource sharing)。它允许浏览器向跨源(协议 + 域名 + 端口)服务器,发出XMLHttpRequest请求,从而克服了AJAX只能同源使用的限制。
CORS需要浏览器和服务器同时支持。它的通信过程,都是浏览器自动完成,不需要用户参与。对于开发者来说,CORS通信与同源的AJAX/Fetch通信没有差别,代码完全一样。浏览器一旦发现请求跨源,就会自动添加一些附加的头信息,有时还会多出一次附加的请求,但用户不会有感觉。
因此,实现CORS通信的关键是服务器。只要服务器实现了CORS接口,就可以跨源通信
在springboot的controller中添加@CrossOrigin
@CrossOrigin(origins = "http://localhost:8080")
@RestController
public class ContentController {

    @Autowired
    private ContentMapper contentMapper;

    @GetMapping("/queryAll")
    public List<Content> queryAll(){
        return contentMapper.queryAll();
    }
}
当然,也可以在controller方法中添加@CrossOrigin


![[外链图片转存失败,源站可能有防盗链机制,建议将图片保存下来直接上传(img-jKAtizLV-1589729019261)(C:\Users\333\AppData\Roaming\Typora\typora-user-images\1584867941398.png)]](http://img.e-com-net.com/image/info8/636673ff98e446089a585dcef222064e.jpg)
