深度学习笔记(一)——初步理解yoloV3原理
深度学习笔记(一)——初步理解yoloV3原理
我的博客:竹山听雨
文章目录
- 深度学习笔记(一)——初步理解yoloV3原理
- 前言
- 特点
- 网络结构
- 预测部分
- darknet-53主干网络
- 特征获取预测结果
- 预测结果的解码
- 训练部分
- 训练Loss所需参数
- y_pre
- y_true
- loss的计算
前言
最开始本来是打算啃yoloV3的论文的,但是看了半天,可能是自己学识浅薄,实在有点难以下咽,最后只好看看前辈大佬的文章,多方参考下,勉强才总结出算是一些知识点吧,也算是当做学习笔记笔记吧,下一篇打算可能再仔细研究下一些相关细节,然后再实践搭建一个yolov3试试吧
特点
- “分而治之”,从yolov1开始,Yolo算法是通过划分单元格来做检测,只是划分的数量不同
- 采用"leaky ReLU"作为激活函数
- 端到端进行训练,一个loss function搞定训练,只关注输入端和输出端
- 采用BacthNormalization作为正则化,加速收敛,避免过拟合的方法
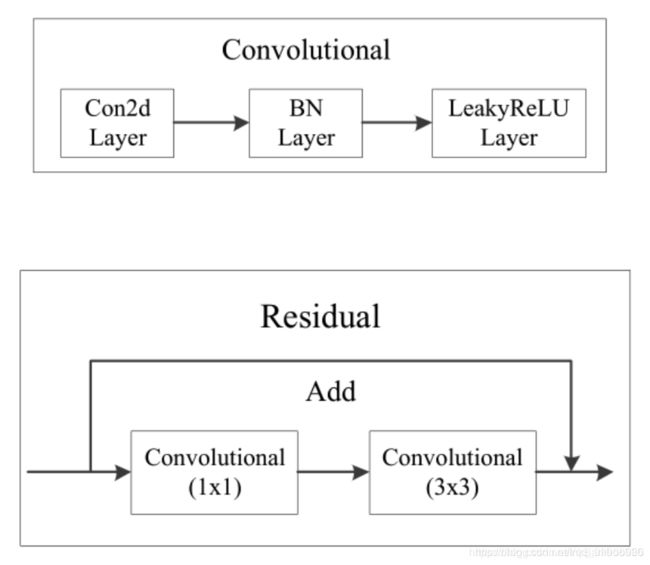
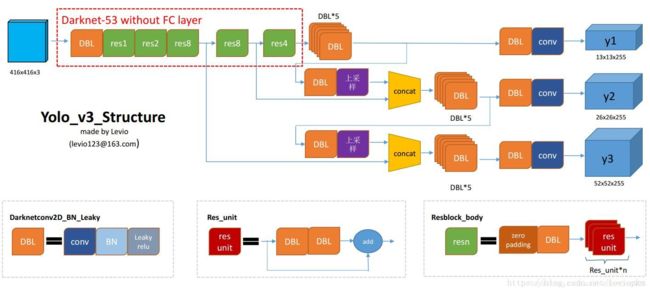
- **DBL:**卷积层+BN层+leaky ReLu层接在一起构成一个卷积块
- 多尺度训练
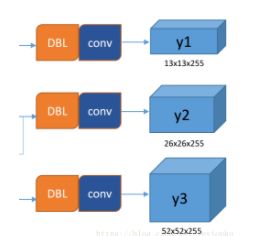
- 将整幅图分为13x13、26x26、52x52的网格,每个网络点负责一个区域的检测,分别用来检测小,中,大三种物体
- 主干网络为DarkNet53
网络结构
预测部分
darknet-53主干网络

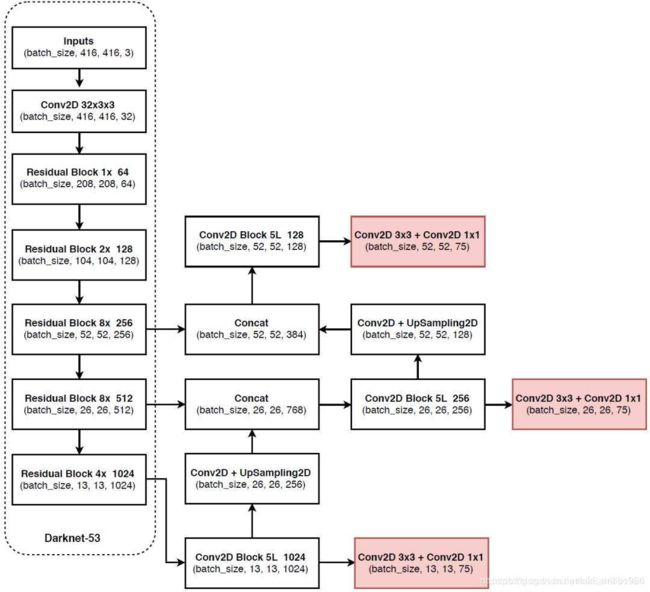
基本有1x1和3x3的卷积构成,有53个卷积层,使用了残差网络Residual
残差卷积是进行一次3x3,步长为2的卷积,然后保存卷积layer,再进行一次1x1的卷积和一次3x3的卷积,并把这个结果加上layer作为最后的结果
内部的残差块使用了跳跃连接,可以缓解深度神经网络中因为增加深度带来的梯度消失问题
每个卷积部分使用了DarknetConv2D结构,即完成卷积后进行BatchNormalization标准化和leakyReLu

特征获取预测结果

yolov3利用三层特征层进行目标检测,尺寸为(52,52,256),(26,26,512),(13,13,1024)。三个特征层进行5次卷积处理,处理完后一部分了用于输出该特征层对应的预测结果,一部分用于进行反卷积UmSampling2d后与其他特征层进行结合。
输出层为(13,13,75),(26,26,75),(52,52,75).
最后的维度75是因为该图基于VOC数据集,它的类为20种,yolov3只有针对每一个特征层存在3个先验框,所以最后维度为3x25。如果是coco数据集,分类为80种,维度为255=3x85.shape为(13,13,255),(26,26,255),(52,52,255).
实际情况就是,输入N张416x416的图片,输出(N,13,13,255),(N,26,26,255),(N,52,52,255)的数据
三层特征层提取
预测结果的解码
由上一步我们可以获得三个特征层的预测结果,shape分别为**(N,13,13,255),(N,26,26,255),(N,52,52,255)**的数据,对应的是每个图分为13x13,26x26,52x52的网格上3个预测框
但是这个预测结果并不对应着最终的预测框在图片上的位置,还需要解码才可以完成。
因为特征层的预测结果对应着三个预测框的位置,所以先将特征层变形:

(N,13,13,255),(N,26,26,255),(N,52,52,255)——>(N,13,13,3,85),(N,26,26,3,85),(N,52,52,3,85)
这里讲下最后一个维度的85是怎么来的:因为使用了COCO数据集,分类为80种,最后的85包含了4+1+80,分别代表(x_offset,y_offset,h,w)+置信度+分类结果
yoloV3的解码过程就是将每个网格点加上它对应的x_offset和y_offset,加完后就是预测框的中心,然后再利用先验框和h,w结合计算出预测框的长和宽

当然最后的预测结构还要进行得分排序与非极大抑制筛选。
处理的方式:
- 取出每一类得分大于self.obj_threshold的框和得分
- 利用框的位置和得分进行非极大抑制
然后在原图上进行绘制即可
训练部分
这里参考了一些这位大佬:链接
训练Loss所需参数
计算loss时,实际上是y_pre和y_true的比较
y_pre
是一幅图像经过网络之后的输出,包含三个特征层的内容,需要解码才能在图上画出
对于yolov3模型来说,网络最后输出的内容就是三个特征层每个网络点对应的预测框及其种类,即三个特征层分别对应着被图片划分为不同大小的网格后,每个网格点上三个先验框的位置,置信度及其种类。
对于输出的y1、y2、y3而言,[…, : 2]指的是相对于每个网格点的偏移量,[…, 2: 4]指的是宽和高,[…, 4: 5]指的是该框的置信度,[…, 5: ]指的是每个种类的预测概率。
现在的y_pre还是没有解码的,解码了之后才是真实图像上的情况。
尺寸为:
(batch_size,13,13,3,85)
(batch_size,26,26,3,85)
(batch_size,52,52,3,85)
y_true
是一个真实图像中,它的每个真实框对应的(13,13)、(26,26)、(52,52)网格上的偏移位置、长宽与种类。其仍需要编码才能与y_pred的结构一致
在yolo3中,其使用了一个专门的函数用于处理读取进来的图片的框的真实情况。
def preprocess_true_boxes(true_boxes, input_shape, anchors, num_classes):
输入为:
true_boxes: shape为(m, T, 5)代表m张图T个框的x_min、y_min、x_max、y_max、class_id。
input_shape: 输入的形状,此处为416、416
anchors: 代表9个先验框的大小
num_classes: 种类的数量。
尺寸为:
(batch_size,13,13,3,85)
对真实框的处理是将其转换为相对网格中对应的x_offset,y_offset,h,w
步骤如下:
- 取框的真实值,获取其框的中心及其宽高,除去input_shape变成比例的模式。
- 建立全为0的y_true,y_true是一个列表,包含三个特征层,shape分别为(m,13,13,3,85),(m,26,26,3,85),(m,52,52,3,85)。
- 对每一张图片处理,将每一张图片中的真实框的wh和先验框的wh对比,计算IOU值,选取其中IOU最高的一个,得到其所属特征层及其网格点的位置,在对应的y_true中将内容进行保存。
for t, n in enumerate(best_anchor):
    for l in range(num_layers):
        if n in anchor_mask[l]:

            # 计算该目标在第l个特征层所处网格的位置
            i = np.floor(true_boxes[b,t,0]*grid_shapes[l][1]).astype('int32')
            j = np.floor(true_boxes[b,t,1]*grid_shapes[l][0]).astype('int32')

            # 找到best_anchor索引的索引
            k = anchor_mask[l].index(n)
            c = true_boxes[b,t, 4].astype('int32')

            # 保存到y_true中
            y_true[l][b, j, i, k, 0:4] = true_boxes[b,t, 0:4]
            y_true[l][b, j, i, k, 4] = 1
            y_true[l][b, j, i, k, 5+c] = 1
对于最后输出的y_true而言,只有每个图里每个框最对应的位置有数据,其它的地方都为0。
preprocess_true_boxes全部的代码如下:
#---------------------------------------------------#
#   读入xml文件,并输出y_true
#---------------------------------------------------#
def preprocess_true_boxes(true_boxes, input_shape, anchors, num_classes):

    assert (true_boxes[..., 4]<num_classes).all(), 'class id must be less than num_classes'
    # 一共有三个特征层数
    num_layers = len(anchors)//3
    # 先验框
    # 678为116,90,  156,198,  373,326
    # 345为30,61,  62,45,  59,119
    # 012为10,13,  16,30,  33,23,
    anchor_mask = [[6,7,8], [3,4,5], [0,1,2]] if num_layers==3 else [[3,4,5], [1,2,3]]

    true_boxes = np.array(true_boxes, dtype='float32')
    input_shape = np.array(input_shape, dtype='int32') # 416,416
    # 读出xy轴,读出长宽
    # 中心点(m,n,2)
    boxes_xy = (true_boxes[..., 0:2] + true_boxes[..., 2:4]) // 2
    boxes_wh = true_boxes[..., 2:4] - true_boxes[..., 0:2]
    # 计算比例
    true_boxes[..., 0:2] = boxes_xy/input_shape[:]
    true_boxes[..., 2:4] = boxes_wh/input_shape[:]

    # m张图
    m = true_boxes.shape[0]
    # 得到网格的shape为13,13;26,26;52,52
    grid_shapes = [input_shape//{0:32, 1:16, 2:8}[l] for l in range(num_layers)]
    # y_true的格式为(m,13,13,3,85)(m,26,26,3,85)(m,52,52,3,85)
    y_true = [np.zeros((m,grid_shapes[l][0],grid_shapes[l][1],len(anchor_mask[l]),5+num_classes),
        dtype='float32') for l in range(num_layers)]
    # [1,9,2]
    anchors = np.expand_dims(anchors, 0)
    anchor_maxes = anchors / 2.
    anchor_mins = -anchor_maxes
    # 长宽要大于0才有效
    valid_mask = boxes_wh[..., 0]>0

    for b in range(m):
        # 对每一张图进行处理
        wh = boxes_wh[b, valid_mask[b]]
        if len(wh)==0: continue
        # [n,1,2]
        wh = np.expand_dims(wh, -2)
        box_maxes = wh / 2.
        box_mins = -box_maxes

        # 计算真实框和哪个先验框最契合
        intersect_mins = np.maximum(box_mins, anchor_mins)
        intersect_maxes = np.minimum(box_maxes, anchor_maxes)
        intersect_wh = np.maximum(intersect_maxes - intersect_mins, 0.)
        intersect_area = intersect_wh[..., 0] * intersect_wh[..., 1]
        box_area = wh[..., 0] * wh[..., 1]
        anchor_area = anchors[..., 0] * anchors[..., 1]
        iou = intersect_area / (box_area + anchor_area - intersect_area)

        best_anchor = np.argmax(iou, axis=-1)

        for t, n in enumerate(best_anchor):
            for l in range(num_layers):
                if n in anchor_mask[l]:
                    # floor用于向下取整
                    i = np.floor(true_boxes[b,t,0]*grid_shapes[l][1]).astype('int32')
                    j = np.floor(true_boxes[b,t,1]*grid_shapes[l][0]).astype('int32')
                    # 找到真实框在特征层l中第b副图像对应的位置
                    k = anchor_mask[l].index(n)
                    c = true_boxes[b,t, 4].astype('int32')
                    y_true[l][b, j, i, k, 0:4] = true_boxes[b,t, 0:4]
                    y_true[l][b, j, i, k, 4] = 1
                    y_true[l][b, j, i, k, 5+c] = 1

    return y_true
loss的计算
得到了y_true,y_pre应该怎么对比呢。在目标检测任务中,有几个关键信息是需要确定的,(x,y),(w,h),class,confidence,具体的对比就是以上几个的误差的和,在整个yolo系列中,只有v1明确使用了一个sum-square error的损失计算方法,简单来说,就是将几个loss进行相加而已。
loss需要对三个特征层进行处理,这里以最小的特征层为例
- 利用y_true取出该特征层中真实存在目标的点的位置(m,13,13,3,1)及其对应的种类(m,13,13,3,80)
- 将yolo_outputs的预测值输出进行处理,得到reshape后的预测值y_pre,shape分别为(m,13,13,3,85),(m,26,26,3,85),(m,52,52,3,85)。还有解码后的xy,wh
- 获取真实框编码后的值,后面用于计算loss,编码后的值其含义与y_pre相同,可用于计算loss
- 对于每一幅图,计算其中所有真实框与预测框的IOU,取出每个网络点中IOU最大的先验框,如果这个最大的IOU都小于ignore_thresh,则保留,一般来说ignore_thresh取0.5,该步的目的是为了平衡负样本
- 计算xy和wh上的loss,其计算的是实际上存在目标的,利用第三步真实框编码后的的结果和未处理的预测结果进行对比得到loss
- 计算置信度的loss,其有两部分构成,第一部分是实际上存在目标的,预测结果中置信度的值与1对比;第二部分是实际上不存在目标的,在第四步中得到其最大IOU的值与0对比
- 计算预测种类的loss,其计算的是实际上存在目标的,预测类与真实类的差距
实际上是总得loss是三个loss的和:
- 实际存在的框,编码后的长宽与xy轴偏移量与预测值的差距
- 实际存在的框,预测结果中置信度的值与1对比;实际不存在的框,在上述步骤中,在第四步中得到其最大IOU的值与0对比
- 实际存在的框,种类预测结果与实际结果的对比
参考文章
一文看懂YOLO v3
睿智的目标检测11——Keras搭建yolo3目标检测平台
yolo系列之yolo v3【深度解析】
